Lab 10 - Introduction to Writing Behaviors for the IvP Helm
Maintained by: mikerb@mit.edu  Get PDF
1 Overview and Objectives
2 Preliminaries
3 Generating a New Behavior and Adding it to the Helm
3.1 Location of Your New Behavior
3.2 Generating a New Behavior with the GenBehavior Script
3.3 Add a New Behavior to the Build System
3.4 Make the New Behavior Accessible to the Helm
3.4.1 Make a Behavior Findable By Augmenting Your Shell Environment
3.4.2 Make a Behavior Findable By Naming Its Location in Your Mission
4 A First Behavior - the Pulse Behavior
4.1 Make a New Pulse Behavior that Does Nothing for Now
4.2 Assignment 1 (self check off): Confirm Your Behavior is Runnable
4.3 Edit Your Behavior to Get Needed Info from the InfoBuffer
4.4 Overload the onRunState() Function
4.5 Handle Behavior User Preferences
4.6 Assignment 2 (check off) - The Alpha Range Pulse Mission
5 A Second Behavior - the ZigLeg Behavior
5.1 Make a New ZigLeg Behavior that Does Nothing for Now
5.2 Edit the ZigLeg Behavior to Get Needed Info from the InfoBuffer
5.3 Overload the onRunState() Function
5.4 Handle User Behavior Preferences
5.5 Assignment 3 (check off) - The Alpha ZigLeg Mission
6 Instructions for Handing In Assignments
6.1 Requested File Structure
6.2 Due Date
1 Overview and Objectives
The goal of this lab is to develop an understanding of how to write MOOS-IvP behaviors. Here we will build two intermediate simple behaviors. The first behavior, the Pulse behavior, simply generates a visual artifact viewable in pMarineViewer to confirm the behavior operation. The second behavior, the ZigLeg behavior, builds on the first behavior to periodically influence the heading of the vehicle in a partial zig-zag leg.

In the end, your two behaviors should be runnable with output similar to the two clips below:
A summary of today's topics:
- Adding a New Behavior with the GenBehavior Script
- Adding a New Behavior to your Third-party Build System
- Building your First Behavior - The Alpha Range Pulse Mission
- Building your Second Behavior - The Alpha ZigLeg Mission
2 Preliminaries
Make Sure You Have the Latest Updates [top]
Always make sure you have the latest code:
  $ cd moos-ivp
  $ svn update
And rebuild if necessary:
  $ ./build-moos.sh
  $ ./build-ivp.sh
Make Sure Key Executables are Built and In Your Path [top]
This lab does assume that you have a working MOOS-IvP tree checked out and installed on your computer. To verify this make sure that the following executables are built and findable in your shell path:
  $ which MOOSDB
  /Users/you/moos-ivp/bin/MOOSDB       (or /home/you/... in Linux)
  $ which pHelmIvP
  /Users/you/moos-ivp/bin/pHelmIvP     (or /home/you/... in Linux)
If unsuccessful with the above, return to the steps in Lab 1:
http://oceanai.mit.edu/ivpman/labs/machine_setup
Where to Build and Store Lab Missions [top]
As with previous labs, we will use your version of the moos-ivp-extend tree, In this tree, there is a missions folder:
  $ cd moos-ivp-extend
  $ ls
  CMakeLists.txt  bin/            build.sh*       docs/           missions/       src/
  README          build/          data/           lib/            scripts/
For each distinct assignment in this lab, there should be a corresponding subdirectory in a lab_10 sub-directory of the missions folder, typically with both a .moos and .bhv configuration file. See Section 6.1 for the full requested file structure.
Documentation Conventions [top]
To help distinguish between MOOS variables, MOOS configuration parameters, and behavior configuration parameters, we will use the following conventions:
- MOOS variables are rendered in green, such as IVPHELM_STATE, as well as postings to the MOOSDB, such as DEPLOY=true.
- MOOS configuration parameters are rendered in blue, such as AppTick=10 and verbose=true.
- Behavior parameters are rendered in brown, such as priority=100 and endflag=RETURN=true.
More Resources [top]
- The slides from lecture "Writing Behaviors":
http://oceanai.mit.edu/2.680/docs/2.680-12-writing_behaviors_2024.pdf - The IvP Behavior Utility Functions
http://oceanai.mit.edu/ivpman/help/bhv_functions - The IvPBuild Toolbox ZAIC documentation
http://oceanai.mit.edu/ivpman/chap/ivpbuild_zaics
3 Generating a New Behavior and Adding it to the Helm
The goals of this section are to gain familiarity with:
- Generation of a new behavior class,
- Adding a behavior to the build system,
- Ensuring a new behavior is findable and runnable by the helm.
3.1 Location of Your New Behavior [top]
Most behaviors are compiled into the IvP Helm in the MOOS-IvP tree. The primary folder is ivp/src/lib_behaviors-marine. In there you will see some of the behaviors we have been using in the labs so far, like the Waypoint behavior, Loiter behavior and so on.
The behaviors available to the helm can be "extended" by writing new behaviors that are not compiled into the helm. The extension behaviors can be compile into a shared object which can be loaded into the helm at launch time. The additional behaviors created in this lab will be written into the moos-ivp-extend tree and added to the lib_behaviors-test folder.
 $ cd moos-ivp-extend/src/lib_behaviors-test
 $ ls
 AOF_SimpleWaypoint.cpp  BHV_SimpleWaypoint.cpp  CMakeLists.txt
 AOF_SimpleWaypoint.h    BHV_SimpleWaypoint.h    README
After you have added your "Pulse" behavior in the steps below, it should look like:
 $ cd moos-ivp-extend/src/lib_behaviors-test
 $ ls
 AOF_SimpleWaypoint.cpp  BHV_Pulse.cpp   BHV_SimpleWaypoint.cpp  CMakeLists.txt
 AOF_SimpleWaypoint.h    BHV_Pulse.h     BHV_SimpleWaypoint.h    README
Methods for creating your new behavior source code files are described next. The required steps for augmenting your CMake build system for building your new behavior are described in Section 3.3.
3.2 Generating a New Behavior with the GenBehavior Script [top]
One way to begin writing a new behavior is to copy an existing behavior's source code files:
  $ cp BHV_SimpleWaypoint.h    BHV_Pulse.h
  $ cp BHV_SimpleWaypoint.cpp  BHV_Pulse.cpp
Sometimes this is the most reasonable way to begin, especially if the new behavior is very similar to the one being copied.
When the new behavior is not substantially similar to an existing behavior, a better way to begin is by creating the new behavior by using the GenBehavior script in the moos-ivp/scripts folder. This script should already be in your path. If it is not, check in your .bashrc file that the folder moos-ivp/scripts is in your path.
To use this script to create your behavior, just provide the name of the behavior and your full name in double-quotes:
  $ cd moos-ivp-extend/src/lib_behaviors-test
  $ GenBehavior FooBar "Jane Doe"
Note that the script automatically pre-pends the BHV_ to the beginning of your behavior name to help reinforce the convention where all behavior classes begin their names this way. The header file produced will look something like that below. A good way to begin working with this file is to tidy up the indenting loose ends and add a date to the file. Note that it has all the overloadable virtual functions defined, and placeholders for protected utility functions. It also has a placeholder for configuration and state variables. The latter is just a recommended convention for grouping instances variables. It is often helpful to see immediately what variables represent the state of the behavior, and what variables are potentially configurable in a .bhv mission file.
 /************************************************************/
 /*    NAME: Jane Doe                                        */
 /*    ORGN: MIT                                             */
 /*    FILE: BHV_FooBar.h                                    */
 /*    DATE:                                                 */
 /************************************************************/

 #ifndef FooBar_HEADER
 #define FooBar_HEADER

 #include <string>
 #include "IvPBehavior.h"

 class BHV_FooBar : public IvPBehavior {
 public:
   BHV_FooBar(IvPDomain);
   ~BHV_FooBar() {};

   bool         setParam(std::string, std::string);
   void         onSetParamComplete();
   void         onCompleteState();
   void         onIdleState();
   void         onHelmStart();
   void         postConfigStatus();
   void         onRunToIdleState();
   void         onIdleToRunState();
   IvPFunction* onRunState();

 protected: // Local Utility functions

 protected: // Configuration parameters

 protected: // State variables
 };

 #define IVP_EXPORT_FUNCTION

 extern "C" {
   IVP_EXPORT_FUNCTION IvPBehavior * createBehavior(std::string name, IvPDomain domain)
   {return new BHV_FooBar(domain);}
 }
 #endif
3.3 Add a New Behavior to the Build System [top]
After a new behavior has been created, it needs to be added to the build system. This is done in likely just one of two ways: Either case (a) you have added it to an existing library where other behaviors are already being built, or case (b) you are creating a new lib_behaviors-jane library from scratch.
Case (a) Adding a New Behavior to an Existing Library [top]
If the new behavior was created in an existing behavior library, e.g., lib_behaviors-test in the moos-ivp-extend tree, then the only thing that needs to be done is to edit the CMakeLists.txt file in that library. A block similar to the below should exist for each behavior:
 #--------------------------------------------------------
 #                                      BHV_SimpleWaypoint
 #--------------------------------------------------------
 ADD_LIBRARY(BHV_SimpleWaypoint SHARED
    BHV_SimpleWaypoint.cpp AOF_SimpleWaypoint.cpp)
 TARGET_LINK_LIBRARIES(BHV_SimpleWaypoint
    helmivp
    behaviors
    ivpbuild
    logic
    ivpcore
    bhvutil
    mbutil
    geometry
    ${SYSTEM_LIBS} )
Just copy this block and replace all occurrences of the above behavior with the new behavior instead. Also add any other .cpp files needed for building this behavior. In the above example, the file AOF_SimpleWaypoint.cpp was needed, but often just the BHV_* files are the only file needed for specifying here. The same holds true for the link libraries in the example above. The libraries for the newly added behavior may be different. All the above libraries, helmivp, behaviors, ivpbuild, logic, ivpcore, bhvutil, and mbutil will almost certainly be required. The geometry library will be needed if the behavior involves any of the classes like XYPolygon or XYSegList.
(Case (b) Adding a New Behavior by Creating a New Behavior Library [top]
If the new behavior is being added as part of new library directory, such as lib_behaviors-jane, then an additional step is needed to add lib_behaviors-jane to the /src/CMakeLists.txt file. There should already be a block in this file similar to the one below, taken from the file:
moos-ivp-extend/src/CMakeLists.txt
  #========================================================================
  # List the subdirectories to build...
  #========================================================================
  ADD_SUBDIRECTORY(lib_behaviors-test)
  ADD_SUBDIRECTORY(pXRelayTest)
  ADD_SUBDIRECTORY(pExampleApp)
Just add the new behavior library to this list.
3.4 Make the New Behavior Accessible to the Helm [top]
When the behavior is built, it generates a new shared library, typically in the moos-ivp-extend/lib directory if one starts with the moos-ivp-extend template. When the helm launches, it needs to know the location of this lib/ directory so it can load all behaviors found there. There are two ways to do this:
3.4.1 Make a Behavior Findable By Augmenting Your Shell Environment [top]
- Augment the IVP_BEHAVIOR_DIRS shell environment variable by adding a line such as the one below in your shell configuration file. Here's the example for bash users:
export IVP_BEHAVIOR_DIRS=$HOME/moos-ivp-extend/lib
Here's the example for tcsh users:
setenv IVP_BEHAVIOR_DIRS '$HOME/moos-ivp-extend/lib'
Note: Adjust the above lines accordingly if you have moos-ivp-extend in some other directory besides your home directory. The shell variable $HOME expands to your home directory in both bash and tcsh.
3.4.2 Make a Behavior Findable By Naming Its Location in Your Mission [top]
- Or, add the following line in your pHelmIvP configuration block in your .moos mission file:
 ivp_behavior_dir = /Users/jane/moos-ivp-extend/lib   (OSX)
 ivp_behavior_dir = /home/jane/moos-ivp-extend/lib    (Linux)
Specifying the library location may also be done relative to the mission file, e.g.,
ivp_behavior_dir = ../../lib
4 A First Behavior - the Pulse Behavior
Although the primary purpose of writing a behavior is to generate output (IvP functions) to influence the trajectory of a vehicle, our first behavior will simply post a visual artifact to the MOOSDB at certain points in time. The goals of this exercise are to gain familiarity with:
- Generation of a new behavior class
- Adding a behavior to the build system
- Obtaining information from the information buffer into your behavior
- Overloading general behavior functions to suit your needs
- Handling the setting of behavior parameters set by the user
General Description of the Pulse Behavior [top]
The simple idea behind the Pulse behavior is for the behavior to post a visual artifact to the MOOSDB five seconds after the behavior notices that the vehicle reaches a waypoint achieved by a sister behavior; the waypoint behavior. The idea is shown in the Figure 4.1 below.
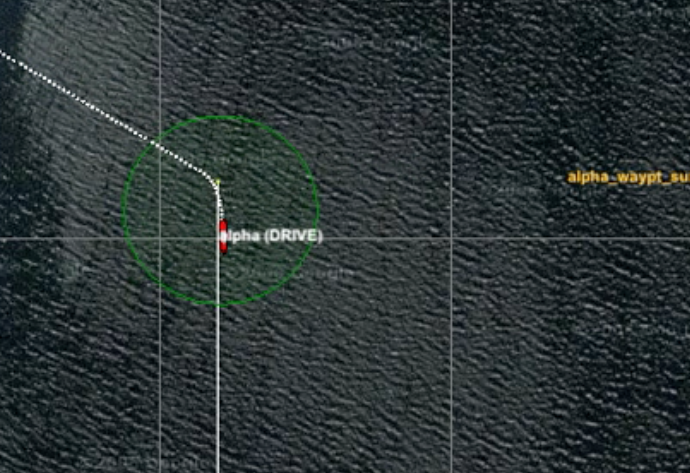
Figure 4.1: The Pulse Behavior: The behavior simply generates a range pulse after it observes that a waypoint has been achieved. The range pulse is a posting to the variable RANGE_PULSE.
The Pulse behavior is not configured with waypoints itself, but uses information published by the waypoint behavior to detect a change in waypoint status. Each time the "next" waypoint changes, the behavior posts a range pulse. Nothing more.
4.1 Make a New Pulse Behavior that Does Nothing for Now [top]
The first step is to create a new behavior. Each behavior is a class with a corresponding .h and .cpp file. Use the GenBehavior script described in Section 3.2:
  $ cd moos-ivp-extend/src/lib_behaviors-test
  $ GenBehavior Pulse "Jane Doe"
Once the behavior is generated, follow the instructions in Section 3.3 for augmenting your build system to build the new behavior. Confirm that the behavior is built by looking for a Pulse behavior in moos-ivp-extend/lib. Finally, follow the instructions in Section 3.4 for making your new behavior findable by the helm when it is launched.
4.2 Assignment 1 (self check off): Confirm Your Behavior is Runnable [top]
This newly created Pulse behavior, as empty as it is, should be ready for use by the helm. Here we confirm this:
Create the Alpha Range Pulse Mission [top]
If you haven't done so already, make a new mission folder, alpha_range_pulse, by making a copy of the s1_alpha mission from the moos-ivp tree.
  $ cd ~/moos-ivp-extend/missions/
  $ mkdir lab_10
  $ cd lab_10
  $ cp -rp ~/moos-ivp/ivp/missions/s1_alpha alpha_range_pulse
Add the Pulse Behavior to the Alpha Range Pulse Mission [top]
Add the Pulse behavior to the alpha.bhv file by adding the following lines before or after the other behaviors:
  Behavior=BHV_Pulse
  {
    name       = pulse
    pwt        = 100
  }
This configuration doesn't really do much, but it's enough to load the behavior alongside the other behaviors and confirm that the behavior works.
Verify the Pulse Behavior is Loaded and Running [top]
Once the Pulse behavior is added to the mission file, launch the mission:
  $ cd moos-ivp-extend/missions/lab_10/alpha_range_pulse
  $ ./launch.sh 10
You should see the vehicle doing its normal home-plate pattern of the alpha mission. To confirm the Pulse behavior is loaded and running, check the AppCast output of the pHelmIvP application. It should look something like that below:
 ===================================================================
 pHelmIvP alpha                                            0/0(1307)
 ===================================================================
 Helm Iteration: 1202
   IvP Functions:  1
   Mode(s):
   SolveTime:   0.00   (max=0.01)
   CreateTime:  0.01   (max=0.01)
   LoopTime:    0.01   (max=0.01)
   Halted:         false   (0 warnings)
 Helm Decision: [speed,0,4,21] [course,0,359,360]
   speed = 2
   course = 180
 Behaviors Active: ---------- (1)
   waypt_survey [298.87] (pwt=100) (pcs=20) (cpu=0.52) (upd=0/0)
 Behaviors Running: --------- (1)
   pulse [298.87]
 Behaviors Idle: ------------ (1)
   waypt_return[298.87]
 Behaviors Completed: ------- (0)
Note the presence of the Pulse behavior under the "Behaviors Running:" section. It's not doing anything yet, but at least it's running. The next step is to get it to start doing something.
4.3 Edit Your Behavior to Get Needed Info from the InfoBuffer [top]
There are three key pieces of information your behavior will need to know and update frequently. The vehicle's own x,y position, and the waypoint index to which the waypoint behavior is currently transiting toward. The latter information is published to the MOOSDB by the waypoint behavior in a simple report of the form:
WPT_INDEX = 2
To ensure the above MOOS variable is subscribed for by the helm and thus in the helm info buffer, you will need to explicitly declare that your behavior needs it by using the addInfoVars() function in the behavior constructor as described in the lecture notes.
You will need also to get the current time from the information buffer. Use the getBufferCurrTime() function as described in the lecture notes.
You will need to monitor the value of the waypoint index to note when it has changed. You need the time so you can mark the time when it changed and generate the pulse five seconds later. And you will need the vehicle x,y position for creating the range pulse when the time comes. You may or may not want to store these as member variables of your behavior class. By storing them as member variables, you then have the option of having a separate helper class function for updating information from the info buffer on each behavior iteration. This is just a style suggestion.
4.4 Overload the onRunState() Function [top]
Implement your behavior's onRunState() function to produce a range pulse each time the behavior notes that the waypoint index has incremented. Remember, the waypoint index is information posted by a separate behavior, the waypoint behavior, in a posting to the MOOSDB. Have your behavior make its posting five seconds after hitting each waypoint.
The range pulse is a particular message that the pMarineViewer application knows how to parse and render. A typical posting looks like:
   VIEW_RANGE_PULSE  =  x=15,y=-45,radius=40,duration=4,label=pulse,
                        edge_color=yellow,fill_color=yellow,time=16010.31,edge_size=1
Try poking the above to the MOOSDB with uPokeDB while pMarineViewer is running, to get an idea of how it works and what it looks like.
  $ uPokeDB VIEW_RANGE_PULSE=x=15,y=-45,radius=40,duration=4,label=pulse,edge_color=yellow,
 fill_color=yellow,time=@MOOSTIME,edge_size=1 alpha.moos++
Note the inclusion of alpha.moos++ on the uPokeDB invocation above. This is to ensure that the poke time warp is consistent with the overall mission time warp.
The pulse is essentially a ring with expanding radius that expands to a specified value (radius), over a specified time (duration). It is centered at a given x,y position and specified edge color, fill color, and edge width. In our behavior we want the center to be the vehicle's current position.
It is recommended that a VIEW_RANGE_PULSE message be generated by first creating a XYRangePulse instance, setting its parameters, and getting a serialized string version, as below:
  // Presumably inside your behavior implementation
  #include "XYRangePulse.h"

  XYRangePulse pulse;
  pulse.set_x(m_osx);                // Presumably m_osx is ownship's x position
  pulse.set_y(m_osy);                // Presumably m_osy is ownship's y position
  pulse.set_label("bhv_pulse");
  pulse.set_rad(m_range);
  pulse.set_time(m_curr_time);
  pulse.set_color("edge", "yellow");
  pulse.set_color("fill", "yellow");
  pulse.set_duration(m_pulse_duration);

  string spec = pulse.get_spec();
  postMessage("VIEW_RANGE_PULSE", spec);
4.5 Handle Behavior User Preferences [top]
Although not strictly essential in this simple behavior, almost all behaviors need to handle parameter preferences specified by the user in the .bhv file. In the Pulse behavior, you should handle two particular parameters: the radius of the range pulse and the duration of the range pulse. Your behavior should be able to handle the below configuration (namely lines 5 and 6):
  1  Behavior=BHV_Pulse
  2  {
  3    name = pulse
  4
  5    pulse_range    = 20
  6    pulse_duration = 4
  7  }
To do this, overload the setParam() function in your behavior. You should be able to just follow the example of the BHV_SimpleWaypoint behavior in your tree.
4.6 Assignment 2 (check off) - The Alpha Range Pulse Mission [top]
To demonstrate your behavior, run the Alpha Range Pulse mission with the Pulse behavior. Part of the demonstration involves showing that your behavior can accept a different pulse_range or pulse_duration specified at the time of the demo. Your end result should look something like the video posted at:
Figure 4.2: The Pulse behavior simply posts a rendering of a range pulse a few seconds after each waypoint is hit. video:(0:23): http://vimeo.com/91971985
5 A Second Behavior - the ZigLeg Behavior
The ZigLeg behavior is an extension of the Pulse behavior. Rather than post a range pulse after hitting a waypoint, the ZigLeg behavior will briefly produce an objective function to influence the vehicle trajectory. Like the Pulse behavior, the ZigLeg behavior looks for the point in time where a sister waypoint behavior has reached a waypoint. Five seconds after hitting a waypoint, the ZigLeg behavior will produce an objective function with a heading preference some number of degrees (by default 45) from the vehicle's present heading. It will do this only for a brief period of time (by default 10 seconds). The idea is shown in the Figure 5.1 below.
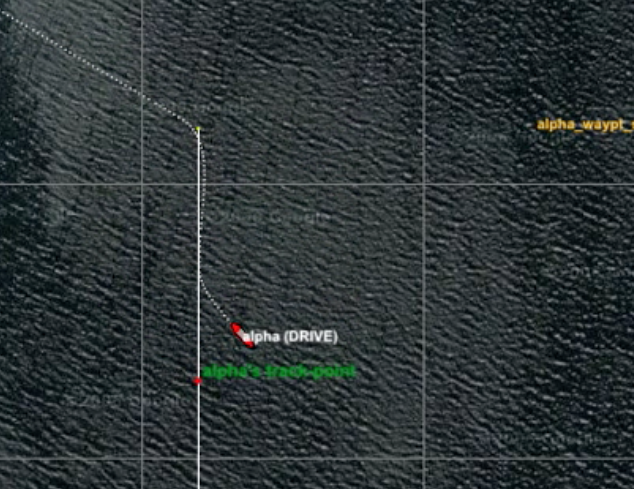
Figure 5.1: The ZigLeg Behavior: The behavior generates a brief heading preference (in the form of an IvP objective function) shortly after noticing the arrival at a waypoint.
As with the Pulse behavior, the ZigLeg behavior is not configured with waypoints itself, but uses information published by the waypoint behavior to detect a change in waypoint status. Each time the "next" waypoint changes, the behavior posts a range pulse and briefly generates an objective function. The idea is shown in the video in Figure 5.2.
5.1 Make a New ZigLeg Behavior that Does Nothing for Now [top]
In the case of the ZigLeg behavior, there are features that will be similar to the Pulse behavior, namely that it will do its thing a few seconds after the vehicle otherwise hits a waypoint. For this reason you may find it more convenient to build your new ZigLeg behavior by copying the Pulse behavior:
  $ cd moos-ivp-jsmith/src/lib_behaviors-test
  $ cp BHV_Pulse.h    BHV_ZigLeg.h
  $ cp BHV_Pulse.cpp  BHV_ZigLeg.cpp
Of course you'll need to do a find-replace in both files, replacing all the BHV_Pulse references with BHV_ZigLeg. Augment your build system to handle the new behavior. If you want, you can replicate the assignment in Section 4.3 to confirm your ZigLeg behavior is runnable at this point, but that's up to you.
5.2 Edit the ZigLeg Behavior to Get Needed Info from the InfoBuffer [top]
Same as with the Pulse behavior, Section 4.4, except you will also need the vehicle's present heading. When the behavior does produce an objective function over heading, it will be as an offset to the present heading. Note: the 45 degree offset is relative to the vehicle heading when the zigleg begins. You'll need to mark this value rather than continually use the present value. Otherwise the likely result is a vehicle that turns in a circle rather than making a zigleg.
5.3 Overload the onRunState() Function [top]
Same as with the Pulse behavior, Section 4.5, except in this behavior you will additionally produce an objective function over vehicle heading, at the very moment the range pulse would have been generated. Whereas the Pulse behavior generated the pulse only once, the IvP function will be generated continuously once it has started, continuing for some number of seconds. The number of seconds and the heading offset should by default be 10 seconds and 45 degrees respectively. But these values should be configurable in the behavior file and thus handled in your behavior's setParam() function as described below.
Regarding the syntax needed to create an objective function, most likely you will be using the ZAIC_PEAK tool to do this. For more information, consult the BHV_SimpleWaypoint behavior for an example, and documentation:
http://oceanai.mit.edu/ivpman/chap/ivpbuild_zaics
Two additional important notes:
- Before returning the objective function in the onRunState() function, you will need to set its priority weight. This step may be missing in the BHV_SimpleWaypoint behavior. If you built your behavior with the GenBehavior script it should already be there. You can do this with the following two lines:
 if(ipf)
 ipf->setPWT(m_priority_wt);
- Your ZigLeg behavior will be running alongside the Waypoint behavior. For the ZigLeg behavior to exert its influence, you will need to give it a higher priority weight in the .bhv configuration file.
5.4 Handle User Behavior Preferences [top]
Your ZigLeg behavior should handle two parameters: the heading offset, and the duration for which the behavior produces the objective function on each waypoint arrival event.
Your behavior should be able to handle the below configuration (namely lines 5-6)
   Behavior=BHV_ZigLeg
   {
     name = zigleg

     zig_duration   = 10
     zig_angle      = 45
   }
As before, do this by overloading the setParam() function in your behavior.
5.5 Assignment 3 (check off) - The Alpha ZigLeg Mission [top]
To demonstrate your behavior, run the Alpha ZigLeg mission with the ZigLeg behavior. Part of the demonstration involves showing that your behavior can accept a different zig_angle or zig_duration specified at the time of the demo. Your end result should look something like the video posted at:
Figure 5.2: The ZigLeg behavior influences the heading of the vehicle briefly a few seconds after each waypoint is hit. video:(0:21): https://vimeo.com/91975349
6 Instructions for Handing In Assignments
6.1 Requested File Structure [top]
The assignment for this lab is to (a) demonstrate your two working behaviors to a TA or instructor, and (b) demonstrate that your two behaviors accept parameter modifications as described in Section 4.6 and Section 5.4. There isn't any requirement to hand in code, but the below is the requested file structure:
   moos-ivp-extend/
     missions/
       lab_10/
         alpha_range_pulse/      // Assignment 2 - check off
         alpha_zigleg/           // Assignment 3 - check off
6.2 Due Date [top]
This lab should be completed by the end of day next Tuesday. (April 16th, 2024).
Document Maintained by: mikerb@mit.edu
Page built from LaTeX source using texwiki, developed at MIT. Errata to issues@moos-ivp.org. Get PDF