Lab 12 - Payload Autonomy on an M300 Heron USV
Maintained by: mikerb@mit.edu  Get PDF
1 Overview and Objectives
2 The Marine Autonomy Lab at the MIT Sailing Pavilion
3 Robotic Vehicles at the Pavilion
3.1 Introduction to the Heron M300 Vehicle
3.1.1 Storing and Moving
3.1.2 Deploying and Retrieving
3.1.3 Manual Remote Control
3.2 Boxes vs. Bodies
3.3 Assignment 1 (check off): Manual Control of an M300
4 Connecting to WiFi at the Pavilion
4.1 Your Laptop IP Address
4.2 Heron IP Addresses
4.3 IP Address Aliases
4.4 Bash Aliases for SSH and ping
4.5 Assignment 2 (check off): Connecting to the network
5 Using the PABLO Unit in a Vehicle
5.1 Assignment 3 (self check-off): Connecting with a PABLO Unit to an M300
5.2 Configuring the alpha_heron Mission
5.3 Assignment 4 (check-off): Launching the Mission on the Dock
5.4 Assignment 5 (check-off): Launching the Mission on the Water
5.5 Assignment 6 (check-off): Shutdown and Stowing
1 Overview and Objectives
The objective of this lab is to prepare students for deploying vehicles with a PABLO unit at the MIT Sailing Pavilion. This lab is a companion to the PABLO introduction lab, which describes the interface to the PABLO unit and how missions are structured for on-vehicle deployment. The sections below introduce the deployment environment, describe the hardware, and explains how to transition from simulation to real vehicles. By the end of this lab, the student will be able to launch a mission on a PABLO unit that drives an M300 vehicle across the river while being monitored from a shoreside laptop. Steps to be completed in this lab include:

- Introducing the Marine Autonomy Lab at the MIT Sailing Pavilion
- Introducing the Clearpath Heron M300 vehicles
- Understanding the computer network environment at the Pavilion
- Editing the alpha_heron mission to run on actual hardware
2 The Marine Autonomy Lab at the MIT Sailing Pavilion
The Marine Autonomy Laboratory at the MIT Sailing Pavilion provides a convenient waterside location to test marine autonomy software on real-world vehicles. To reach the lab, enter the main entrance of the Pavilion, descend the stairs onto the dock, and turn left. Doors are kept locked when not in use. Coordinate with lab staff to gain access.
While deploying vehicles at the Pavilion, please be courteous to other users of the facility and boaters on the river. Mornings generally have less water traffic and fewer people at the dock. Sailing teams from MIT and other organizations are active in the afternoons and early evenings. Rowing crews are active in the morning and a lookout needs to watch for their boats. Sailing classes, regattas, and Pavilion activities always have priority over deploying robotic boats. The boats are deployed in all weather except for extreme cold and during thunderstorms. There is never a guarantee of water time.
Never Work Alone: If you arrive early or find yourself alone in the lab, please be conservative in your activities. It's ok to hang out and work on your laptop alone, but NOT OK to be accessing the water or putting equipment in and out of the water alone.
3 Robotic Vehicles at the Pavilion
The current fleet stored at the Pavilion includes nine robotic vehicles, Clearpath Heron M300 vessels, that make take on the names of either abe, ben, cal, deb, eve, fin, max, ned, oak
3.1 Introduction to the Heron M300 Vehicle [top]
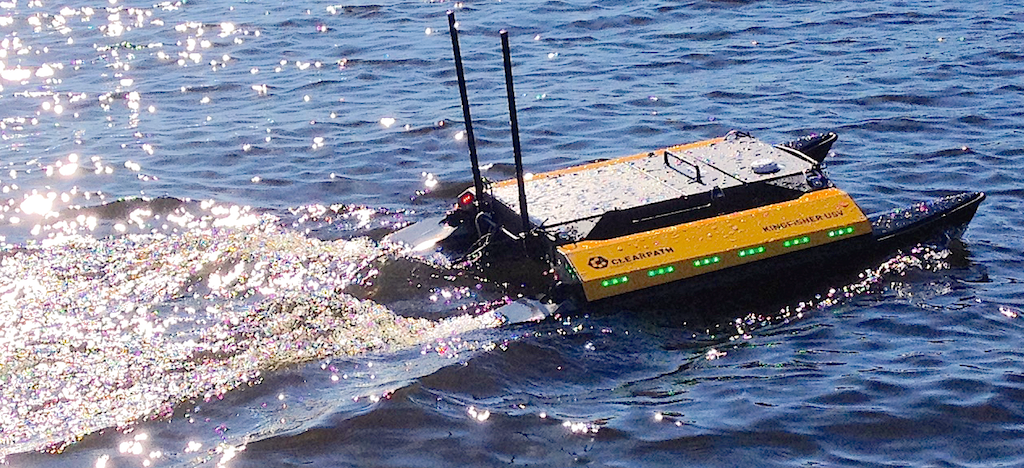
Figure 3.1: The Clearpath Robotics Heron M300 on the river.
The Clearpath Heron M300 is a collapsible catamaran-style vessel that can be deployed by a single person, although it is easier to handle with two people. Jet-drive motors are installed at the stern of each pontoon that allow efficient forward thrust and very modest reverse capability. The main body of the vehicle has three sections:
| Section | Description |
| Computing | The forward section contains the front seat embedded computer with a 2.2GHz Intel ATOM processor and support equipment for motor control, communications, and sensing. |
| Battery | A single battery package is installed above the main electronics bay in the front section. It is used to power propulsion and for computing. |
| Payload | The large aft-ward tray is the payload bay where the back seat computer (the PABLO unit) is housed. This section has removable top and bottom covers. The bay includes three waterproof ports: two USB-A connectors and an Ethernet receptacle. |
Table 3.1: Sections of the M300 vessel
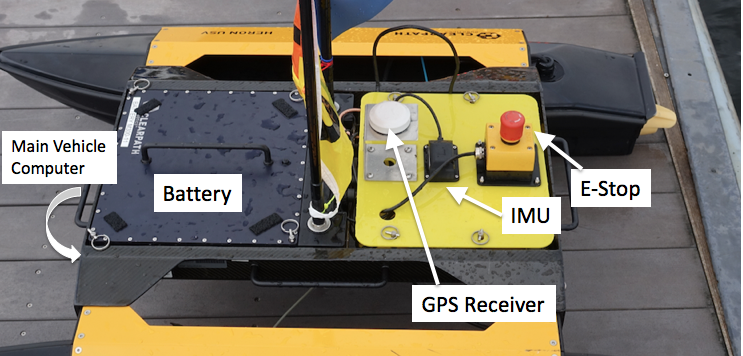
Figure 3.2: Some main components of the M300 USV with payload, sensor modifications for the MIT variant. The E-Stop equipment is unique to the MIT variant. The GPS and IMU sensors ship with the vehicle, but their locations and mounting have been modified in the MIT variant for better performance and access.
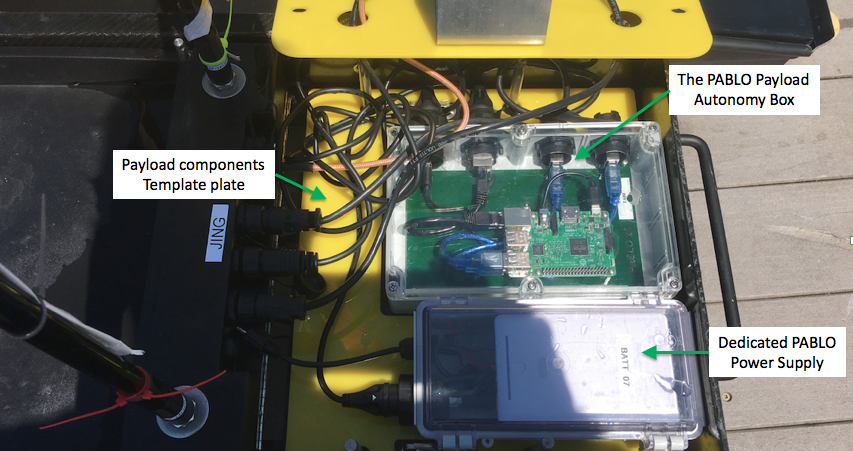
Figure 3.3: In the MIT variant, the payload compartment contains both the payload autonomy box (PABLO) and a dedicated power supply for the PABLO (the smaller box in the photo). Both components sit in a custom template cut with holes to fit the PABLO and battery box. The latter helps to ensure a position for smooth cable arrangements.
Navigation Sensors [top]
The GPS antenna is a white puck mounted on the lid of the payload bay cover as in Figure 3.2. An inertial motion unit with integrated digital compass is also mounted on the payload cover lid. Both sensors connect to and are processed by software on the frontseat computer. Output from these sensors is published by the frontseat, as defined by the Clearpath Wire Protocol, shared to the PABLO computer running the payload autonomy (MOOS-IvP) software.
Vehicle Batteries and Charging [top]
The lab has a number of battery packs available for use. Several of the batteries are suitable for on-dock preparations but do not include enough capacity for sustained deployment. Batteries are stored and charged on the metal rack at the rear of the lab. One battery package is charged by two charger units. To charge a battery, set it on the side so that the connector is on the top. Plug in the charger with the red plugs matching. If necessary, orient the chargers so that the LED indicators are facing outward. Red or amber light indicates charging; completed charging shows a green light.
Installing Batteries [top]
Always pull the M300 out of the water and well onto the dock to change the battery. Do not change the battery while the vessel is in the water. Change the batteries in a place where there is no chance of dropping the battery into the river.
The M300 battery is secured by four pins, each with a circular key-ring at the end, as shown in Figure 3.2. To remove a battery, undo the four pins and pull upward on the handle. If it is stuck, give a light yank or seek assistance from the lab instructor. To install a battery, first verify that the battery terminals align with the power port on the vehicle. Insert the battery straight down and push it in until it is almost flush with the vehicle. After the battery is firmly in place, install all four pins on each of the four posts. Do not power on the vehicle unless the battery is secured.
3.1.1 Storing and Moving [top]
The M300 units are usually stored on carts or on a shelf inside the lab, although it is acceptable to leave units on the floor at the rear of the lab. With only one handler it is advisable to remove the battery before lifting or moving the vehicle. With two people the battery's additional weight is typically manageable. The vehicle carts are provided for moving the M300s around the dock and lab space. Take care to secure the cart if is used on the docks, to make sure they don't roll away. They will sink if rolled into the river (in theory - don't be the one that proves this theory).
3.1.2 Deploying and Retrieving [top]
Always have the correct remote control handy when the M300 is in the water near the dock. To deploy, take the vehicle off the cart and set it on the dock with the thrusters pointing into the river. Verify that the remote can control the thrusters. Gently push the vehicle into the water and use the remote to transit away from the dock. It is inadvisable to leave the vehicle drifting near or tied to the dock. Wake from passing motorboats can pummel the vehicle into the floating platform.
To retrieve an M300 vessel, use the remote control to bring it back to the dock head first. Lift and pull it onto the dock by the front handle. Using the side handles, one or two people can lift it onto the cart.
3.1.3 Manual Remote Control [top]
Remote control (RC) operation is suitable for transiting from or returning to the dock or as an emergency override. The flat slider switch adjacent to the LCD display turns the unit on and off. When the RC is powered on, the switch on the upper-left (SW2) of the face selects when the vehicle's computer (switch down) or the remote (switch up) has control. When enabled, the RC will override the on-board computer. RC range is approximately 100 feet. When not in use, the remote control should be turned off and connected to charge on its hook at the rear of the lab.
3.2 Boxes vs. Bodies [top]
The main computer on the Heron vehicles comes in an electronics box that can be swapped between vehicles. This is a wonderful design feature that allows us to keep more vehicles in a ready state. Each electronics box costs about 1/6 the cost of the overall Heron. So we tend to have more electronics boxes than bodies. It also raises the existential question of "Where does the identity of the vehicle reside? In the body or the box?"
Because a lot of the vehicle identity is tied to the network IP assignments, we tend to associate the identity of the vehicle with the (much smaller) electronics box. Each electronics box is labeled. Just keep this in mind, since the vehicle frame and pontoons sometimes may have a conflicting label or flag mounted on an antenna.
You will also want to be aware of the vehicle identity when it comes to grabbing a remote control hand unit. These are labeled with the vehicle name and correspond to the electronics box.
3.3 Assignment 1 (check off): Manual Control of an M300 [top]
Before connecting a PABLO unit to the vehicle, the lab instructor will walk you through manually deploying and controlling the M300 vehicle. Go through the following checklist:
| In the lab... |
| [ ] Identify a vehicle to use with one of the TAs |
| [ ] Install battery in vehicle and secure all four latch pins |
| [ ] Verify that unused payload bay connectors are securely tightened |
| [ ] Securely install the payload cover |
| On the dock... |
| [ ] With a partner, place vehicle gently on dock near the water |
| [ ] Power on the vehicle |
| [ ] Verify that the remote control actuates thrusters |
| Deploying... |
| [ ] Push vehicle into water stern first, then try to hand-rotate pointing it away |
| [ ] Drive vehicle away from dock |
| [ ] Attempt straight line for 10 meters |
| [ ] Attempt tightest turn to right, left, rinse and repeat. |
| Retrieving... |
| [ ] Carefully return vehicle to dock (do not hit the dock) |
| [ ] Lift vehicle onto dock and leave it powered on |
4 Connecting to WiFi at the Pavilion
There are several WiFi networks available at the Pavilion. The kayak-local-5GHz and kayak-local-2GHz networks are used for this class. The access-point WiFi router is located inside the lab and provides wireless coverage for laptops in the lab, classroom, and a portion of the outside dock. Connection to the 5GHz network is preferred.
WiFi coverage to vehicles on the river is possible with a dedicated wireless bridge. The sector repeater and antenna must be deployed and powered so that vehicles can communicate on the network. Remember to unplug the antenna after shutting down the vehicles.

Figure 4.1: The pavlab antenna is mounted on a tripod as shown here. Normally the antenna is stored just inside the doors of the lab. Sometimes the tripod will be mounted up on the sailing pavilion roof.
Computers and vehicles connected to the lab's WiFi operate on a dedicated subnet. Devices can all see each other and originate network traffic to the Internet but are insulated from outside requests. Cabled or WiFi connections to the router receive a local IP address like 192.168.1.xxx, where xxx is a number unique to each device. Vehicles and lab-related computers have static IP addresses that will remain the same.
4.1 Your Laptop IP Address [top]
On your laptop, the IP address may change between visits to the lab. The number should remain constant for the entire day. You probably won't need to know which IP address your laptop has obtained. You will be more concerned about reaching the robot computer from your laptop. If you're curious you can check the Network section of your Systems settings. Or to find the address assigned to your computer, use the ifconfig command in combination with grep:
  $ ifconfig | grep 192.168
  inet 192.168.1.208 netmask 0xffffff00 broadcast 192.168.1.255
In this example, the assigned address is 192.168.1.208.
4.2 Heron IP Addresses [top]
Each Heron has three IP addresses. (a) The first IP address allows the user to log into the Heron front-seat computer. This IP address is a static IP address configured in the router on the wall in the lab. (b) the second IP address is the IP address of the PABLO if you were logged in to the front-seat computer. We will rarely use this address. (c) The third IP address allows the user to directly log into the PABLO without needing to first log in to the front-seat computer. This address is the one we will most often use. These three IP addresses are conveyed in Figure 4.2, for the case of vehicle abe.
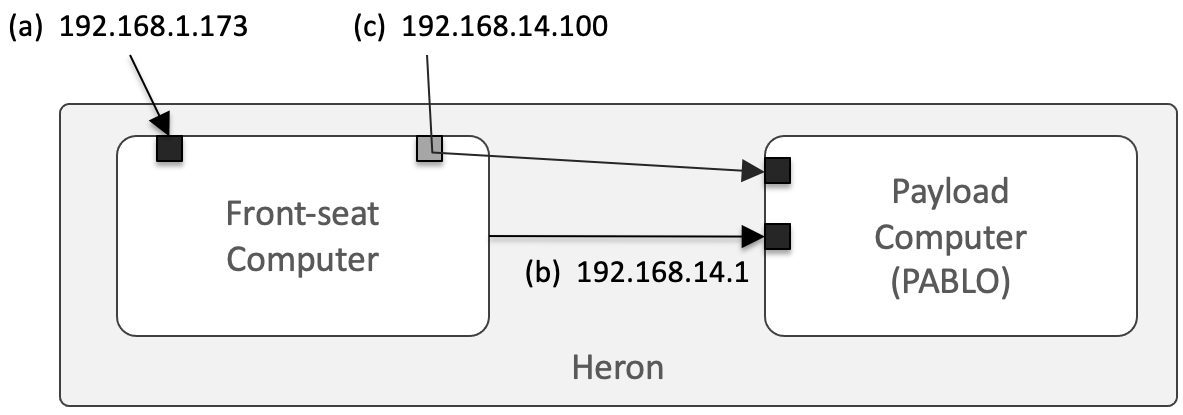
Figure 4.2: Each Heron has three IP addresses. (a) direct login to the front-seat, (b) login to the payload from the front-seat, (c) direct login to the payload computer. The example here shows the IP address for the vehicle abe.
You will not be able to log into the PABLO computer unless the front-seat computer is performing normally. If you cannot log into the PABLO, a first step in debugging is to see if you can log into the front-seat.
The IP addresses for the current pavlab Herons are in the table below.
| Vehicle | Front Seat IP | Front Seat IP to PABLO | IP assigned to PABLO |
| abe | 192.168.1.173 | 192.168.14.1 | 192.168.14.100 |
| ben | 192.168.1.174 | 192.168.15.1 | 192.168.15.100 |
| cal | 192.168.1.169 | 192.168.16.1 | 192.168.16.100 |
| deb | 192.168.1.168 | 192.168.17.1 | 192.168.17.100 |
| eve | 192.168.1.167 | 192.168.18.1 | 192.168.18.100 |
| fin | 192.168.1.149 | 192.168.19.1 | 192.168.19.100 |
| max | 192.168.1.148 | 192.168.19.1 | 192.168.20.100 |
| ned | 192.168.1.147 | 192.168.21.1 | 192.168.21.100 |
| oak | 192.168.1.146 | 192.168.22.1 | 192.168.22.100 |
Table 4.1: IP addresses for PABLO units and vehicles
4.3 IP Address Aliases [top]
Since typing IP addresses requires a bit of attention at the keyboard and can lead to errors, GNU/Linux and OS X have a method for mapping IP addresses to more convenient names. The file /etc/hosts is a list of known static IP addresses referenced to aliases (type man hosts at the terminal prompt for more detail). If the file does not exist, create it and add the following, or if it does exist, append the following:
    192.168.1.173  abe
    192.168.1.174  ben
    192.168.1.169  cal
    192.168.1.168  deb
    192.168.1.167  eve
    192.168.1.149  fin
    192.168.1.148  max
    192.168.1.147  ned
    192.168.1.146  oak
With the /etc/hosts file updated, mission files and command line references can use the IP alias name instead of the IP address. For example, you should be able to ping the robots now with:
$ ping deb
4.4 Bash Aliases for SSH and ping [top]
You may also create aliases in your own shell environment, e.g., in your own .bashrc file on your laptop. See the list below. For example, the alias sshaf is short for "ssh to the abe front-seat computer", and ssha is short for "ssh to the abe pablo".
   # Front-Seat Computer aliases (abe,ben,cal,deb,eve,fin,max,ned,oak)
   alias sshaf='ssh -l student2680 192.168.1.173'
   alias sshbf='ssh -l student2680 192.168.1.174'
   alias sshcf='ssh -l student2680 192.168.1.169'
   alias sshdf='ssh -l student2680 192.168.1.168'
   alias sshef='ssh -l student2680 192.168.1.167'
   alias sshff='ssh -l student2680 192.168.1.149'
   alias sshmf='ssh -l student2680 192.168.1.148'
   alias sshnf='ssh -l student2680 192.168.1.147'
   alias sshof='ssh -l student2680 192.168.1.146'

   # Pablo aliases  (abe,ben,cal,deb,eve,fin,max,ned,oak)
   alias ssha='ssh -l student2680 192.168.14.100'
   alias sshb='ssh -l student2680 192.168.15.100'
   alias sshc='ssh -l student2680 192.168.16.100'
   alias sshd='ssh -l student2680 192.168.17.100'
   alias sshe='ssh -l student2680 192.168.18.100'
   alias sshf='ssh -l student2680 192.168.19.100'
   alias sshm='ssh -l student2680 192.168.20.100'
   alias sshn='ssh -l student2680 192.168.21.100'
   alias ssho='ssh -l student2680 192.168.22.100'
Additionally, it is also often useful to have aliases for pinging the various computers. Similar to above, the alias pingaf is short for "ping the abe front-seat computer, and pinga is short for "ping the abe pablo".
   # Front-Seat Computer aliases  (abe,ben,cal,deb,eve,fin,max,ned,oak)
   alias pingaf='ping 192.168.1.173'
   alias pingbf='ping 192.168.1.174'
   alias pingcf='ping 192.168.1.169'
   alias pingdf='ping 192.168.1.168'
   alias pingef='ping 192.168.1.167'
   alias pingff='ping 192.168.1.149'
   alias pingmf='ping 192.168.1.148'
   alias pingnf='ping 192.168.1.147'
   alias pingof='ping 192.168.1.146'

   # Pablo aliases  (abe,ben,cal,deb,eve,fin,max,ned,oak)
   alias pinga='ping 192.168.14.100'
   alias pingb='ping 192.168.15.100'
   alias pingc='ping 192.168.16.100'
   alias pingd='ping 192.168.17.100'
   alias pinge='ping 192.168.18.100'
   alias pingf='ping 192.168.19.100'
   alias pingm='ping 192.168.20.100'
   alias pingn='ping 192.168.21.100'
   alias pingo='ping 192.168.22.100'
For convenience, you can download a file with all these aliases, which should make copying into your .bashrc file easier:
$ wget http://oceanai.mit.edu/pavlab/docs/heron_aliases
4.5 Assignment 2 (check off): Connecting to the network [top]
This assignment validates that your laptop connects to the lab's WiFi. Be aware that to complete the labs you should not connect with the MIT, MIT GUEST, or MIT SECURE networks at the Pavilion. Connect using kayak-local-5ghz.
If not done already by preceding students, (a) move the antenna out from the lab and onto the dock (Figure 4.1), and (b) Plug in the power connector by the telephone inside the lab.
For the assignment, follow this checklist:
| On your laptop... |
| [ ] Connect with the kayak-local_5ghz network |
| [ ] Enter the supplied router password when promted |
| [ ] Fill in your computer's IP address: 192.168.1._______ |
| [ ] Ping the front-seat IP address of the vehicle |
| [ ] Show the lab instructor the ping results |
5 Using the PABLO Unit in a Vehicle
The PABLO unit used in the PABLO introductions lab will be installed in the vehicle and used to drive the alpha_heron mission. The system is designed so that the PABLO unit can move between simulation and the actual M300 vehicle with minimal changes.
5.1 Assignment 3 (self check-off): Connecting with a PABLO Unit to an M300 [top]
Follow these steps to connect with the PABLO:
| [ ] Tighten the gland at the end of the PABLO unit's Ethernet plug |
| [ ] Make sure the two USB-B ports on your PABLO are capped |
| [ ] Get a battery box from the lab instructor |
| [ ] Place the PABLO unit in the payload bay (DON'T CONNECT POWER YET) |
| [ ] Connect the Ethernet plug to the M300's payload bay port |
| [ ] Connect power and wait approximately one minute |
| [ ] Use your laptop to ssh to the PABLO unit |
Note, the PABLO will no longer have the IP address it had when it was directly connected to your laptop as in the previous lab. It should have the IP address corresponding to the name of your Heron. See the table in Section 4.2. For example, if your vehicle is abe, the PABLO IP address should be 192.168.14.100.
5.2 Configuring the alpha_heron Mission [top]
From the prior lab, the moos-ivp-pavlab repository should already be present on your PABLO computer. This repository should have a missions folder with the particular mission alpha_heron. The goal in this step is to use this mission to deploy a Heron on the water.
We regularly tweak this baseline mission, so it is a good idea to update it on your PABLO before proceeding.
 PABLO $ cd moos-ivp-pavlab/missions
 PABLO $ svn update
Note: as discussed in the previous PABLO setup lab, we use the convention of
PABLO $ command
for commands to be executed on your PABLO, and the solitary $ prompt for commands to be executed locally on your laptop.
Get the alpha_heron Mission on your Laptop [top]
You will need the alpha_heron mission on your laptop to run the shoreside part of the mission. You don't need to download this entire tree. You only need the mission folder on your laptop. Download the mission with:
$ svn co https://oceanai.mit.edu/svn/moos-ivp-pavlab-aro/missions/alpha_heron
Configuring the Shoreside Launch Script [top]
The shoreside community runs on your laptop. You should be able to simply launch the shoreside by invoking:
 $ cd moos-ivp-pavlab/missions/alpha_heron
 $ ./launch_shoreside.sh
Of course you will not be launching the shoreside with any time warp while you're working with vehicles on the water. After the shoreside is launched, make note of the IP address displayed at the top of the pMarineViewer window. You will need to know this IP address when configuring the mission launch script on your robot (so the robot knows where to find the shoreside computer).
Note: When or if you launch this shoreside on your laptop at home or elsewhere on campus on your home or MIT Wi-Fi network, you will get an IP address from that router. The one that counts is the IP address that you get when connecting the pavilion router (kayak-local-5GHz). This should begin with 192.168.1.X. For convenience, rather than opening your Systems Network settings, your IP address should be shown a the top of your pMarineViewer window.
IMPORTANT NOTE: If your IP address shows up in pMarineViewer simply as "localhost", you will need to provide the IP address explicitly upon launch. So, determine your laptop's IP address, and launch instead with:
$ ./launch_shoreside.sh --ip=192.168.1.233 (or similar)
Should I make a copy of the alpha_heron mission? [top]
It should be possible to run the alpha_heron mission today as-is, without any modification. Recall that it resides in moos-ivp-pavlab/missions. This is a read-only folder on your PABLO. So any changes you make are in jeopardy of not persisting.
If you would like to modify the mission in some form or another, just make a copy of the mission into your moos-ivp-extend/missions tree and folder. Presumably you have given yourself permission to edit and commit changes back to github.
Command Line Args When Launching your Vehicle [top]
When you launch the vehicle MOOS community on your PABLO, on the Heron, you need to provide a few pieces of information:
- The name of the vehicle you are launching
- The IP address of the shoreside computer
- The location of the Waypoint pattern to be traversed.
The launch_vehicle.sh script contains command-line switches for all of the above, so we don't have to edit any .moos or .bhv files. You can run ./launch_vehicle.sh -h at any time to see your options, but here we discuss the important ones. Here is an example of all three arguments:
PABLO $ ./launch_vehicle.sh --shore=192.168.1.224 --east
The shoreside IP address: Recall from above that you get this from your own laptop when it connects to the pavilion Wi-Fi. To specify it on the command-line: --shore=192.168.1.224, or whatever your IP address may be.
The survey region: This mission is configured to run a home plate pattern in one of two locations. In this mission we have not enabled collision avoidance with other Herons operating nearby. To mitigate this we configured East and West regions that do not overlap. Choose one, with either --east or --west. And try to pick the one the other group is not using at the moment.
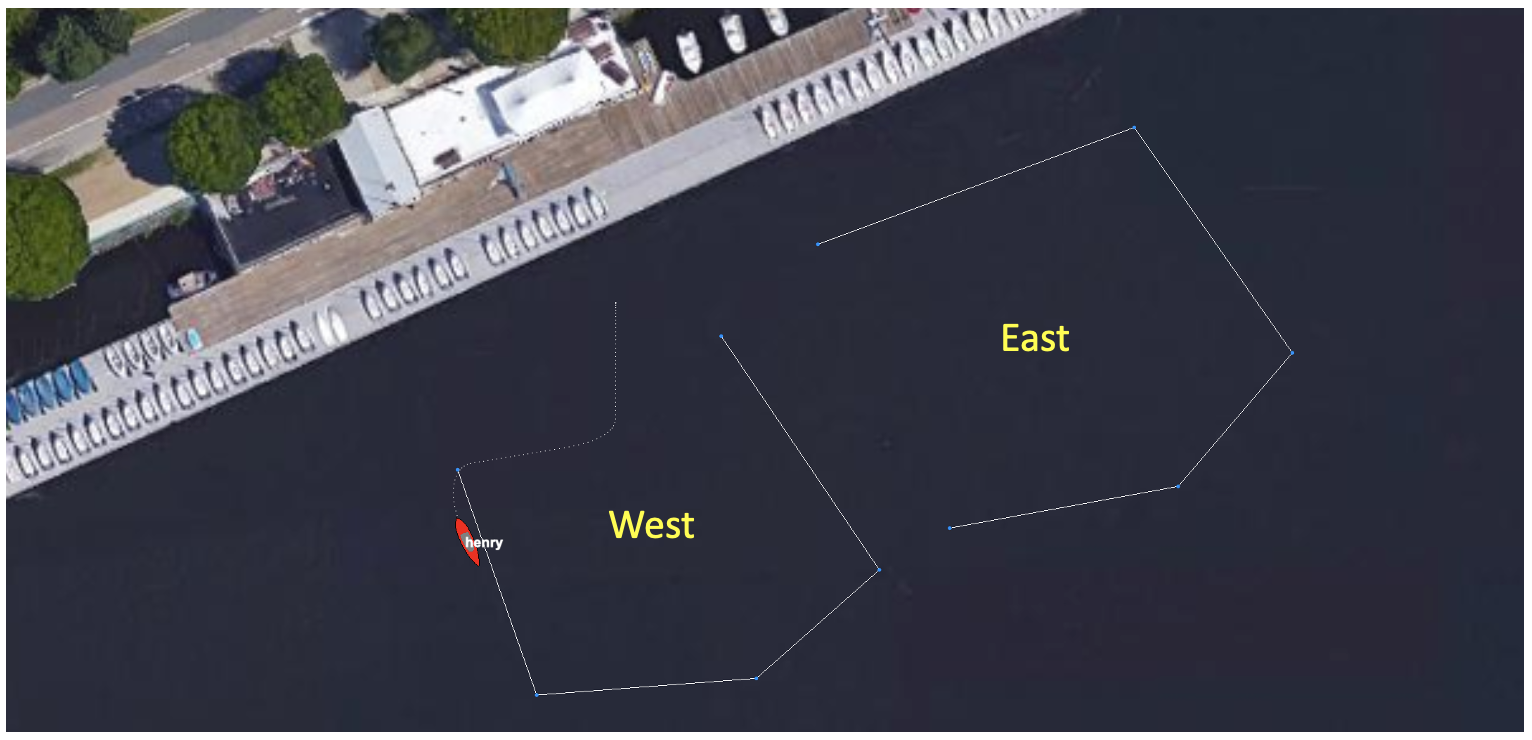
Figure 5.1: The East and West options for running the vehicle in the Alpha mission. Selectable in the launch_vehicle.sh script with either --east, or --west.
So, to launch your mission, here are some examples that you might encounter:
 PABLO $ cd moos-ivp-pavlab/missions/alpha_heron
 PABLO $ ./launch_vehicle.sh --shore=192.168.1.211 --east
 PABLO $ ./launch_vehicle.sh --shore=192.168.1.214 --west
5.3 Assignment 4 (check-off): Launching the Mission on the Dock [top]
This assignment verifies that your vehicle is ready to be controlled by the alpha_heron mission. Do not let the motors run dry for more than a few seconds.
| In a terminal window on your laptop... |
| [ ] Launch the shoreside mission, making note of the IP address |
| In an {ssh} window to the PABLO unit... |
| [ ] svn update or git update anything that needs it |
| [ ] Prepare yourself to run the launch vehicle script: know your IP address, vehicle name, and east/west region. |
| [ ] Launch the vehicle mission |
| In a terminal window on your laptop... |
| [ ] Re-launch the shoreside mission if necessary |
| [ ] When the vehicle displays on shoreside, deploy the mission |
| [ ] Stop the motors quickly |
| [ ] Show the lab instructor the operating mission |
IMPORTANT NOTE: Make sure you do an svn update on the moos-ivp-pavlab folder. There are likely changes to the alpha_heron mission since your PABLO was configured.
5.4 Assignment 5 (check-off): Launching the Mission on the Water [top]
This assignment verifies that your vehicle is ready to be controlled by the alpha_heron mission on the water. Do not let the motors run dry for more than a few seconds.
| [ ] Ask the lab instructor to verify connections before deploying |
| [ ] Secure the payload bay lid |
| [ ] Re-check all connectors and caps on un-used ports |
| [ ] Push the vehicle back into the water |
| [ ] Remote-control the vehicle away from the dock |
| [ ] Deploy the mission for at least one loop of the pattern |
5.5 Assignment 6 (check-off): Shutdown and Stowing [top]
Shutting down and returning equipment is as important as any other portion of the lab. When working with the vehicles, always leave enough time to close out properly.
| [ ] Return the vehicle to the dock |
| Retrieving... |
| [ ] Carefully remote control vehicle to dock (do not hit the dock) |
| [ ] Lift vehicle onto dock |
| Powering Down... |
| [ ] Through ssh, power down the PABLO unit |
| [ ] Open the payload bay and disconnect the PABLO unit |
| [ ] Turn off vehicle power using the main pushbutton switch |
| Returning Equipment... |
| [ ] Remove main computer battery from vehicle (the one with the handle) |
| [ ] Turn off remote control |
| [ ] Return remote to hook on the back wall of the lab |
| [ ] Place batteries on shelf to charge |
| [ ] Show lab instructor the batteries and vehicle |
| If you are the last operator... |
| [ ] Disconnect power to the repeater WiFi antenna |
| [ ] Bring in the repeater WiFi antenna inside and onto the storage hook |
Completing the Lab [top]
Your work on this lab is successful when you can demonstrate to the lab instructor the PABLO unit driving a vehicle on the river and after all equipment has been put away.
Document Maintained by: mikerb@mit.edu
Page built from LaTeX source using texwiki, developed at MIT. Errata to issues@moos-ivp.org. Get PDF