2.680 Labs
01 Machine Setup
02 Intro to C++
3A Version Control W/Git
03 Intro to MOOS
04 MOOS Programming
05 Helm Autonomy
06 Multi-Vehicles Pre-Lab
06 Multi-Vehicles
07 Distributed TSP
08 Multi-Machine TSP
09 Inter-Vehicle Messaging
10 Behavior Writing
11 Payload Autonomy
12 Operating MIT Herons
13 Autonomous Rescue (Pt1)
14 Autonomous Rescue (Pt2)
15 Autonomous Rescue (Pt3)
16 Autonomous Rescue (Pt4)
17 Autonomous Rescue (Pt5)
2.680 Retired Labs
12 Hazard Search
13 Hazard Search II
17 Front Estimation
18 In-Water Front Estimate
Ten Short C++ Labs
01 C++ Program Structure
02 C++ Cmd Line Args
03 C++ Functions
04 C++ I/O and Vectors
05 C++ Classes, Rand #'s
06 C++ Deserialization
07 C++ Build Systems
08 C++ Inheritance
09 C++ Coding Guidlines
10 C++ Style Guidelines
Lab 08 - Multi-Machine TSP with Re-planning
Maintained by: mikerb@mit.edu  Get PDF
1 Overview and Objectives
2 Preliminaries
3 Experimenting with Distributed Simulation
3.1 Lab IP Address Requirements for Distributed Simulations
3.2 Local and Publicly Available IP Addresses
4 Run the Double-Vehicle Mission On Multiple Machines
4.1 Obtain a Copy of the Lab 8 Baseline mission Configuration
4.2 Confirm the Baseline Mission is Runnable on a Single Machine
4.3 Work With a Lab Partner to Launch the Baseline Mission
4.4 Assignment 1 (check off) - Demonstrate Double Loiter on Two Machines
5 Add Re-planning to the Distributed TSP Mission
5.1 Mission Folder Preparation
5.2 Re-visiting Missed Points
5.3 Requirements for this Exercise
5.4 Assignment 2 (check off) - Distributed TSP Two
6 Distributed TSP Mission on Multiple Machines
6.1 Preparing Your Mission for Launching on Multiple Machines
6.1.1 Preparing Your Mission Launch Scripts
6.2 Assignment 3 (check off) - Distributed TSP Mission on Multiple Machines
7 Instructions for File Organization of Assignments
7.1 Requested File Structure
7.2 Due Date
1 Overview and Objectives
The focus on today's lab is (a) to begin working with multi-vehicle missions with separate physical machines (for now simulated) vehicles and a separate remote Shoreside machine, and (b) to extend our distributed traveling salesman solution to include re-planning when the robot mission misses points on the first tour. In this lab, we will:

- Run a simple baseline double-vehicle mission over multiple machines,
- Extend the Lab 07 Distributed TSP mission with re-planning,
- Run the Distributed TSP mission over multiple machines.
The goal of the first and third items above is to begin migrating our lab work-flow to make use of an in-lab simulation environment where individual (or group) autonomy configurations are demonstrated. In short, the goal is to replace the shoreside MOOS community you have been running on your laptops with a single classroom shoreside community to which you connect your simulated vehicle. This is much closer to the setup that will be used during robot operation on the Charles river.
The goal of the second (re-planning) item above is to gain more familiarity with behavior configurations and MOOS app development by implementing a further capability on your Lab 7 TSP assignment.
2 Preliminaries
The MOOS-IvP-2680 Tree [top]
Starting with Lab 6 and continuing with this lab, we use the additional moos-ivp-2680 tree. In total we work with three trees:
- moos-ivp: Public autonomy codebase (provided to you)
- moos-ivp-2680: 2.680 autonomy codebase and baseline missions (provided to you)
- moos-ivp-extend: Student codebase and lab solution missions (created by you)
If you haven't done so already, download this tree onto your computer in the same folder, side-by-side with moos-ivp and moos-ivp-extend. To download:
$ git clone git@github.com:mit2680/moos-ivp-2680.git
If you already have this repo, please perform a git pull, to ensure you have any recent updates.
The moos-ivp-2680 tree contains both MOOS apps and MOOS missions useful to 2.680. In today's lab, content from the moos-ivp-2680/missions folder will be needed. We don't yet need any apps, but if you want to add moos-ivp-2680/bin to your shell path in your .bashrc file, this is a good move you will need for later.
Make Sure Your Machine Hostname is Set [top]
Make sure your machine hostname is set to a meaningful value. To check your hostname, run the following from the command line:
$ hostname
If you're using one of the lab MacBooks (or your own Mac), you may be surprised to see it return a number instead of the lab assigned machine name. If this is the case, set your hostname to match the name assigned on your machine label using the following command:
$ sudo scutil --set HostName <your-machine-name>
Make Sure You Have the Latest Updates [top]
Always make sure you have the latest code:
  $ cd moos-ivp
  $ git pull
And rebuild if necessary:
  $ ./build-moos.sh
  $ ./build-ivp.sh
Make Sure Key Executables are Built and In Your Path [top]
This lab does assume that you have a working MOOS-IvP tree checked out and installed on your computer. To verify this make sure that the following executables are built and findable in your shell path:
  $ which MOOSDB
  /Users/you/moos-ivp/bin/MOOSDB
  $ which pHelmIvP
  /Users/you/moos-ivp/bin/pHelmIvP
If unsuccessful with the above, return to the steps in Lab 1:
http://oceanai.mit.edu/ivpman/labs/machine_setup
Where to Build and Store Lab Missions [top]
As with previous labs, we will use your version of the moos-ivp-extend tree. In this tree, there is a missions folder:
  $ cd moos-ivp-extend
  $ ls
  CMakeLists.txt  bin/         build.sh*      docs/         missions/       src/
  README          build/       data/          lib/          scripts/
For each distinct assignment in this lab, there should be a corresponding sub-directory in a lab_08 sub-directory of the missions folder, typically with both a .moos and .bhv configuration file. See Section 7.1 for the full requested file structure.
Documentation Conventions [top]
To help distinguish between MOOS variables, MOOS configuration parameters, and behavior configuration parameters, we will use the following conventions:
- MOOS variables are rendered in green, such as IVPHELM_STATE, as well as postings to the MOOSDB, such as DEPLOY=true.
- MOOS configuration parameters are rendered in blue, such as AppTick=10 and verbose=true.
- Behavior parameters are rendered in brown, such as priority=100 and endflag=RETURN=true.
- MOOS-IvP applications are rendered in magenta, such as pShare, or pHelmIvP.
- General GNU/Linux commands are represented in dark purple, such as wget, mkdir, or cd.
More MOOS-IvP Resources [top]
- See the slides from class which give a bit more background into marine autonomy, the IvP Helm, and uField Toolbox.
- The uFldNodeBroker documentation
http://oceanai.mit.edu/ivpman/apps/uFldNodeBroker - The uFldShoreBroker documentation
http://oceanai.mit.edu/ivpman/apps/uFldShoreBroker
3 Experimenting with Distributed Simulation
The first exercise in today's lab involves simulation distributed over more than one machine. Note that in labs 6 and 7, the mission configuration structure began to take the form of (a) single shoreside MOOS community running pMarineViewer, and (b) some number of vehicle communities. All of these communities were still running on a single machine, e.g., your laptop. When our labs begin to use robots the Charles River, this of course will change, but the logical topology will be the same.
As a step in this direction, in today's lab we experiment with simulations distributed over multiple machines.
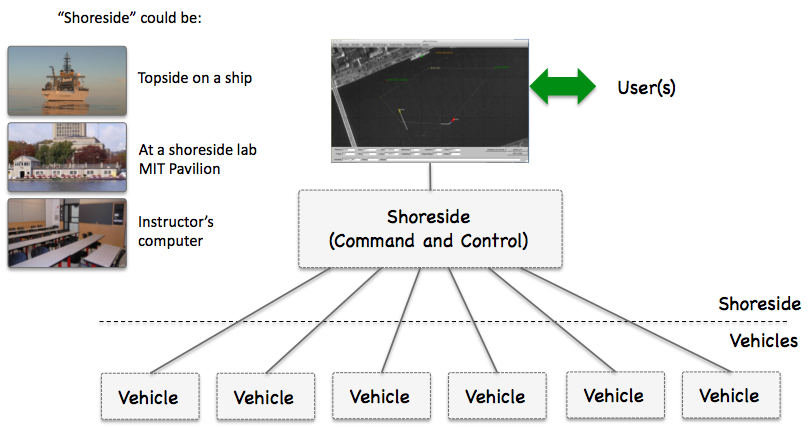
Figure 3.1: Shoreside to Multi-Vehicle Topology: A number of vehicles are deployed with each vehicle maintaining some level of connectivity to a shoreside command and control computer. Each node (vehicles and the shoreside) are comprised of a dedicated MOOS community. Modes and limits of communication may vary.
3.1 Lab IP Address Requirements for Distributed Simulations [top]
The multi-vehicle topology described above requires that (a) the shoreside IP address is known to each of the vehicles, and (b) the shoreside also knows the IP address for all vehicles. When we launch our shoreside community, we will declare the shoreside IP address:
$ ./launch_shoreside.sh --ip=18.18.23.149
And when a remote vehicle is launched, we will also declare the vehicle's IP address, but also indicate where we expect to find the shoreside:
$ ./launch_vehicle.sh --ip=72.74.58.121 --shore=18.18.23.149 --sim
The rest is taken care of automatically by the uFldShoreBroker app running on the shoreside, and the uFldNodeBroker app running in the vehicle community.
Our requirement is that each side can actually reach each other at the specified IP address. Just because your machine is connected to the Internet and can browse the web and so on, doesn't mean your machine is reachable and ready to participate in our multi-vehicle environment.
3.2 Local and Publicly Available IP Addresses [top]
The IP address space (Internet Protocol Version 4) has 256^^4 or roughly 4.3 billion possible unique IP addresses. This may have seemed like a sufficiently large number in the early Internet years, but in practice it is nowhere near enough today. There are at least a couple ways of dealing with this. One way is IPv6, or Internet Protocol Version 6 (Version 5 was apparently just an experimental protocol). IPv6 has 128 bits instead of the 32 bits in IPv4, so it should accommodate humanity for some time.
Another way is to conserve IPv4 addresses, by "sharing" a single IPv4 address among local users. Perhaps the best case example is a home router. There may be a dozen or many more devices connected to a router in a house, including laptops and phones, but all these devices share a single IPv4 address.
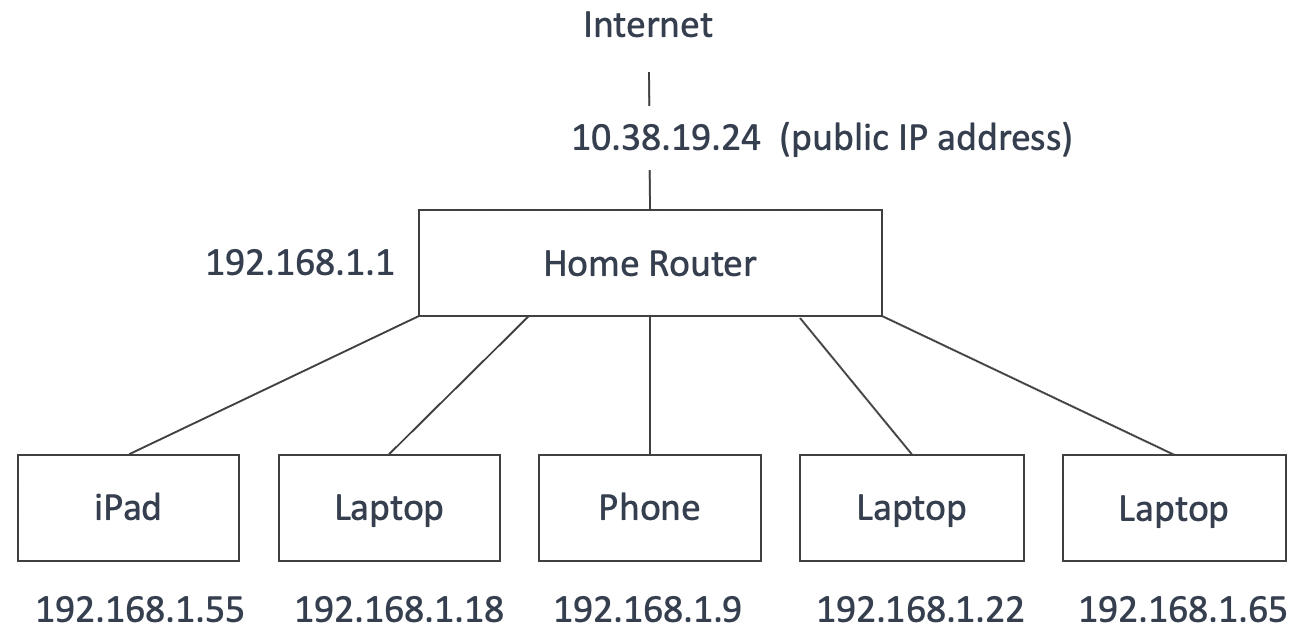
Figure 3.2: A typical home network with a local router. Each device has a local (192.168.x.x) IP address, with the home as a whole using a single IPv4 public IP address.
It would be hard to connect directly to any single home device from the outside world, via say ssh. If you were to try:
$ ssh 10.38.19.24
The ssh interaction could be meant for any one of the computers on the home network, how would the router know which computer the outside user was trying to ssh into? The ssh protocol uses port 22, and the router could be configured to re-direct incoming traffic over port 22 to a particular computer. This is called port forwarding. In our case in 2.680, we are concerned with traffic over pShare. Similar to ssh, we could configure our home router to forward incoming traffic over port 9200 (a common port we choose to use in our missions), to a particular machine.
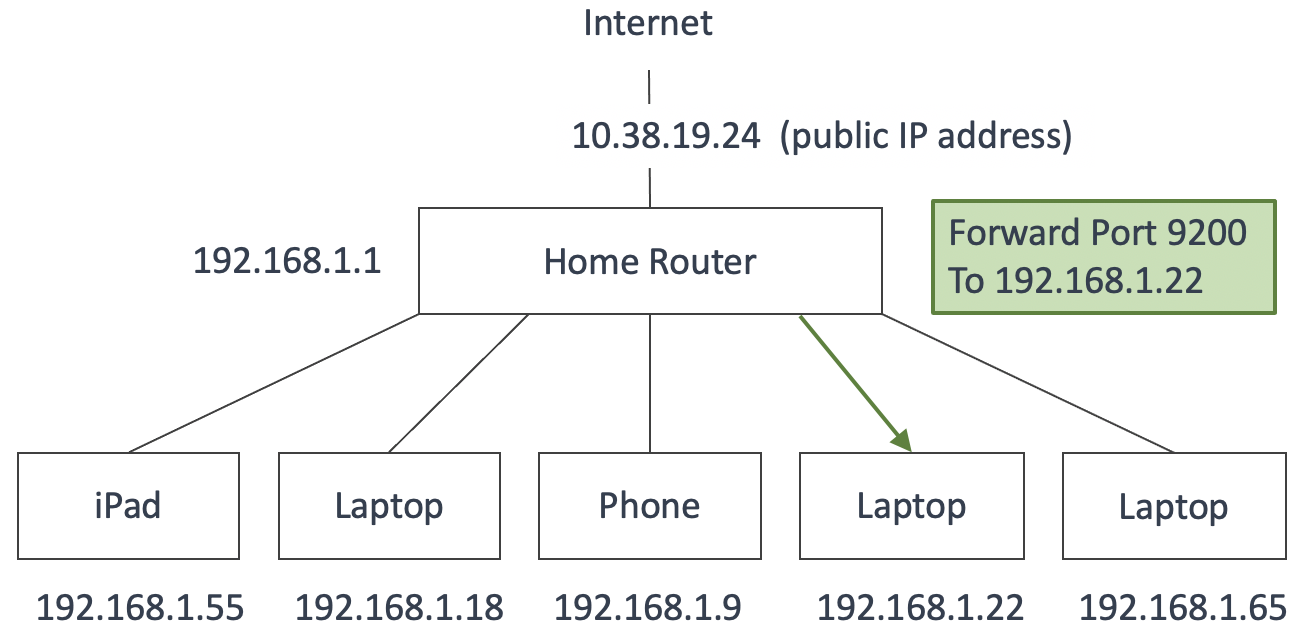
Figure 3.3: Port forwarding can be configured on a home router to re-direct incoming traffic on a particular port to a particular machine.
For most use-cases in 2.680, we will all be working on the same 192.168.* (or similar) network in the classroom. It is possible however to run the multi-machine simulation across machines from your home to your lab partner at home, if you would like to take a crack at configuring your home routers with port forwarding. If you do end up trying this, let us know if you succeed!
4 Run the Double-Vehicle Mission On Multiple Machines
In this part we will:
- Obtain a copy of the lab 08 baseline mission configuration.
- Confirm that it is runnable on your own machine.
- Work with a lab partner to test it over two machines.
4.1 Obtain a Copy of the Lab 8 Baseline mission Configuration [top]
The first step is to copy the baseline example mission from the moos-ivp-2680 tree and copy it into your own moos-ivp-extend tree.
  $ mkdir moos-ivp-extend/missions/lab_08
  $ cp -rp moos-ivp-2680/missions/lab_08_baseline  moos-ivp-extend/missions/lab_08
It should look like:
   moos-ivp-extend/
     missions/
       lab_08/
         lab_08_baseline/
The lab_08_baseline mission files should like:
  $ ls missions/lab_08/lab_08_baseline
  clean.sh*             launch_vehicle.sh*    meta_vehicle.moos
  launch.sh*            meta_shoreside.moos   plugs.moos
  launch_shoreside.sh*  meta_vehicle.bhv      init_field.sh
The most important part to use from this baseline is the launch*.sh files. You can use the *.moos and *.bhv files from your Lab 07 mission folder.
Note: this mission file uses the condensed style of plugs where all plugs common to the vehicle and shoreside are in the single file, plugs.moos. Each block is separated by a tag. The inclusion of plugs inside the meta file then uses the tag, e.g., #include plugs.moos <pShare>.
As with previous missions, the actual targ_* mission files are auto-generated upon executing the launch scripts. Here there are three launch scripts - one (launch_shoreside.sh) if you are launching the shoreside community on your machine and serving others, and the other (launch_vehicle.sh) if you are launching a vehicle community and connecting to a remote shoreside community. The launch.sh script is used when you want to test the mission running all three communities on your machine. All three scripts support the -h switch and both support the --just_make (or simply -j) switch if you want to just build the target files without actually launching. Below is an example (with username mikerb):
  $ cd lab_08/lab_08_baseline
  $ ./launch_shoreside.sh --just_make
  $ ./launch_vehicle.sh --just_make --sim
  $ ls
  clean.sh*             meta_shoreside.moos   targ_mikerb.bhv
  launch.sh*            meta_vehicle.bhv      targ_mikerb.moos
  launch_shoreside.sh*  meta_vehicle.moos     targ_shoreside.moos
  launch_vehicle.sh*    plugs.moos
Note the three target files newly created. And the target files should not be under version control. You should have a .gitignore file in your moos-ivp-extend tree with a line *targ_*, to ensure you don't accidentally put these files under version control. Running the clean.sh script should remove both the targ_* files and the log files. I use the following alias in my .bashrc file. Feel free to add it if you like it:
alias lll='./clean.sh; ktm; ./launch.sh'
Then you can launch a mission, using time warp 20 for example, with:
$ lll 20
4.2 Confirm the Baseline Mission is Runnable on a Single Machine [top]
The goal of this step is to launch two communities with the two specialized shell scripts provided in the lab_08_baseline mission. Although the intention is that typically you would launch just one or the other, launching both on the same machine should work just fine. To do this, first launch the shoreside community with a time warp of ten:
$ ./launch_shoreside.sh 10 -v
With the -v or --verbose option, the launch scripts will present to you output like that shown below, before continuing to launch. This allows you confirm the key launch parameters, as a form of debugging. Once you have things working, you can drop the -v command line argument.
 $ ./launch_shoreside.sh 10 --verbose
 ==================================
   launch_shoreside.sh SUMMARY
 ==================================
 launch_shoreside.sh
 CMD_ARGS =      [-v 10 ]
 TIME_WARP =     [10]
 JUST_MAKE =     [no]
 AUTO_LAUNCHED = [no]
 ----------------------------------
 IP_ADDR =       [10.200.14.243]
 MOOS_PORT =     [9000]
 PSHARE_PORT =   [9200]
 LAUNCH_GUI =    [yes]
 MMOD =          []
 ----------------------------------
 VNAMES =        []
 ----------------------------------
 Hit any key to continue launch
This allows you to verify the values of the important settings before continuing. To disable this prompt and just launch immediately, launch instead without the --verbose, -v flag.
Note, when launching on a separate machine, you may need to provide the public IP address explicitly:
$ ./launch_shoreside.sh --ip=1.2.3.4 10 (time warp 10)
Then launch a vehicle community with a matching time warp:
$ ./launch_vehicle.sh 10 --sim (or -s)
In launching the vehicle community as above with no command-line arguments other than the time warp, defaults are used for the vehicle name (username), MOOSDB ServerPort (9001), and pShare listen port (9201). In launching a second or more vehicles, these arguments need to be provided with different values on the command line. For example, try launching a second vehicle with:
$ ./launch_vehicle.sh --vname=henry --mport=9002 --pshare=9202 --sim 10
It may seem strange that there are multiple pMarineViewer windows launched. But this is more sensible when these two communities are being launched on separate machines, as intended normally. The shoreside pMarineViewer will render all vehicles. The vehicle pMarineViewer will render just what is known locally.
4.3 Work With a Lab Partner to Launch the Baseline Mission [top]
In the next step, find a lab partner to work with launching the baseline mission. Take turns playing the vehicle role and the shoreside role. If you want to work with multiple partners to launch several vehicles connected to a single shoreside community, that's great.
As before, the first step is to launch the shoreside community. Pick a desired time warp and inform those connecting with a vehicle of this value:
$ ./launch_shoreside.sh --ip=<your-ip-address> <time-warp>
OR if working on the same subnet, simply:
$ ./launch_shoreside.sh <time-warp>
Noting the shoreside IP address: To next launch a vehicle community on another machine, the person launching the vehicle community needs to know the IP address of the shoreside community. This can be found many ways but perhaps the easiest is to just look at the top of the pMarineViewer window. Once this is known, the vehicle community is launched with:
  $ ./launch_vehicle.sh --ip=<your-ip-address> --shore=<ip-address-for-shore> --vname=<vname>
   --mport=<port> --pshare=<port> <time-warp> --sim
If you are only launching one vehicle per machine, the --vname, --mport, and --pshare arguments may be omitted. The default values will suffice. They only need to be specified to make sure that when launching more than one vehicle on a single machine that the vehicle name, MOOSDB port and pShare input ports are unique for each machine.
Regarding the network IP address on the two machines, note that it's important that either:
- Both machines are on the same local network. This is the case when the IP address is assigned by a router perhaps in the room. In this case the IP address may begin with one of a couple special numbers, 192.168.x.x, or 10.1.x.x.
- Both machines are on the global network, with an IP address known to the rest of the Internet.
One way to test your network setup between the two machines is if both of you are able to ping each other using the ping command. This utility is found at /sbin/ping on most machines. Test the ping in both directions.
If you've never used ping before, you can try pinging the class server. A successful connection looks like below. (hit ctrl-c to quit)
 $ ping 18.18.38.22
 64 bytes from 18.18.38.22: icmp_seq=0 ttl=49 time=62.625 ms
 64 bytes from 18.18.38.22: icmp_seq=1 ttl=49 time=101.966 ms
 64 bytes from 18.18.38.22: icmp_seq=2 ttl=49 time=131.908 ms
An unsuccessful ping would look like:
 $ ping 18.18.38.22
 PING 18.18.38.22 (18.18.38.22): 56 data bytes
 Request timeout for icmp_seq 0
 Request timeout for icmp_seq 1
 Request timeout for icmp_seq 2
 Request timeout for icmp_seq 3
If you can't ping or connect to your lab partner's machine, you can try disabling the firewall. See a lab TA if you need help on this.
4.4 Assignment 1 (check off) - Demonstrate Double Loiter on Two Machines [top]
To demonstrate this assignment, you can either:
- Work with a partner, one acting as a shoreside, the other partner launching a vehicle, or preferably two vehicles. Or
- Work with one of the TAs, with the TA providing the second community, either shoreside or vehicle.
5 Add Re-planning to the Distributed TSP Mission
The next exercise in this lab is to augment the lab 7 Distributed TSP mission with a re-planning component.
5.1 Mission Folder Preparation [top]
We'll make a new mission folder in our missions/lab_08 folder which, for starters, will be just a direct copy from your Lab 7 mission folder:
  $ cd moos-ivp-extend/missions/lab_08
  $ cp -rp moos-ivp-extend/missions/lab_07/distributed_tsp  distributed_tsp_replan
Now things should look like:
   moos-ivp-extend/
     missions/
       lab_08/
         lab_08_baseline/            // Assignment 1 - check off
         distributed_tsp_replan/     // For now a copy of lab 7 distributed_tsp mission
5.2 Re-visiting Missed Points [top]
Note that when the vehicle makes sharp turns, it often "achieves" its next waypoint even though it may miss going directly over the point by a wide margin. This is due to generous settings of the capture radius and slip radius parameters in the waypoint behavior. (For exampled, if the slip_radius is 20 meters, and the capture_radius is 10 meters, the vessel may "achieve" the waypoint, but may never come closer than say 18 meters.)
In this exercise, we will define a separate notion of what it means to have successfully visited a waypoint. We augment the pGenPath application to keep track of which points were visited by its own observation and criteria for achieving a visit. Once the vehicle has completed its first pass on the waypoints, it will repeatedly go back to visit waypoints it missed the first time.
5.3 Requirements for this Exercise [top]
Here's what we need to do:
- Augment the pGenPath application to keep track of which points a vehicle actually visits. The pGenPath app may be configured with a parameter visit_radius=N, setting the criteria for visiting a waypoint to be within N meters. The default should be 5. (Note the app will have to subscribe to NAV_X and NAV_Y if it isn't doing so already.)
- Configure your autonomy mission such that when it ends and returns to home, a helm behavior posts a message to GENPATH_REGENERATE.
- The pGenPath app registers for this message and regenerates a new path consisting of all the points missed on the previous pass.
- Once a new path has been regenerated, the vehicle resumes its mission until the new path has been traversed.
- The mission continues until there are no points left un-visited (as determined by the pGenPath application).
- For Assignment 2, demonstration will be on a single machine, all three vehicles simulated on the single machine.
5.4 Assignment 2 (check off) - Distributed TSP Two [top]
You should demonstrate this re-planning capability from within a new mission folder created for this lab, in your missions/lab_08 folder. As discussed above, it should be called missions/lab_08/distributed_tsp_replan. To make it easier to assess whether your planning is working, choose the pPointAssign option of assigning points grouped by East and West region so the paths are not overlapping one another. Your mission should look something like the video below:
Figure 5.1: In the Distributed TSP Two mission two vehicles are assigned randomly chosen points in the region based on the section of the region. Therefore their paths do not overlap and the mission is somewhat more efficient. video:(2:03): https://vimeo.com/88017560
6 Distributed TSP Mission on Multiple Machines
In this last assignment, the goal is to convert your distributed TSP Replan mission to be launchable/runnable across separate machines. Again you will need a lab partner to demonstrate.
6.1 Preparing Your Mission for Launching on Multiple Machines [top]
Your previous Distributed TSP mission will need to be modified a bit to support running on multiple machines. From Assignment 2 above, you should already have a distributed_tsp_replan mission folder, and your file structure should look like:
   moos-ivp-extend/
     missions/
       lab_08/
         lab_08_baseline/            // Assignment  1 - check off
         distributed_tsp_replan/     // Assignments 2,3 - check off
In Assignment 2 above, the mission folder for distributed_tsp_replan didn't change much in terms of the launch files and network configuration, compared to the structure from Lab 7. But in order for it to be run on multiple machines, it needs to borrow some of the structure from the lab_08_baseline mission folder. This is discussed next.
6.1.1 Preparing Your Mission Launch Scripts [top]
The first thing you will need to do is to copy the launch_vehicle.sh and launch_shoreside.sh scripts from the lab_08_baseline mission into your distributed_tsp_replan mission folder.
   $ cd moos-ivp-extend/missions/lab_08
   $ cp lab_08_baseline/launch_shoreside.sh distributed_tsp_replan/
   $ cp lab_08_baseline/launch_vehicle.sh   distributed_tsp_replan/
   $ cp lab_08_baseline/launch.sh           distributed_tsp_replan/
Note that in copying the launch.sh script into your distributed_tsp_replan folder that you will be overwriting the previous launch.sh script.
6.2 Assignment 3 (check off) - Distributed TSP Mission on Multiple Machines [top]
To demonstrate this assignment:
- Enlist a lab partner to launch a Lab 8 shoreside community.
- The other lab partner should launch two distinct vehicles remotely on their machine.
- The shoreside lab partner hits the Deploy button.
Your mission should also re-demonstrate the re-planning aspect of Assignment 2.
If a student is working solo, the TA should be able pull the student's code from version control and launch the shoreside community. The TA will need to ensure that the student's version of pPointAssign is the version running on the shoreside, by setting the shell path order appropriately.
If the team consists of three people, one student should perform shoreside duties, while the other two students launch one vehicle each.
7 Instructions for File Organization of Assignments
7.1 Requested File Structure [top]
This is a bit redundant by now, but here is the final requested file structure:
   moos-ivp-extend/
     missions/
       lab_08/
         lab_08_baseline/            // Assignment 1 - check off
         distributed_tsp_replan/     // Assignment 2,3 - check off
7.2 Due Date [top]
The due date for this lab is Thursday March 20th, 2025. We will start the next lab upon returning from Spring Break.
Document Maintained by: mikerb@mit.edu
Page built from LaTeX source using texwiki, developed at MIT. Errata to issues@moos-ivp.org. Get PDF