2.680 Labs
01 Machine Setup
02 Intro to C++
3A Version Control W/Git
03 Intro to MOOS
04 MOOS Programming
05 Helm Autonomy
06 Multi-Vehicles Pre-Lab
06 Multi-Vehicles
07 Distributed TSP
08 Multi-Machine TSP
09 Inter-Vehicle Messaging
10 Behavior Writing
11 Payload Autonomy
12 Operating MIT Herons
13 Autonomous Rescue (Pt1)
14 Autonomous Rescue (Pt2)
15 Autonomous Rescue (Pt3)
16 Autonomous Rescue (Pt4)
17 Autonomous Rescue (Pt5)
2.680 Retired Labs
12 Hazard Search
13 Hazard Search II
17 Front Estimation
18 In-Water Front Estimate
Ten Short C++ Labs
01 C++ Program Structure
02 C++ Cmd Line Args
03 C++ Functions
04 C++ I/O and Vectors
05 C++ Classes, Rand #'s
06 C++ Deserialization
07 C++ Build Systems
08 C++ Inheritance
09 C++ Coding Guidlines
10 C++ Style Guidelines
Lab 17 - Autonomous Rescue Challenge - Part 5 Final Lab and In-Water Competition
Maintained by: mikerb@mit.edu  Get PDF
1 Overview and Objectives
2 Preliminaries
2.1 Preliminaries: Documentation Conventions
2.2 Preliminaries: Pull Latest Code and Mission Files
2.3 Preliminaries: Pavilion Coordinates
2.4 Preliminaries: The Shell Path
2.5 Preliminaries: The Helm Behavior Path
3 Four Mission Variations - For Simulation or In-Water
3.1 The Rescue Mission Variation
3.2 The Rescue-Rescue Mission Variation
3.3 The Rescue-Scout Mission Variation
3.4 The Rescue-Scout-Rescue-Scout (RS2) Mission Variation
4 Launching the Mission for In-Water Experiments
4.1 Launching the Shoreside Mission In the Field
4.2 Launching the Vehicle Mission In the Field
4.3 Criteria for Winning and Actions Upon Winning
4.3.1 Criteria for Winning in the Rescue-Rescue Mission
4.3.2 Criteria for Winning in the RS2 Mission
4.3.3 Tie-breaker Algorithm
4.4 A Note on Return Points
5 Assignments
5.1 Assignment 1 (self check off) - Run the Scout Simulations
5.2 Assignment 2 (check off) - Create Your Own Scout Behavior
5.3 Assignment 3 (check off) - Run the Rescue-Scout Mission on the Robots
5.4 Assignment 4 (check off) - Run the RS2 Mission on the Robots
6 Instructions for Handing In Assignments
6.1 Requested File Structure
6.2 Due Date
1 Overview and Objectives
In the final part of the Autonomous Rescue lab, the competition, each team is expanded to two vehicles, to include a collaborative robot, a scout vehicle. As in the previous lab stages, a set of swimmers and their locations will be communicated to both robot teams. In this new stage, a set of additional, unregistered, swimmers will also exist at unknown locations. These unregistered swimmers can be located, scouted, by a scout robot teammate. When a swimmer has been scouted, the scout robot will message its rescue robot teammate with the swimmer ID and location. The idea is conveyed in Figure 1.1:

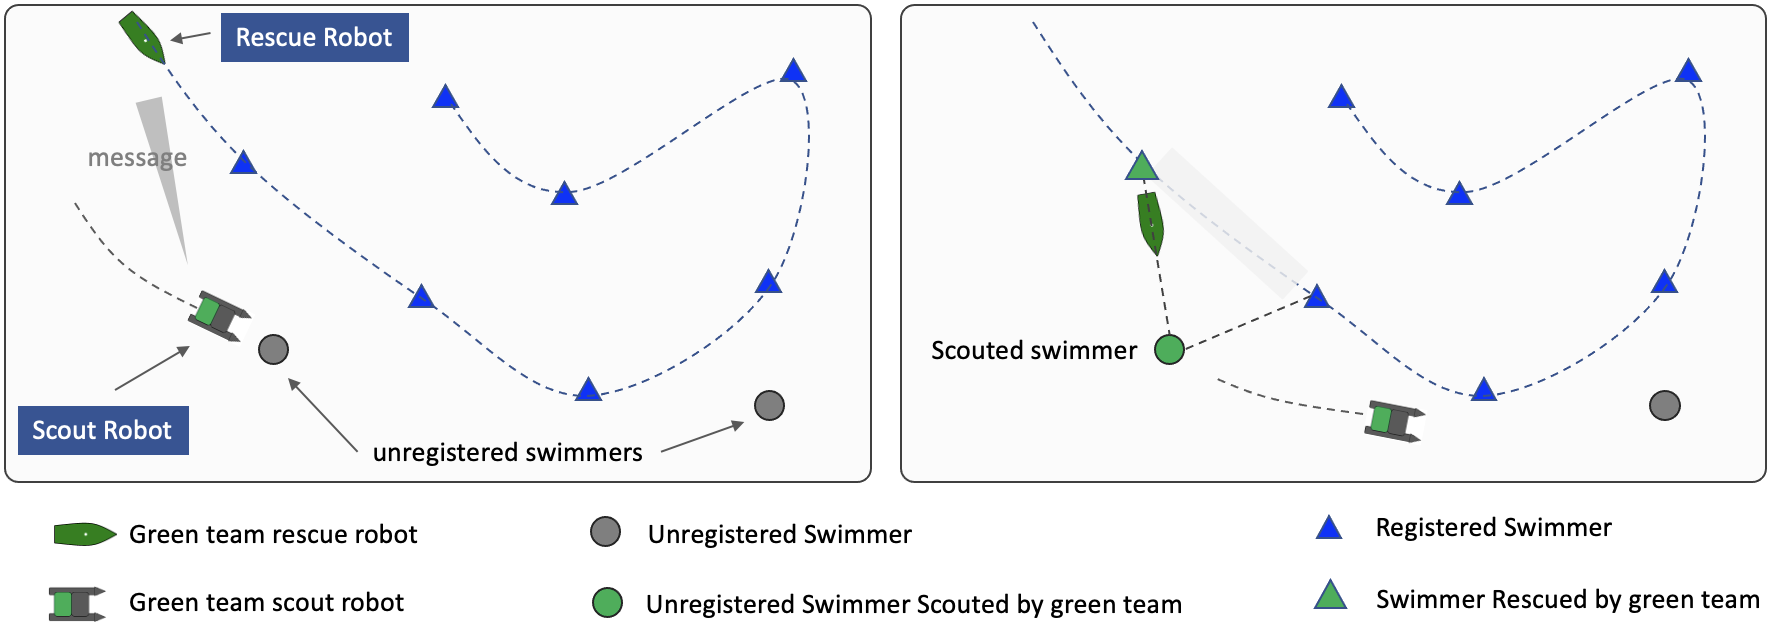
Figure 1.1: The Scout Robot: (left) The scout robot discovers a previously not known (unregistered) swimmer, and conveys its location to its rescue vehicle teammate. (right) The rescue vehicle adjusts its path to include the newly known swimmer, while the scout robot continues to search for other unregistered swimmers.
Your goal is to build a new Helm behavior for your scout vehicle. A baseline behavior will be provided for you. This behavior will simply drive to random locations in the playing region, randomly picking a new point after reaching the previous point. Sometimes it will get lucky and stumble upon an unregistered swimmer. As with the greedy tour policy for your pGenRescue app, the baseline behavior provides a legitimate capability out of the box, but is pretty inefficient and easily improved.
A summary of topics:
- Development of a new Helm behavior for autonomous scouting
- Inter-vehicle messaging for autonomous scouting and rescue
- Demonstration of student-provided path planning module, pGenRescue, in an adversarial situation.
- In-water demonstration of 2 on 2 robot autonomous scout and rescue.
2 Preliminaries
2.1 Preliminaries: Documentation Conventions [top]
To help distinguish between MOOS variables, MOOS App configuration parameters, MOOS App names, behavior parameters, we will use the following conventions:
- MOOS variables are rendered in green, such as IVPHELM_STATE, as well as postings to the MOOSDB, such as DEPLOY=true.
- MOOS configuration parameters are rendered in blue, such as AppTick=10 and verbose=true.
- Behavior parameters are rendered in brown, such as priority=100 and endflag=RETURN=true.
- MOOS-IvP applications are rendered in magenta, such as pShare, or pHelmIvP.
- General GNU/Linux commands are represented in dark purple, such as wget, mkdir, or cd.
When distinguishing between command-line actions on a PABLO, and on your laptop, the below convention is used:
        $ cd moos-ivp    (a command executed on your local laptop)
  PABLO $ cd moos-ivp    (a command executed on the PABLO computer)
2.2 Preliminaries: Pull Latest Code and Mission Files [top]
At each stage of the lab we need to be mindful of the code on both the laptop and the PABLO. Changes may be made to (a) course-provided code, (b) the course baseline mission, and (c) your own moos-ivp-extend code. Use this section as a reminder to update frequently.
To recap, here are the relevant trees:
- moos-ivp: All the core autonomy code, and MOOS middleware
- moos-ivp-2680: uFldRescueMgr, gen_swimmers, and the baseline BHV_Scout behavior in lib_bhv_scout.
- moos-ivp-extend: Your pGenRescue and your BHV_Scout behavior.
- moos-ivp-heron: (PABLO only) When running on the Heron, we need the iM300 app. This should already be on your provided PABLO.
- pablo-common: (PABLO only) Enviroment settings for the Heron. This should already be on your provided PABLO.
The pablo-common and moos-ivp-heron trees are only on your PABLO. The PABLO boot script is configured to automatically update the pablo-common tree when the PABLO boots and finds the Internet. If the moos-ivp-heron tree should happen to need an update, this would need to be done by entering the tree and performing an update and build. This is unlikely and only done if a change to iM300 needs a change during the course of the lab.
Ensure the Latest Code and Updates On your Laptop [top]
Updates will be needed on your laptop to run the initial simulations. You may also be using your laptop to act as the shoreside computer during field tests. You will need to update and possibly rebuild: the moos-ivp, moos-ivp-2680, and moos-ivp-extend trees:
 $ cd ~/moos-ivp; git pull; ./build-ivp.sh
 $ cd ~/moos-ivp-2680; git pull; ./build.sh
 $ cd ~/moos-ivp-extend; git pull; ./build.sh
In the first rescue lab you may not already have the moos-ivp-2680 tree. It can be obtained as below, placing it alongside your moos-ivp and moos-ivp-extend trees. You will need to augment your shell path accordingly.
$ git clone git@github.com:mit2680/moos-ivp-2680.git
Ensure the Latest Code and Updates On your PABLO [top]
Updates will also be needed on your PABLO. Re-connect your PABLO to your laptop with Internet Sharing enabled, and update the following trees:
- The moos-ivp tree, and build
- The moos-ivp-2680 tree, and build
- The moos-ivp-heron tree, and build
- The pablo-common tree (build not needed)
- The moos-ivp-extend tree, and build
The first four trees above are on your PABLO when you received it, but may need updating if changes were made during the course of the lab. The moos-ivp-extend tree was not on your PABLO when you received it (since it is your individual work), but should be on your PABLO as part of Lab 11 Introduction to the PABLO.
 $ cd ~/moos-ivp; git pull; ./build-ivp.sh
 $ cd ~/moos-ivp-2680; git pull; ./build.sh
 $ cd ~/moos-ivp-heron; git pull; ./build.sh
 $ cd ~/moos-ivp-extend; git pull; ./build.sh
Note: In a pinch, you can do any of the above steps while your PABLO is connected to a Heron, but the more you can do before you work with the Heron, the better. This will free up Heron time and TA time for other users.
2.3 Preliminaries: Pavilion Coordinates [top]
The MIT Sailing Pavilion is the center of operations for the Pavlab, or Marine Autonomy Lab. The (0,0) coordinates, or datum, is located at: 42.358456, -71.087589. These datum coordinates are declared in the top of every .moos file in this lab, and set in the plug file plug_origin_warp.moos:
 // MIT Sailing Pavilion
 LatOrigin  = 42.358456
 LongOrigin = -71.087589
All other coordinates are usually configured in local coordinates relative to the above datum.
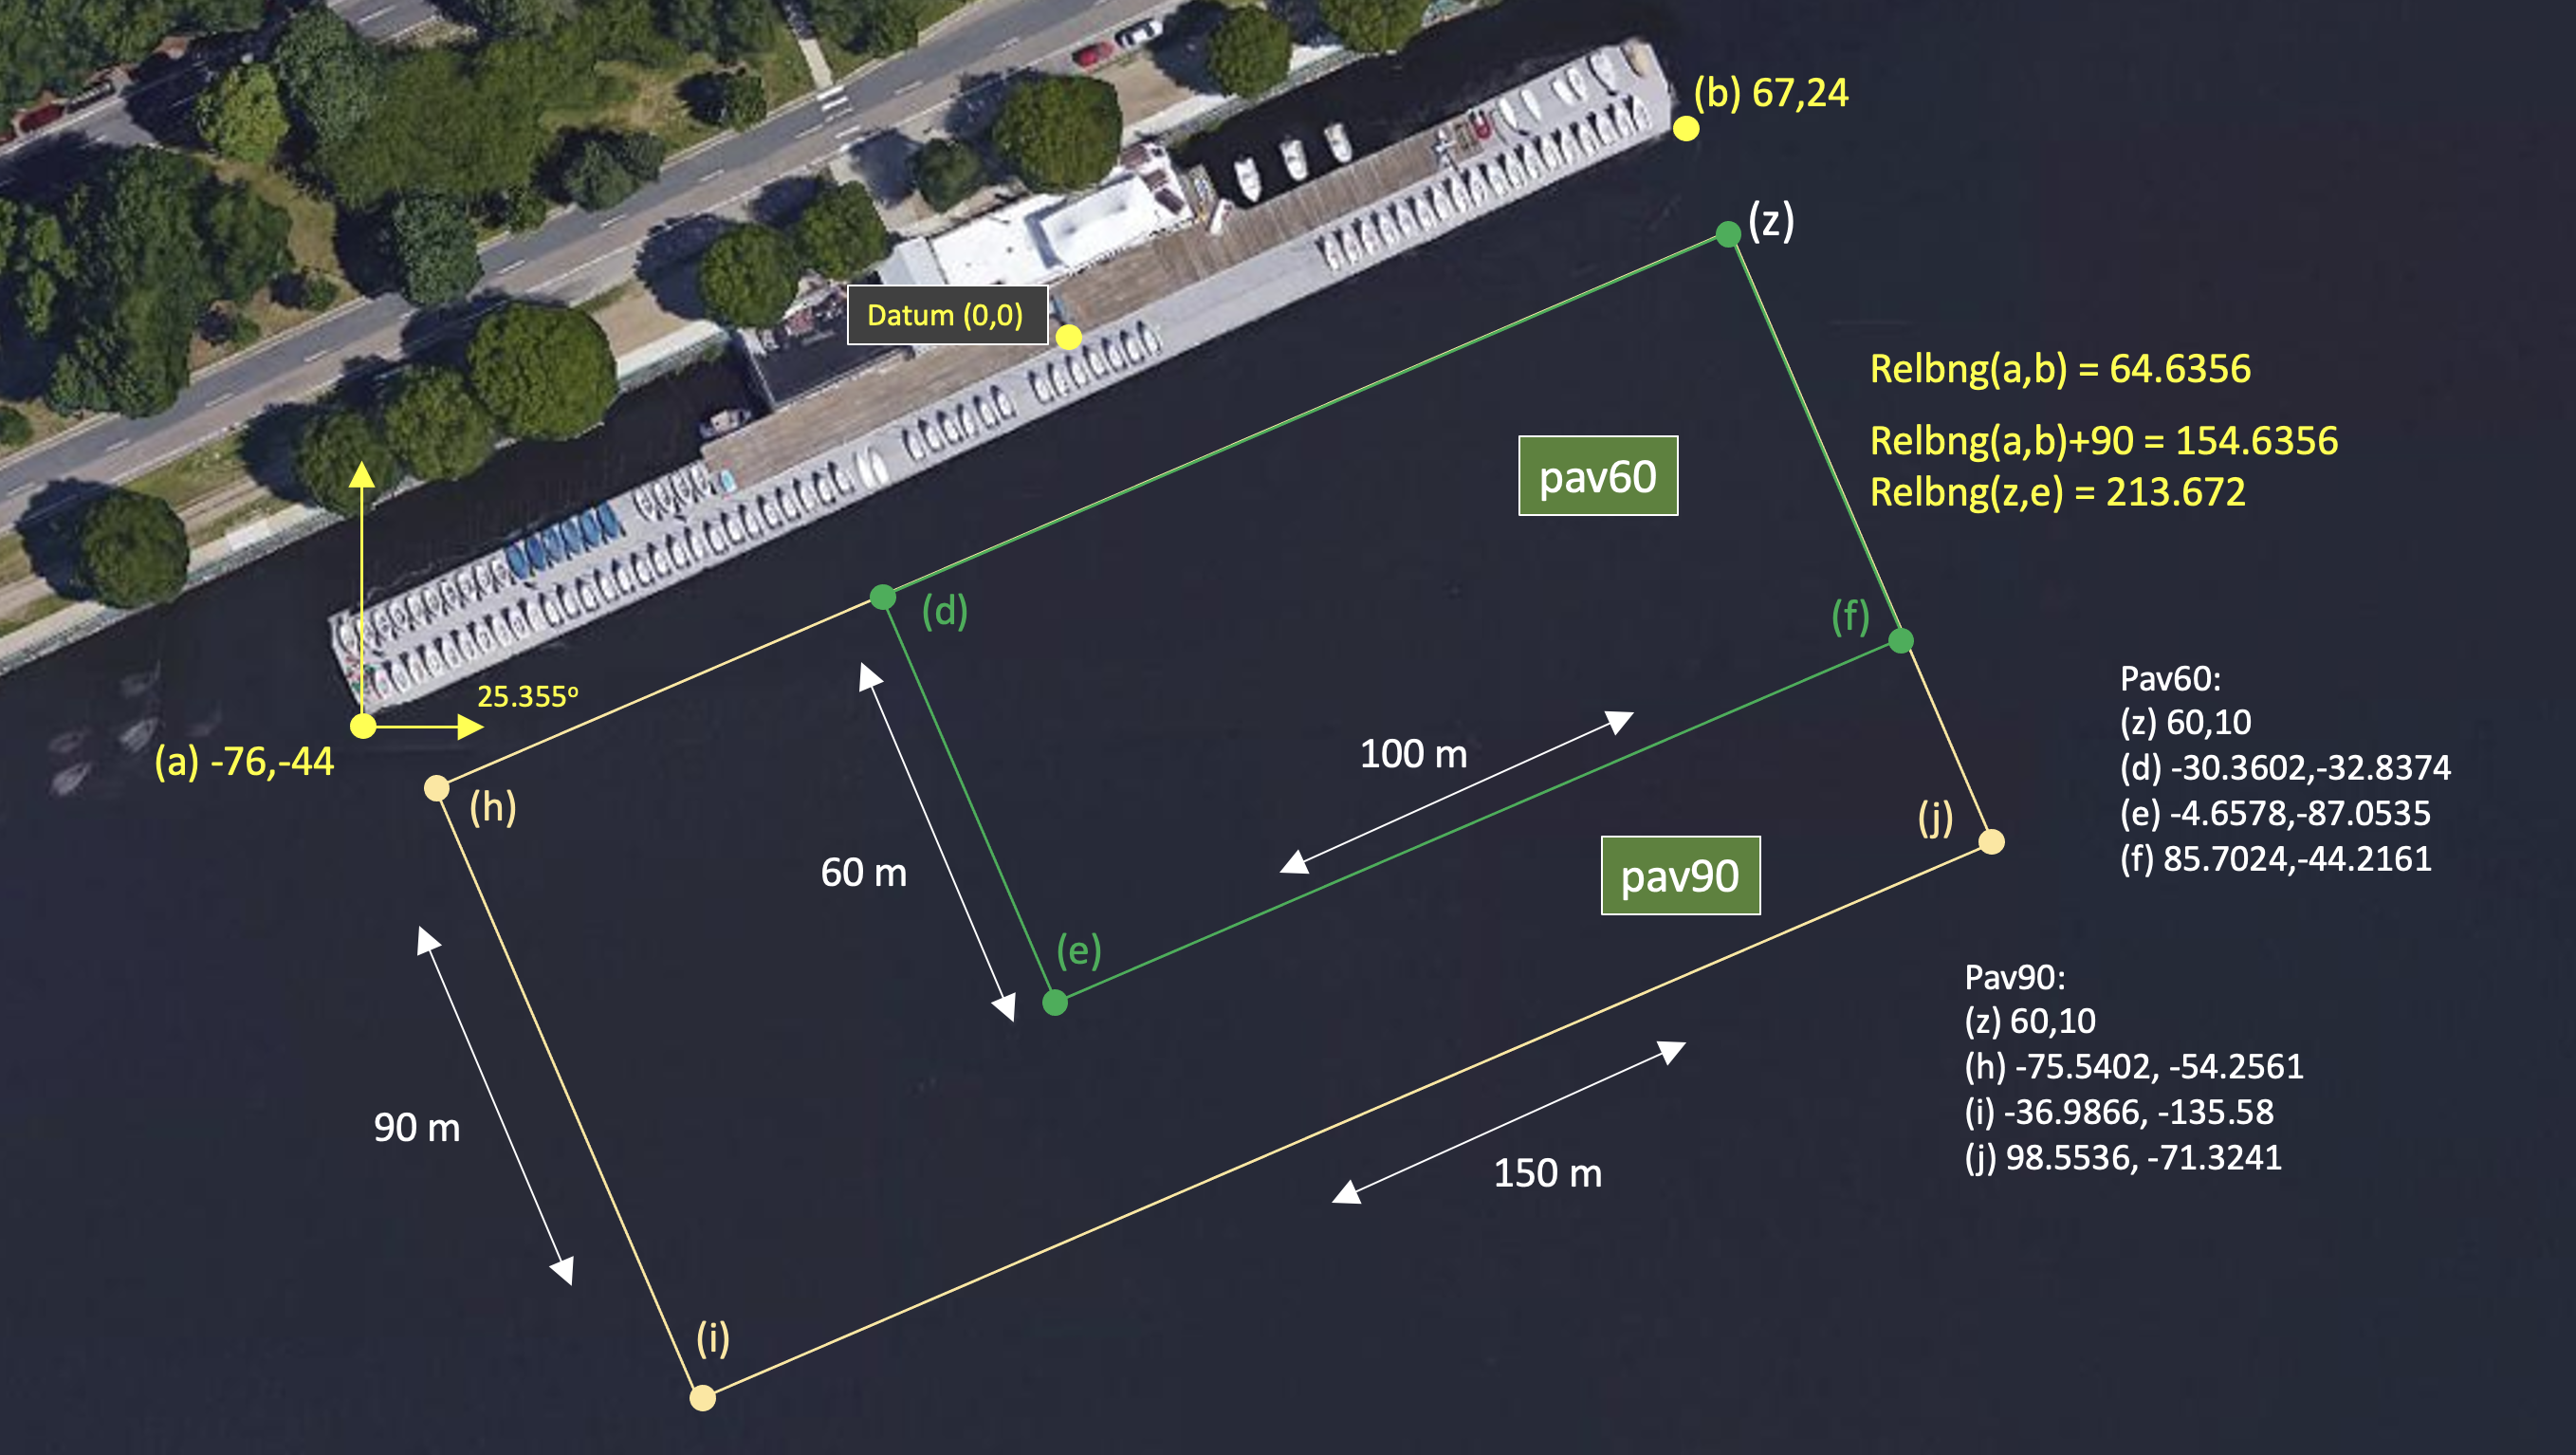
Figure 2.1: Useful coordinates related to the rescue lab. There are two playing field rectangles, a large one ("pav90") roughly the extent of the docks, and a smaller region ("pav60") closer to the Pavlab doors on the East end of the dock.
Note there are two rectangles representing a small and large operation area. The smaller area (pav60) is typically used for in-water tests involving one or two vehicles. The larger area (pav90) is typically used for in-water tests involving two-on-two competitions.
These two regions can be passed to the gen_swimmers app:
 $ gen_swimmers = --pav60 --swimmers=15
 $ gen_swimmers = --pav90 --swimmers=17 --unreg=11
Likewise, in the baseline mission, a new set of random swimmer locations can be generated at launch time with either of the two MIT regions:
 $ ./launch.sh --pav60 -r1 10
 $ ./launch.sh --pav90 -r2 --swimmers=17 10
The boundaries of the playing field are read in by uFldRescueMgr from the swim file. The swim file is a key config parameter for this app, and it contains the location of all the swimmers. The region will will be communicated to the vehicles, through the MOOS variable RESCUE_REGION. For example, for the larger region above:
RESCUE_REGION = pts={60,10:99,-71:-37,-136:-76,-54}
The region message is received by the vehicle and is ingested by the OpRegionV24 behavior in the helm, so the vehicle will know the playing field.
2.4 Preliminaries: The Shell Path [top]
This lab sequence will use applications in the following locations:
- moos-ivp/bin
- moos-ivp/scripts
- moos-ivp-2680/bin
- moos-ivp-extend/bin (your code)
The moos-ivp-2680 tree will hold a few apps specific to this lab, e.g., uFldRescueMgr, and the moos-ivp-extend tree will hold your app, pGenRescue. To augment your path, you may need to edit your .bashrc file as below:
 PATH+=:~/moos-ivp/bin             (this was likely already there)
 PATH+=:~/moos-ivp/scripts         (this was likely already there)
 PATH+=:~/moos-ivp-extend/bin
 PATH+=:~/moos-ivp-2680/bin
 export PATH                       (this was likely already there)
You can confirm this by examining the contents of the $PATH bash environment variable:
$ echo $PATH
Confirmation can also be done with the GNU/Linux which function:
  $ which pHelmIvP
  /Users/you/moos-ivp/bin/pHelmIvP              (or /home/you/... in GNU/Linux)
  $ which uFldRescueMgr
  /Users/you/moos-ivp-2680/bin/uFldRescueMgr    (or /home/you/... in GNU/Linux)
There exists a convenience function in moos-ivp/scripts called path_shell.sh. This command will list your $PATH environment variable in a more human readable format. Normally the output is one long line with each directory separated by a colon:
  $ echo $PATH
  /usr/bin:/usr/local/bin:/bin:/Users/janedoe/bin:/Users/janedoe/project-pavlab/utils/bin:
  /Users/janedoe/moos-ivp-janedoe/bin:/Users/janedoe/moos-ivp-heron/bin:/Users/janedoe/mo
  os-ivp-extend/bin:/Users/janedoe/moos-ivp-2680/bin:/Users/janedoe/moos-ivp/bin:
  /Users/janedoe/pablo-common/bin
The path_shell.sh utility will separate each directory out to a single line:
  $ path_shell.sh
  1: /usr/bin
  2: /usr/local/bin
  3: /bin
  4: /Users/janedoe/bin
  5: /Users/janedoe/project-pavlab/utils/bin
  6: /Users/janedoe/moos-ivp-janedoe/bin
  7: /Users/janedoe/moos-ivp-heron/bin
  8: /Users/janedoe/moos-ivp-extend/bin
  9: /Users/janedoe/moos-ivp-2680/bin
  10: /Users/janedoe/moos-ivp/bin
  11: /Users/janedoe/pablo-common/bin
2.5 Preliminaries: The Helm Behavior Path [top]
Two behavior library folders need to be in your behavior path. They are:
- moos-ivp-extend/lib
- moos-ivp-2680/lib
The moos-ivp-extend tree will hold your Scout behavior when needed in the final part of this lab sequence. The 2680 library folder contains the staw-man version of the Scout behavior used for testing until replaced with your behavior. Important: When you are ready to use your Scout behavior, comment out the 2680 library from your behavior path.
If not done already, on your laptop and PABLO, augment your .bashrc file to augment the IVP_BEHAVIOR_DIRS to the following:
 IVP_BEHAVIOR_DIRS+=~/moos-ivp-2680/lib      (comment out when you have your own)
 IVP_BEHAVIOR_DIRS+=:~/moos-ivp-extend/lib
 export IVP_BEHAVIOR_DIRS
Confirm your path afterwards by examining the $IVP_BEHAVIOR_DIRS environment variable:
$ echo $IVP_BEHAVIOR_DIRS
Note: The helm will not complete its startup process if it detects a behavior of the same name in two locations in the IVP_BEHAVIOR_DIRS. That may happen in this lab since the BHV_Scout behavior exists in the moos-ivp-2680 tree, and then you will make your version in your moos-ivp-extend tree. Using the same name has its benefits since it allows us to have a common mission meta_vehicle.bhv file.
There exists a convenience function in moos-ivp/scripts called path_bhv.sh. This command will list your $IVP_BEHAVIOR_DIRS environment variable in a more human readable format. Normally the output is one long line with each directory separated by a colon:
  $ echo $IVP_BEHAVIOR_DIRS
  /home/janedoe/moos-ivp-foo/trunk/lib:/home/janedoe/moos-ivp-bar/lib:/home/jane\
  doe/moos-ivp-2680/lib:/home/janedoe/moos-ivp-foobar/trunk/lib
The path_bhv.sh utility will separate each directory out to a single line:
  $ path_bhv.sh
  1: /home/janedoe/moos-ivp-foo/trunk/lib
  2: /home/janedoe/moos-ivp-bar/lib
  3: /home/janedoe/moos-ivp-2680/lib
  4: /home/janedoe/moos-ivp-foobar/trunk/lib
3 Four Mission Variations - For Simulation or In-Water
There are four distinct mission variations, the first two of which you have seen already. We will move our attention to the 3rd and 4th variations in this lab, but the initial two simpler variations are still very useful for testing sub-components.
- Rescue: One vehicle is launched, and will simply rescue all swimmers, unimpeded. Section 3.1.
- Rescue-Rescue: Two vehicles are launched, and will attempt rescue all swimmers, first-come-first-rescue. Section 3.2.
- Rescue-Scout: A single two-vehicle team comprised of a rescue vehicle and a scout vehicle. The rescue vehicle will proceed to visit and rescue all known swimmers, unimpeded. Any swimmers discovered by the scout vehicle will be conveyed to the rescue vehicle and the rescue vehicle will visit these newly discovered swimmers as well. Section 3.3.
- Rescue-Scout-Rescue-Scout (RS2): Same as Rescue-Scout except two teams are fielded and swimmers are awarded first-come-first-serve. Section 3.4.
Each of these mission variations is described next, along with instructions for launching them within the baseline mission. We will continue to use the baseline mission from the previous lab, located in moos-ivp-2680/missions called lab_14_rescue_baseline. This mission folder is updated as part of the moos-ivp-2680 tree.
3.1 The Rescue Mission Variation [top]
The rescue mission variation is probably the first mission you ran from the earlier parts of this lab sequence. It is still supported in the baseline mission with the --r1 or -r1 command-line argument:
$ ./launch.sh -r1 --swim_file=mit_02.txt 10 (time warp 10)
It should look something like the below video:
Figure 3.1: The swimmer locations shown are from swimmer file mit_02.txt. The vehicle proceeds to each point, in a greedy path tour, and then returns home.
This mission variation is useful when fine-tuning your path planning algorithm (improvements over greedy-path) in your pGenRescue app.
3.2 The Rescue-Rescue Mission Variation [top]
The rescue-rescue mission variation is also from previous labs, comprised of a single rescue vehicle competing against another single rescue vehicle.
 $ ./launch.sh -r2 --swim_file=mit_02.txt 10     (time warp 10)
   or equivalently
 $ ./launch.sh -r2 -2 10
It should look something like the below video:
Figure 3.2: Two vehicles are given the same set of swimmers and locations. They each depart at the same time, each using a greedy path to traverse the set of swimmer locations and tally rescues. This mission was run at 10x realtime.
This mission variation is useful when fine-tuning the elements of your path planning algorithm that consider adversarial intent, in your pGenRescue app.
3.3 The Rescue-Scout Mission Variation [top]
The rescue-scout mission variation is new in this lab. It is comprised of a single rescue vehicle, and a single scout vehicle. The rescue vehicle performs as before, receiving a set of swimmer locations and IDs at the outset, and proceeding to visit and rescue each of them. In this mission variation, a number of unregistered swimmers is also randomly generated. The existence of the unregistered swimmers is not conveyed to any vehicle at the outset. A second scout vehicle is deployed, with the sole capability of detecting unregistered swimmers and sharing this information with it's rescue vehicle teammate. This mission variation is launched with the -rs1 flag.
$ ./launch.sh -rs1 --swim_file=mit_04.txt 10 (time warp 10)
It should look something like the below video:
Figure 3.3: The Rescue-Scout baseline mission is comprised of a single rescue vehicle, and a single scout vehicle. There is no competitor. The rescue vehicle rescues vehicles one by one, turning the marker from green to yellow. The scout vehicle wanders the region and reports the locations of previously unknown swimmers. This mission was run at 10x real-time.
This mission variation is useful when fine-tuning the coordination of your rescue vehicle (pGenRescue app), and your scout vehicle (BHV_Scout behavior).
Note: To run randomly generated missions with the same number of swimmers, number of un-registered swimmers and operating area, you can run:
$ ./launch.sh -rs1 --swimmers=11 --unreg=15 --pav90 10 (time warp 10)
This will generate and load mit_rand.txt.
What Does the Scout Vehicle Know? [top]
The scout vehicle has the following information at its disposal:
- The location of the playing field, i.e., region of possible swimmer locations.
- The location of its teammate and all other vehicles
- The location and IDs of all registered swimmers, i.e., the swimmers known to all at the outset.
The scout vehicle does NOT have the following information:
- The results of other scout vehicles
- The current planned path of its partner rescue vehicle, although this could be arranged by modifying your pGenRescue app to share if you think it would be useful.
Note: The rescue vehicle, if it happens to stumble upon an unregistered swimmer, previously unknown to the rescue vehicle, this swimmer will also be rescued. (Hint: so there is no reason for the scout vehicle to go where the rescue vehicle is already going.)
3.4 The Rescue-Scout-Rescue-Scout (RS2) Mission Variation [top]
The rescue-scout-rescue-scout, a.k.a. the RS2 mission variation is also new in this lab. It is comprised of four vehicles, two teams of two vehicles each. Each team is comprised of a single rescue vehicle, and a single scout vehicle. Each rescue vehicle performs as before, receiving a set of swimmer locations and IDs at the outset, and proceeding to visit and rescue each of them. In this mission variation, a number of unregistered swimmers is also randomly generated. The existence of the unregistered swimmers is not conveyed to any vehicle at the outset. On each team, a second scout vehicle is deployed, with the sole capability of detecting unregistered swimmers and sharing this information with it's rescue vehicle teammate. This mission variation is launched with the -rs2 flag.
$ ./launch.sh -rs2 --swim_file=mit_04.txt 10 (time warp 10)
It should look something like the below video:
Figure 3.4: The Rescue-Scout-Rescue-Scout (RS) baseline mission is comprised of two teams competing for swimmers. Each team consists of a single rescue vehicle and a single scout vehicle. The scout vehicle searches for swimmers unknown, informing its rescue teammate when it finds a new swimmer. The rescue vehicle rescues vehicles one by one, turning the marker from green to yellow. The scout vehicle wanders the region and reports the locations of previously unknown swimmers. This mission was run at 10x realtime.
This mission variation is useful when preparing for the final in-water competition, since this is pretty close to the real deal.
4 Launching the Mission for In-Water Experiments
There are a couple changes for launching robots on the water, discussed in this section:
- On the shoreside, not much is changed other than remembering to use the larger operation area.
- On the vehicle, the launch script needs to be told (a) the role of the vehicle (rescue or scout). If it is a scout vehicle, the name of the teammate must be specified on the command line.
This is discussed further below.
4.1 Launching the Shoreside Mission In the Field [top]
The shoreside mission is launched as before in previous labs, and will very likely be launched by a TA. The TA will have the following trees on their laptop:
- moos-ivp: General shoreside autonomy apps.
- moos-ivp-2680: To run the uFldRescueMgr app. This tree also contains the lab_14_recue_baseline mission.
A typical launch:
   $ cd moos-ivp-2680/missions/lab_14_rescue_baseline
   $ ./launch_shoreside.sh --swim_file=mit_04.txt
4.2 Launching the Vehicle Mission In the Field [top]
The vehicle mission is launched as before, logged onto your PABLO on your robot. A couple additions are needed when launching the scout vehicle. The scout vehicle needs to be declared as a scout, and it needs to declare its teammate. As before, you will need to know (a) the name of your robot, and (b) the IP address of the shoreside computer.
Launching the Rescue Vehicle:
 PABLO  $ cd moos-ivp-2680/missions/lab_14_rescue_baseline
 PABLO  $ ./launch_vehicle.sh --shore=192.168.1.224 (Or different IP/robot)
Launching the Scout Vehicle:
 PABLO  $ cd moos-ivp-2680/missions/lab_14_rescue_baseline
 PABLO  $ ./launch_vehicle.sh --shore=192.168.1.224 --vrole=scout --tmate=ben
The launch script will disallow the launch of a scout vehicle unless the teammate is specified as above.
4.3 Criteria for Winning and Actions Upon Winning [top]
In the head-to-head versions of this lab, where two teams are fielded, there are distinct criteria for winning. This is monitored by uFldRescueMgr. There are three events monitored by the rescue manager:
- Lead change: Any time the leader has changed, coinciding with the posting of UFRM_LEADER.
- Winner declared: This event happens once, when the first vehicle satisfies the win criteria. This coincides with the posting of UFRM_WINNER.
- Final rescue: The final swimmer has been rescued. Un-scouted un-registered swimmers do not count. This coincides with the posting of UFRM_FINISHED.
Once the finished state is set to true, and the winner state has been set to a particular rescue vehicle, these states cannot change, even if a scout vehicle later discovers previously unknown swimmers.
4.3.1 Criteria for Winning in the Rescue-Rescue Mission [top]
In the Rescue-Rescue mission variation described in Section 3.2, there are no scout vehicles. The only swimmers to be rescued are all registered and known to both rescue vehicles at the outset. In this case the winner can be determined before all swimmers are rescued, as soon as a majority of swimmers have been rescued by one rescue vehicle. The competition however may still continue until finished when all swimmers have been rescued.
Why continue playing after a winner has been established? In some test cases, or batch of automated tests, we may only care about the percentage of wins for a particular configured vehicle. In other cases we may be interested not only in the win, but the final score. By default, the competition in a Rescue-Rescue mission variation will continue until finished. If the uFldRescueMgr app is instead configured with finish_upon_win=true, then the competition will finish as soon as a winner has been identifed.
4.3.2 Criteria for Winning in the RS2 Mission [top]
In the RS2 mission, a winner cannot be declared until all known swimmers have been rescued, i.e., the finished state has been irrevocably entered. Note that the set of known swimmers are the registered swimmers known at the outset, and the unregistered swimmers scouted at some point by one of the scout vehicles. The finished state, where all known swimmers have been rescued, may be entered even if there are unregistered and unrescued swimmers that have not been discovered (scouted) by one of the scout vehicles.
4.3.3 Tie-breaker Algorithm [top]
It is possible that, when the competition has entered the finished state, two teams may have the same amount of rescued swimmers. In this case the tie is broken by examining the time at which each team rescued its most recent swimmer. The team that rescued its most recent swimmer first is declared the winner.
4.4 A Note on Return Points [top]
All of the below is FYI regarding how robot return points are set.
In the simulation version of this lab, the vehicle starting positions were chosen randomly in a manner that ensures they were unique and separated by a minimum distance. And the return waypoint behavior was configured to return to its starting position. The return waypoint is handled a bit differently in the in-water version of the lab.
In the in-water experiments, it is also helpful if the vehicles are not returning to the same point. And they don't have a "starting position" as they do in simulation. The unique points are assigned to each vehicle by their Heron name. For example, eve returns to position (4,-11). The vehicle ned returns to (12, -8). These are set in the meta_vehicle.bhv file in a conditional block that switches base on the detected vehicle name.
 #ifdef VNAME abe
 	point = 52,9
 #elseifdef VNAME ben
 	point = 39,4
 #elseifdef VNAME cal
 	point = 29,0
 #elseifdef VNAME deb
 	point = 16,-6
 #elseifdef VNAME eve
 	point = 4,-11
 #elseifdef VNAME fin
 	point = 2,-15
 #elseifdef VNAME max
 	point = 26,-2
 #elseifdef VNAME ned
 	point = 12,-8
 #elseifdef VNAME ned
 	point = 14,-10
 #else
         point = $(START_POS)
 #endif
All Herons will have one of these names. The launch_vehicle.sh script, when not running in simulation mode, will automatically detect which Heron you are in (based on the network configuration which is unique to each Heron).
5 Assignments
5.1 Assignment 1 (self check off) - Run the Scout Simulations [top]
To get started, the first thing we will do is to run the two new simulation variations. First a single rescue vehicle and scout, and then the four-vehicle variation. You need to have updated your moos-ivp-2680 tree, rebuilt, and augmented your IVP_BEHAVIOR_DIRS path as described in Section 2.5.
Running the Rescue-Scout mission variation was discussed in Section 3.3, and should look like the video in Figure 3.3. It can be launched with:
$ ./launch.sh -rs1 --swim_file=mit_04.txt 10 (time warp 10)
Running the RS2 mission variation was discussed in Section 3.4, and should look like the video in Figure 3.4. It can be launched with:
$ ./launch.sh -rs2 --swim_file=mit_04.txt 10 (time warp 10)
Experiment with these missions to get a feel for how they work. Take notice especially of the scout vehicle behavior.
5.2 Assignment 2 (check off) - Create Your Own Scout Behavior [top]
Once you have confirmed that you can run the scout missions from Assignment 1 on your laptop, using the BHV_Scout behavior, make a copy of this behavior into your moos-ivp-extend tree:
   $ cd moos-ivp-extend/src
   $ cp -rp ~/moos-ivp-2680/src/lib_bhv_scout ./
Then edit your moos-ivp-extend/src/CMakeLists.txt file to build your behavior, adding the line:
ADD_SUBDIRECTORY(lib_bhv_scout)
At this point, you have TWO scout behaviors. You will need to disable the first one, the one we provided in moos-ivp-2680. To do this comment out the appropriate line in your .bashrc file:
 #IVP_BEHAVIOR_DIRS+=:~/moos-ivp-2680/lib       (comment this out)
 IVP_BEHAVIOR_DIRS+=:~/moos-ivp-extend/lib     (keep this one now)
For good measure, you should also remove the library from the moos-ivp-2680 folder:
   $ cd ~/moos-ivp-2680/lib
   $ rm libBHV_Scout.dylib
Then confirm that you can still run the scout simulation missions from Assignment 1. You are now free to edit/improve this scout behavior for later missions. Further updates/suggestions for improvements will be posted during the week.
5.3 Assignment 3 (check off) - Run the Rescue-Scout Mission on the Robots [top]
Your first in-water test should be with you and your lab partner running two vehicles. One rescue vehicle and one scout vehicle. You should use a TA for running the shoreside, but in a pinch, one of you can act as the shoreside for this assignment. The instructions for launching the shoreside in the field are described in Section 4.1 and Section 4.2.
In this assignment, you should be running your version of the Scout behavior on your scout robot. It does not matter whether or if you have made any improvements to the algorithm of this behavior over the baseline version. The important thing is that your (version of) the behavior is in place and running.
You should continue to use the small (default) operation area for this exercise.
5.4 Assignment 4 (check off) - Run the RS2 Mission on the Robots [top]
This is your final step of 2.680!
You and your lab partner will need to find a team to compete with. And a TA must be acting as the shoreside for this assignment.
The instructions for launching the robot in the field are described in and Section 4.2.
In this assignment, you should be running your version of the Scout behavior on your scout robot, with any improvements you may have made to gain efficiencies in its scouting algorithm.
Good luck! Glory to the victors!
6 Instructions for Handing In Assignments
6.1 Requested File Structure [top]
The assignment for this lab is to (a) demonstrate a working mission on the Heron in a two-vehicle competition. (b) save your alog files.
   moos-ivp-extend/
      src/
         pGenRescue
         lib_bhv_scout
      missions/
         may0423/
           (your alog files)
6.2 Due Date [top]
This lab should be completed by the end of day Tuesday, May 13th, 2025, the last day of class.
Document Maintained by: mikerb@mit.edu
Page built from LaTeX source using texwiki, developed at MIT. Errata to issues@moos-ivp.org. Get PDF