Lab 11 - Introduction to the PABLO Payload Autonomy Computer
Maintained by: mikerb@mit.edu  Get PDF
1 Overview and Objectives
1.1 Overview of Payload Autonomy
1.2 PABLO Hardware Overview
1.3 PABLO Software Overview
1.4 Working with the PABLOS and the Heron Robots
2 Connecting to the PABLO through a Mac Computer
2.1 Enabling Internet Sharing on the Mac
2.2 Detecting the PABLO IP Address in MacOS
3 Connecting to the PABLO through a Linux Computer
3.1 Enabling Internet Sharing in Ubuntu 20.04
3.2 Detecting the PABLO IP Address in Linux
4 Verifying PABLO Connection and Login
4.1 Using ping Command Line Utility
4.2 Assignment 1 (Self Check off) SSH onto the PABLO
5 Accessing your Course Code on the PABLO
5.1 Assignment 2 (Check off) Loading, Building Your Tree on the PABLO
5.2 Assignment 3 (Check off) Decide on a Lab Partner
5.3 Assignment 4 (Self Check off) Access your Lab Partner's Code
5.4 How to Best Shut Down the Pablo Box
5.5 Assignment 5 (Bonus to Yourself) Streamline Your Workflow
5.5.1 Install SSH Keys
5.5.2 Add Heron Aliases to your Laptop Bash Environment
6 Troubleshooting Notes
6.1 Mechanical Troubleshooting
6.2 On the MAC - No entry in the dhcpd_leases file
6.3 On the MAC - Multiple entries in the dhcpd_leases file
6.4 Connecting to the PABLO - Fall-back Methods
6.5 Check the PABLO Power Source
1 Overview and Objectives
This lab has the following objectives:

- Introduce the Payload Autonomy Paradigm.
- Introduce the PABLO as a hardware platform for payload autonomy.
- Access the PABLO from your laptop.
- Access the PABLO from your laptop using SSH keys.
- Download your course code (moos-ivp-extend) tree onto your PABLO.
- Identify your lab partner for upcoming in-water labs
- Coordinate shared access to you course code on the the PABLO.
By the end of this lab, you will be able to power up a PABLO computer, connected to a course laptop, log in, download and compile your course codebase. In the next lab, you will use your PABLO to run a simple mission with the Heron on the Charles River.
Terms used throughout:
- "MacOS", "OSX", "Mac OS X": all refer to the Apple operating system and generally Apple computers.
- DHCP: or Dynamic Host Configuration Protocol is a network management protocol used for automatically assigning IP addresses to devices connected to the network using a client–server architecture (Wikipedia).
1.1 Overview of Payload Autonomy [top]
Consider how a robotic vessel like the Heron M300 works. Translation and rotation are effected via differential electric thrusters, which are actuated by motor controllers. Pose (e.g., heading) and position (e.g., lat/lon or x, y) are discovered by a GPS and digital compass. An on-board computer reads the sensors and commands the motors.
The sense-plan-act loop of a robot autonomy system, could be completed entirely within the main (front seat) computer that ships with the Heron. This arrangement, however has drawbacks. Preparing an autonomy mission with 3rd party software, like MOOS-IvP, requires access to the vehicle to load software and files, install dependencies, and build the 3rd party applications and behaviors. This effort is then duplicated on each Heron main vehicle computer. What if your dependencies are incompatible with packages installed by others? Even worse, what if the 3rd party software install breaks other aspects of the main vehicle computer environment?
Many commercially-available robotic vehicles, the M300 included, support a "front-seat, back-seat" paradigm. The front seat handles the sense and act portion of the loop, with a connected computer handling the planning and decision-making. On the Herons the only "sensing" involves the determination of vehicle position, i.e., the navigation solution. A wire protocol defines how the front seat and back-seat computers communicate to send sensor data from the front and to push thrust commands from the back-seat.
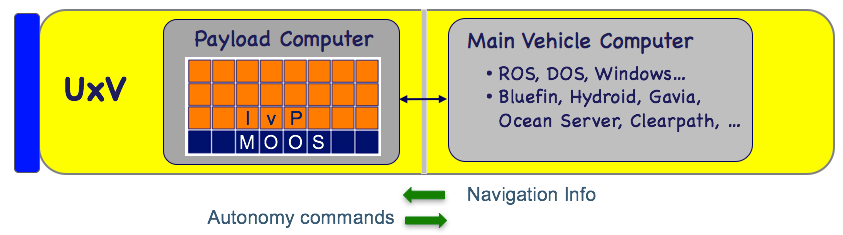
Figure 1.1: The Payload Autonomy Concept.
The iM300 application in the moos-ivp-pavlab repository handles communicating between your mission and the M300's front seat. DESIRED_THRUST and DESIRED_RUDDER output from pMarinePID are converted into percent thrust to the left and right motors and sent to the front seat via the wire protocol. Pose and position messages from the front are parsed and published as the NAV_* variables. The vehicle plus the iM300 app, are in effect a one-for-one replacement for uSimMarine.
Figure 1.2 offers a more detailed look of the payload/front-seat flow of information and the role if the iM300 application.
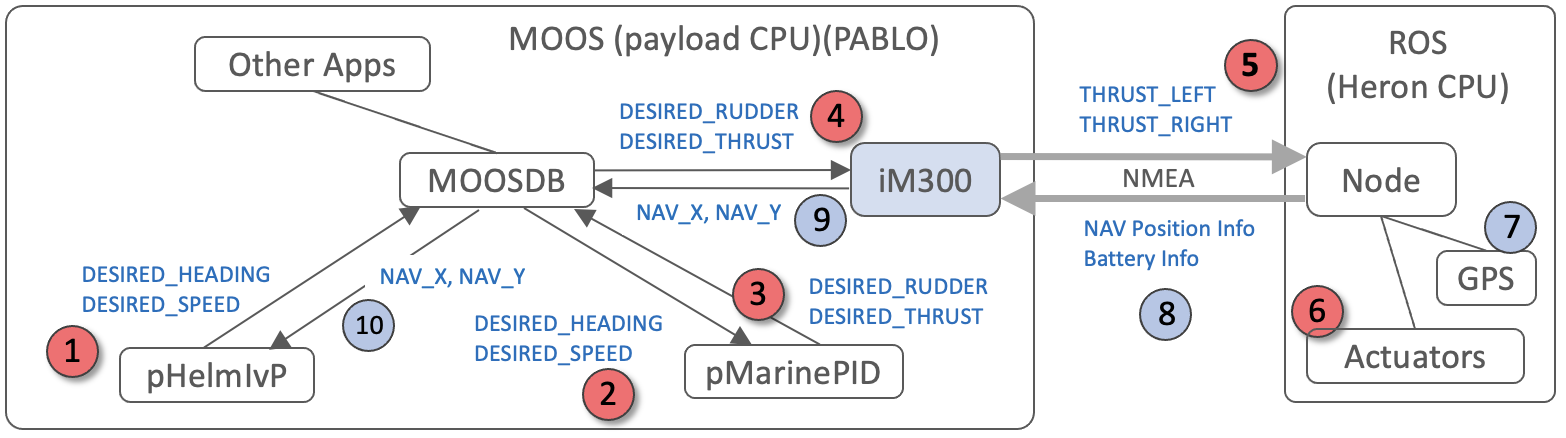
Figure 1.2: The flow of information: starting with output from the Helm, to the front-seat computer through the iM300 application. The NMEA interface is over an Ethernet cable. This cable is a special Ethernet cable with wet-connectors on each end when used on the Herons.
1.2 PABLO Hardware Overview [top]
The goal in this section is connect to the PABLO from your laptop. You will run an Ethernet cable from your laptop to the PABLO. And you will power the PABLO with a USB power cord. A few pieces of additional equipment are provided by the staff:
- Ethernet cable
- Ethernet to USB adaptor (USB-A and USB-C adaptors available)
- USB A to B power cable
- 5V power supply via adaptor or power strip or USB hub
There are three modes of connecting:
- Laptop connected to the PABLO with PABLO connected to the external Internet, via Internet sharing enabled on your laptop.
- Laptop connected to the PABLO with no external Internet connection on the PABLO.
- Directly connected to the PABLO a keyboard and monitor.
Our goal is the first method. The others are temporary fall-backs. You will need to have your PABLO connected to the external Internet to pull down your moos-ivp-extend code.
Connection steps are provided below. With MacOS there is probably less variation in the setup steps between OS versions and laptop versions. If you are working with Linux, the setup steps may have more variation. We provide the setup steps for Ubuntu 20.04, which is based on Debian. Our hope is that this matches most people, and for those using some other Linux distro, these setup steps will be similar.
1.3 PABLO Software Overview [top]
On your PABLO computer, the Heron payload computer, there will be five software trees:
- moos-ivp
- moos-ivp-extend (student tree)
- moos-ivp-2680
- moos-ivp-pavlab
- pablo-common
The first two trees should be familiar as you have had them already on your laptop all semester. When you receive your PABLO, it will not have the moos-ivp-extend tree since it is different for every person. A goal of this lab is to log onto your PABLO through your laptop with Internet sharing, so you can pull your moos-ivp-extend tree from git.
The moos-ivp-pavlab tree contains code that is (a) under development in our lab, and (b) code that is specific to hardware or vehicles in our lab. This tree comes with your PABLO, compiled, and moos-ivp-pablo/bin is already in the shell path of the PABLO user (student2680). The critical app in our case is iM300, which implements the payload interface to the Clearpath front-seat computer. This app is discussed further in the next lab, but it essentially ingests the vehicle navigation solution and hardware status from the front-seat and publishes it in the PABLO MOOS community. And it ingests the THRUST_LEFT and THRUST_RIGHT from the back-seat PABLO computer.

Figure 1.3: The Heron Payload Autonomy Interface: The PABLO computer box is connected by an Ethernet cable to the Heron main computer. The MOOS community running on the PABLO includes the iM300 MOOS app. This app opens a socket over the Ethernet connection to the Heron computer. It publishes the level of left/right thrust to be applied by the actuator software running on the main computer. It consumes navigation and robot status information from the Heron and publishes this information locally in the MOOSDB on the PABLO, for consumption by the helm and other apps.
The fourth tree on your PABLO, pablo-common, is designed to contain as much as the PABLO and student2680 configuration content as possible. For example, imagine creating the student2680 user account, with a nice .bashrc file, and then replicating the SD card to 50 PABLOs, all boxed up and delivered to users. Then imagine that something was wrong or missing in the .bashrc file. At this point our options would be to either (a) log into all 50 boxes and edit the file, or (b) fix it on one box and clone 50 new SD cards and swap out all cards. Neither option is sane.
Instead, we put the bulk of the .bashrc file in another file in pablo-common. The actual .bashrc file on the PABLO is quite thin and simply reads further bash configuration content from another file in pablo-common. In this way, a change to the bash environment for all PABLOs can be made in the pablo-common tree, and pushed into version control. The PABLO user can simple pull the change. In our case, the PABLO is configured to automatically pull pablo-common changes when it boots and finds the Internet.
1.4 Working with the PABLOS and the Heron Robots [top]
When we begin working with the Heron robots on the water, your PABLO will be running the vehicle. The Ethernet is connected between the PABLO and the Heron front-seat computer. And the PABLO is powered through the USB port from a small battery in a similarly water-tight box, as shown on the right in Figure 1.4. The gap between the PABLO and the Heron is open to the elements and that's why all the connectors on the PABLO are Bulgin IP67 rated water-tight connectors.

Figure 1.4: The PABLO with the Heron USV: (left) In 2015, an earlier version of the PABLO was used in the Heron. (right) The current version of the PABLO has a slightly different connector layout and the payload compartment is structured to fit the PABLO box in a pre-defined location. The PABLO battery is also now in its own battery box with wet connectors.
The two USB A ports on the PABLO will need to be capped when you work with the vehicle on the water.
With the PABLO, the idea is that you (a) prepare your code in simulation on your laptop, and push it to version control, (b) connect your PABLO to the laptop and pull your code onto the PABLO and compile. And finally, when you're ready to test on the water, (c) find a Heron, connect your PABLO and launch your mission. So far we have been solely working in mode (a), in simulation on your laptop. Connecting your PABLO and pulling and preparing your code is a key step, and is the focus of today's lab.
When you do eventually connect your PABLO to the Heron, it will still be possible to log onto your PABLO and pull code updates and re-compile. However, robot time is a precious commodity, especially dock-side on a day when testing is supported by colleagues. You will want to have as much prepared on your PABLO as possible before you arrive at the dock.
2 Connecting to the PABLO through a Mac Computer
For the below instructions, things are slightly different in terms of the layout in System Settings menus between MacOS Ventura or MacOS Sonoma (newest) releases. Where possible we try to show both views, but they really are pretty similar enough that you should be able to find your way around, or with TA help. You can always find out which release you have by selecing the Apple pull-down menu that persists in the upper left-hand corner of your window, and select About This Mac.
For MacOS users, your Mac will effectively act as a router, providing the PABLO with an IP address, connectivity to the computer, and a route to reach the Internet. MacOS has a feature called Internet Sharing. This option allows the Mac to get a connection to the Internet on one interface (e.g., wireless) then allow another device to connect to the Mac over a different interface (e.g., Ethernet). Effectively, the PABLO will have access to the Internet and to the Mac by plugging into the Mac's Ethernet port.
When Internet Sharing is turned on, the Mac creates a new subnet and by default assigns itself the shared connection the IP address 192.168.2.1. The connected PABLO device will be assigned 192.168.2.2. However, like any router you are not always guaranteed to receive the .2 suffix on the IP address. We describe below how to detect the IP address that was actually assigned to your PABLO.
2.1 Enabling Internet Sharing on the Mac [top]
Below are the steps for enabling Internet Sharing on a Mac:
Step 1: Open Systems Settings: Click the apple menu (top-left of the menu bar), and select System Setttings.
Step 2: Open the Sharing sub-page: Click on System Setttings then General, then Sharing. It should like Figure 2.1 below.

Figure 2.1: On MacOS Ventura release, System Settings will look like this.
Step 3: Configure Sharing: Disable Internet Sharing if it is currently enabled. See the toggle button at the end of the arrow in Figure 2.1. When it is disabled, you can make selections on its configuration by clicking on the (i) button next to the toggle button as shown in the same figure. For the Share your connection from: option, select Wi-Fi. For the To computers using: option, check the box or boxes related to Ethernet. These may have names like USB10/100/1000LAN as shown in Figure 2.2.
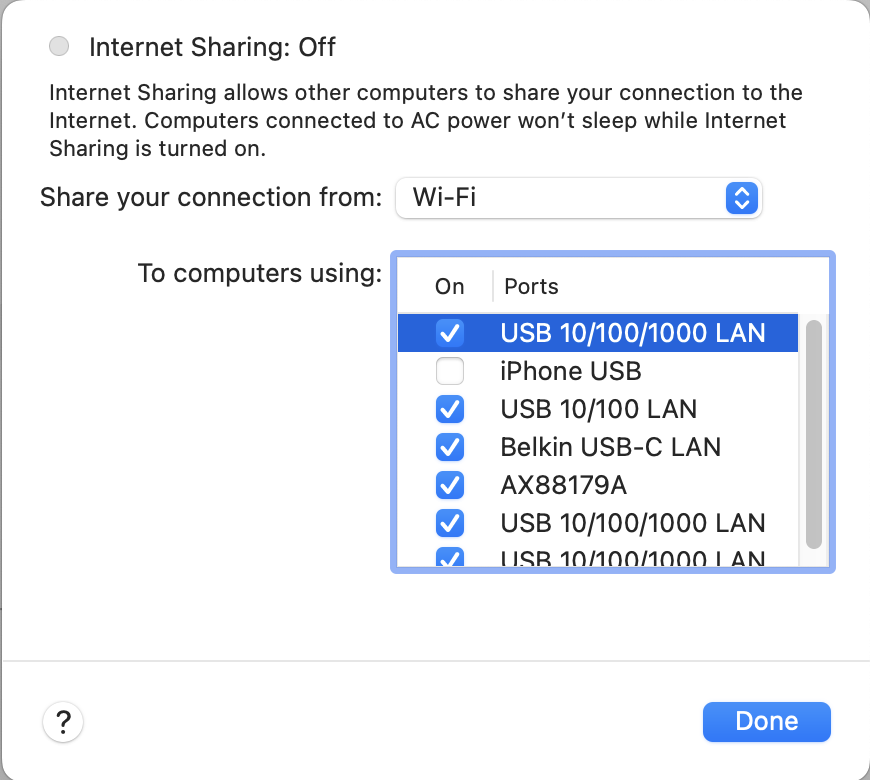
Figure 2.2: The settings for Internet Sharing may be selected as shown on the right. The Mac will connect to the Internet through Wi-Fi, and share with computers connected to one of the Ethernet connector options.
Step 4: Enable Sharing: Once you have the settings the way you like, go ahead and check the box next to Internet Sharing, as shown at the end of the arros in Figure 2.1.
You are now ready to connect your PABLO. (1) Connect the Ethernet cable between the PABLO and your Mac. (2) Then power on the PABLO by plugging the USB cable into a power source and then into your PABLO.
Step 5: Disable Sharing: When you're done working with the PABLO, de-select the Internet Sharing option.
2.2 Detecting the PABLO IP Address in MacOS [top]
With Internet Sharing on the Mac turned on, when you connect the PABLO to the MAC it will be assigned an IP address. The assigned IP addresses are stored in a system file. To determine which IP address was assigned to your PABLO, you can just display the contents using the more, or cat command:
 $ cat /var/db/dhcpd_leases
 {
     name=PABLO
     ip_address=192.168.2.2              <- This is your PABLO's IP address
     hw_address=1,dc:a6:32:4b:88:c0
     identifier=1,dc:a6:32:4b:88:c0
     lease=0x62535727
 }
A couple things to note about this file.
- It persists even after you disconnect your PABLO. If you reconnect the same PABLO, or power off/on the PABLO while retaining the Ethernet connections, your Mac can tell it's the same PABLO since it also detects the unique hardware address in the hw_address field above.
- If you connect a new PABLO, your Mac will assign the next available IP address, likely 192.168.2.3 in this case. This file will now contain two blocks like the example above. The newest block is usually at the top.
- You can safely remove this file at any time.
 $ cd /var/db
 $ sudo rm dhcpd_leases
The next time you re-connect a PABLO to your Mac, the file will be written to again with the latest assigned DHCP lease, starting again with 192.168.2.2
You are now ready to proceed to Section 4.
3 Connecting to the PABLO through a Linux Computer
These instructions are from the perspective of Ubuntu 20.04. The steps may vary for other Linux distros.
3.1 Enabling Internet Sharing in Ubuntu 20.04 [top]
Below are the steps for enabling Internet Sharing in Ubuntu 20.04.
Step 1: Open System Settings Main Menu: Select the menu item on the left labeled Network as shown in Figure 3.1 below. NOTE: On some computers, if the Ethernet cable is not yet physically connected, the Wired section may simply just not shown.
After you connect your Ethernet cable from your Linux machine to the powered-on PABLO, the Wired menu will be enabled and will look similar to Figure 3.1 on the right.

Figure 3.1: The Ubuntu Settings Network Menu Option: The Wired option in the Network menu will indicate an unplugged cable (left). Note: The Wired section may also be just not shown on newer versions of Ubuntu. Either way, plug in the cable. When the Ethernet cable is inserted and connected to another device, the Wired menu item changes automatically to be enabled (right).
Step 2: Click on the Gear Icon in the Wired Menu Item: By clicking on the gear icon, shown on the left in Figure 3.2, the dialog window for configuring the Wired connection will open, shown on the right in Figure 3.2.
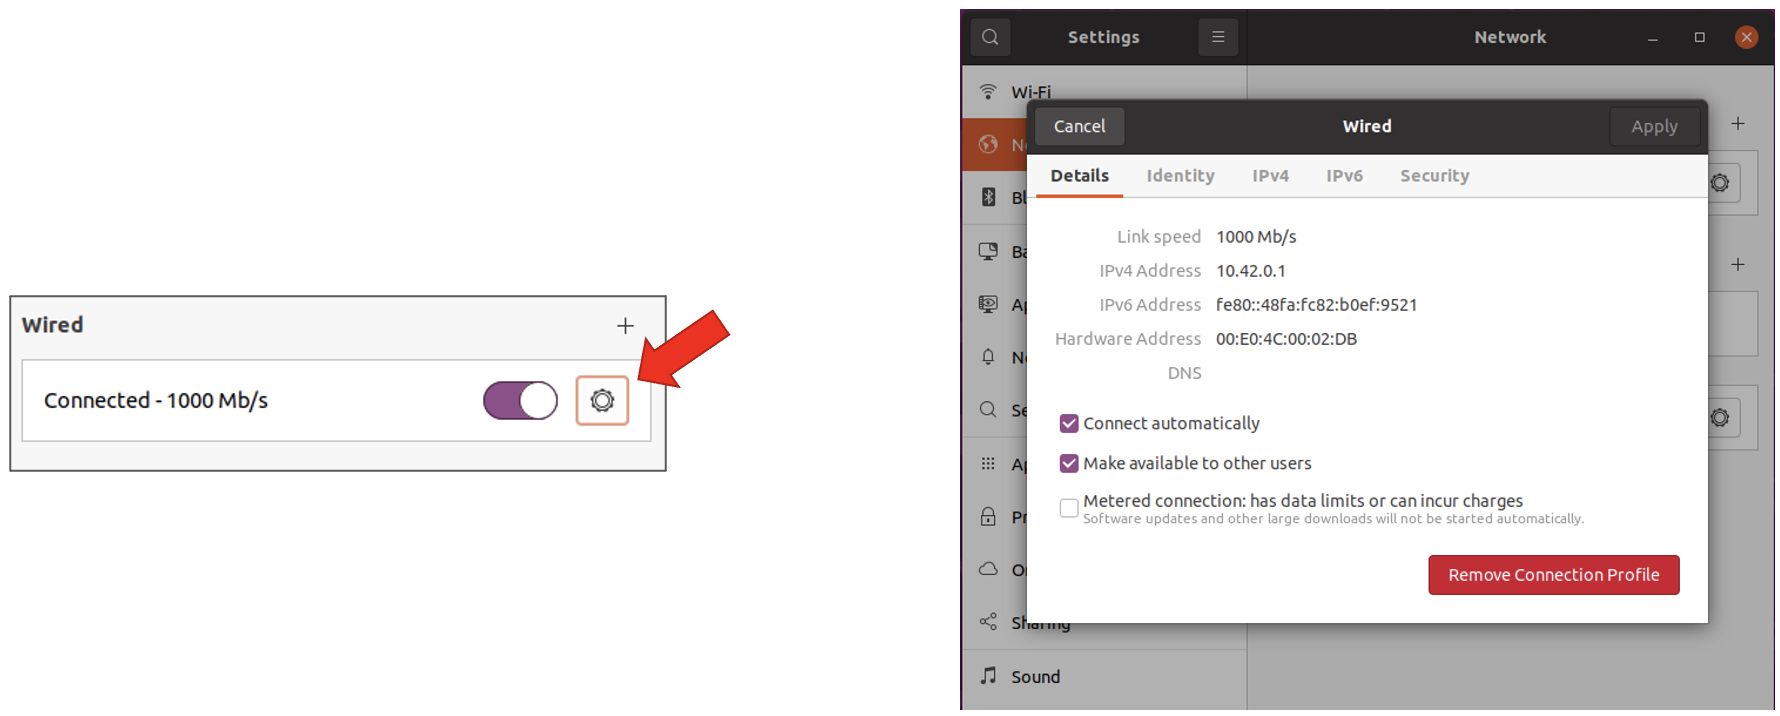
Figure 3.2: Editing the Settings for the Wired Connection: Click on the gear icon in the Wired Menu item (left). A dialog window will open to configure the Wired parameters (right).
Step 3: Choose IPv4 Settings: Select the IPv4 tab and use the settings Shared to other computers
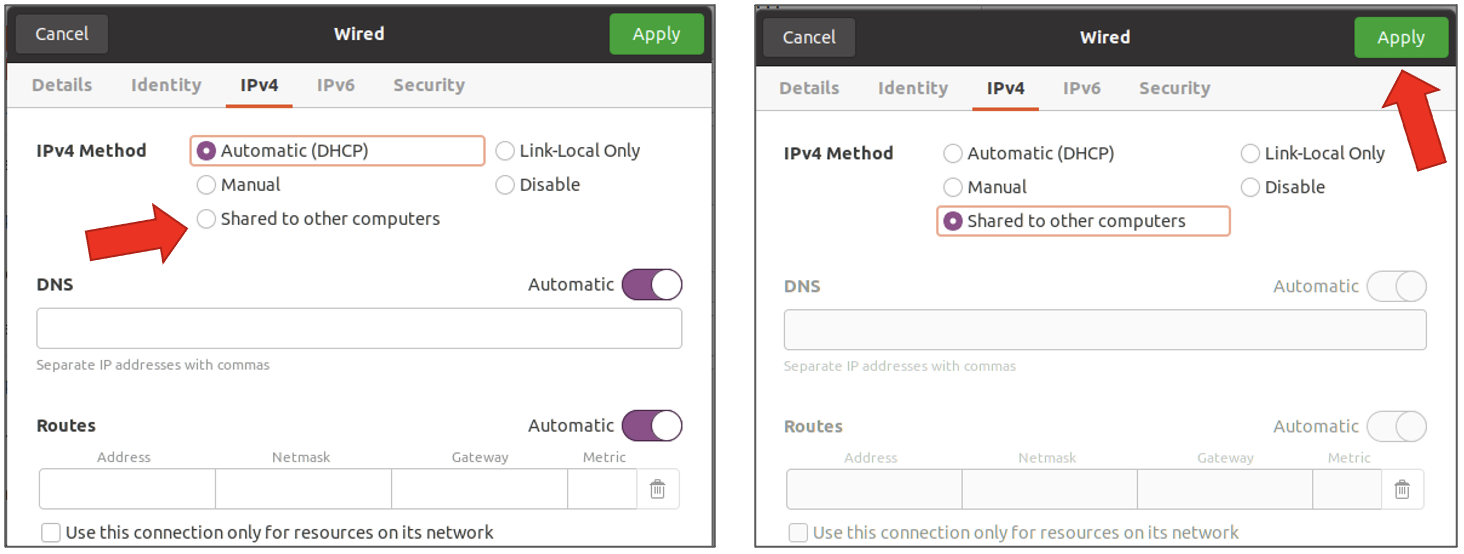
Figure 3.3: IpV4 Settings: Initially the Sharing option is disabled (left). After selecting it and hitting the Apply button, it will be enabled.
Step 4: Connect the Ethernet Cable: If you haven't done so already, connect the PABLO and laptop together over Ethernet, and power on the PABLO. When they are not connected the Wired dialog box, with the Details tab, looks like the left in Figure 3.4. When it is connected, it should look like the right in Figure 3.4. Notice on the right, the Ethernet IP address of the Linux machine is shown. In this case 10.42.0.1.
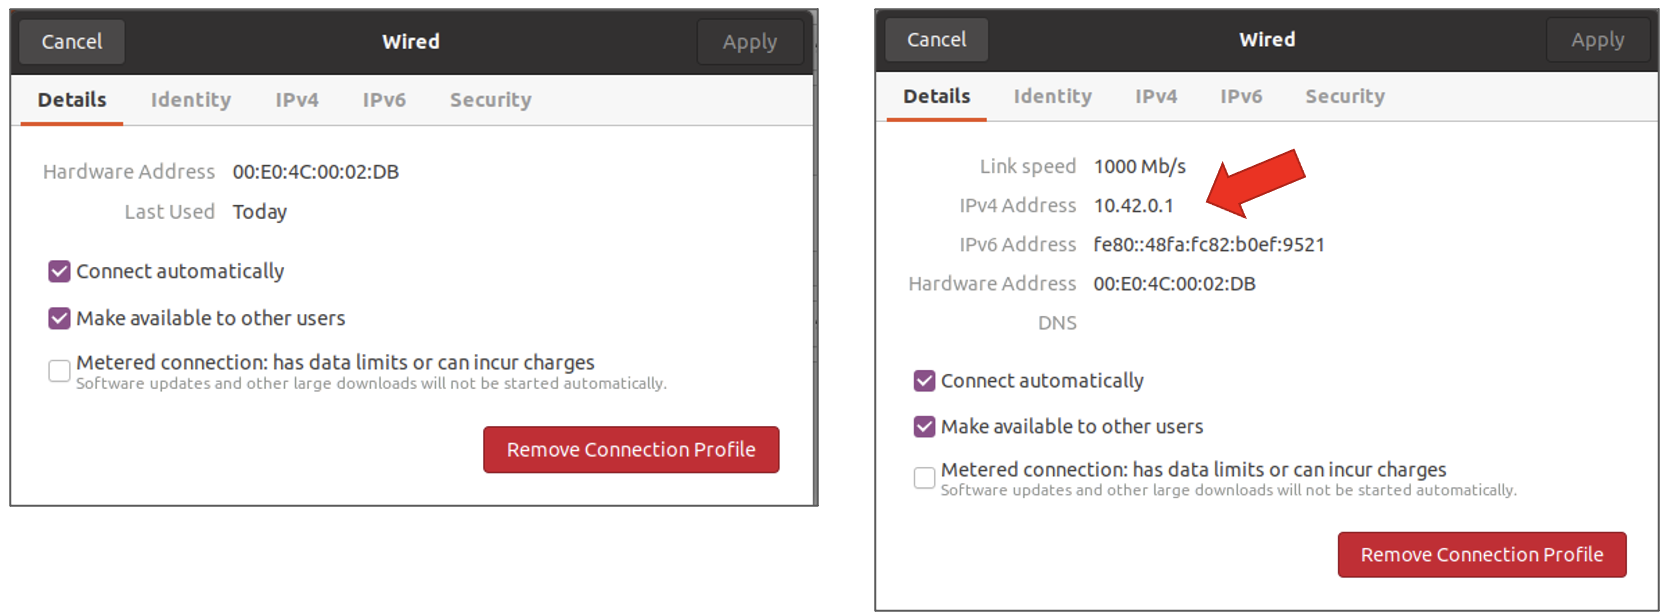
Figure 3.4: IPv4 Address: When the Ethernet is not connected, the Details dialog box looks like the left. Once the Ethernet is connected to a powered-on PABLO, it looks like that shown on the right, displaying the Ethernet IP address.
The next step, discussed next, is to determine the IP address of the PABLO, so we can connect to it and log in.
3.2 Detecting the PABLO IP Address in Linux [top]
There are a couple options (and probably more that I'm not aware of), for determining the IP address that was assigned to the PABLO. We describe both. The first is perhaps a bit simpler but may not work on systems other than the Ubuntu 20.04 that I have tested on. But it's so simple, so why not.
Method 1: Determine the PABLO IP: On the command line, try the below:
 $ cat /var/log/syslog | grep DHCPACK
 Apr 11 16:28:40 pa dnsmasq-dhcp[16042]: DHCPACK(en..db) 10.42.0.236 dc:a6:32:4b:88:00 PABLO
 Apr 11 16:58:45 pa dnsmasq-dhcp[16042]: DHCPACK(en..db) 10.42.0.236 dc:a6:32:4b:88:00 PABLO
 Apr 11 17:05:35 pa dnsmasq-dhcp[16332]: DHCPACK(en..db) 10.42.0.236 dc:a6:32:4b:88:00 PABLO
You should be able to pick out the IP address 10.42.0.236 from the above, or you can use more command line magic:
 $ cat /var/log/syslog | grep DHCPACK | tail -1 | cut -d ' ' -f7
 10.42.0.236
Hint: If the above step works for you, consider adding an alias in your .bashrc to make it easy in the future.
As mentioned, the above may or may not work on your Linux distro. With Ubuntu 20.04, it does seem that new DCHP leases are logged in the system file /var/log/syslog in this manner. If this doesn't work, try the next method below.
Method 2: Determine the PABLO IP: In this method, we use the nmap utility. If this is not installed on your Linux machine, install it now:
$ sudo apt install nmap
On the command line run nmap as follows:
 $ nmap -sP 10.42.0.1/24
 Starting Nmap 7.80 ( https://nmap.org ) at 2024-04-03 21:50 EDT
 Nmap scan report for rehoboth (10.42.0.1)     <--- YOUR Linux Machine
 Host is up (0.00020s latency).
 Nmap scan report for 10.42.0.236              <--- The PABLO
 Host is up (0.00061s latency).
 Nmap done: 256 IP addresses (2 hosts up) scanned in 3.03 seconds
The nmap command will respond with a list of hosts that are up. One will be the laptop you are using while the other should be the PABLO's IP. In the following instructions do not use 10.42.0.236 for the PABLO's IP but the one that nmap just found!
4 Verifying PABLO Connection and Login
Now that your PABLO is connected to your laptop, the next step is to verify that you can log in. You should at this point gbe armed with your PABLO's IP address, e.g., something like 192.168.2.2 on the the Mac, or something like 10.42.0.236 on Linux.
4.1 Using ping Command Line Utility [top]
The ping command is a command-line (OS X and GNU/Linux) tool for testing whether another computer can be reached across an IP network. After connecting the PABLO, it is useful to use ping to verify that PABLO can be reached from your laptop. In a terminal window on your laptop:
  $ ping 192.168.2.2
  PING 192.168.1.2 (192.168.1.2): 56 data bytes
  64 bytes from 192.168.1.2: icmp_seq=0 ttl=64 time=9.203 ms
  64 bytes from 192.168.1.2: icmp_seq=1 ttl=64 time=12.605 ms
  64 bytes from 192.168.1.2: icmp_seq=2 ttl=64 time=7.238 ms
  ^C
  --- 192.168.1.2 ping statistics ---
  3 packets transmitted, 3 packets received, 0.0% packet loss
  round-trip min/avg/max/stddev = 7.238/9.682/12.605/2.715 ms
The ping command can be stopped by pressing control-C. In the example above, ping reached the PABLO and reported the round-trip communications time. When the connection fails, output similar to the following is displayed:
  $ ping 192.168.2.2
  PING 192.168.2.2 (192.168.2.2): 56 data bytes
  Request timeout for icmp_seq 0
  Request timeout for icmp_seq 1
  Request timeout for icmp_seq 2
  ^C
  --- 192.168.2.2 ping statistics ---
 4 packets transmitted, 0 packets received, 100.0% packet loss
4.2 Assignment 1 (Self Check off) SSH onto the PABLO [top]
The ssh tool is a command-line (OS X and GNU/Linux) tool for opening up a terminal on a remote device using a secure shell connection. In other words, ssh connects the keyboard and terminal window directly to another computer that is reachable across the network (i.e, ping displays an affirmative response). Inputs to ssh include the IP address of the remote system and the user name. In a terminal window on your laptop, enter the following to connect via ssh:
$ ssh -l student2680 192.168.2.2
The username is student2680 and the password will be provided by the lab instructor. Once connected, the terminal will behave as if the keyboard and screen (at least the terminal window on the screen) were connected directly to the remote system.
Final part of this step: Once you are logged into the PABLO, verify that you have a connection to the external Internet through your laptop. We can do this by pinging the course server
 PABLO $ ping oceanai.mit.edu
 PING marine-robotics.mit.edu (18.18.38.22): 56 data bytes
 64 bytes from 18.18.38.22: icmp_seq=0 ttl=55 time=18.218 ms
 64 bytes from 18.18.38.22: icmp_seq=1 ttl=55 time=21.325 ms
 64 bytes from 18.18.38.22: icmp_seq=2 ttl=55 time=21.999 ms
If you do not see a successful ping as above, double-check that you have Wi-Fi enabled on your (laptop) machine. If you do see a successful ping as above, you are ready for the next step.
Note: Hereafter we use the following shell prompt to indicate you are working on your laptop:
$
And the following shell prompt to indicate you are working on your PABLO:
PABLO $
5 Accessing your Course Code on the PABLO
In this section the goal is to get your moos-ivp-extend code onto the PABLO. If git is not installed on your PABLO, you can install it with:
PABLO $ sudo apt-get install git
5.1 Assignment 2 (Check off) Loading, Building Your Tree on the PABLO [top]
In this step the goal is to (a) load your personal repository onto PABLO unit, (b) build the tree, (c) add your bin/ directory to the shell path, (d) update your IVP_BEHAVIOR_DIRS environment variable, and finally (f) demonstrate that your binaries are runnable from the command line.
Step 1: Log back on to the PABLO If you're not still logged in, log back in:
  $ ssh -l student2680 192.168.2.2
  student2680@192.168.2.2's password:
  Last login: Sat Mar 23 17:47:24 2023 from 192.168.2.1
  PABLO $
Step 2: Check out your tree: By default, logging into the PABLO puts you in the student2680 home directory. Check out your svn or git repository into that home directory.
PABLO $ git clone git@gitlab.com:janesmith/moos-ivp-janesmith.git
Don't forget that on the PABLO you are the user student2680. On your laptops you may have the same user name as your git or svn account, and you may need to keep this in mind when pulling down your code. You may need to add the user student2680 to your version control access list.
Step 3: Build your tree: The moos-ivp and other trees should already be loaded on the machine. To build your tree:
  PABLO $ cd moos-ivp-janesmith
  PABLO $ ./build.sh
Step 4: Augment your Shell Path Configure the system path to know where your MOOS applications are located. Using the editor of your choice, on the PABLO unit edit the file /home/student2680/.bashrc. At the end of the file, add:
export PATH=$PATH:/home/student2680/moos-ivp-janesmith/bin
Source the .bashrc file (or log out and back in) to apply changes to the PATH.
5.2 Assignment 3 (Check off) Decide on a Lab Partner [top]
For the remainder of the labs, you will be working with a lab partner. Decide who this is, and let the TAs know.
5.3 Assignment 4 (Self Check off) Access your Lab Partner's Code [top]
As you prepare for the in-water labs, you will want to test in simulation. You will need to work collaboratively on a shared set of code. Work out with your lab partner how you want to do this. It's OK to just share one person's code base. Even better if you each have access to each other's codebase and you have both codebase on each of your PABLOs.
5.4 How to Best Shut Down the Pablo Box [top]
When you are done, or anytime you need to shut down the Pablo Box, run the following command before disconnecting power:
PABLO $ sudo halt
This ensures the computer will nicely shut down before power is removed.
5.5 Assignment 5 (Bonus to Yourself) Streamline Your Workflow [top]
Normally when you log onto a PABLO installed on a Heron robot, it is a two step process:
$ ssh -l student2680 192.168.14.100 (For vehicle abe)
You have to (a) remember the IP address for vehicle abe, and (b) enter the password for the user student2680. That's a lot of typing. It can be done, but it can be simplified to:
$ ssha
With the steps below, you can just type these four characters, with no need to enter a password. Nothing to remember, except ssha is for "abe" and sshb is for "ben" and so on.
5.5.1 Install SSH Keys [top]
When labs move to the water, you will want to ssh onto your PABLO many times. Typing in the password will be a nuisance. Create an ssh key pair and install the public half in the ~/.ssh/ directory on your PABLO.
https://oceanai.mit.edu/ivpman/help/sshkeys
5.5.2 Add Heron Aliases to your Laptop Bash Environment [top]
When operating on at the Pavilion, with your PABLO installed into one of the Herons, the PABLO will be on the local WiFi network with an IP address determined by which Heron it is on. The names of the MIT Herons are:
- abe
- ben
- cal
- deb
- eve
- fin
- max
- ned
- oak
If you add the following aliases on your local laptop, it will be much easier to log into your PABLO. Typing ssha for example takes you right to the PABLO on the vehicle abe. AND, if you have your ssh keys installed, then logging in to your PABLO is only 4 key-strokes away! It may seem minor, but when operating robots in the field, experienced users take every opportunity to simplify routine steps.
 alias  ssha='ssh -l student2680 192.168.14.100'
 alias  sshb='ssh -l student2680 192.168.15.100'
 alias  sshc='ssh -l student2680 192.168.16.100'
 alias  sshd='ssh -l student2680 192.168.17.100'
 alias  sshe='ssh -l student2680 192.168.18.100'
 alias  sshf='ssh -l student2680 192.168.19.100'
 alias  sshm='ssh -l student2680 192.168.20.100'
 alias  sshn='ssh -l student2680 192.168.21.100'
 alias  ssho='ssh -l student2680 192.168.22.100'

 alias pinga='ping 192.168.14.100'
 alias pingb='ping 192.168.15.100'
 alias pingc='ping 192.168.16.100'
 alias pingd='ping 192.168.17.100'
 alias pinge='ping 192.168.18.100'
 alias pingf='ping 192.168.19.100'
 alias pingm='ping 192.168.20.100'
 alias pingn='ping 192.168.21.100'
 alias pingo='ping 192.168.22.100'
6 Troubleshooting Notes
6.1 Mechanical Troubleshooting [top]
If things aren't connecting, consider the set of things that must work, and methodically swap out with spare components. Besides the PABLO itself:
- Swap out the Ethernet cable
- Swap out the Ethernet to USB adaptor (if you're using one)
- Swap out the PABLO power cable. You should be able to look inside the PABLO and see the red and green lights come on. If this is happening, then you're USB power cable is 99 percent probably OK.
- If you do not see the LEDs come on inside the PABLO, you may have a bad USB power cable. If you are using a USB power hub, check that the hub itself is powered on. The ANKER 10-port hubs have a separate power switch on back, and there is a blue LED on the front of the ANKER hub when powered on.
- Of course you can also try another PABLO box.
- If it turns out the original PABLO box you were given was not working, you can un-screw the top and check that all the internal connectors are snug.
6.2 On the MAC - No entry in the dhcpd_leases file [top]
If you're not seeing evidence of your PABLO in the form of an entry in the /var/db/dhcpd_leases file:
- Check your spelling of this file
- Bring down the Internet Sharing in the Systems Settings window. Click on the Info button to the far right of the Internet Sharing menu item (the little circle with the 'i' in it, as shown the small green circle on the right in Figure 2.1). Check all boxes for sharing that look like they have anything to do with Ethernet, e.g., Belkin USB-C LAN, or USB 10/100/1000 LAN. Then un-power your PABLO and re-insert the USB power cable, ensuring your Ethernet cable is snug on both ends.
6.3 On the MAC - Multiple entries in the dhcpd_leases file [top]
If you see multiple entries in this file, your PABLO, if it is successfully connected, should be the highest number, e.g., 192.168.2.3 and not 192.168.2.2.
This file can be removed if you feel it's warranted. It will be auto-generated the next/first time a device is connected to your Mac with Internet sharing enabled.
6.4 Connecting to the PABLO - Fall-back Methods [top]
When the PABLO boots, it will attempt to get an IP address for its Ethernet port from a DHCP server. When the PABLO boots, if it cannot obtain an IP address via DHCP, the Ethernet (eth0) interface will fall back to having the IP address of 192.168.2.24. So a fall-back option for connecting with your laptop, or any machine over a direct Ethernet connection, is to set your machine's Ethernet IP address manually to say 192.168.2.6, and just connect with:
$ ssh -l student2680 192.168.2.24
If the above doesn't work, try ping 192.168.2.24. If ping works then re-check your typing in the ssh command. If this option or any of the below methods do not work, your ultimate fallback is to connect with a monitor and keyboard and check out what is going on by running ifconfig once you've logged on to the PABLO.
6.5 Check the PABLO Power Source [top]
When the PABLO boots, initially you should see a small red LED turn on if you look down though the lid. A green light should also blink periodically as it boots and begins to handle network traffic.
Consider what you are using for a power source. Even though power-over-USB should allow you to connect your USB power cable to your laptop, the Pi may experience a brown-out at some point.
Document Maintained by: mikerb@mit.edu
Page built from LaTeX source using texwiki, developed at MIT. Errata to issues@moos-ivp.org. Get PDF