2.680 Labs
01 Machine Setup
02 Intro to C++
3A Version Control W/Git
03 Intro to MOOS
04 MOOS Programming
05 Helm Autonomy
06 Multi-Vehicles Pre-Lab
06 Multi-Vehicles
07 Distributed TSP
08 Multi-Machine TSP
09 Inter-Vehicle Messaging
10 Behavior Writing
11 Payload Autonomy
12 Operating MIT Herons
13 Autonomous Rescue (Pt1)
14 Autonomous Rescue (Pt2)
15 Autonomous Rescue (Pt3)
16 Autonomous Rescue (Pt4)
17 Autonomous Rescue (Pt5)
2.680 Retired Labs
12 Hazard Search
13 Hazard Search II
17 Front Estimation
18 In-Water Front Estimate
Ten Short C++ Labs
01 C++ Program Structure
02 C++ Cmd Line Args
03 C++ Functions
04 C++ I/O and Vectors
05 C++ Classes, Rand #'s
06 C++ Deserialization
07 C++ Build Systems
08 C++ Inheritance
09 C++ Coding Guidlines
10 C++ Style Guidelines
Lab 7 - Distributed Traveling Salesman
Maintained by: mikerb@mit.edu  Get PDF
src: project-pavlab/labdocs/lab_class_07_distributed_tsp
1 Overview and Objectives
2 Preliminaries
3 Distributed Traveling Salesman - Preparing the Shoreside
3.1 Creating a Baseline Mission
3.2 Create a Script for Generating Visit Points
3.3 Create Shoreside pPointAssign MOOS App for Distributing Points
3.4 Sharing Visit Points to Your Vehicles
3.5 Visual Output of Visit Points
3.6 Issues to be Aware of - Gotchas
3.6.1 Handshaking
3.6.2 Logging Initial Bursts of Data
3.7 Assignment 1 (check off) - Point Assignment and Communication
4 Distributed Traveling Salesman - Preparing the Vehicle
4.1 Create a Vehicle pGenPath MOOS App for traversing points
4.2 Mission Constraints
4.3 Handling and Re-visiting Missed Points
4.4 Practical Suggestions
4.5 Assignment 2 (check off) - Confirm your mission runs
5 Suggestions for File Organization of Assignments
5.1 Requested File Structure
5.2 Due Date
1 Overview and Objectives
In today's lab we will continue our shift in focus to autonomy configurations involving multiple vehicles. Our lab exercise will involve a version of the Traveling Salesman Problem (TSP), in this case distributed over multiple vehicles. TSP is the problem of finding a path to visit a set of cities, with known distances between any two cities, in such a way as to visit every city at least once and to minimize the total distance traveled. We use the TSP problem to exercise our new skills in deploying multiple vehicles to handle a version of the TSP problem - the Distributed TSP problem. Given a set of points to visit, assign the points to a set of vehicles to visit those points. Since optimal TSP algorithms can be quite involved, we simplify things a bit and allow for non-optimal shortest tour distances while focusing on the mechanics of getting multiple cooperating vehicles running.

Gaining familiarity with this mode of operation will be essential for later labs and operation of vehicles on the water. In this lab:
- The uTimerScript utility will generate random sets of tour points on the Shoreside.
- A new MOOS app, pPointAssign, will be written by you and run on the Shoreside to distribute points to vehicles.
- Vehicles will be configured to receive visit point assignments from the Shoreside.
- A new MOOS app, pGenPath, will be written by you and run on the simulated robot to generate a tour of waypoints.
- Autonomy missions will be constructed to tour the points and return periodically for refueling.
- Resumed missions will finish any incomplete tour portion until the total tour is done.
2 Preliminaries
Make Sure You Have the Latest Updates [top]
It is possible we will be making changes to the MOOS-IvP tree during the semester. Always make sure you have the latest code:
  $ cd moos-ivp
  $ git pull
  Already up to date.
If you see see a response similar to the one above, indicating that no changes were pulled in from the GitHub server, then you shouldn't need to re-build the software.
Otherwise you will need to rebuild:
$ ./build.sh
Do the same for the moos-ivp-2680 tree.
Make Sure Key Executables are Built and In Your Path [top]
This lab does assume that you have a working MOOS-IvP tree checked out and installed on your computer. To verify this make sure that the following executables are built and findable in your shell path:
  $ which MOOSDB
  /Users/you/moos-ivp/bin/MOOSDB
  $ which pHelmIvP
  /Users/you/moos-ivp/bin/pHelmIvP
If unsuccessful with the above, return to the steps in Lab 1:
http://oceanai.mit.edu/ivpman/labs/machine_setup
Where to Build and Store Lab Missions [top]
As with previous labs, we will use your version of the moos-ivp-extend tree. In this tree, there is a missions folder:
  $ cd moos-ivp-extend
  $ ls
  CMakeLists.txt  bin/         build.sh*     docs/         missions/       src/
  README          build/       data/         lib/          scripts/
You will create a lab_07 folder/directory in the missions folder, typically with both a .moos and .bhv configuration file. See Section 5.1 for the full requested file structure.
Documentation Conventions [top]
To help distinguish between MOOS variables, MOOS configuration parameters, and behavior configuration parameters, we will use the following conventions:
- MOOS variables are rendered in green, such as IVPHELM_STATE, as well as postings to the MOOSDB, such as DEPLOY=true.
- MOOS configuration parameters are rendered in blue, such as AppTick=10 and verbose=true.
- Behavior parameters are rendered in brown, such as priority=100 and endflag=RETURN=true.
- MOOS-IvP applications are rendered in magenta, such as pShare, or pHelmIvP.
- General GNU/Linux commands are represented in dark purple, such as wget, mkdir, or cd.
More MOOS / MOOS-IvP Resources [top]
A few further resources are worth mentioning for following up this lab with your own exploration.
- The IvP Helm and Utilities documentation: http://oceanai.mit.edu/ivpman
- The moos-ivp.org website: http://www.moos-ivp.org
The Shoreside (Topside) / Vehicle Topology [top]
The layout of interconnected MOOS communities used in this lab is depicted in the figure below. This layout will be used for the remainder of the course, including during operations on the river.
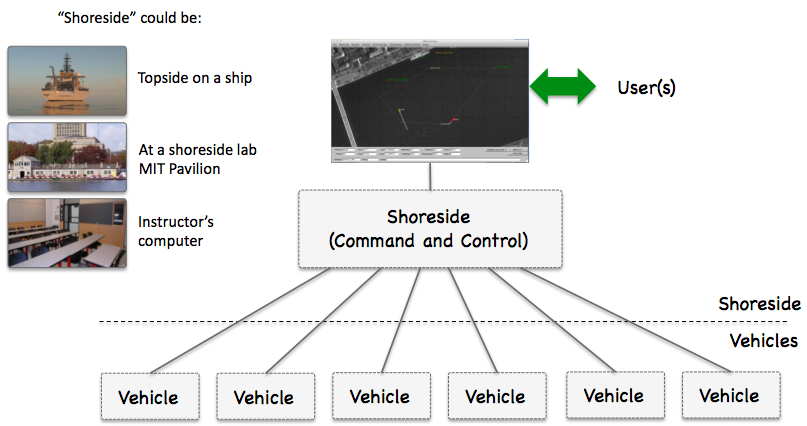
Figure 2.1: Shoreside to Multi-Vehicle Topology: A number of vehicles are deployed with each vehicle maintaining some level of connectivity to a shoreside command and control computer. Each node (vehicles and the shoreside) are comprised of a dedicated MOOS community. Modes and limits of communication may vary.
3 Distributed Traveling Salesman - Preparing the Shoreside
The Traveling Salesman Problem (TSP) is the problem of finding a path to visit a set of cities, with known distances between any two cities, in such a way as to visit every city at least once and to minimize the total distance traveled.
https://en.wikipedia.org/wiki/Travelling_salesman_problem
In this section we use the TSP problem to exercise our new skills in deploying multiple vehicles to handle a version of the TSP problem - the Distributed TSP problem. Given a set of points to visit, assign the points to a set of vehicles to visit those points. Since optimal TSP algorithms can be quite involved, we simplify things a bit and allow for non-optimal shortest tour distances while focusing on the mechanics of getting multiple cooperating vehicles running.
In this part we will:
- Create a uTimerScript script to generate 100 random points in a specified region.
- Create a pPointAssign MOOS App on the shoreside to send half the points to one vehicle and half to the other.
- Ensure our pShare communications is configured to share points out to the vehicles.
- Confirm it works by verifying that visit points are received on a pair of vehicles.
To create new apps, use the GenMOOSApp_AppCasting utility. For example:
   $ cd moos-ivp-extend/src
   $ GenMOOSApp_AppCasting PointAssign p "Chris Jones"
   pPointAssign generated
Recall that the GenMOOSApp_AppCasting script is in the moos-ivp/scripts/ folder, and this needs to be in your shell path if it isn't already. Also don't forget that you'll need to add the new app to the CMakeLists.txt file in the moos-ivp-extend/src folder.
3.1 Creating a Baseline Mission [top]
We will call the TSP mission distributed_tsp. A good place to start as a template is the last mission from the previous lab. If your file structure from Lab 6 followed the lab guidance, this should be henry_gilda_auto_refuel. We'll make a copy of that in our newly created lab_07 folder.
  $ cd moos-ivp-extend/missions
  $ mkdir lab_07
  $ cd lab_07
  $ cp -rp ~/moos-ivp-extend/missions/lab_06/henry_gilda_auto_refuel  distributed_tsp
The file structure for this lab is shown in Section 5.1.
3.2 Create a Script for Generating Visit Points [top]
Configure a uTimerScript script running on the shoreside community, to generate a random sequence of points within a region of the operation area. The four corners of this region should be:
   -25,-25
   -25,-175
   200,-25
   200,-175
The script should generate 100 postings to the MOOSDB of the form:
   VISIT_POINT = "firstpoint"
   VISIT_POINT = "x=8, y=9, id=1"
   ...
   VISIT_POINT = "x=-11, y=-9, id=100"
   VISIT_POINT = "lastpoint"
The first posting in the script should be VISIT_POINT="firstpoint". The last posting in the script should be VISIT_POINT="lastpoint". These are the cues to recipients to indicate completeness of the set of points posted. The id values don't need to be perfectly in order, but should just be unique.
HINT: Consult the example script in the uTimerScript documentation in the example "A Script for Generating 100 Random Numbers" in the "Examples" section. The uTimerScript documentation is found:
http://oceanai.mit.edu/ivpman/apps/uTimerScript
Or, from the command line:
$ uTimerScript --web (or -w)
How do we know this is working? There are a few options:
- Check the output of the uTimerScript appcasting window.
- After quitting the mission, after the script has run, use the aloggrep tool, on the alog file created in the shoreside log file, grepping on VISIT_POINT.
- After quitting the mission, launch alogview on the shoreside alog file and use the VarHist pull-down menu, selecting VISIT_POINT.
Note: In the last two options, we are relying on the contents of the alog file to confirm desired results. See the Section 3.6.2 below for an extra configuration of pLogger required in this mission. This is due to the fact that all our VISIT_POINT publications occur in a single burst.
3.3 Create Shoreside pPointAssign MOOS App for Distributing Points [top]
Create a new pPointAssign MOOS application on the shoreside to send half the points to one vehicle and half to the other. The app should have the following capabilities:
- The app should subscribe to the VISIT_POINT output of the timer script described in Section 3.2 and produce output along the lines of:
 VISIT_POINT_HENRY = "firstpoint"
 VISIT_POINT_HENRY = "x=8, y=9, id=1"
 ...
 VISIT_POINT_HENRY = "x=33, y=29,  id=50"
 VISIT_POINT_HENRY = "lastpoint"
 VISIT_POINT_GILDA = "firstpoint"
 VISIT_POINT_GILDA = "x=19, y=111, id=51"
 ...
 VISIT_POINT_GILDA = "x=-11, y=-9,  id=100"
 VISIT_POINT_GILDA = "lastpoint"
Your app should follow the above format exactly. In a later lab we will want to combine one person's shoreside community, connected to another person's vehicle commmunity. The above format will be important in this regard.
- The first and last postings made by pPointAssign, shared to each of the vehicles, should be VISIT_POINT_VNAME="firstpoint" and VISIT_POINT_VNAME="lastpoint". These are the indicators usable on the vehicle that confirm that the complete set of visit points have been sent and received. The component VNAME above should be replaced by the vehicle name and there should be one such posting per vehicle.
- The app should have a configuration parameter, vname, which adds a known vehicle to the list of vehicles to which points will be distributed. In other words, the names henry and gilda shouldn't be hard-coded into the C++ code of pPointAssign, but should be parameters read in from a configuration file.
- Your app should support the assignment of points in one of two manners. In the first manner, points are assigned in an alternating fashion. The first point to the first vehicle, second point to the second vehicle, third point to the first vehicle and so on. In the second manner, points are assigned according to region, e.g., east-west. The app should be configurable to either way with a configuration parameter assign_by_region set to either true or false. You can see the difference in the two videos shown in Section 4.5.
- The east-west regions are simply the east and west halves of the region given earlier, with the four corners of (-25,-25), (-25,-175), (200,-25), (200,-175).
- NOTE: When distributing points by East/West region, it is not necessary to have an exactly even amount sent to each vehicle. Just split the region in half and distribute accordingly. Given the uniform distribution of the random points, they should be close to 50-50 on each side, but no guarantee.
3.4 Sharing Visit Points to Your Vehicles [top]
You need to share pPointAssign postings out to their respective vehicles. For example you may want to share VISIT_POINT_HENRY out to vehicle henry with the arrival name VISIT_POINT. Remember that you should handle the share configuration with uFldShoreBroker now - not pShare.
3.5 Visual Output of Visit Points [top]
It would be helpful to have your pPointAssign app also produce some visual output for pMarineViewer. This way you can verify that your pPointAssign app is (a) receiving points, and (b) grouping/handling them properly. Here is a suggested utility function for accomplishing this:
 #include "XYPoint.h"    // Include this somewhere near the top of your file

 ...

 void PointAssign::postViewPoint(double x, double y, string label, string color)
 {
   XYPoint point(x, y);
   point.set_label(label);
   point.set_color("vertex", color);  // yellow is handy on dark screen
   point.set_param("vertex_size", "4");

   string spec = point.get_spec();    // gets the string representation of a point
   Notify("VIEW_POINT", spec);
 }
The label should be unique for each point, otherwise pMarineViewer will overwrite one point after another. A good label would just be the ID associated with the visit point. Another suggestion is to use a different color for each vehicle.
NOTE: The above code segment makes use of the XYPoint class, which is part of the lib_geometry library. To make use of this class (and others like it, such as XYSegList, XYPolygon etc.) you will need to link against the geometry library. To link against this library, just add geometry to list of libraries that your app links to. This is found in the CMakeLists.txt file for your pPointAssign application.
   $ cd moos-ivp-you/src/pPointAssign
   $ emacs CMakeLists.txt                 (or whatever text editor you use)
Then add the line as below:
 TARGET_LINK_LIBRARIES(pPointAssign
    ${MOOS_LIBRARIES}
    geometry           <--- Add this line
    mbutil
    m
    pthread)
Further note: In Linux the order of the libraries is important. And it's important to link against geometry first, before mbutil as above. For some reason the MacOS compiler is resilient to the order.
3.6 Issues to be Aware of - Gotchas [top]
3.6.1 Handshaking [top]
Recall that the MOOSDB only keeps track of the most recent value of a variable. When a new app connects and registers for mail, it will get only the latest value, not the entire history. Keep in mind that your pPointAssign app needs all the output of your timer script producing points. For this reason you will want to ensure that the script starts after pPointAssign has connected to the MOOSDB. Consider launching the timer script in a paused mode, where it gets automatically un-paused by the actions of pPointAssign. See the pause_var and paused configuration parameters for uTimerScript.
Likewise, eventually your pPointAssign app will send VISIT_POINT messages to your vehicles, to be handled in your pGenPath app. You will want to hold those outgoing messages from pPointAssign, until pPointAssign has received an indication that pGenPath app on the vehicle is ready to receive them.
3.6.2 Logging Initial Bursts of Data [top]
The pLogger app is typically configured to "log everything" via the configuration parameter:
WildCardLogging = true
However, the way this is implemented in the logger is to monitor the list of variables known to the MOOSDB, published in the MOOS variable DB_VAR_SUMMARY. Once the logger has seen a new variable known to the MOOSDB, it will register for the variable. However, if the first time a variable is published to the MOOSDB, it is published in a burst of say 100 publications essentially at the same time, then the logger may not log all publications. This is because, by the time pLogger notices the new variable on the DB_VAR_SUMMARY list, and then registers for subsequent publications, the initial burst has finished and the logger was not able to register for them in time.
The way to avert this problem is to configure the logger to register for such variables at the outset. We can still configure wildcard logging, but we can also tell the logger to register for certain variables without waiting for them to be seen on the DB_VAR_SUMMARY list. This can be done with the following configuration line:
Log = VISIT_POINT @ 0 nosync
The logger can be configured with as many of this lines as desired.
3.7 Assignment 1 (check off) - Point Assignment and Communication [top]
Demonstrate the successful implementation of your pPointAssign app, and the configuration of communications to your vehicles.
- Demonstrate that your pPointAssign app is receiving and processing (grouping) all points by rendering the groups in different colors in pMarineViewer. An example would be the image on the cover page of this lab.
- Demonstrate that your pPointAssign app is sending a proper group of points to one vehicle and the other part to the other vehicle. This is simply to confirm that the share configuration is properly configured.
To demonstrate things are working, you have two options. The first is the method traditionally used, before RealmCasting was available. Still works, but probably harder and more cumbersome:
- First method of demonstration: open two terminal windows, one for each vehicle, running uXMS with the --history option scoping on VISIT_POINT.
- Second method of demonstration: Add pRealm to the set of apps running on the shoreside and vehicle communities. In the vehicles, in the pRealm config block, add the configuration line: hist_var = VISIT_POINT. When the mission is launched, in pMarineViewer, you can toggle between AppCasting and RealmCasting by using the 'a' key. Then you can select the vehicle and the history variable.
4 Distributed Traveling Salesman - Preparing the Vehicle
The vehicles in this lab will be sent a set of visit points from the Shoreside, as described in the previous section. On the vehicle a new MOOS app is needed to ingest those points, wait until all have been received, and generate a path for visiting all points. That is is the focus of this part of the lab.
In this part we will:
- Create pGenPath MOOS App to be run on the vehicle side. It should subscribe for the points coming from pPointAssign on the shoreside, generate a sequence of waypoints, and then publish them to the helm as an update to a waypoint behavior.
- Configure an autonomy mission on the vehicle to traverse the points while periodically returning to home. We will simulate a vehicle with limited energy for surveying, by mandating that it return home for refueling after some amount of time being under way.
4.1 Create a Vehicle pGenPath MOOS App for traversing points [top]
Create a new pGenPath MOOS module for running on the vehicle, that takes as input a series of VISIT_POINT messages from the shoreside, and generates a waypoint list suitable for consumption by the waypoint behavior.
In your behavior configuration, use a Waypoint behavior with an updates parameter specifying the MOOS variable used for incoming dynamic parameter configuration. In this case, the primary incoming configuration will be the list of waypoints from your pGenPath module. To make things a bit easier, your shortest path algorithm may simply be a greedy shortest path with an imaginary virtual initial point being the vehicle's present position.
In your pGenPath module you can use the following pseudo code as guidance for how to build a proper list of waypoints recognized by the waypoint behavior:
   XYSegList my_seglist;
   my_seglist.add_vertex(3, 8);
   my_seglist.add_vertex(43, 99);
   my_seglist.add_vertex(44, -111);

   string update_str = "points = ";
   update_str      += my_seglist.get_spec();
   Notify("UPDATES_VAR", update_str);  // UPDATES_VAR depends on your config
If your application uses the XYSegList class (recommended), your app must link against the geometry library. You will need to edit the CMakeLists.txt file in your pGenPath application folder. In this file, simply add geometry in the TARGET_LINK_LIBRARIES block. Similar to what you probably also needed to do for the pPointAssign app in the previous part of the lab.
4.2 Mission Constraints [top]
- Maximum vehicle speed: The vehicle may go no faster than 1.2 meters/sec.
- Tour Duration: The vehicle may be underway no longer than 10 minutes (600 seconds) before re-fueling will be required. To simplify things, you need not include the time required to return to home in this time limit.
- Refuel Duration: Once the vehicle has returned home, it must wait at least 60 seconds before resuming its mission.
4.3 Handling and Re-visiting Missed Points [top]
You may find that the tour generated by a greedy algorithm has turns that the vehicle simply cannot make quickly enough, causing the vehicle to "miss" a point on the tour. You should use the slip_radius parameter (in the Waypoint behavior) with a high enough number, e.g., 15, such that the vehicle does not come back around for missed points. For our lab, a visit to a point is satisfied if the vehicle comes within three meters of the point.
In the next lab, we will re-design this mission such that, upon completion of the tour, the pGenPath app makes a new tour of all points missed on the previous tour. The pGenPath app can keep track of visited points by simply noting the present vehicle position on each iteration, and comparing it to known points in the tour. Upon each completion of a tour, or modified tour, the vehicle should return home for re-fueling regardless of how long it has been deployed since the previous re-fueling.
For now, we won't worry about "missed" points or re-visiting points on a second tour. We mention this now in case you want to keep in mind this upcoming challenge in building your pGenPath application.
4.4 Practical Suggestions [top]
Make pGenPath an AppCastingMOOSApp [top]
In your pGenPath module, keep records of various state values, e.g., number of points received, visited, unvisited etc. Below is the appcast output of my own implementation. Store and report whatever helps you debug your application.
 ===================================================================
 pGenPath henry                                            0/0(6011)
 ===================================================================
 Visit Radius:            3
 Total Points Received:   55
 Invalid Points Received: 0
 First Point Received:    true
 Last Point Received:     true
 NAV_X/Y Received:        true

 Tour Status
 ------------------------
    Points Visited:       55
    Points Unvisited:     0
Make pPointAssign an AppCastingMOOSApp [top]
For the same reasons as above, you may find good appcasting output for pPointAssign will help you debug.
4.5 Assignment 2 (check off) - Confirm your mission runs [top]
When your pPointAssign application is configured to assign points in an alternating manner as they come in, your mission may look something similar to the video posted below. Note that in this mission the vehicle returns to visit points missed on the first tour. You don't need to be concerned with this aspect of the mission until the next stage, in the next lab.
Figure 4.1: In the First Distributed TSP mission two vehicles are assigned randomly chosen points in the region to visit on a first-come basis. Therefore their paths overlap and the mission is somewhat inefficient, but at least the same amount of points are assigned to each vehicle. video:(1:52): https://vimeo.com/88013053
When pPointAssign is configured to assign points by region, your mission may look something like the video posted below. Note that in this mission the vehicle returns to visit points missed on the first tour. You don't need to be concerned with this aspect of the mission until the next lab.
Figure 4.2: In the Distributed TSP Two mission two vehicles are assigned randomly chosen points in the region based on the section of the region. Therefore their paths do not overlap and the mission is somewhat more efficient. video:(2:03): https://vimeo.com/88017560
5 Suggestions for File Organization of Assignments
5.1 Requested File Structure [top]
You are encouraged to continue to upload all mission files. Here is the requested file structure:
   moos-ivp-extend/
     missions/
       lab_07/
         distributed_tsp/
     src/
       pPointAssign/
       pGenPath/
5.2 Due Date [top]
Assignment 1 of this lab should be finished by the beginning of lab, Thursday, March 13th, 2025.
Assignment 2 of this lab is due by the end of lab, Thursday March 13th, 2025.
Document Maintained by: mikerb@mit.edu
Page built from LaTeX source using texwiki, developed at MIT. Errata to issues@moos-ivp.org. Get PDF