Lab 1 - Overview and Machine Setup
Maintained by: mikerb@mit.edu  Get PDF
1 Overview and Objectives
2 Linking the Course Web Pages
3 Choosing a Development Environment for 2.680
3.1 Machine Requirements for MIT 2.680
3.2 Options for Those Without a Mac or Linux Machine
3.3 What Qualifies as a Reasonably Powerful Machine?
4 For Both MacBook and Linux Users
4.1 The 2.680 Software Environment
4.2 User Accounts on your Machine
5 Linux Users
6 MacBook Users
6.1 Adding a New User Account to a Lab-Provided Mac
6.2 Finding the Command Line Using the Terminal Application
6.2.1 A Quick Note about the Finder Application on MacOS
6.2.2 Getting Terminal to your Dock
6.2.3 Hints on Opening New Terminal Windows
6.2.4 Hints on the Configuring Terminal Application
6.3 Installing XCode and Enabling Command Line Tools
6.3.1 Checking if XCode is already installed (using Finder)
6.3.2 Installing XCode
6.3.3 Updating XCode
6.3.4 Installing the XCode Command Line Utilities
6.4 Installing and Using the Homebrew Package Manager
6.4.1 Getting the Homebrew base
6.4.2 Add Homebrew to Your Shell Path
6.4.3 Download Packages Needed for our Labs
7 Getting Started with the Command Line
7.1 Command Line Quick Survival Basics
7.1.1 Viewing the Contents of Your Directory with ls Command
7.1.2 Knowing what directory (folder) you are in with pwd
7.1.3 Changing Directories with the cd Command
7.2 Creating/Removing Directories and Files on the Command Line
7.2.1 Making a New Directory with the mkdir Command
7.2.2 Removing a Directory with the rmdir Command
7.2.3 Making a File with the touch Command
7.2.4 Removing a File with the rm Command
7.2.5 Removing Groups of Files with the rm Command
7.2.6 Removing Directories with the rm Command
7.3 Moving/Renaming and Copying Files on the Command Line
7.3.1 Moving and Renaming a file with the mv command
7.3.2 Copying files and directories with the cp command
7.4 How to Customize Your Shell Environment
7.4.1 What shell am I using?
7.4.2 Configuration files
7.4.3 Example shell configuration files for bash users
7.4.4 Customize Your Shell Prompt
7.4.5 Customize Your Shell Prompt for bash Users
7.4.6 Customize Your Shell Prompt for tcsh Users
7.5 Adding a Directory to Your Shell Path
7.5.1 Make Sure You Know How to Edit a Text File
7.5.2 Augmenting the Shell Path for bash Users
7.5.3 Verifying Success
7.6 Augmenting the Power of the Command Line with Aliases
7.6.1 Add aliases to your shell configuration to make them persistent
7.6.2 Suggestions for useful aliases
7.6.3 Temporarily disabling an alias
7.6.4 Reminding yourself of previously defined aliases
8 All Users - Getting, Building and Running the Course Software
8.1 Downloading and Building the MOOS-IvP Software
8.1.1 For MacOS
8.1.2 For Linux
8.1.3 Downloading the Software
8.1.4 Building the Course Software
8.2 Running the MOOS-IvP Software
8.2.1 Add the new executables to your shell path
8.2.2 Verify that moos-ivp executables are in your shell path
8.2.3 Run the example "alpha" mission
8.2.4 Operating Systems Supported by MOOS and IvP
1 Overview and Objectives

- Goal - Make sure everyone has a suitable development machine for the course on Day 1
- Goal - All students able to build and run the course software on Day 1
- Overview of the Course Web Pages and Support
- Overview of Setting up Development Environment for MacBook Users
- Getting Started with the Command Line
- Downloading, Building, Running the Course software
2 Linking the Course Web Pages
There are two main web pages for this course, the main course page on the MIT server, and the Piazza Page. We recommend putting these pages in your browser's bookmarks or Favorites tab as soon as possible. We will be referring to them a lot:
- Course wiki: https://oceanai.mit.edu/2.680
- Piazza: https://oceanai.mit.edu/piazza
Lectures and labs are posted and linked from the course page:
This lab and other course labs are also online in wiki format at the above link. The wiki pages are generated from the same content (LaTeX) that generated the PDF or hard-copy version of the labs. This is done as a matter of convenience and for later labs where there may be videos embedded in the labs.
3 Choosing a Development Environment for 2.680
3.1 Machine Requirements for MIT 2.680 [top]
In 2.680 you will need either a Linux or Mac laptop to do your work. If you do have one, then you are most likely fine, assuming it is fairly modern and sufficiently powerful. If you don't have one, continue reading below for options.
3.2 Options for Those Without a Mac or Linux Machine [top]
If you don't have a Linux or Mac laptop, I'm guessing you have a Windows machine. (If someone doesn't fall into one of these three groups, I'd love to know!)
If you have a Windows machine you will need to either:
- Borrow a Linux or Mac laptop, or
- Set up your Windows machine to dual-boot Linux, or
- Run Linux inside a virtual machine on your Windows laptop (not recommended)
If you can borrow a Linux or Mac laptop, this will almost certainly be your best option. The 2.680 staff has a handful of Mac laptops to loan for the semester, and a couple of older Linux laptops. In my opinion, even the older Linux laptops will be better options than running the course code from a virtual machine.
While several of the TAs have experience setting up dual-boot machines or setting up a virtual machine (VM) in Windows, for those choosing this method, you are largely expected to be self-sufficient in setting this up. If you think you will need technical help setting up dual-boot, or a VM, you are strongly encouraged to accept a loaner machine instead. The Mac course laptops also come pre-loaded with the necessary course software, making several things easier.
3.3 What Qualifies as a Reasonably Powerful Machine? [top]
First, it should be mentioned, that the performance load on your machine will increase during the semester. Initial labs will involve simpler things. Later labs will involve multi-vehicle mission simulations that you will want to run at 5x or 10x real-time. Your ability to complete later labs will be diminished if your machine can only run 2x real-time, especially if your lab partner is running 30x real-time. You won't notice any of this in the first roughly 4 weeks of the course, but you will notice later.
The vast majority of machines built in the last 5-10 years are probably sufficient for use in this class.
You can safely skip the discussion below on machine specs, especially if you are confident you have a good working machine for the semester
But let's discuss some of the metrics we use for those who may not be familiar, or for those who may be considering upgrading their machine:
- Number of CPUs, or "cores"
- CPU Speed
- RAM memory
- Hard disk memory
If your computer has at least two cores, each with a clock speed of 2.0GHz, at least 8Gb of RAM, and 250Gb of hard disk space, you will be fine. Even the above numbers are not hard thresholds. If you're curious about what the above means, or you'd like some help in figuring out your machine specs, feel free to check out the following help page link:
https://oceanai.mit.edu/ivpman/help/cmdline_specs
4 For Both MacBook and Linux Users
4.1 The 2.680 Software Environment [top]
In this class, we will want to run the MIT autonomy software environment, and eventually your software creations as part of that environment. The primary goal of today's lab, after making sure you have a good machine, is to make sure that the MIT autonomy software environment is loaded and running on your machine. By "environment" we mean not only the MIT autonomy software, but also the software and tools from other vendors or providers, for building the MIT software.
For some people this is 15 minutes of work. For others, maybe longer. The issue is that the MIT software requires some other software which in turn requires further software for obtaining and building that software. We will go through all the steps. For rather vanilla/typical Linux or Mac machines, this will be pretty straight-forward.
4.2 User Accounts on your Machine [top]
If you already have a Linux or Mac laptop prior to the start of today's class, you probably already have a user account on your laptop. If you are borrowing a machine from someone, and you are using their user account, you should make your own account. If you are accepting a 2.680 loaner laptop, you should also make your own account, per the instructions below.
In both cases, it is a good idea to make your username on your 2.680 laptop match your MIT Athena username, which should be the same as the first part of your MIT email address. If it is already set up with a different username, it is probably not worth changing.
5 Linux Users
Linux users will most likely have nearly everything they need out of the box. This can be attributed to the fact that a Linux machine already heavily utilizes software from the open source community. So the compiler and package manager are probably already on your machine.
As mentioned earlier, if for some reason you don't already have an account on your Linux machine, perhaps because you are borrowing it, we recommend you make your own account. And we recommend that you use your MIT Athena name. A new account can be added using the Linux system utilities GUI, or it can be added on the command line as below (assuming janedoe as a username):
 $ sudo useradd -g users -s /bin/bash -d /home/janedoe janedoe
 $ sudo passwd janedoe
Ask a 2.680 TA if you need help.
If you are a Linux user and you have your account all set up, you can skip to Section 7.
6 MacBook Users
This section is for the Mac user who is either (a) accepting a 2.680 loaner MacBook, or (b) is using their own Mac but has not done any software development previously on this Mac. If this you, the below sections will help you:
- Make sure you have your own user account on your Mac.
- Get started with accessing the Mac Terminal application which will be your primary way on the Mac to use the command line environment.
- Make sure you have XCode installed on your machine, a hard requirement for building any course software.
- Get started with a third-party package manager, either MacPorts or Homebrew. We recommend Homebrew, but both are fine.
Note: If you are using a 2.680 provided Mac, you should already have XCode and Homebrew installed. Students using one of the 2022 course laptops are running the latest Mac operating system, Ventura, a.k.a., Release 13.0.1.
Note: For those using the 2.680 provided Mac laptops, XCode was installed under my (mikerb) Apple ID. When or if there is an XCode update offered to you, you will be prompted for my Apple ID. You have two options. Come see me and I will type it in. Or, remove XCode from your machine and re-install it using your own Apple ID. The latter seems pretty disruptive, so I recommend the former. I think this is super annoying and if anyone finds a work-around for this, please let me know.
6.1 Adding a New User Account to a Lab-Provided Mac [top]
This topic is the first step for the student who has just taken possession of a 2.680 course-provide Mac for use in lab exercises. When the machine is first powered on, it presents a set of user login options. Log in as the administrator, with the password given in class. And then do the following to set up your new user account:
- Open the System Preferences tool by selecting the System Preferences icon in the Dock of applications on the lower part of the window. If you don't know which icon to click, move the mouse over each icon until you see System Preferences. The System Preferences tool may also be launched from the Apple pull-down menu on the very upper left of your screen.

Figure 6.1: The Systems Preferences icon.
- Click on the Users & Groups icon in the System section. Once you have opened the Users & Groups window, click on the "Add Account" button.
- At the top of the window, there is a setting "New Account:" with the default set to "Standard". Click on "Standard" and change this to "Administrtor". You will need admin privileges to install code on the computer.
- You will be prompted for the original administrator password again, enter it.
- Enter your actual name in the "Full Name:" field. In the "Account Name" field, I recommend using your MIT Athena (email) account name. (If you are jsmith@mit.edu, I recommend choosing jsmith as your account name.)
- After the new account is created, log out by pulling down the Apple menu in the upper left corner of the computer screen. Select Log Out.
- Log back in as yourself. You should now have admin privileges to install further software if needed.
6.2 Finding the Command Line Using the Terminal Application [top]
This topic describes how to get started using the Mac Terminal Application. Terminal provides a command-line interface to your system which we will use extensively. All Macs come with Terminal pre-installed, but it is not one of the applications in your Dock by default. This topic describes how to add it to your dock and configure a few basic properties of Terminal.
6.2.1 A Quick Note about the Finder Application on MacOS [top]
As perhaps a new Mac user, you may have noticed a distinct feature on the Mac, going back to its very earliest days, is that the top-most menu on your screen changes, depending on what application you are using. Two things remain constant though:
- The left-most item on the top menu bar is always the Apple icon which has a consistent set of pull-down menu options regardless of what application you are using.
- The next left-most item is the name of the current application. If you are using the Terminal app, it will say Terminal. If you are using Emacs, it will say Emacs, and so on.
The Finder application is a core application on your Mac. Unlike most other applications, it is always running. If you click anywhere on the desktop, outside any other application window, you will essentially be selecting the Finder application and you will notice the corresponding change on the menu bar. (try it!)
The Finder application is essentially an alternate universe compared to the command line environment. It provides a GUI based experience for navigating your computer. It is wonderfully intuitive, but the command line is infinitely more powerful. Nevertheless for some things we will reference the Finder application.
6.2.2 Getting Terminal to your Dock [top]
Open the Applications folder in Finder. You can do this with a shortcut by hitting Command-Shift-A anywhere on your desktop (outside an open application). The long way is to select the Go pull-down menu in Finder and select Applications.
- In the Applications folder, scroll down to near the end, and look for a Utilities folder. Open it and scroll down and look for the Terminal application.
- Drag and drop the Terminal icon to your dock.
- Now you may launch Terminal from the dock whenever you want a command-line interface.
6.2.3 Hints on Opening New Terminal Windows [top]
Clicking on the Terminal icon in the dock will not open multiple windows. This may seem a bit counter-intuitive to users new to MacOS. Below are some ways to open a new window:
- When Terminal is the active application (it says Terminal next to the Apple icon in the upper left of your window), you can open a new window by pulling-down the Shell pull-down menu, and select New Window.
- When Terminal is the active application, type the short-cut Command-n, to open a new window.
- When Terminal is the active application, type the short-cut Command-t, to open a new terminal as a Tab in an existing window (I use this a lot!).
- Control-click (or right-click, for two-button mouse users) the Terminal icon in the Dock. Select New Window.
6.2.4 Hints on the Configuring Terminal Application [top]
User preferences for Terminal may be set by selecting Settings from the Terminal pull-down menu. We point your attention to a couple things you may want to set:
- The Terminal preferences window has several tabs at the top. Select the Profiles tab. In the upper right there is a bar of buttons: Text, Window, Tab, Shell, and so on.
Select the Shell button.
In the Startup section, check the box that says Run command, and enter the command bash, as shown in Figure 6.2 below.

Figure 6.2: Setting the Shell to bash for the Terminal application.
- Under the Profiles tab, and the Window sub-tab, you can alter the default size of your window when it opens. Default is 80 columns and 24 rows. To change it, enter what you like in Columns and Rows fields as shown below.

Figure 6.3: Setting the Terminal size in terms of columns and rows.
- Choose a background color that suits you. Very likely this will be the window/color your eyes will encounter the most in this and future labs. I recommend tinkering to get it best suited for you.
Random Historical Mac Notes:
- The Mac operating system is sometimes called "MacOS", and sometimes called "OSX". Apple used the latter for many years up until a few years ago before switching to the former. They mean the same thing.
- On a Mac laptop, there is only the track pad. The "mouse-click" is done by clicking the track pad. The Mac laptop "mouse-click" can be configured to be a tap on the track pad instead of a full push-down click. See the track pad section under the System Settings menu. There is no physical right-click, but there is indeed a whole bunch of stuff that can be accessed with a right-click. To achieve a right-click, hold down the control button and perform a normal left-click. Try right-clicking on the Desktop background and see what happens. If you buy a mouse from Apple it only has one button. But you can certainly by a two-button mouse from another vendor and both buttons will be respected.
6.3 Installing XCode and Enabling Command Line Tools [top]
This page concerns getting XCode on your Mac. It contains components, like the C++ compiler, that will be essential for our purposes, so we'll need to make sure it's installed on your machine. On your machine, it's possible that:
- XCode is properly installed but you just don't know it,
- XCode is not at all on your machine.
If you have a Mac provide by the 2.680 staff, and have just created your own user account, the most likely scenario is the first one. In any event, we'll soon find out.
6.3.1 Checking if XCode is already installed (using Finder) [top]
Finder is the Mac application that is running constantly and by default upon login. To switch over to running Finder, just click anywhere in the screen background outside an app. We'll use Finder to find out if XCode is installed.
- In Finder, select the Go pull-down menu, and select Applications. Or just use the short-cut key Command-Shift-A while Finder is active.
- This should open a new Finder window, showing all the Applications installed on your machine. Look for the XCode icon in the Applications folder. It is blue and has a little hammer. It should look something like:
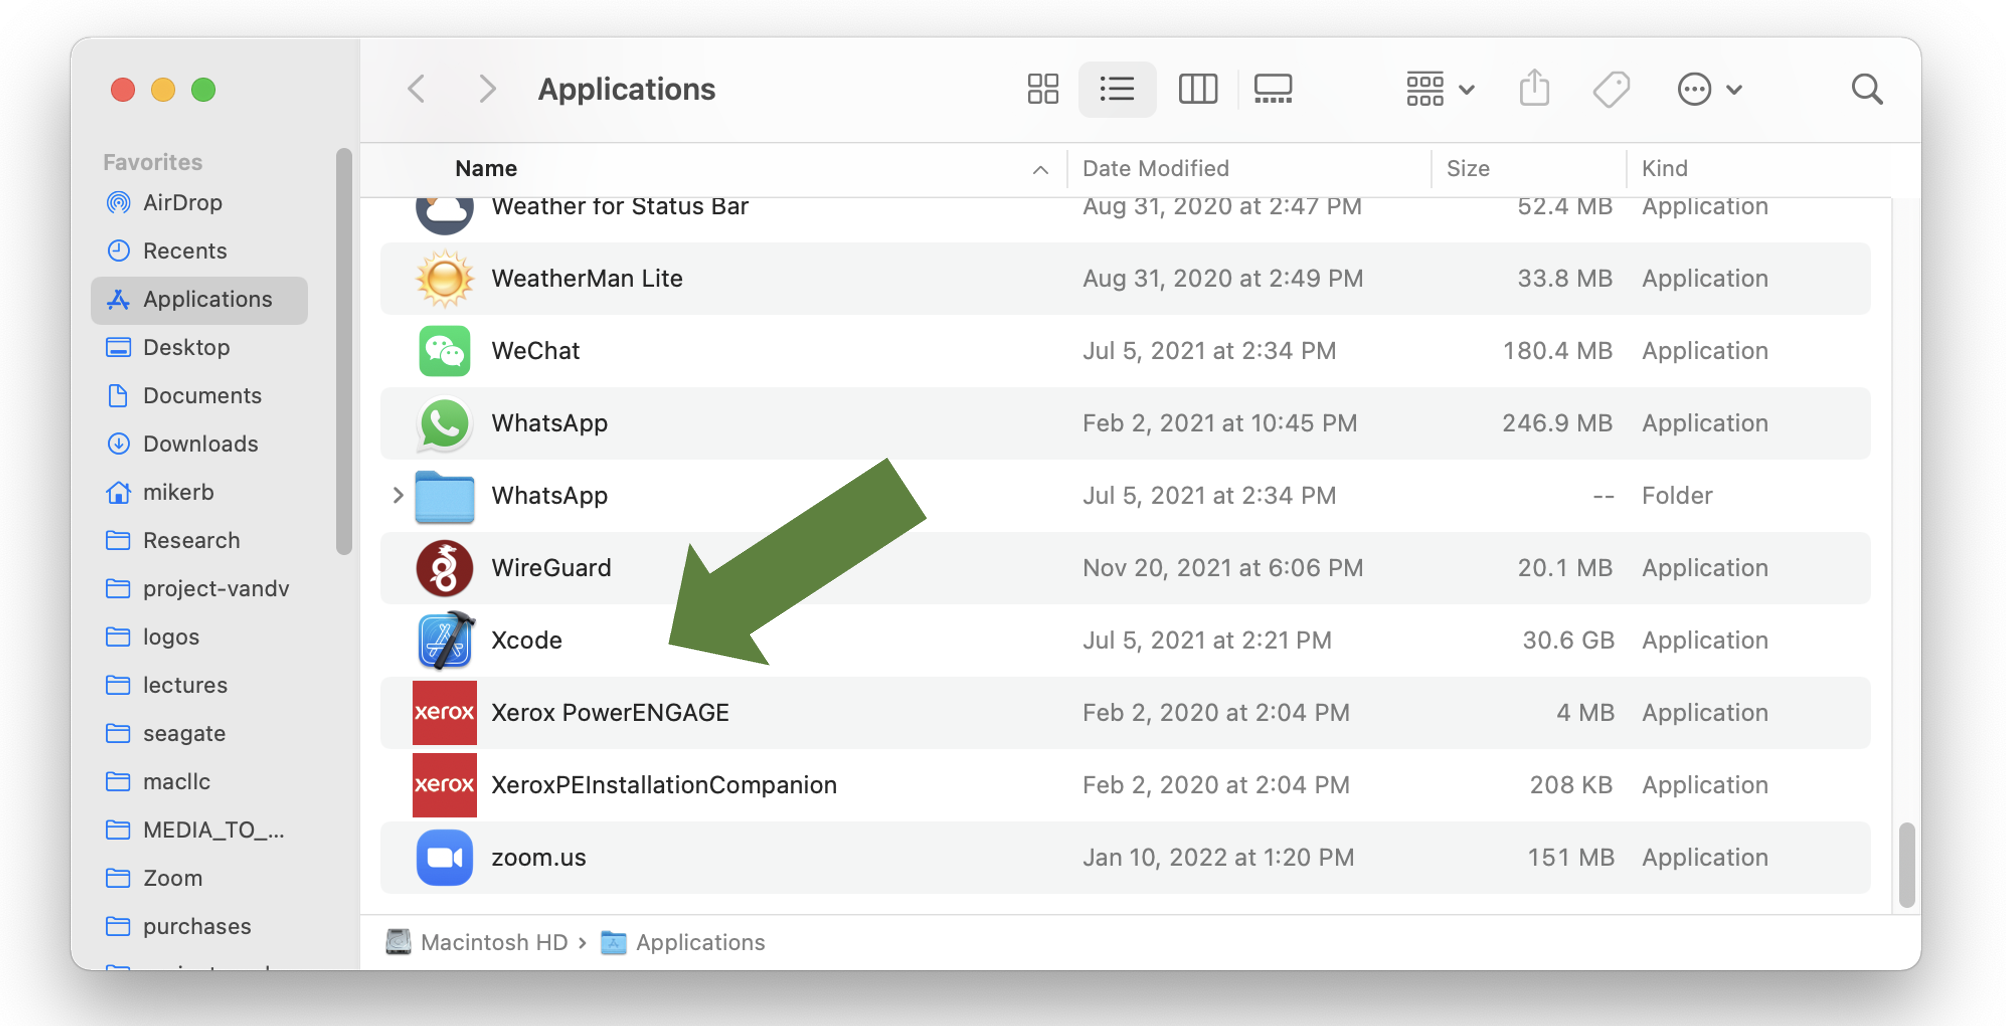
Figure 6.4: The Finder window, showing the XCode application, should look something like this.
After double-clicking on the XCode icon above, the XCode splash window should appear, looking something like:
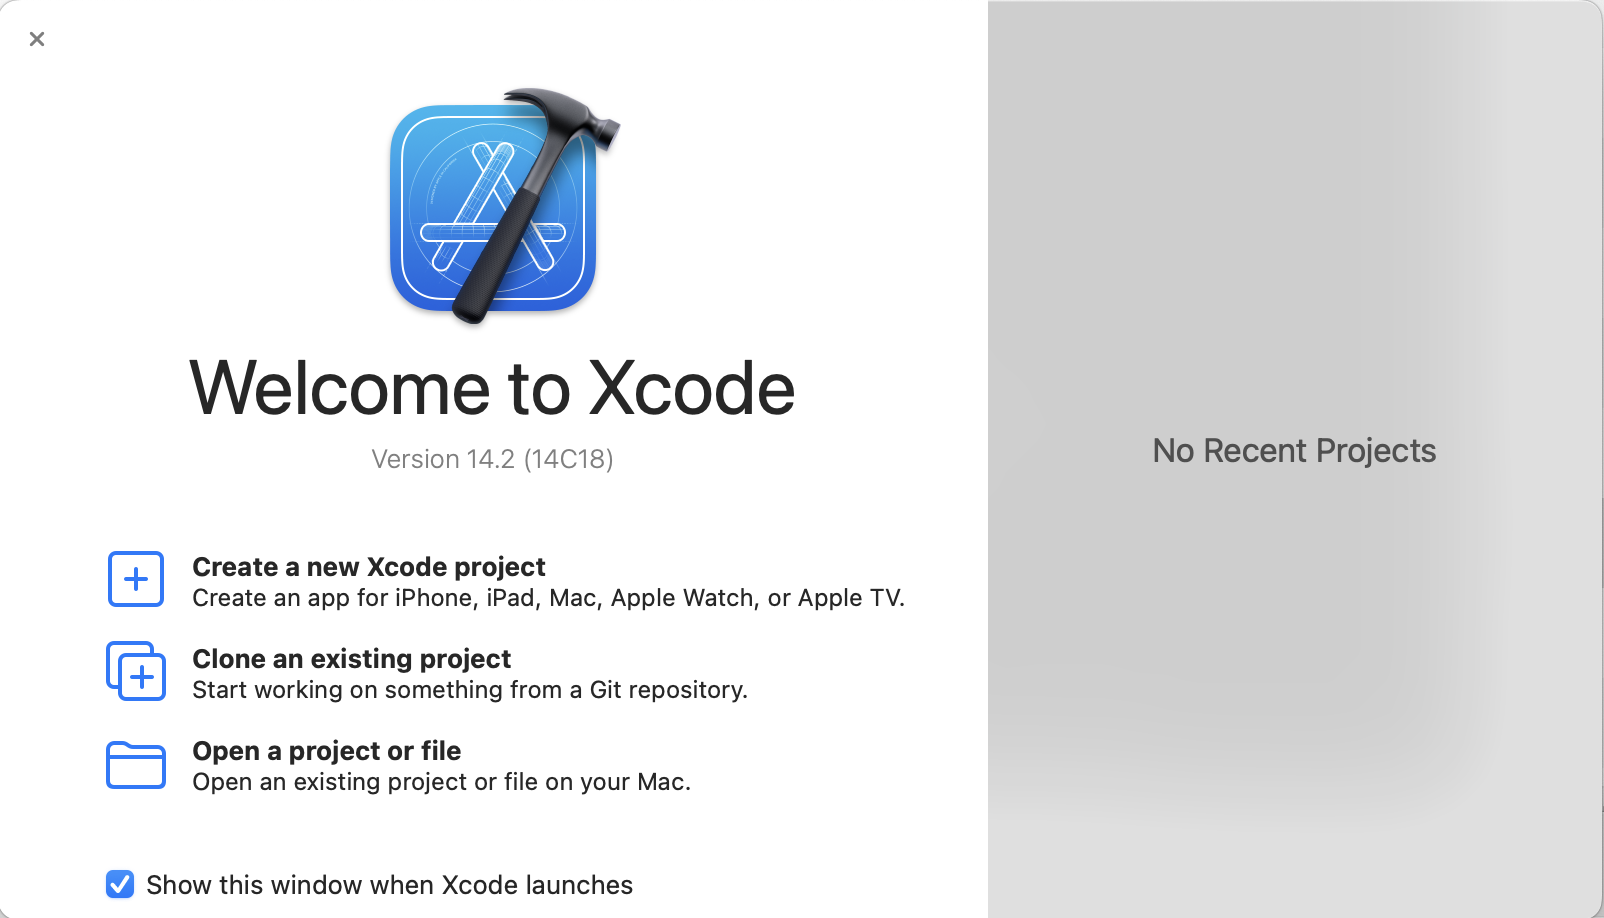
Figure 6.5: The XCode splash window typically will open when you launch XCode.
If you successfully found and launched XCode, go directly to the Section "Updating XCode".
If you did not find XCode on your system, proceed to the following Section "Installing XCode".
6.3.2 Installing XCode [top]
XCode is distributed by Apple. It is free but Apple wants you to sign up as a developer to have access to XCode. This can be done anonymously, but you have to do the following steps:
- Obtain an Apple ID if you haven't already. It is free. https://appleid.apple.com
- Obtain XCode from the App Store. Even though it's free, this is still the way to install it on your computer. To access the App Store, you obviously will need to have a network connection.
You can go to the App Store by clicking on the main Apple Menu at the very top left of your screen, and selecing App Store. You can also get there by selecting the App Store icon in your Dock if it is there. The icon should look like:

Figure 6.6: The App Store icon.
- Once you have launched the App Store, search on the term "XCode". You should see something like:
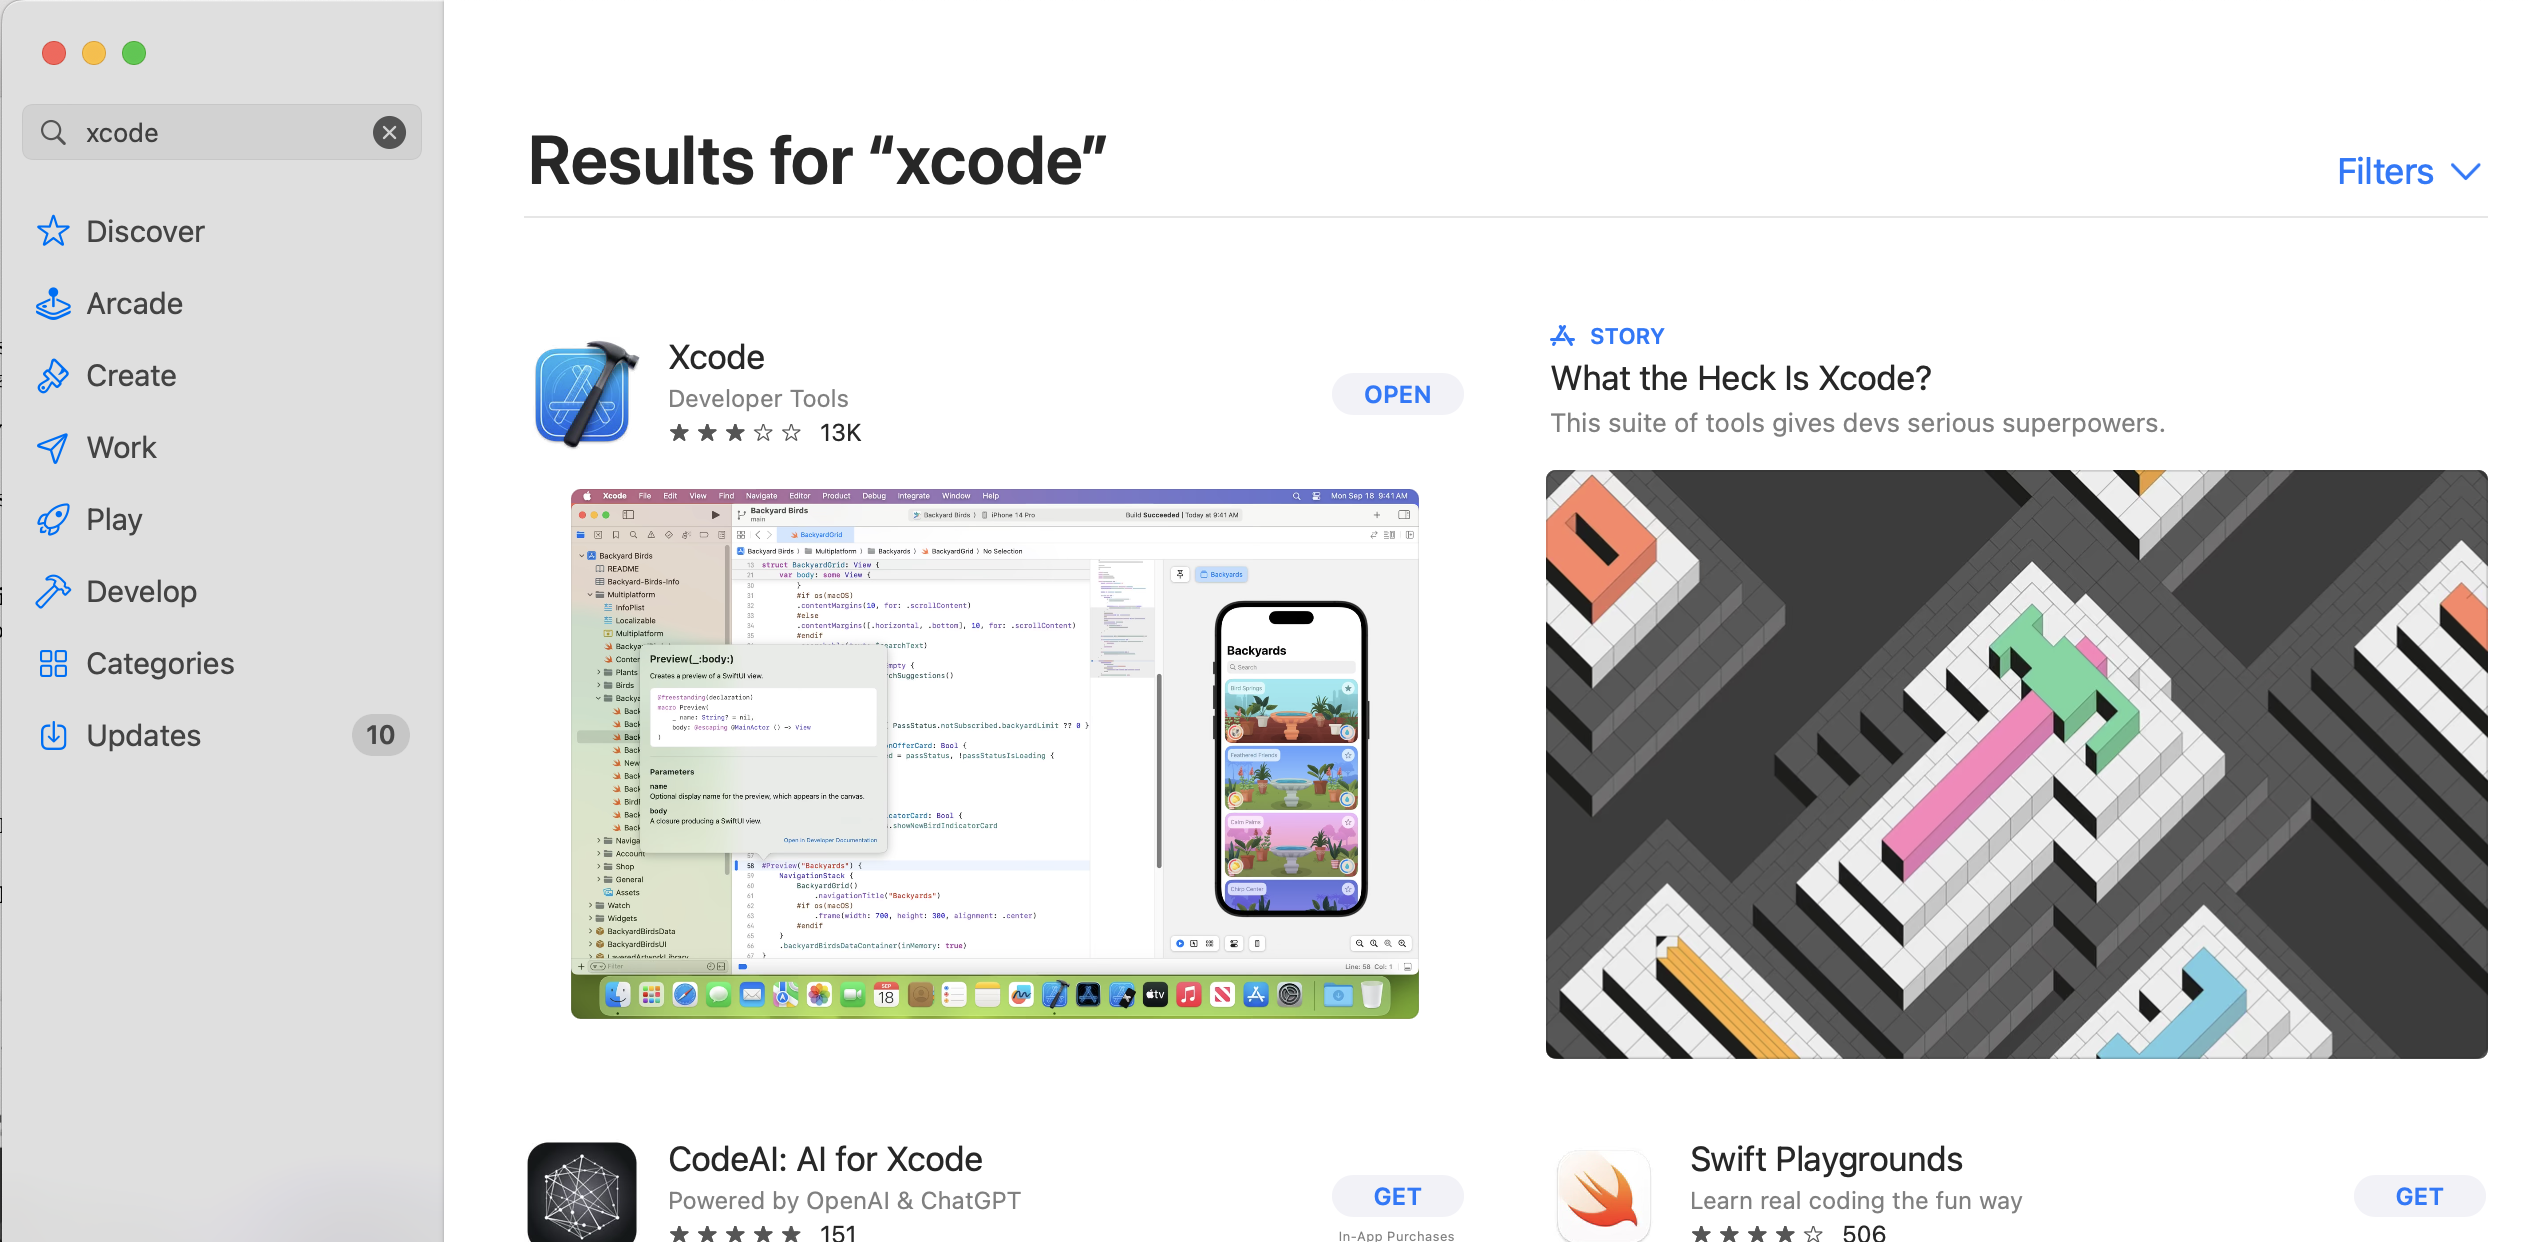
Figure 6.7: The XCode Application is found on the App Store.
Presumably the button next to XCode will say "GET", but it may say "UPDATE" or "OPEN" if in fact it somehow was installed but ecaped our attention when we were looking for it previously. If it says "GET" or "UPDATE", click on the button and go through the steps to download or update the software. Once you are done, or if the button said "OPEN", proceed to the section "Installing the XCode Command Line Utilities".
6.3.3 Updating XCode [top]
Even if XCode is installed on your machine already, we want to (a) check if it needs to be updated, (b) install the command line utilities. If you just now installed XCode as in the previous section, you can skip this step and proceed to the Section "Installing the XCode Command Line Utilities".
We check for available updates first since, if a new update is indeed applied, the command line utilities may need to be re-installed anyway. Note, some people may have their system configured to apply updates automatically. But if you don't you need to periodically check to see if updates are available and decide if the current moment allows for the disruption of downloading and applying updates.
To check if an update is available for XCode, select the main Apple pull-down menu from the upper-left corner of your screen. It may show something like:
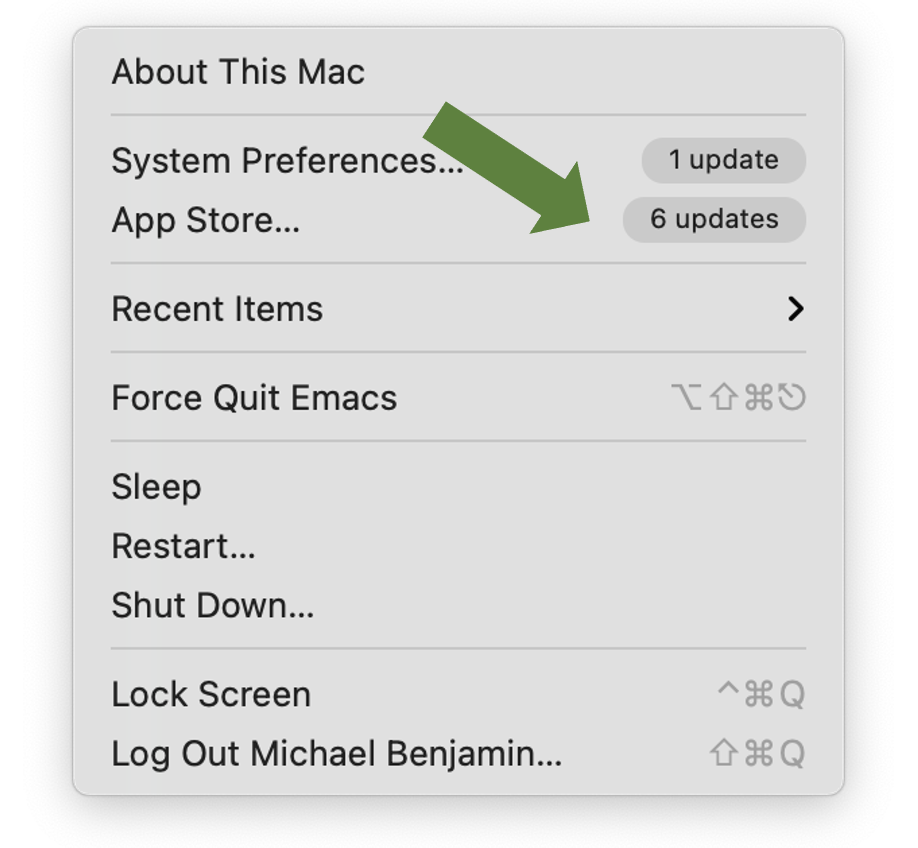
Figure 6.8: The Apple pull-down menu shows that there are currently 6 applications that need to be update.
In the above case, there are 6 applications from the App Store (XCode is obtained through the Apple App Store), that have updates available. Select this menu item, and a window like the following should appear.
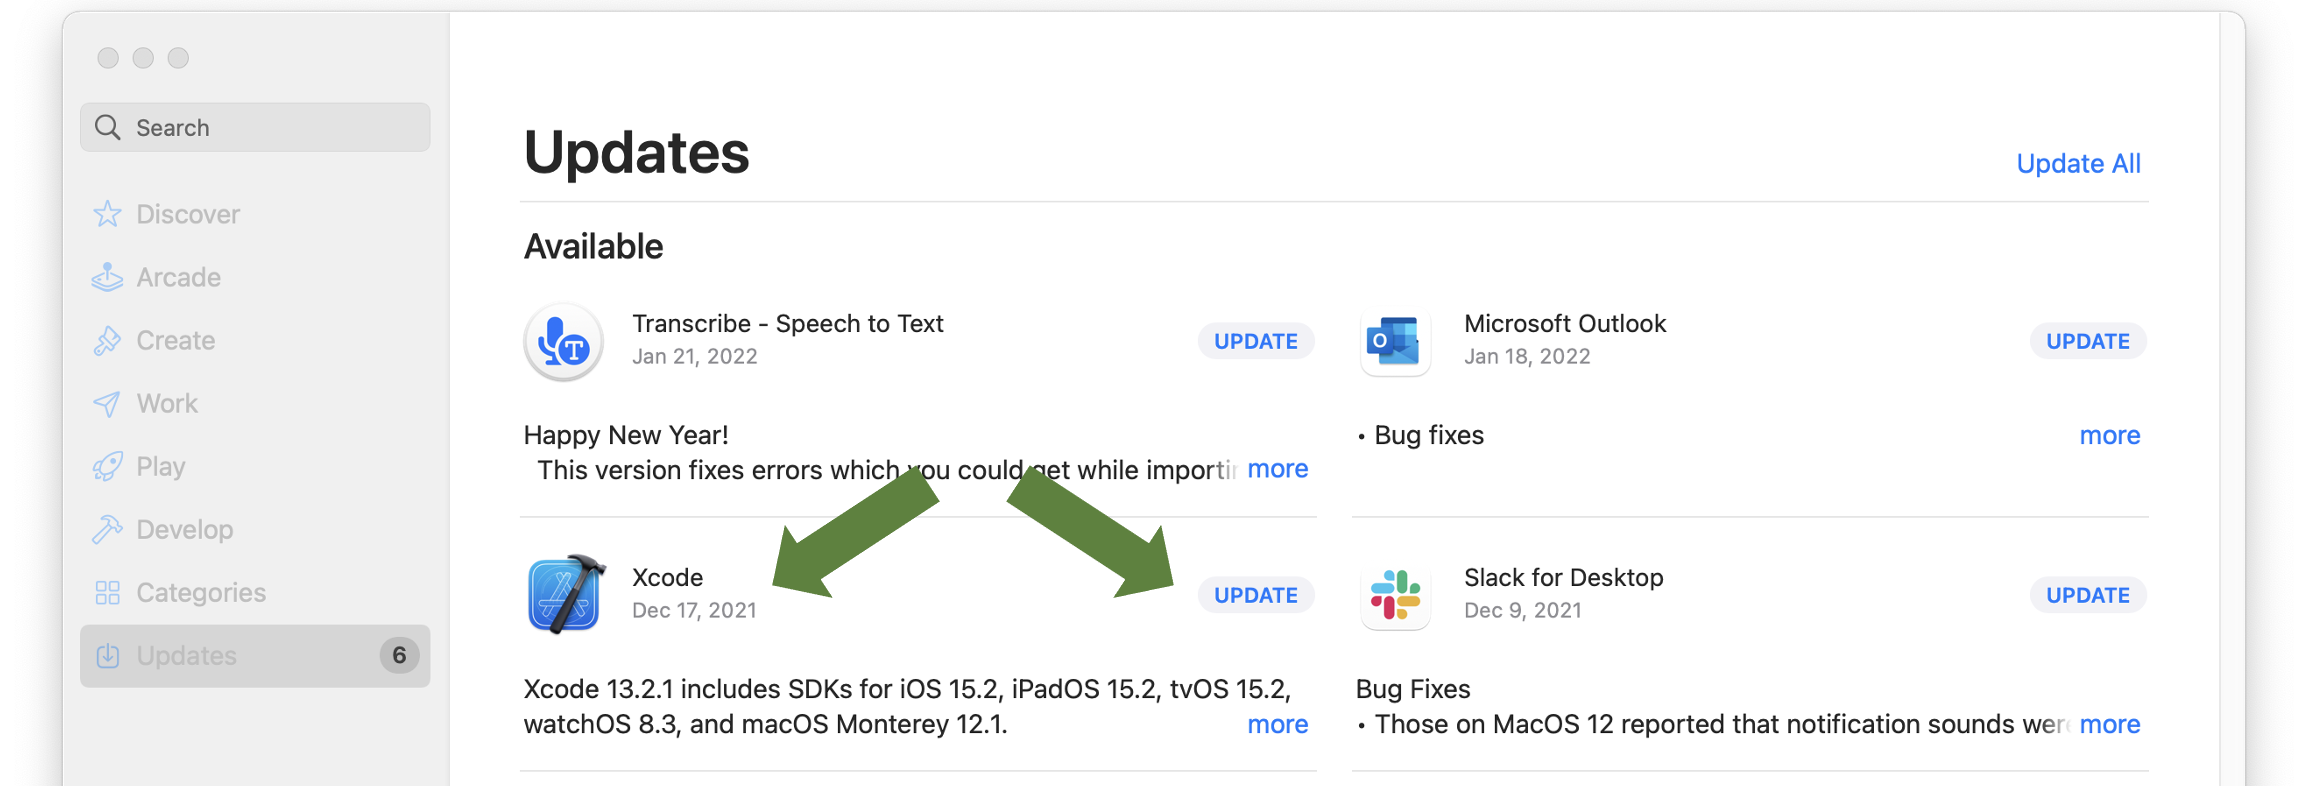
Figure 6.9: In this case XCode is listed as needing an update.
If you see XCode in the list of apps that need to be updated, as above, go ahead and select it by clicking on the UPDATE button and following the instructions.
6.3.4 Installing the XCode Command Line Utilities [top]
XCode is quite large and there are a number of optional components that may not be installed by default. One of these is the Command Line Utilities. We will install this from the command line with:
$ xcode-select --install
Follow the instructions presented to you either on the command line, or in a pop-up window. It may prompt you for your password.
You should now have a pretty powerful developer environment ready to go!
6.4 Installing and Using the Homebrew Package Manager [top]
We will use MacPorts or Homebrew occasionally in this class to install open source software packages as needed. Both package managers work perfectly fine for the purposes of 2.680. You do not need both package managers. If you already have MacPorts installed, you can safely skip installing Homebrew, and vice-versa.
Arguably there is greater adoption of Homebrew than MacPorts, and Homebrew is generally faster to install packages, but both are very fast in practice. If you would like to use MacPorts, see:
https://oceanai.mit.edu/ivpman/help/osx_get_macports
This document describes how to obtain Homebrew and install needed packages for 2.680. If you're using a 2024 course-provided computer, Homebrew and most of the common packages are already installed. This topic is for someone using their own Mac for the class who may not have installed either package manager yet.
*Note: If you have a course computer, with Homebrew already installed, you still need to augment your shell path as described in the Section "Add Homebrew to Your Shell Path".
From the https://brew.sh page: Homebrew is the easiest and most flexible way to install the UNIX tools Apple didnât include with MacOS. It can also install software not packaged for your Linux distribution to your home directory without requiring sudo.
Note: You need to have installed XCode before Homebrew may be installed. If you have not installed XCode yet, or if you are not sure, return to this topic an do so. A direct link is here:
http://oceanai.mit.edu/ivpman/help/osx_get_xcode.
6.4.1 Getting the Homebrew base [top]
Homebrew is a package manager that allows you to easily download software packages needed in our labs. But the package manager itself, the Homebrew base, first needs to downloaded and installed in the steps described here.
(In most Linux distributions, the analogous package manager (apt-get) is present with the out-of-the-box Linux installation. Perhaps because many Mac users are not developers, the steps of installing XCode and a package manager are left as options for developers.)
Here's how to get Homebrew:
- Point your web browser to: https://brew.sh. At the very top of the page you will see "Installing Homebrew":
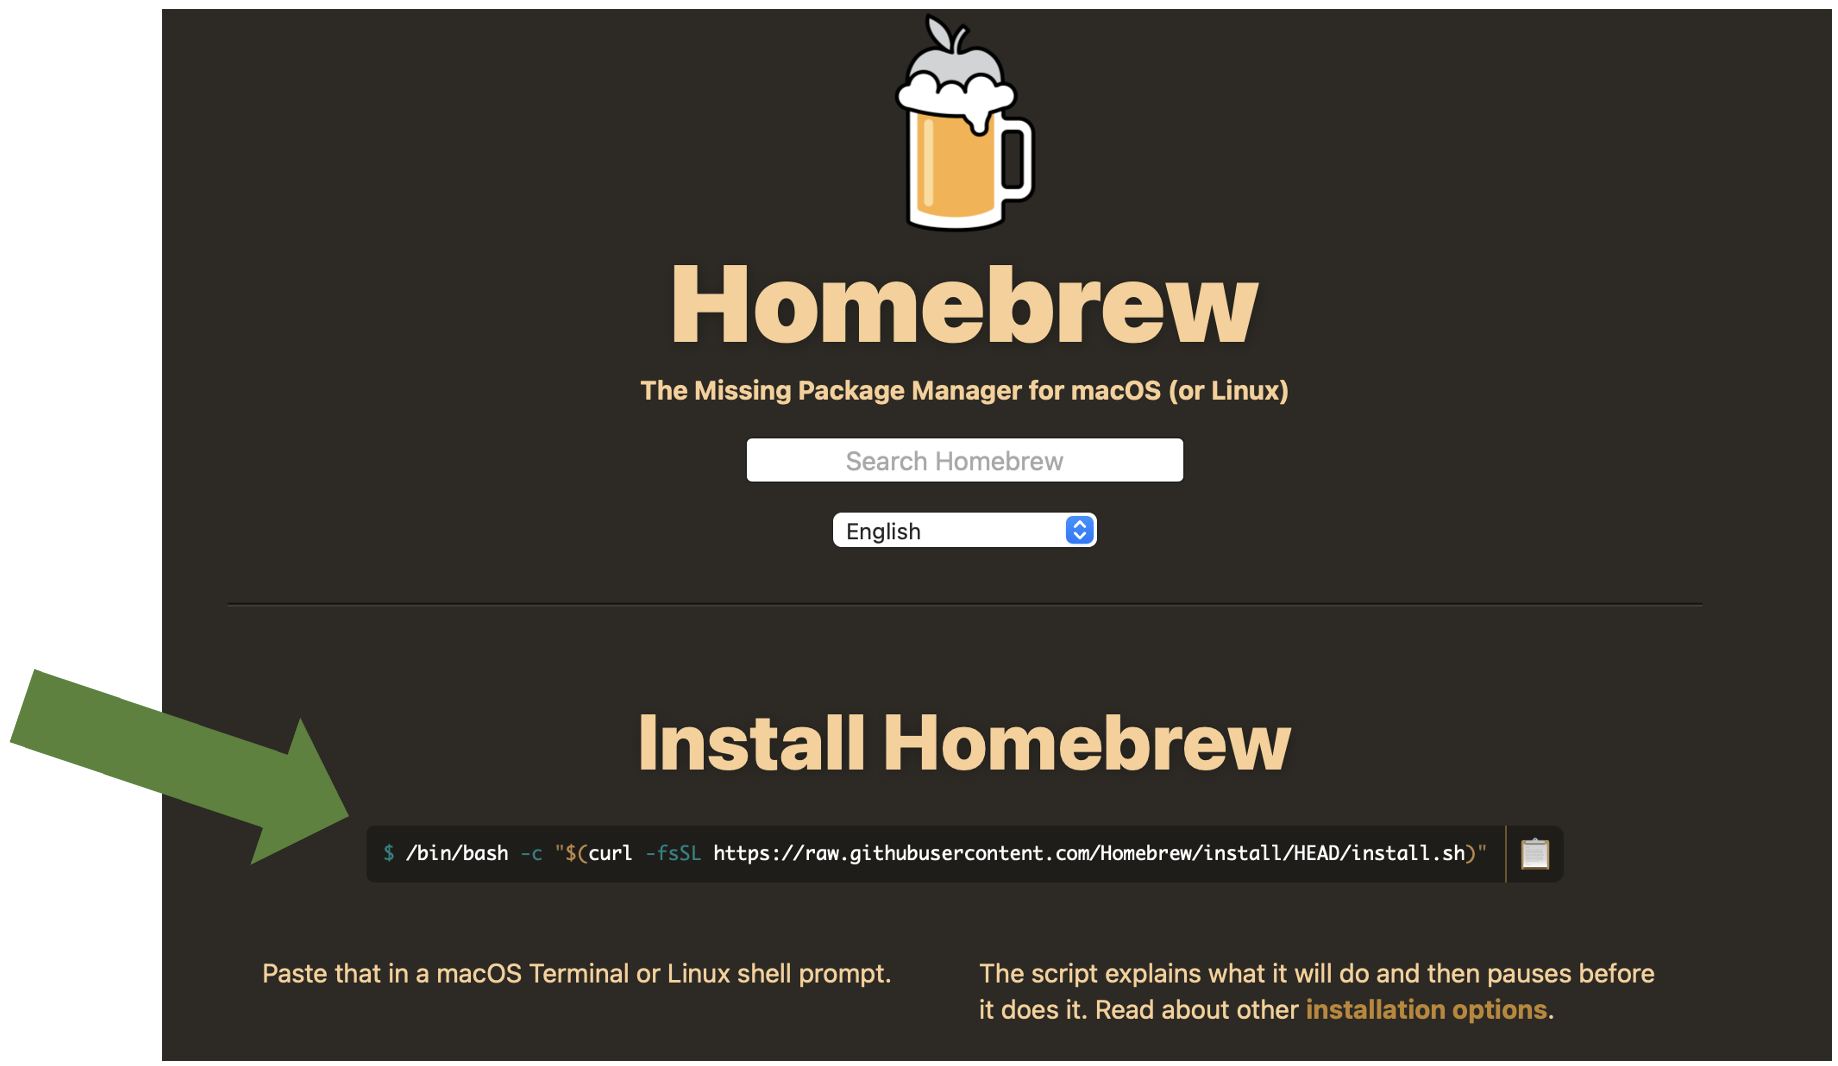
Figure 6.10: The Homebrew main page has instructions for obtaining Homebrew by cut-and-pasting the text in this window into your MacOS Terminal window.
- Follow the instructions to cut and paste the text into your terminal window and hit enter.
- Confirm that installation succeeded by checking that the brew command exists in the folder /opt/homebrew/bin, or in the folder /usr/local/bin. If not, see a TA.
Related Mac Note:
- Around 2022 Apple started selling MacBook laptops with their own M1 (and now M2 and M3) chips, instead of the Intel chips they had always used. For some reason, on the older Intel computers, homebrew would install all of its binaries in /usr/local/bin. And on the newer Apple M1 and M2 chip machines, homebrew would install binaries in /opt/homebrew/bin. (shrug emoji). You will need to know which case is you since this bin path will need to be added to your shell path in the steps described below.
- If you're not sure what type of processor you have, you can go to the Apple pull-down menu (upper left corner of your screen), select "About this Mac", which should be the very first option. The very first line should describe the Processor. Check if it says Intel or M1 (or M2).
Before you do anything else, let's install the wget command. It will come in handy very soon. Since the brew command is not yet in our shell path, we'll invoke it with its full path name:
$ /opt/homebrew/bin/brew install wget
6.4.2 Add Homebrew to Your Shell Path [top]
Homebrew packages are installed in /opt/homebrew/, (or /usr/local/bin per the above note on this issue). The brew command line tool should be installed in this bin directory, and you add it to your shell path. If you're not sure how to augment your shell path, see:
http://oceanai.mit.edu/ivpman/help/cmdline_augment_shell_path.
6.4.3 Download Packages Needed for our Labs [top]
Once Homebrew is installed, we need to use the Homebrew package manager to download and install common open source software packages used in this course. This part is relatively easy and is all done from the command line in a terminal window. Again make sure the brew command is in your shell path and then:
  $ brew install cmake
  $ brew install subversion
  $ brew install wget
  $ brew install libtiff
  $ brew install fltk
Or simply:
$ brew install cmake subversion wget libtiff fltk
- Note: Not all of the above packages result in an executable, i.e., program, installed on your machine. Some do, like cmake, wget, and svn from the subversion package. The others install libraries that other programs need later in the course.
- Hint: The brew install command accepts a list of packages on the command line like the last entry above. This obviates the need for re-typing your password each time.
- Hint: The brew list command, with no arguments, returns a list of already installed packages. You may notice a number of packages installed that you didn't request. The Homebrew package manager will also download dependency packages as-needed, to build the ones you did explicitly request.
- Hint: The brew leaves command, with no arguments, returns a list of installed packages that have been explicitly requested, as opposed to those that were installed because they were a dependency of a requested package.
7 Getting Started with the Command Line
Most of the exercises in this lab are given from the perspective of the command-line user. If you're not familiar with the command-line, this is a powerful mode of interfacing with your computer that, for many, far surpasses the efficiency afforded through a pure point-and-click GUI experience. For Mac users, the command line comes by way of the Terminal application discussed above. For GNU/Linux users, you are very likely already accustomed to opening a console or shell window.
The below couple sections help the very-new users get started a bit. Just enough so we can reach the goals of our lab. Much more information can be found on the web, and there are a few help pages related to the command line on the course help page:
http://oceanai.mit.edu/ivpman/help
Finally let's not overlook help already on your system. For any given GNU/Linux command, for example wget, try one of the below to get further information.
  $ man wget
  $ wget --help
7.1 Command Line Quick Survival Basics [top]
The Terminal, i.e., the command line environment, offers an incredibly powerful set of tools out of the box. These tools are readily extendible through the addition of countless open source additions, as well as through additions made by you, in this course and hopefully well afterwards. To get started, the below list represents the bare bones basics. This list represents my own perspective, but you can find similar material by just doing a web search on "command-line basics".
Here we use the terms Terminal and command line interchangeably. This reflects a Mac user's perspective since the Terminal application is the most common way to interact with the command line. If you're a GNU/Linux user, you're more likely to refer to the Console instead of the terminal.
Let's get started.
7.1.1 Viewing the Contents of Your Directory with ls Command [top]
The command line offers just another way of navigating through the same file system you might otherwise navigate with GUIs such as Finder. Perhaps the most commonly used command is ls, which just displays the contents of present directory:
  $ ls
  mail  project_fango   public_html   report_a.pdf   report_b.pdf   test.txt
The ls command comes with a bunch of command line options. These are extra things you can type on the command line as arguments to the command being invoked. For example, in the above, six items are reported. It turns out that mail, project_fango, and public_html are directories, i.e., folders, containing other files or directories. This is hard to discern from the above output. But if you use a simple command line option, "-F", you'll be able to see this right away:
  $ ls -F
  mail/  project_fango/   public_html/   report_a.pdf   report_b.pdf   test.txt
Note all directories have the trailing "/" character. I also use -G to make the directories show up in color. This can be done by typing ls -F -G, or more simply, ls -FG. There are several useful options worth exploring when you get a chance. For example, in directories with many files, you can sort by file type or date. Or you can filter to only show files of certain types. To explore, just type man ls to see some options.
Note also that arguments provided on the command line are separated by spaces. This is why most command line users loathe file names with spaces. Note the names report_a.pdf above uses the underscore character instead.
7.1.2 Knowing what directory (folder) you are in with pwd [top]
Using the command line, you are always "in" a particular directory. Remember, command line users tend to refer to a directory where other users might refer to a folder. To know what the "present working directory" is, simply use the "pwd" command with no arguments.
  $ pwd
  /Users/mary/lab_one
This is such a useful piece of information to have that many users customize their command line prompt (the dollar-sign at the left) to show the present working directory. As an exercise, search the web for "customize command line prompt" and see if you can set this up.
7.1.3 Changing Directories with the cd Command [top]
Now that you know how to tell what directory you're, you might be wondering how to change directories, moving around the overall file structure. To do this we use the cd command. The most common argument is the full path name of the directory you want to go to, as in:
  $ cd /Users/mary/lab_one
  $ pwd
  /Users/mary/lab_one
  $ cd /Users/bob/projects/lab_three
  $ pwd
  /Users/bob/projects/lab_three
There are a few handy shortcuts that should be in your mental toolbox right away. The first is for changing to the directory right above your current directory. For example, suppose you are presently in the directory /Users/bob/projects/lab_three, and you wish to move up to the directory /Users/bob/projects. You could do it the hard way:
  $ pwd
  /Users/bob/projects/lab_three
  $ cd /Users/bob/projects
  $ pwd
  /Users/bob/projects
Or you could do it the easy way, replacing the third line above with the simpler version below:
  $ pwd
  /Users/bob/projects/lab_three
  $ cd ..
  $ pwd
  /Users/bob/projects
The ../ notation is an actual "directory" in every directory in your file system. This special shorthand name has been around forever. Another shorthand name is ./ which stands for the current directory. Because both directories begin with a dot, they are also known as hidden directories, and don't show up when you use the ls command. They can be seen if you use the ls -a option for showing "all" files and directories, including the hidden ones. Go ahead and try it now, you will see both ./ and ../ regardless of which directory you are in. Even the "root" directory, the top-most directory in the tree, contains the ../ directory. Trying to go up from the root directory will just land you back in the root directory however.
A few other handy shortcuts are below. To move up two directories at once:
$ cd ../../ (go up two directories)
To move to straight to your home directory:
  $ cd                            (go directly to your home directory)
  $ pwd
  $ /Users/bob
To move to a directory within your home directory:
  $ cd ~/project                  (go to a subdirectory of your home directory)
  $ pwd
  $ /Users/bob/project
To move to the last directory you were in, prior to the last invocation of cd:
  $ pwd
  $ /Users/bob
  $ cd /Users/mary/projects/one
  $ pwd
  $ /Users/mary/projects/one
  $ cd -                          (go to the directory prior to the last cd)
  $ pwd
  $ /Users/bob
7.2 Creating/Removing Directories and Files on the Command Line [top]
Now that we know how to see what directory we're in with pwd, and see the contents of the directory with ls and change between directories with cd, we discuss how to make and remove contents of directory. A directory has two types of elements: other directories, and files. We begin first with directories.
7.2.1 Making a New Directory with the mkdir Command [top]
Making a new directory is done with the mkdir command. It typically has only a single argument, the name of the new directory. For example, suppose your current directory has the following contents:
  $ ls -F
  mail/  public_html/   report_a.pdf   report_b.pdf   test.txt
You can make a new directory, project_fango, using mkdir:
  $ mkdir project_fango
  $ ls -F
  mail/  project_fango/   public_html/   report_a.pdf   report_b.pdf   test.txt
That's it. In our example, we were in the directory where we created the new directory, but that's not necessary. You can provide a full path name of the directory you wish to create. For example:
$ mkdir ~/project_fango
will create the new directory in your home directory regardless of where you are in your file system. If the directory already exists, it will tell you so:
  $ mkdir ~/project_fango
  $ mkdir ~/project_fango
  mkdir: project_fango: File exits
Lastly, to make a directory, you need write permissions in the directory where you're creating the new directory. By default you always have write permission in your home directory and in the new directories you make. But eventually you may encounter the issue of permissions.
7.2.2 Removing a Directory with the rmdir Command [top]
A directory may be removed with the rmdir command:
$ rmdir project_fango
To use this command the directory must be empty. If you really wish to remove a directory containing a whole tree of other files and directories without having to crawl through the tree, you can do this with the rm -rf command discussed below. Be careful, this command wields great power.
7.2.3 Making a File with the touch Command [top]
There are many ways to make a new file; with an editor, as output from a program and so on. Assuming no knowledge yet of these things, the easiest way to create an empty file is with the touch command
  $ touch file1 file2 file3
  $ ls
  file1 file2 file3
The above action creates three empty files. To check that they are empty it may be a good time to introduce the -l (for long format) option of the ls command:
  $ touch file1 file2 file3
  $ ls -l
  -rw-r--r--   1 john  staff     0B Nov  3 09:51 file1.txt
  -rw-r--r--   1 john  staff     0B Nov  3 09:51 file2.txt
  -rw-r--r--   1 john  staff     0B Nov  3 09:51 file3.txt
The fifth column confirms that each new file created with touch has a size of zero bytes. The important thing is now we know a simple way to make a file to demonstrate the next essential command, rm for removing a file.
7.2.4 Removing a File with the rm Command [top]
Existing files may be removed with the rm command, which accepts one or more file names as arguments:
  $ ls
  file1 file2 file3
  $ rm file3
  $ ls
  file1 file2
A note of caution. The rm command can be brutally powerful. It does not, by default, ask you if you're sure about what you've just requested to be removed. I highly recommend you change this default behavior. The rm command has a command line option -i that changes rm to ask for confirmation:
  $ ls
  file1 file2 file3
  $ rm -i file3
  remove file3?
To see how to make this interactive mode the default mode for the rm command, see the following help topic:
http://oceanai.mit.edu/ivpman/help/cmdline_interactive_rm_mv_cp
For now, just be really careful using the rm command.
7.2.5 Removing Groups of Files with the rm Command [top]
The command line offers a generic ability for matching groups of files or directories by naming a pattern. To remove all three of the files in the example above, one could instead just type:
  $ ls
  file1 file2 file3
  $ rm file*
  $ ls
  $
The asterisk pattern matches any combination of characters against all file and directory names in the current directory. You could also remove, for example, all PDF files with rm *.pdf. Or any PDF file in any subdirectory with rm */*.pdf. Obviously this should be used with caution.
7.2.6 Removing Directories with the rm Command [top]
It was discussed above that a directory may be removed with the rmdir command. This only works when the directory being removed is empty. To remove an entire directory, including all its subdirectories, you can use two additional command line arguments:
$ rm -rf project
The -r options stands for recursive and will recursively remove the entire tree in the named directory. The -f option stands for force and overrides any -i option, meaning no prompt for confirmation will be presented after the command is invoked. Extremely powerful, extremely dangerous. Use with caution.
As with mkdir, the rm command will not let you remove files or directories for which you do have write permisions. But you should certainly pause and think for a second whenever you begin a shell command with rm -rf.
7.3 Moving/Renaming and Copying Files on the Command Line [top]
Moving (renaming) and copying files and directories are done on the command line using the mv (move) command and the cp (copy) command.
7.3.1 Moving and Renaming a file with the mv command [top]
The jobs of moving and renaming files are both handled by the mv command. In the simplest case for example, file1 can be renamed to file file2 like this:
  $ ls
  file1
  $ mv file1 file2
  $ ls
  file2
The mv command may also be used to move one or many files into a directory:
  $ ls -F
  file1   file2   file3   file4   file5   project/
  $ mv file* project
  $ ls -F
  project/
  $ ls project
  file1   file2   file3   file4   file5
If you try to move a file into a directory that doesn't exist you will get an error.
  $ ls -F
  file1   project/
  $ mv file1 project23/
  mv: rename file1 to project23/: No such file or directory
By default the mv command will let you rename one file to another, even if the target file already exists. Most people find this a bit unsettling to allow this without prompting for confirmation of intention. If the mv command is used with the -i option, the user will indeed be prompted for confirmation if the target file already exists. For this reason most people employ an alias for the mv command that makes the interactive mode the default:
  $ alias mv 'mv -i'       (if using tcsh)
  $ alias mv='mv -i'       (if using bash)
See the help topics on aliases and shell configuration to do this. Once this is done, you can always use the -f (force) command line option to force the renaming of file to a target, even if the target already exists, without prompting the user for confirmation.
7.3.2 Copying files and directories with the cp command [top]
Files and whole directories can be copied with the cp command. The simplest case of copying one file to another:
  $ ls
  file1
  $ cp file1 file2
  $ ls
  file1 file2
Copying a directory with cp requires a couple additional arguments on the command line:
  $ ls -F
  project/
  $ cp -rp project project_backup
  $ ls
  project/ project_backup/
The first argument -r stands for recursive and indicates that all subcomponents of the folder being copied should also be copied, following the tree structure recursively in each subfolder's subfolder and so on. The second argument -p is not required. It ensures that certain file attributes are preserved when copying. This includes the read-write permissions, and date of last modification. When copying a directory it is a good habit to always use this option.
A note of caution. If you are copying a file to a file that already exists, the cp does not, by default, prompt you for a confirmation of your intentions. I highly recommend you change this default behavior. See the following additional help topic:
http://oceanai.mit.edu/ivpman/help/cmdline_interactive_rm_mv_cp
7.4 How to Customize Your Shell Environment [top]
The command line experience is driven by a special program called the shell. The shell utilizes a number of common commands such as ls, rm, mkdir and so on. It turns out, there are a number of different shells to choose from. While they are all very similar, they have important differences, slightly different syntax, and users tend to have a strong allegiance to their choice of a shell. Perhaps the most common choices are the bash, zsh and tcsh shells. The bash shell is what is typically running out-of-the-box upon a GNU/Linux install. MacOS by default runs zsh, but we configured it to run bash instead in the steps discussed earlier and here:
http://oceanai.mit.edu/ivpman/help/osx_terminal
An important part of using the command line involves the customization of your shell to make it support your individual work style. In this help topic we:
- Explain how you can tell which shell you are presently using
- Introduce shell configuration files
- Provide example bash and tcsh shell configuration files
- Introduce custom prompts
The bash and tcsh executables are typically found in /bin/bash and /bin/tcsh. At any time you can just launch a new shell from the command line:
$ /bin/bash
This has the effect of perhaps switching shell types if you were using another shell, and it clears the local shell history (another topic).
7.4.1 What shell am I using? [top]
Before augmenting your shell path, you need know which shell you're running. In most cases, it is either bash or tcsh. One way to find out:
  $ echo $0
  bash                    (should return with either bash or tcsh)
Take note of the answer and proceed.
7.4.2 Configuration files [top]
Regardless of which shell you use, custom configuration is done with one or two key configuration files stored in the user's home directory. When the shell is launched, the file is read, and customizations are in place. Typically each line in the configuration file uses the same format as if the user typed them all directly at the start of their session.
If you have N terminal or console windows open, then you have N separate shell sessions in operation. They all read the same configuration file(s) upon startup. If you do make a change to the shell environment from the command line, e.g., define an alias, change an environment variable, it will only be in effect in the shell session where you typed it in. If you want that effect to be carried over across all future shell sessions, this needs to be reflected in the shell configuration file(s).
7.4.3 Example shell configuration files for bash users [top]
Bash typically is configured with the .bashrc and .bash_profile files in the user's home directory. For a discussion on why both files are used, see here:
http://www.joshstaiger.org/archives/2005/07/bash_profile_vs.html
Example .bash_profile and .bashrc files can be found by pointing your web browser to the below URLs and copying and pasting what you want into your own files.
http://oceanai.mit.edu/ivpman/docs/.bash_profile
http://oceanai.mit.edu/ivpman/docs/.bashrc
Or just use wget to download copies directly into your home directory:
  $ cd                                                   // go to your home directory
  $ wget http://oceanai.mit.edu/ivpman/docs/.bash_profile // get the file
  $ wget http://oceanai.mit.edu/ivpman/docs/.bashrc       // get the file
7.4.4 Customize Your Shell Prompt [top]
One customization I can't live without is the customization of my shell prompt. By convention when we indicate a command typed on the command line, we would show something like:
$ cd ../
The dollar sign character is the shell prompt. In practice, people commonly customize this with something like:
leonardo:Research/project$ cd ../
Everything to the left of the dollar sign is a customization. In this case leonardo is the name of the machine, and Research/project is the name of current directory. Actually the full name of the current directory, may be too long to want on your shell prompt, so only two levels are shown in the prompt. This is my personal favorite configuration, but you can choose one of your own. For me, I always want to know what machine I'm on because I'm frequently remotely logging in to other machines or robots. And I always want some indication of which directory I'm in and showing two levels is enough to do the trick.
Next we'll show how this kind of configuration can be done for both bash and tcsh. Regardless of how you configure yours, I definitely recommend taking this step. It's extremely useful in practice and will cut down common errors due to not knowing what directory or machine you're on when you type a command.
7.4.5 Customize Your Shell Prompt for bash Users [top]
If you're using bash and you took the example .bashrc file provided above, then you already have customized your shell prompt. It was done with the line:
PS1="\H:\W\$ "
The \\H will expand to the machine name, and the \\W will expand to the last component of the present working directory. The \\$ simply puts the dollar sign at the end of prompt. A convention is to use the dollar sign for bash, and the percent sign for tcsh.
There are many other ways to configure your prompt to your liking, such as including the time, day of the week, and so on. A google search on "customize bash prompt" will give you all you need.
7.4.6 Customize Your Shell Prompt for tcsh Users [top]
If you're using tcsh and you took the example .cshrc file provided above, then you already have customized your shell prompt. It was done with the line:
set prompt="%m:Â "
The %m will expand to the machine name, and the %C2 foobar will expand to the last two components of the present working directory. The %% simply puts the percent sign at the end of prompt. A convention is to use the percent sign for tcsh and the dollar sign for bash.
There are many other ways to configure your prompt to your liking, such as including the time, day of the week, and so on. A google search on "customize tcsh prompt" will give you all you need.
7.5 Adding a Directory to Your Shell Path [top]
The shell path is a list of locations your shell program knows about to look for programs to run. When you type:
$ pwd
or
$ du
The pwd command is located in the /bin directory and du is located in the /usr/bin directory. These locations are conventional locations most shells users have in their shell paths. But if you add your own code (as we will in this class) you'll need to know how to augment your shell path to tell your shell where the new programs reside.
Adding a directory to your shell path is a very common thing command line users need to do. Unfortunately the need often comes up for new users while they're still finding their feet with the command line, and before they know what a shell environment is, and sometimes before they even know how to use a text editor. Here we focus on the minimal steps for adding a new directory to the shell path, perhaps glossing over a few things for the sake of getting it done.
7.5.1 Make Sure You Know How to Edit a Text File [top]
The next step involves a simple edit to a text file. If you know how to do this proceed to the next step.
If you don't know what a text file is, vs. say a Microsoft Word document which just has text, then you may not know what a text editor is either. Wikipedia has a good entry on this topic. I recommend giving it a skim.
The good news is that you very likely already have a text editor on your machine. On the Mac it is an application called TextEdit, in the /Applications/ directory. In GNU/Linux, it is a called gedit in the /usr/bin directory. And, if for some reason those directories are not in your shell path, don't despair. You can launch these editors by typing their full path name, or double clicking on them in a GUI like Finder on the Mac.
The bad news is that we really don't want to be using editors like gedit or TextEdit in our class. And we certainly don't encourage people to launch a text editor from a GUI. We want to do this all from the command line, and want to use a more powerful text editor like Emacs or vi. But for now, do what you need to do, just so long as you can make simple edits to a text file so we can get through the next few steps below.
If you really do want to hit the pause button here and go get Emacs and learn just enough to make and save simple edits, then check out the first couple emacs help topics on the main help page.
The main help page:
https://oceanai.mit.edu/ivpman/help
The Emacs Editor help page for MacOS users:
https://oceanai.mit.edu/ivpman/help/emacs_get_for_osx
7.5.2 Augmenting the Shell Path for bash Users [top]
If you're a bash user, your configuration is done in a couple files in your home directory: .bash_profile, and .bashrc. Use ls -a to see them since they are hidden files. If you don't have these files, I recommend downloading the example files described earlier, or on the help page:
http://oceanai.mit.edu/ivpman/help/cmdline_shell_environment
Otherwise, if you already have the .bashrc file, edit the file and put the following two lines at the end of the file.
  PATH=$PATH:/my/full/directory/
  export PATH
7.5.3 Verifying Success [top]
To verify success, pick one of the executables in the directory you added to the shell path and use the which tool:
  $ which cmake
  /opt/local/bin
Note the returned value may also be something like /usr/local/bin/cmake, or /bin/cmake, or /usr/bin/cmake, depending on if your system is MacOS or GNU/Linux and depending on the particular release of MacOS or GNU/Linux. The important measure of success is that the above command does just return without an answer.
7.6 Augmenting the Power of the Command Line with Aliases [top]
Aliases may be the single most powerful, and simplest tool available for command line users. They also allow you to personalize your work flow. They allow you to save time on simple things that you may do very often. For example, to change directories to the directory above the current one, you normally type:
$ cd ..
No problem, but if do this a lot, this can be simplified by making an alias:
$ alias cdd='cd ..'
Once this is defined, I can change directories a bit more efficiently with:
$ cdd
7.6.1 Add aliases to your shell configuration to make them persistent [top]
Although aliases can be defined on the fly on the command line as above, the drawback is that they do not carry over to other shell sessions in another window or at a later date after logging back in. To make more persistent aliases, add them to your shell configuration file. The above example alias can be achieved with the following line in your .bashrc file as in:
alias cdd='cd ..'
7.6.2 Suggestions for useful aliases [top]
Below are some suggestions offered up here partly from firm belief of best practices, and partly based on what I found to work for me over time. In the category of best practices, I recommend altering your rm, mv and cp shell commands to work in the interactive mode:
  alias rm='rm -i'
  alias cp='cp -i'
  alias mv='mv -i'
In my opinion, any time you're about to potentially overwrite or remove a file, a prompt should be given to the user. You can always override this by using -f on the command line which will override the -i. You might have these already if you took the class example shell configuration files. Some others:
  alias    cdd='cd ..'
  alias   cddd='cd ../..'
  alias  cdddd='cd ../../..'
  alias cddddd='cd ../../../..'
The above should be self-explanatory. Try it. The need to change up a directory or three comes up a lot!
alias hemacs='/Applications/Emacs.app/Contents/MacOS/Emacs -bg DarkOliveGreen -fg white'
This emacs alias explicity invokes the graphical emacs (if you installed it from emacsformacosx.com) rather than the one in /usr/bin/emacs. It also sets my background and foreground color the way I like them.
  alias duh1='du -d 1 -h'               (in OS X)
  alias duh1='du --max-depth=1 -h'      (in GNU/Linux)
The du command is super useful. It estimates the file space usage for the current directory and each subdirectory. The command line options are slightly different in GNU/Linux and OS X as shown above. By setting the depth (OSX) or max-depth (GNU/Linux) to one, this limits the depth of reporting subdirectories to just the present directory and subdirectories. Otherwise it will recursively report everything, which I find is too much. The first time you fill up your hard drive with a runaway log file, you will find this command indespensible.
  alias  cdmi='cd moos-ivp'
  alias cdmim='cd moos-ivp/missions'
  alias cdmis='cd moos-ivp/src'
In the example above the moos-ivp aliases are not what's important. The general idea is to give yourself meaningful aliases for jumping through your own file structure. Probaly 70% or more of my aliases are of this type, and may account for most of why I think using the command line is way more efficient than anything else. My "cd aliases" all begin with "cd" and usually what follows is a single letter for each directory in the path, or some heuristic along these lines. If I look over a student's shoulder midway through a course and I see them typing "cd ../../project12/missions" rather than something like "cdp12m", then a feeling of failure rushes over me, like I have failed to pass on something important. Embrace this capability.
  alias runa='cd moos-ivp/missions/s1_alpha; pAntler alpha.moos'
  alias runb='cd moos-ivp/missions/s1_bravo; pAntler bravo.moos'
As before, the important thing here is not the actual mission. The key point is that an alias can include multiple shell commands separated by a semicolon. When you're working on a particular autonomy problem, you may find yourself launching the same mission over and over again to test little changes. With the above style alias, you can launch the mission from wherever your shell happens to be in the file system. You can even add a timewarp component to launch the mission with time warp 12, for example, with an alias like runa12.
7.6.3 Temporarily disabling an alias [top]
Sometimes you may want to temporarily disable an alias like:
alias rm='rm -i'
and return the rm command to the way it was before, without prompting for confirmation. You can do this by typing:
  $ alias rm='rm'
  . . .
7.6.4 Reminding yourself of previously defined aliases [top]
If the power of aliases strikes you as it did me, you may find at some point that you have a lot of aliases defined. A quick check on my own computer just now confirms that I have over 850 aliases defined. People ask me how I can remember them all? Well, I don't. But I remember the important ones, and even the lesser used ones are still pretty useful when I come back to working on a piece of code or a paper I haven't touched in a while.
One way to remind yourself of previously defined aliases is to just look in the file where they are defined, e.g., .bashrc. But you know there has to be a better way. A slightly better way is to just type the following:
  $ alias
  alias cp='cp -i'
  alias mv='mv -i'
  alias rm='rm -i'
  . . .
This will dump all your defined aliases in alphabetical order. At least you didn't have to open an editor to get this information, but the alphabetical order may actually make it harder to find what you're looking for. A better approach is to use grep to find what you're looking for. For example, you may remember that you had an alias related to launching emacs, so you could do this on the command line:
  $ alias | grep emacs
  alias hemacs='emacs --geometry=162x83+735+0 -bg DarkOliveGreen -fg white'
  alias nem='emacs -nw'
This will find only only those aliases that have the word "emacs" as part of their definition. This is such a useful trick that I actually have an alias for that in my shell configuration file as in:
alias afind='alias | grep'
This can now be used instead to find all aliases with the word "emacs" in the definition. The search list can be further pruned to say only show aliases that have "emacs" and "geometry" in the definition:
  $ afind emacs | grep geometry
  alias hemacs='emacs --geometry=162x83+735+0 -bg DarkOliveGreen -fg white'
8 All Users - Getting, Building and Running the Course Software
The objective is to build and run the "Hello World" version of the marine autonomy software, the Alpha mission. This will confirm for us that:
- You have everything you need in terms of software installed on you machine.
- You have properly configured your shell path to include the locations of the software executables used in this class.
Follow the steps here until you are able to successfully run the Alpha example mission.
8.1 Downloading and Building the MOOS-IvP Software [top]
The MOOS-IvP autonomy code may be checked out and built following the steps on this page. Before you begin, below are few steps that need to be done beforehand:
8.1.1 For MacOS [top]
Here are prerequisites for the Mac (likely not needed if working with an MIT course-provided laptop):
- On the Mac you will need to have installed XCode and command line tools. More info here:
http://oceanai.mit.edu/ivpman/help/osx_get_xcode - On the Mac you will need to have installed either the Homebrew or Macports package manager installed, for installing a few external software dependencies you will need for building all of MOOS-IvP. While the helm and other "on-the-robot" apps do not have dependencies, the MOOS-IvP graphical (operator) tools do have dependencies like OpenGL, FLTK, etc.
More info on Homebrew here:
http://oceanai.mit.edu/ivpman/help/osx_get_homebrew
More info on MacPorts here:
http://oceanai.mit.edu/ivpman/help/osx_get_macports
- Once the package manager has been installed, homebrew (or macports), per the above instructions, install the packages needed for running the course software, e.g., cmake, subversion, fltk, libtiff, xterm.
$ brew install cmake subversion fltk libtiff xterm
8.1.2 For Linux [top]
Here are prerequisites for Linux (likely not needed if working with an MIT course-provided laptop):
- On a Linux machine, the build environment, e.g., C++, and the package manager come with the Linux OS install, so there should be no issues there.
- Install the packages needed for running the course software, e.g., cmake, xterm, subversion, libfltk1.3-dev, libtiff5-dev.
$ apt-get --assume-yes install cmake xterm subversion libfltk1.3-dev libtiff5-dev
8.1.3 Downloading the Software [top]
The latest software is downloaded using Subversion (svn). You will download this into your home directory.
  $ cd
  $ svn co https://oceanai.mit.edu/svn/moos-ivp-aro/trunk moos-ivp
- The above command invokes svn to check out a tree, at the given URL, with the local name of "moos-ivp".
- This tree is generally available from moos-ivp.org in one of several forms. The most public forms are (1) the latest release, and (2) the development trunk.
- At any point after an initial checkout, users may pull down the latest updates to the software by typing:
  $ cd moos-ivp
  $ svn update
8.1.4 Building the Course Software [top]
After a successful download, you should have a new directory (folder) called moos-ivp. All the code is in this folder. There are README instructions in the top-level folder for each OS flavor.
Assuming you have installed the handful of prerequisite packages outlined above, the course software may be built in the steps below:
  $ cd moos-ivp
  $ ./build-moos.sh
  (let it build)
  $ ./build-ivp.sh
  (let it build)
8.2 Running the MOOS-IvP Software [top]
After a successful build, there should be about 100 new executables in the below directory. Start by confirming this.
  $ cd  moos-ivp/bin/
  $ ls
  (about 100 executables, including MOOSDB and pHelmIvP)
If you don't see these files in the bin directory, go back to the step of downloading and building the course software.
Command line tip: To see exactly how many items are in this directory, you can use a combination of ls and sending the results to the wc or "word count" utility, by piping the output of ls to wc:
 $ cd moos-ivp/bin
 $ ls | wc -l
 107                  (number may vary as the code evolves)
8.2.1 Add the new executables to your shell path [top]
This moos-ivp/bin/ directory needs to be added to your shell path. If you know how to augment your shell path do this now and proceed to the next step. Otherwise, see the help topic:
http://oceanai.mit.edu/ivpman/help/cmdline_augment_shell_path
8.2.2 Verify that moos-ivp executables are in your shell path [top]
After the code is built, and the shell path has been augmented, we should be able to run an example. First, a simple sanity test:
  $ which MOOSDB
  /Users/you/moos-ivp/bin/MOOSDB
  $ which pHelmIvP
  /Users/you/moos-ivp/bin/pHelmIvP
If either of the above which queries turn up blank, go back and verify that the software built (check the bin directories), and verify that your shell path has been augmented.
8.2.3 Run the example "alpha" mission [top]
Now launch the example "alpha" mission:
  $ cd moos-ivp/ivp/missions/s1_alpha
  $ pAntler --MOOSTimeWarp=10 alpha.moos
When the pMarineViewer window comes up, hit the Deploy button. You should see something similar to this.
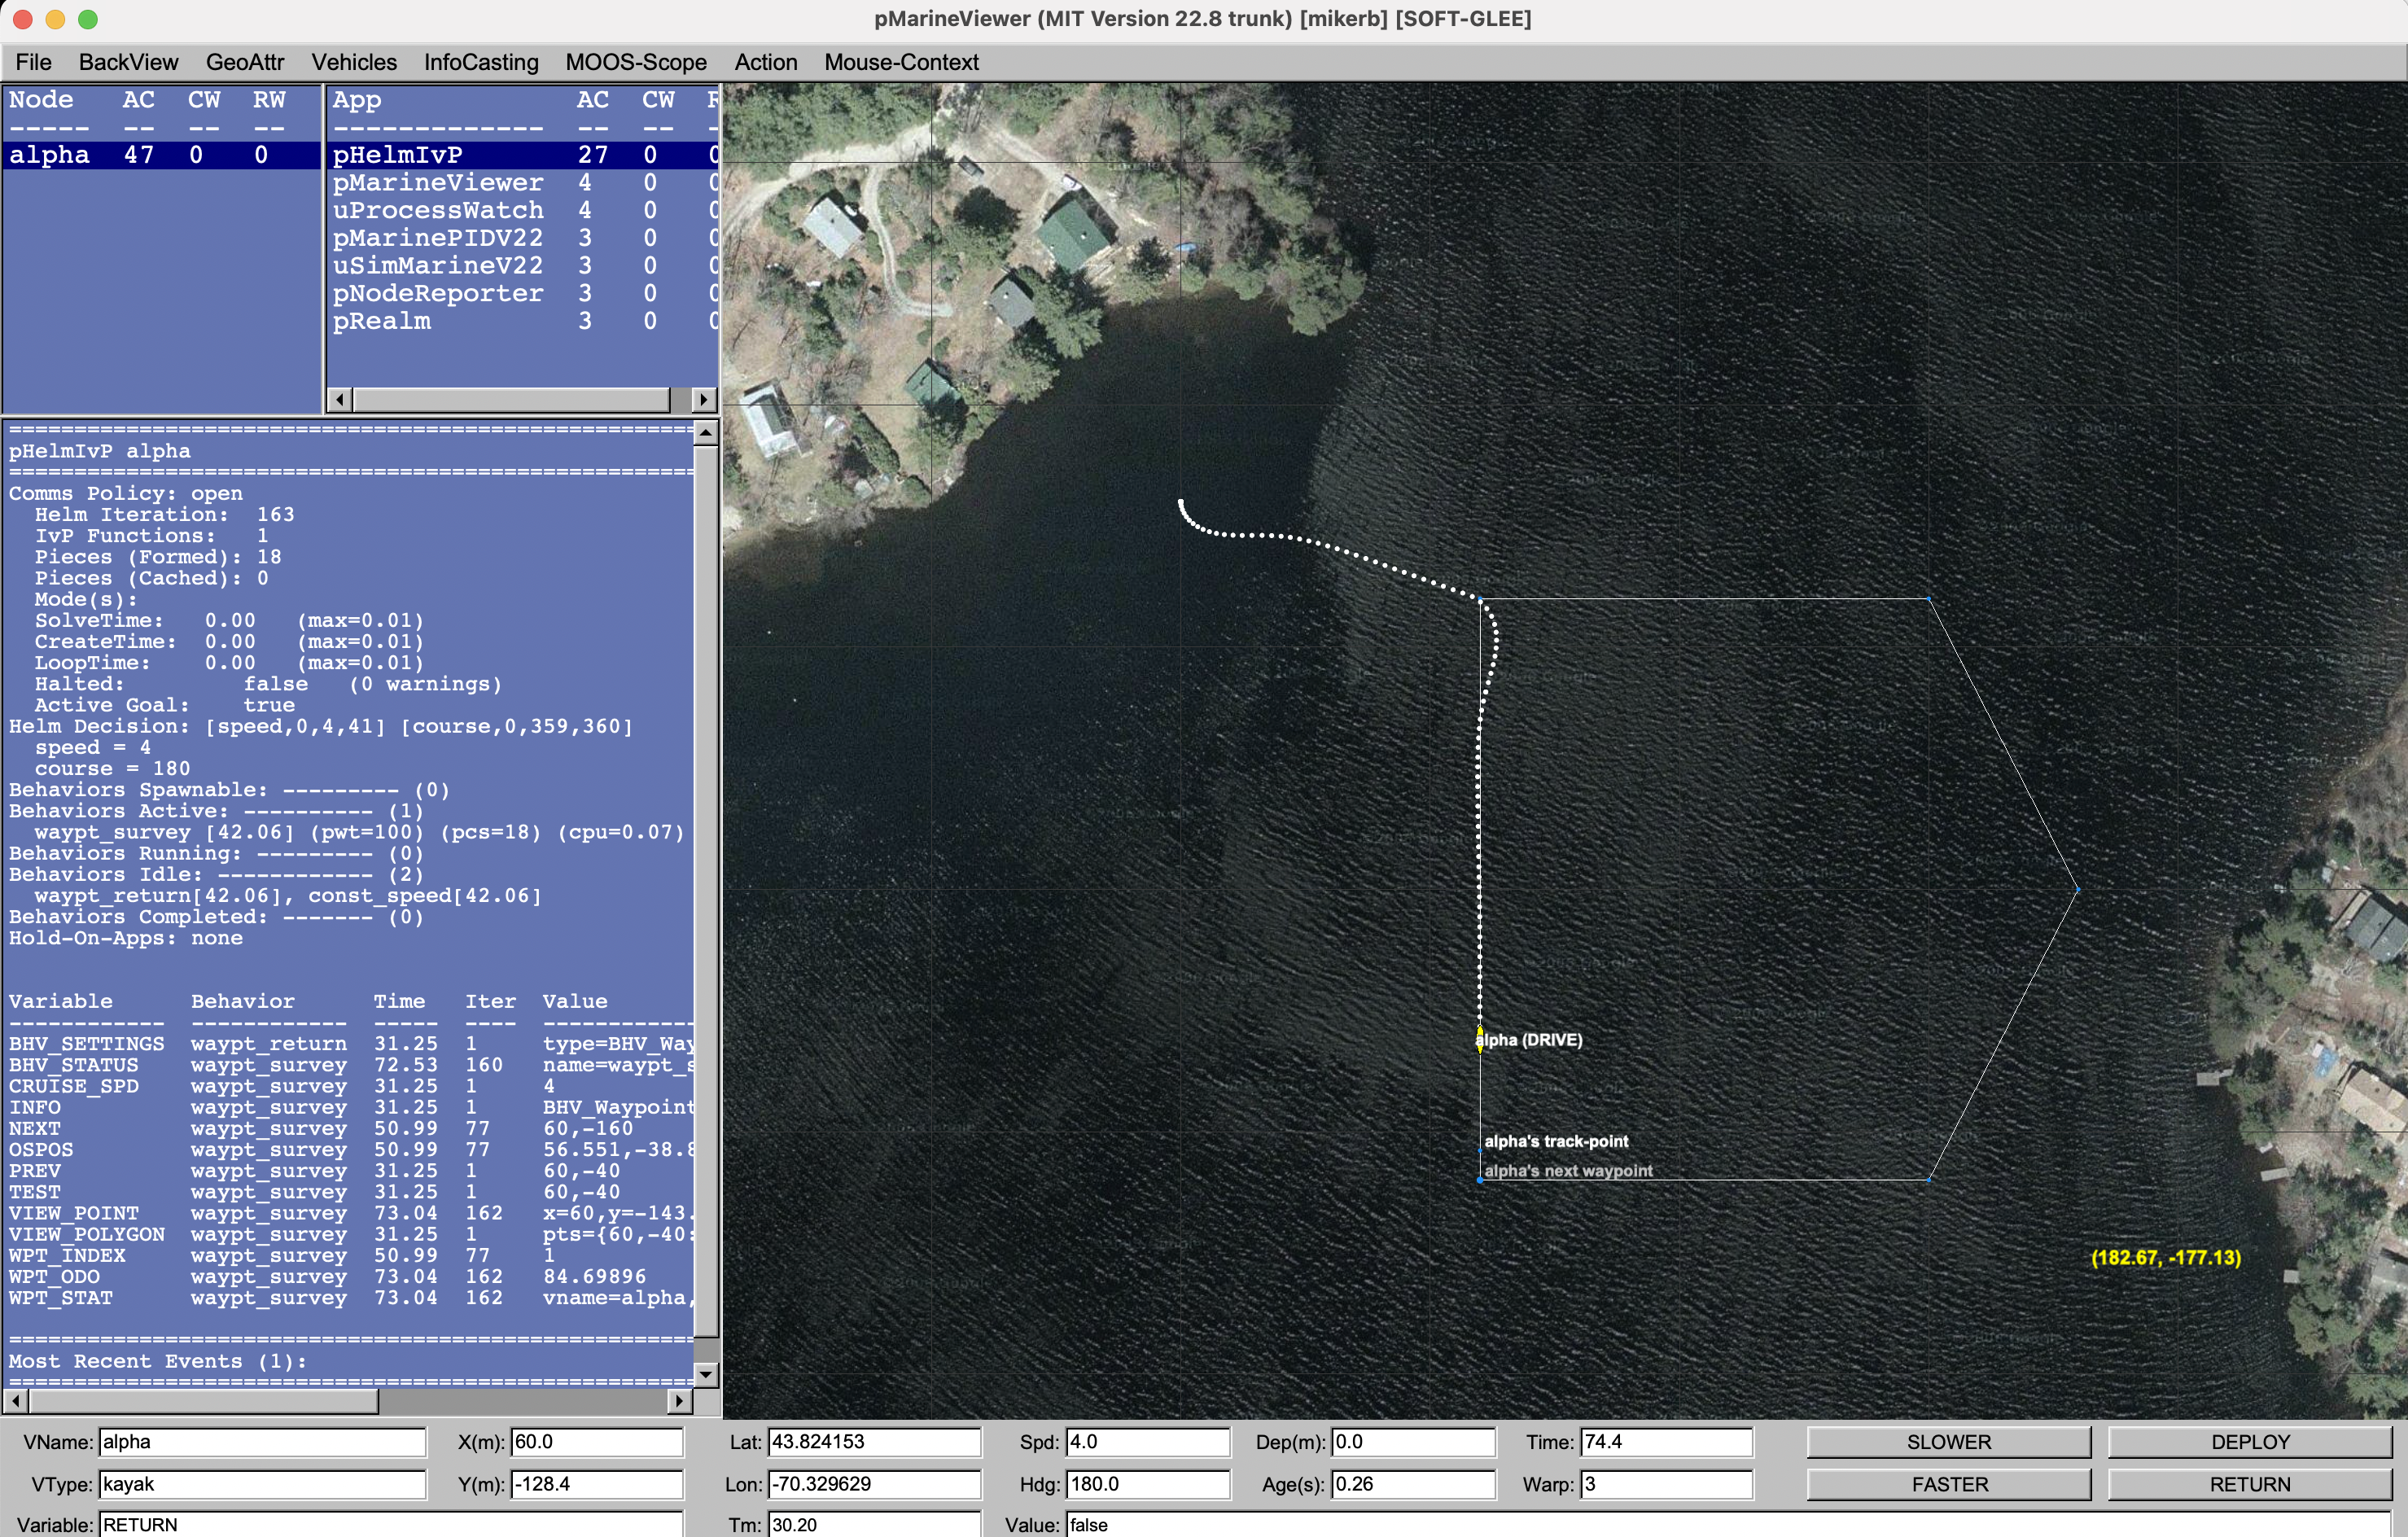
Figure 8.1: A screen shot of the Alpha example mission shortly after launch.
8.2.4 Operating Systems Supported by MOOS and IvP [top]
The MOOS software distributed by Oxford is well supported on Linux, Windows and Mac OS X. The software distributed by MIT includes additional MOOS utility applications and the IvP Helm and related behaviors. These modules are supported on Linux and Mac OS X and the software compiles and runs on Windows but Windows support is limited.
Document Maintained by: mikerb@mit.edu
Page built from LaTeX source using texwiki, developed at MIT. Errata to issues@moos-ivp.org. Get PDF