Lab 6 - Multi-Vehicle Operations
Maintained by: mikerb@mit.edu  Get PDF
1 Overview and Objectives
2 Preliminaries
3 The Shoreside (Topside) / Vehicle Topology
4 A Very Brief Discussion on Launch Scripts
4.1 Why Launch Scripts are Used
4.2 Launch Scripts are Bash Scripts
4.3 Launching MOOS Communities from the Launch Script
4.4 Bash Script Command Line Arguments
5 Further Experimenting with pShare
5.1 Assignment 3 (check off) - The Alpha Bravo pShare Mission
5.1.1 Make a Copy of the Previous Two-MOOS-Communiity Alpha mission
5.1.2 Create a New bravo.moos File for Simulating a Second Vehicle
5.1.3 Launch the Three Communities and Confirm Things Work
6 Using the uField Toolbox to Facilitate Multi-Vehicle Simulations
6.1 Assignment 4 (self check off) - The Henry Gilda Baseline Mission
6.2 Assignment 5 (self check off) - The Henry Gilda Refuel Mission
6.3 Assignment 6 (check off) - The Henry Gilda Auto Refuel Mission
7 Instructions for Handing In Assignments
7.1 Requested File Structure
7.2 Due Date
1 Overview and Objectives
This lab assumes the completion of the Lab 6 Pre-Lab Assignment ending with the self checkoff "Alpha pShare" mission.

In this lab we will continue shifting our focus to autonomy configurations involving multiple vehicles. The first focus, in the pre-lab, was on communications between two independently running MOOSDB processes, where typically a single MOOSDB, or "MOOS Community" is associate with a single vehicle. Ultimately the inter-MOOSDB or inter-vehicle communication may come over an acoustic modem link or a satellite link, our primary initial focus is on communications over an Internet connection, even if the multiple "nodes" are all running on your one laptop.
Gaining familiarity with this mode of operation will be essential for later labs and operation of vehicles on the water.
- The Shoreside and Vehicle(s) Topology
- Introduction to pShare via the xrelay mission
- Converting the Alpha Mission to use a Shoreside / Vehicle Topology
- Converting the Alpha Mission to a Two-Vehicle Mission with pShare
- Using the uField Toolbox to Ease pShare Configuration
2 Preliminaries
The MOOS-IvP-2680 Tree [top]
Starting with this lab, we begin using the additional moos-ivp-2680 tree. In total you will now work with three trees:
- moos-ivp: Public autonomy codebase (provided to you)
- moos-ivp-2680: 2.680 autonomy codebase and baseline missions (provided to you)
- moos-ivp-extend: Student codebase and lab solution missions (created by you)
Download this tree onto your computer in the same folder, side-by-side with moos-ivp and moos-ivp-extend. To download:
$ svn co https://oceanai.mit.edu/svn/moos-ivp-2680-aro/trunk moos-ivp-2680
The moos-ivp-2680 tree contains both MOOS apps and MOOS missions useful to 2.680. In today's lab, content from the moos-ivp-2680/missions folder will be needed. We don't yet need any apps, but if you want to add moos-ivp-2680/bin to your shell path in your .bashrc file, this is a good move you will need for later.
Make Sure You Have the Latest MOOS-IvP Updates [top]
It is possible we will be making changes to the MOOS-IvP tree during the semester. Always make sure you have the latest code:
  $ cd moos-ivp
  $ svn update
If you see see a response similar to the below, indicating that no updates were pulled in from the server, then you shouldn't need to re-build the software.
Updating '.': At revision 10516.
Otherwise you will need to rebuild:
  $ ./build-moos.sh
  $ ./build-ivp.sh
Make Sure Key Executables are Built and In Your Path [top]
This lab does assume that you have a working MOOS-IvP tree checked out and installed on your computer. To verify this make sure that the following executables are built and findable in your shell path:
  $ which MOOSDB
  /Users/you/moos-ivp/bin/MOOSDB
  $ which pHelmIvP
  /Users/you/moos-ivp/bin/pHelmIvP
If unsuccessful with the above, return to the steps in Lab 1:
http://oceanai.mit.edu/ivpman/labs/machine_setup
Where to Build and Store Lab Missions [top]
As with previous labs, we will use your version of the moos-ivp-extend tree. In this tree, there is a missions folder:
  $ cd moos-ivp-extend
  $ ls
  CMakeLists.txt  bin/          build.sh*      docs/        missions/       src/
  README          build/        data/          lib/         scripts/
For each distinct assignment in this lab, there should be a corresponding subdirectory in a lab_06 sub-directory of the missions folder, typically with both a .moos and .bhv configuration file. See Section 7.1 for the full requested file structure.
Documentation Conventions [top]
To help distinguish between MOOS variables, MOOS configuration parameters, and behavior configuration parameters, we will use the following conventions:
- MOOS variables are rendered in green, such as IVPHELM_STATE, as well as postings to the MOOSDB, such as DEPLOY=true.
- MOOS configuration parameters are rendered in blue, such as AppTick=10 and verbose=true.
- Behavior parameters are rendered in brown, such as priority=100 and endflag=RETURN=true.
- MOOS-IvP applications are rendered in magenta, such as pShare, or pHelmIvP.
- General GNU/Linux commands are represented in dark purple, such as wget, mkdir, or cd.
More MOOS / MOOS-IvP Resources [top]
A few further resources are worth mentioning for following up this lab with your own exploration.
- See the slides from class related to multiple vehicles and inter-vehicle sharing of information: http://oceanai.mit.edu/2.680/docs/2.680-07-multiple_vehicles_2024.pdf
- See the slides from class which give a bit more background into marine autonomy and the IvP Helm: http://oceanai.mit.edu/2.680/docs/2.680-08-ivphelm_behaviors_2024.pdf
- The IvP Helm and Utilities documentation: http://oceanai.mit.edu/ivpman
- The moos-ivp.org website: http://www.moos-ivp.org
3 The Shoreside (Topside) / Vehicle Topology
The layout of interconnected MOOS communities used in this lab is depicted in the figure below. This layout will be used for the remainder of the course, including during operations on the river. You will experience different versions of this arrangement. In the simplest arrangement, in the lab, the Shoreside and vehicle communities will all be running on your computer. As we mentioned previously, A MOOS community is a collection of MOOS apps, each connected to a single MOOSDB for that community. The Shoreside topology is sometimes also referred to as the uField topology since the uField Toolbox is a set of utility applications for facilitating the Shoreside arrangement.
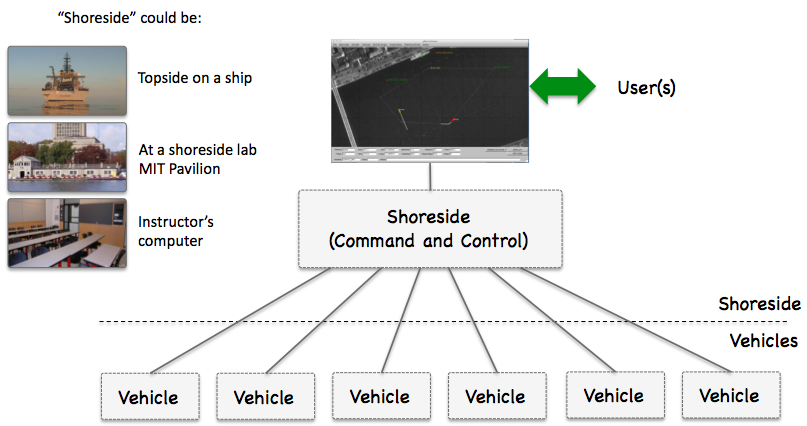
Figure 3.1: Shoreside to Multi-Vehicle Topology: A number of vehicles are deployed with each vehicle maintaining some level of connectivity to a shoreside command and control computer. Each node (vehicles and the shoreside) are comprised of a dedicated MOOS community. Modes and limits of communication may vary.
Communications between apps within a single MOOS community are typically high bandwidth with little or no latency. This is all handled over TCP communications between the app and the MOOSDB through the publish-subscribe protocol described thus far in class. Communications between MOOS communities will typically be much lower in bandwidth with higher latency. Communication modalities may also vary, but include WiFi, underwater acoustic modems, satellite networks like Iridium, and others. In these cases there can also be messages that are simply lost.
Because of these limitations, communications are also typically more deliberately arranged ahead of time. Communications within a MOOS community can be quite dynamic in the sense that any app can publish anything at any time, and any app can Register for information at any time. In autonomy systems where there are communications between MOOS communities, the allowed inter-node messages are usually declared beforehand, and there may also be message priorities and upper limits on message frequency for certain variables.
In our class, both in simulation and on the water, the app pShare is used for inter-node communications (comms between MOOS communities). Each MOOS community runs an instance of pShare as shown in Figure 3.2 below.
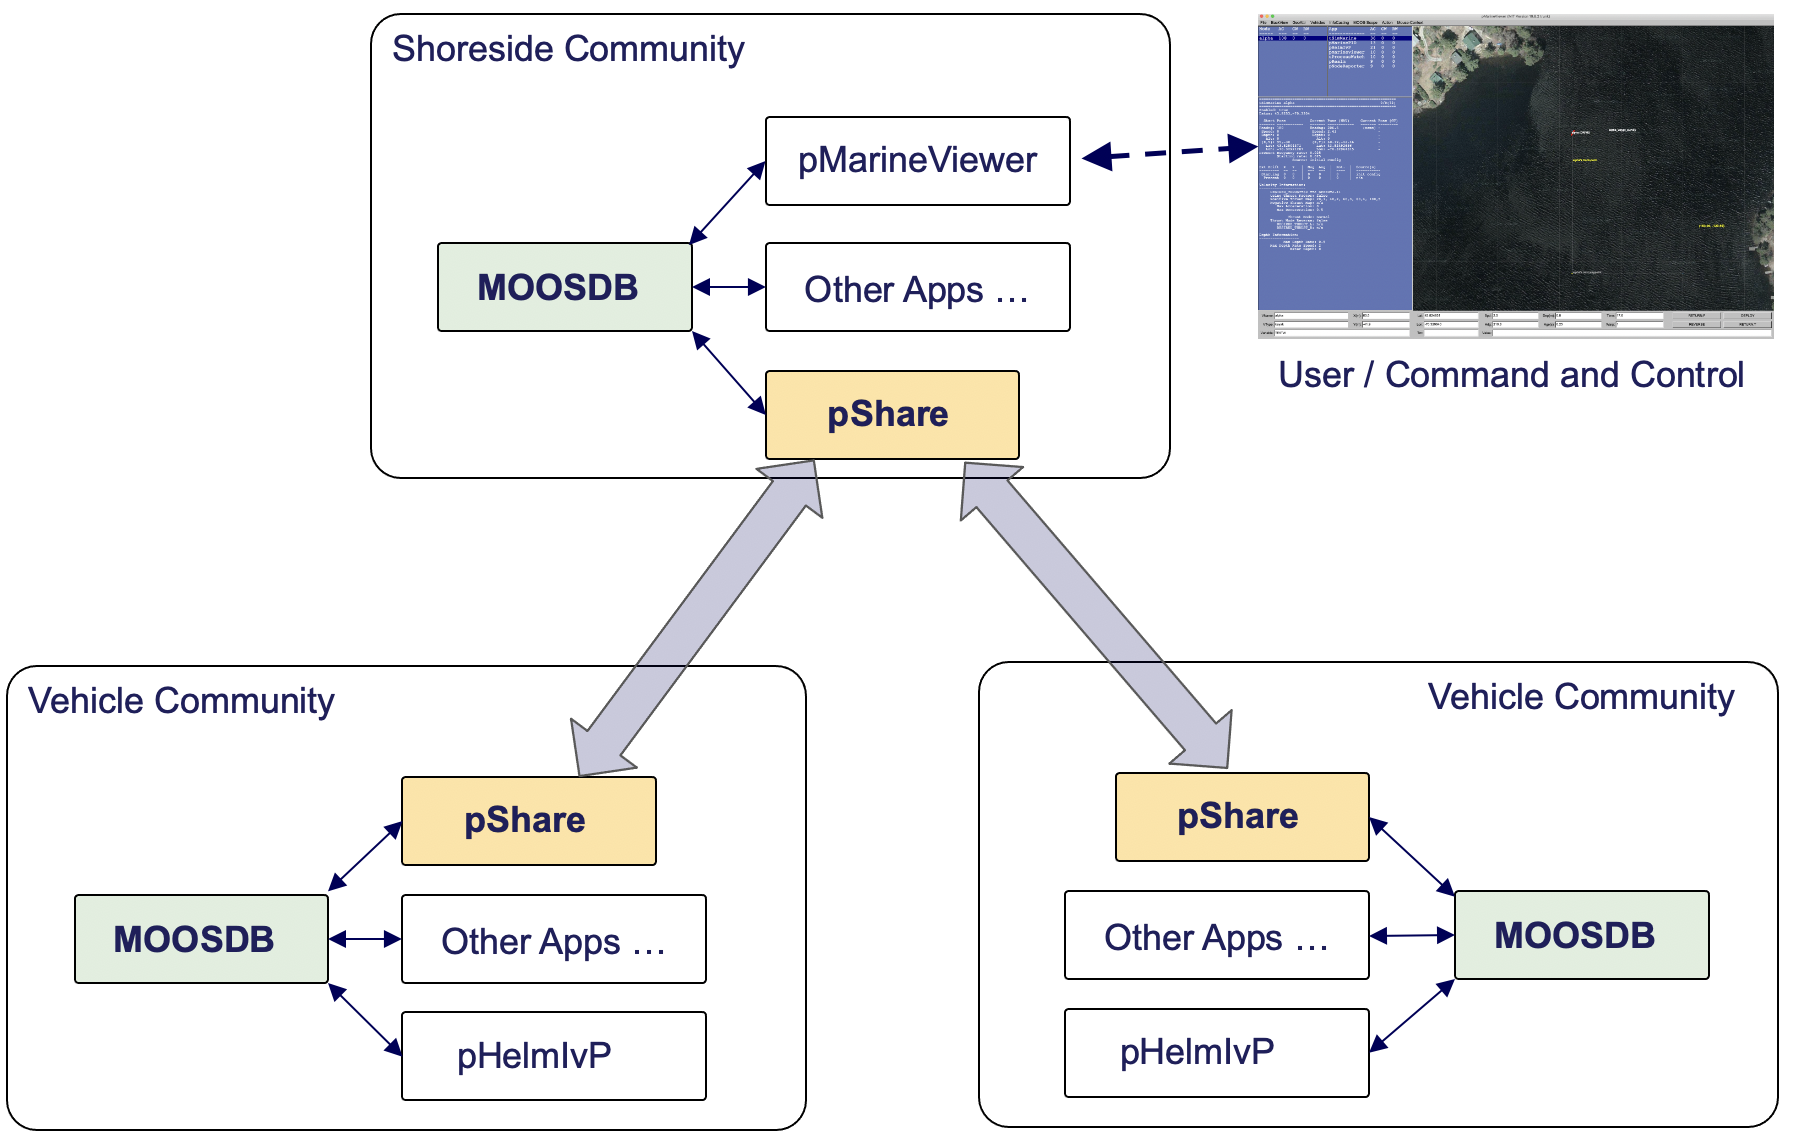
Figure 3.2: Inter MOOS Community Communications: Apps within a single MOOS community communicate over TCP, while communication between communities is assumed to be lossy. The pShare app is use in simulations in some field test environments to share a small configurable set of information between platforms.
Each instance of pShare is configured to listen on a unique channel. The channel is defined by its IP address and port number. Therefore, when multiple MOOS communities are simulated on a single machine (same IP address), the port numbers need to be different. When the multiple MOOS communities are on different platforms, each with its own unique IP address, then each pShare app may have the same port number.
In addition to specifying the channel for incoming messages, pShare needs to be configured to specify outgoing messages. An outgoing message configuration consisting of specifying a MOOS variable in the local (source) community, and the destination of the message in terms of the IP address and port number of the receiving pShare app in the destination community. It is also possible to change the name of MOOS variable as it arrives in the destination community. So each pShare configuration will consist of two parts:
- the incoming listen port
- one or more MOOS variables mapped to a destination community.
When finally configured, a publication to a local MOOS variable involved in a pShare, will result in a near instantaneous similar publication in the destination community. Note that pShare works over UDP, and messages do not have the same guarantee of arrival as they do with TCP.
https://www.spiceworks.com/tech/networking/articles/tcp-vs-udp
Messages can and will drop when using pShare. You are unlikely to experience a dropped message when simulating inter-node comms on a single computer, or even over reasonably strong WiFi connection. But there will be dropped messages when working on the Charles River when the robots have lossy comms to the shore. There are no mechanisms built into pShare to detect a dropped message. If a message is critical, the user will have to implement their own acknowledgment and re-send protocol. Note: our lab has developed an additional app, pMediator for this purpose, but it is in beta mode and not yet part of the main MOOS-IvP release.
Normally in our setups, the pShare communications are solely between the shoreside MOOS community and the one or more vehicle MOOS communities. We typically don't share information directly between vehicles, although there is nothing about pShare that would disallow this. While inter-vehicle communication is certainly desired, and part of our future labs, we implement all inter-vehicle communications to be routed through the Shoreside community. For reasons further explained in later labs, we use this comms-routed through-the-shoreside arrangement so that we can simulate comms limitations often experienced in the field. We can drop comms based on inter-vehicle range, or we can limit the bandwidth between vehicles to simulate communications with similar limits, like satellite or underwater acoustic comms.
4 A Very Brief Discussion on Launch Scripts
With multi-vehicle missions hereafter common in this course, we will make regular use of launch scripts using Bash. You will want to use these scripts. When baseline missions are provided as part of the lab, a launch script will be provided. For multi-vehicle mission meant to run both on the water and in simulation, multiple nexted scripts will be provided. This may seem initially like an unwelcome additional layer of complexity, but their utility and will quickly become apparent. And they do make things simpler. Some knowledge of how they work and how to make modifications will be helpful.
4.1 Why Launch Scripts are Used [top]
A quick review on launching a MOOS community. We could launch all applications on the command line, one per terminal window, using something like
 $ MOOSDB mission.moos
 $ pHelmIvP mission.moos
 $ uSimMarine mission.moos
   ...
 $ pLogger mission.moos
But this would be insane and wouldn't scale, so that's why we have been using pAntler instead, with the Antler config block at the top of the mission.moos file. So all of the above is replaced with
$ pAntler mission.moos
A similar unscalable situation arises when we are simulating multiple vehicles alongside a shoreside MOOS community (our Shoreside, a.k.a., uField Topology). Launching N vehicles would require:
 $ pAntler shoreside.moos
 $ pAntler vehicle1.moos
 $ pAntler vehicle2.moos
   ...
 $ pAntler vehicleN.moos
Although our multi-vehicle missions typically involve only two vehicles, and we could almost get by with launching like the above, we do routinely launch as many as 10-50 simulated vehicles in other projects. Our use of launch scripts makes this easier, and we will use them even in a two-vehicle-plus-shoreside missions. Although the contents of the script may vary, most multi-vehicle mission folders simply can be launched with:
$ ./launch.sh [WARP] [OPTIONS]
The arguments surrounded by brackets is common notation for being an optional argument. The [WARP] argument is the time warp, which defaults to 1. The other set of [OPTIONS] may vary between launch scripts in different missions, but may include mission parameters such as the number of vehicles to launch, their speed or initial placement and so on. Most launch scripts support the --help or -h arguments to see the full list of availble command line arguments.
4.2 Launch Scripts are Bash Scripts [top]
Our launch scripts are Bash scripts, which is in itself its own sort of programming language. Bash scripts have the distinct quality that each line in the script could be something you just typed on the command line. After all, your command line is a Bash session. It is possible that your command line session is using some other shell, like zsh or tcsh. But if you are, it will be very similar. And even if you are using something different than Bash on your command line, our Bash scripts always have the first line:
#!/bin/bash
This indicates that the prevailing shell program, e.g., Bash, will be exactly Bash, in the form of the executable /bin/bash, rather than some other shell program. Note also the location of /bin/bash. It is in the top-level folder of your system (/bin), which means it is a pretty baked-in utility that came with your GNU/Linux or MacOS operating system.
4.3 Launching MOOS Communities from the Launch Script [top]
Take a look in the launch.sh file. It is an "executable" and we may be accustomed to think of executables as binary files, not human readable. But a Bash script is just a text file, and can be opened in your normal text editor. For the immediate purposes of this lab, most of this script will be left for explaining later, but we will want to edit this script to launch three MOOS communities in the next exercise. Open the file in a text editor and find the block:
 #----------------------------------------------------------
 #  Part 3: Launch the processes
 #----------------------------------------------------------
 echo "Launching $COMMUNITY MOOS Community with WARP:" $TIME_WARP
 pAntler $COMMUNITY.moos --MOOSTimeWarp=$TIME_WARP >& /dev/null &

 uMAC -t $COMMUNITY.moos
In the block above, a single MOOS community, whose name is stored in the variable $COMMUNITY, is launched. It is launched using pAntler in the background, indicated by the trailing ampersand on that line. After the MOOS community is launched, the uMAC utility is launched to provide an interactive Appcast session from the terminal window.
Modify and expand the above block with the one below, which essentially does the same thing but launches the shoreside, alpha and bravo communities with three successive pAntler calls.
 #----------------------------------------------------------
 #  Part 3: Launch the processes
 #----------------------------------------------------------
 echo "Launching All MOOS Communities with WARP:" $TIME_WARP
 pAntler shoreside.moos --MOOSTimeWarp=$TIME_WARP >& /dev/null &

 pAntler alpha.moos --MOOSTimeWarp=$TIME_WARP >& /dev/null &

 pAntler bravo.moos --MOOSTimeWarp=$TIME_WARP >& /dev/null &

 uMAC -t shoreside.moos
4.4 Bash Script Command Line Arguments [top]
Bash scripts, like C++ programs, can be built to support command line arguments. As a convention in our lab, all launch.sh scripts will accept a single numerical argument, interpreted as the time warp for the mission. Omitting this argument will result in a time warp of 1. For example:
$ ./launch.sh 10 (launch the mission with time warp 10)
Generally speaking, there are two other types of command line arguments. The simpler of the two involves the detection of an argument:
$ ./launch.sh --verbose
The other type of argument passes a parameter value. For example:
$ ./launch.sh --depth_thresh=45 --vehicle_name=henry
Command line parsing is generally handle at the outset of the script. Here is an example block:
5 Further Experimenting with pShare
Before moving on to use the uField Toolbox in the next section, we have one more mission experimenting with the pShare utility directly. Before going much further, it may be a good spot to discuss launch scripts.
5.1 Assignment 3 (check off) - The Alpha Bravo pShare Mission [top]
In this part we will:
- Prepare a copy of the previous modified alpha mission for experimenting (the Alpha pShare Mission from the Pre-Lab).
- Create a third .moos file, bravo.moos, to launch another simulated vehicle.
- Launch the three communities and confirm that sharing works, and deploy and return commands work for both vehicles with a single pMarineViewer button click.
5.1.1 Make a Copy of the Previous Two-MOOS-Communiity Alpha mission [top]
The first step is to copy the alpha example mission from the last exercise from the Pre-Lab. The file structure should be:
  moos-ivp-extend/missions/lab_06/alpha_bravo_pshare
      shoreside.moos
      alpha.moos
      bravo.moos
      launch.sh
      clean.sh
You should have a script for launching all three communities.
5.1.2 Create a New bravo.moos File for Simulating a Second Vehicle [top]
In this step you will create a third mission file, bravo.moos, for simulating a second vehicle. In the bravo.moos file, you will need to configure it with a distinct community name, e.g., bravo, distinct port number, and distinct port number for UDPListen in the pShare configuration block.
A bravo.bhv file will also need to be created for this vehicle. The behavior mission is not the point of focus here, so just create a waypoint survey mission similar to alpha's with the vertices shifted 50 meters to the east, and 20 meters to the south. Shift the bravo vehicle's starting position 50 meters to the east (in the uSimMarine configuration block). The shoreside.moos will also need to be altered to share the DEPLOY and RETURN commands out to both vehicles with a single button click.
5.1.3 Launch the Three Communities and Confirm Things Work [top]
Your final mission configuration should meet the following criteria:
- You should be able to launch both vehicles and the shoreside community with a single shell script (See section 4).
- You should be able to deploy and return both vehicles with a single button click in pMarineViewer.
- The vehicles and the mission waypoints for both vehicles should be viewable in pMarineViewer.
- Your pMarineViewer should also be configured to deploy or return a single chosen vehicle in isolation. Hint: use the actions parameter in pMarineViewer to add deploy-alpha, return-bravo etc. capability in the Action pull-down menu.
It should look something like the video posted at:
Figure 5.1: A simple two-vehicle mission connecting to vehicle communities, and a shoreside community, using pShare. video:(0:21): https://vimeo.com/87900172
6 Using the uField Toolbox to Facilitate Multi-Vehicle Simulations
In the next exercise, the goal is to create an autonomy mission that uses a few modules in the uField Toolbox to replace some of the pShare configuration steps used in the previous exercise. Our end goal is a two vehicle simulation that should be easily scalable to a larger number of vehicles.
Once we have the multi-vehicle simulation established, our goal in the next lab will be to build a mission where two simulated vehicles are receiving points in the x-y plane, from the shoreside community, and traversing those points in a shortest-path trajectory.
6.1 Assignment 4 (self check off) - The Henry Gilda Baseline Mission [top]
In this part we will:
- Copy the baseline mission from the moos-ivp missions-2680 folder.
- Note the structure of the launch script and the nsplug setup.
- Note the roles of uFldShoreBroker, uFldNodeBroker, and pHostInfo.
Copy the baseline mission from the moos-ivp tree [top]
Start by copying a baseline version of the mission from the moos-ivp-2680 tree:
  $ cd moos-ivp-2680/missions
  $ cp -rp lab_06_henry_gilda_baseline moos-ivp-extend/missions/lab_06/henry_gilda_baseline
Confirm that the mission launches properly by typing ./launch.sh 10 from the command line in your newly created folder. You should see two vehicles appear on the screen. Deploy them with the DEPLOY button, and return them with the RETURN button. At any time you can station-keep them by hitting the STATION button. The vehicle should automatically enter the station keeping mode upon returning.
It should look something like the video posted at:
Figure 6.1: A simple two-vehicle mission connecting two loitering vehicle communities, and a shoreside community, using the uField Toolbox utilities for coordinating the pShare connections. video:(0:20): https://vimeo.com/87907093
Understand the Launch Structure [top]
Before moving on, take a look at how things are launched. See if you can understand what is going on inside the launch script. Note that the script is building the target .moos files by invoking an application called nsplug. This tool is a bit like the cpp pre-processor. It takes as an argument a file which can be thought of as a template of sorts, and produces another file with components of the template filled in. We use it so we can have just one mission and behavior file for both vehicles, with just a few of the details such as vehicle name, start position and MOOS community values filled in at launch time. You can learn a bit more about nsplug by:
  $ nsplug -h
  $ nsplug -m | less
Note that the targ_* files are generated automatically each time the launch script is invoked. If you edit these files, the changes will be lost the next time you launch!
Note that the launch script defines certain variables such as the vehicle name, MOOSDB port etc., and passes this info into nsplug for expansion.
Understand the uField Toolbox Operations [top]
Before moving on, take a look at the relationship between pHostInfo, uFldNodeBroker and uFldShoreBroker. Note how they handle the pShare configuration for you on both ends. From this point forward, using these tools, your configuration of share variables should be handled in this way. Please read the sections on these three applications in the uField Toolbox documentation on the course website. Also the lecture notes describe how these three applications work together:
http://oceanai.mit.edu/2.680/docs/2.680-07-multiple_vehicles_2022.pdf
For now, beginning with this baseline mission, share configuration will just work. But you will want to augment what is being shared for later steps in this lab, so try to understand how share configuration is handled in the uFldNodeBroker and uFldShoreBroker modules.
6.2 Assignment 5 (self check off) - The Henry Gilda Refuel Mission [top]
Copy your "Henry Gilda Baseline" mission from the previous assignment to create a new mission folder:
  $ cd moos-ivp-extend/missions/lab_06/
  $ cp -rp henry_gilda_baseline   henry_gilda_refuel
Augment this mission to accept a shoreside "refuel" command from a new pMarineViewer button. When the refuel command is given, the vehicle returns to its launch point, but automatically enters a new "refueling" mission mode while station keeping, for 60 seconds, and then automatically resumes loitering.
To accomplish this mission you will need to:
- Add a new refuel button to the pMarineViewer configuration that accepts a refueling command by posting REFUEL_NEEDED_ALL=true.
- Make sure this variable is shared out to all vehicles by augmenting the uFldShoreBroker configuration block in the meta_shoreside.moos file.
- (Remember - don't edit the targ_* files since these are auto-generated in the launch process and will be overwritten each time the mission is launched!)
- Add a new Timer behavior in the vehicle behavior configuration file that begins each time the vehicle returns for refueling, waits 60 seconds, and then posts endflags that result in the vehicle resuming its loiter missions. The vehicle should automatically go back to loitering after the timer ends.
- Station keeping should still work at any time, if commanded by the user.
- The vehicle may still be returned with the RETURN button, but when returned in this way, it acts as it did in the baseline mission - it station keeps and remains station keeping indefinitely until re-deployed.
It should look something like the video posted at:
Figure 6.2: The Henry Gilda Refuel mission has two loitering vehicles. When the user commands the vehicles to return, they return to their starting point and station keep for 60 seconds and automatically re-deploy afterwards. As with the baseline mission, both vehicles have their own MOOS community, connected to a shoreside community, with the connections coordinated using the uField Toolbox utilities. video:(0:40): https://vimeo.com/87950212
6.3 Assignment 6 (check off) - The Henry Gilda Auto Refuel Mission [top]
Copy your "Henry Gilda Refuel" mission from the previous assignment to create a new mission folder:
  $ cd moos-ivp-extend/missions/lab_06/
  $ cp -rp henry_gilda_refuel  henry_gilda_auto_refuel
Augment this mission such that (a) the vehicles automatically initiate the refueling after a fixed time "no-refuel-needed" interval (use 300 seconds for testing), (b) the so-called "no-refuel-needed" time duration is paused whenever the vehicle is in the station keeping mode. Presumably because no fuel is being expended. (c) the hierarchical mode structure has an explicit "refueling" mode while refueling.
To accomplish this mission you will need to:
- Add a new Timer behavior in vehicle behavior configuration file that begins when the mission begins and counts down until re-fueling is needed. It should post end-flags that trigger a mode change and the process of returning for re-fueling. It should be re-set after re-fueling is complete (it will need to have the perpetual parameter set to true).
- As before, station keeping should still work at any time, if commanded by the user. The need-to-refuel timer should also be paused when or if the vehicle is station-keeping.
- Remember: Don't edit the targ_* files since these are auto-generated in the launch process and will be overwritten each time the mission is launched!
It should look something like the video posted at:
Figure 6.3: The Henry Gilda Refuel mission has two loitering vehicles. When the user commands the vehicles to return, they return to their starting point and station keep for 60 seconds and automatically re-deploy afterwards. As with the baseline mission, both vehicles have their own MOOS community, connected to a shoreside community, with the connections coordinated using the uField Toolbox utilities. video:(0:47): https://vimeo.com/87958055
7 Instructions for Handing In Assignments
7.1 Requested File Structure [top]
You are encouraged to continue to upload all mission files. Here is the requested file structure:
   moos-ivp-extend/
     missions/
       lab_06/
         xrelay_pshare/              // Assignment 1 - self check off  (pre-lab)
         alpha_pshare/               // Assignment 2 - self check off  (pre-lab)
         alpha_bravo_pshare/         // Assignment 3 - check off
         henry_gilda_baseline/       // Assignment 4 - self check off
         henry_gilda_refuel/         // Assignment 5 - self check off
         henry_gilda_auto_refuel/    // Assignment 6 - check off
7.2 Due Date [top]
This lab should be completed and ready for demonstration/check-off by the end of lab Thursday, March 7th, 2024 (Pi Day!).
Document Maintained by: mikerb@mit.edu
Page built from LaTeX source using texwiki, developed at MIT. Errata to issues@moos-ivp.org. Get PDF