Lab 12 - Autonomous Collaborative Search Part I
Maintained by: mikerb@mit.edu  Get PDF
1 Overview and Objectives
2 Preliminaries
3 Problem Description
3.1 The Search Region
3.2 The Object Laydown
3.2.1 Example File Format
3.2.2 Generating Hazard Files
3.3 Metrics of Success
3.4 Mission and Vehicle Constraints
3.4.1 Time
3.4.2 Top Speed
3.4.3 Limits on Inter-Vehicle Communication
3.4.4 Sensing During Turns
3.4.5 Sensor Configuration Options and Configuration Frequency
3.5 Dynamic Changes to the Rules
4 The Jake Kasper Baseline Mission
4.1 Module Topology in the Jake Kasper Mission
4.2 Key MOOS Variables in the Jake Kasper Mission
4.3 General Description of Events in the Jake Kasper Mission
4.3.1 Phase 1: Sensor Configuration and Handling of Mission Parameters
4.3.2 Phase 2: Executing the Search Phase
4.3.3 Phase 3: Reporting Results
4.4 Required MOOS Variable Sharing
4.4.1 Variable Sharing from the Shoreside to the Vehicle
4.4.2 Variable Bridges from the Vehicle to the Shoreside
4.5 Hazard Files in the Jake Kasper Mission
5 Assignments
5.1 Assignment 1 (self check off) - Obtain and Run the Baseline Mission
5.2 Assignment 2 (self check off) - Understand the Baseline and Key Modules
5.3 Assignment 3 (self check off) - Make your own uFldHazardMgr
5.4 Assignment 4 (check off) - Merge Vehicle Reports
5.5 Assignment 5 (self check off, optional) - Begin to Path Plan
5.6 Assignment 6 (self check off, optional) - Begin to Use the Classify Report
6 Instructions for Handing In Assignments
6.1 Requested File Structure
6.2 Due Date
7 Hazard File Format
8 Generating Your Own Hazard Files
9 Hazard File Renderings
10 Serialization of Hazard and HazardSet Information
10.1 Serializing and De-serializing XYHazard Objects
10.2 Serializing and De-serializing XYHazardSet Objects
1 Overview and Objectives
The focus of today's lab will be on autonomous collaborative search. The goal will be to develop a two-vehicle mission configuration where the two vehicles are working together to locate and identify hazards in a given region. There will be constraints on the vehicle speed, inter-vehicle comms range, and sensor characteristics. The end-goal is to make the best educated report on the location and type of located objects in the search field. The performance score will be based on a reward/penalty system applied to correct/incorrect elements of the final report.

In this lab, there are three MOOS apps that are new arrivals to our labs:
- uFldHazardSensor - A simulated side-scan sonar sensor.
- uFldHazardMetric - An automatic scorer of hazard reports w.r.t. ground truth.
- uFldHazardMgr - A straw-man vehicle application for managing hazard information and reports.
This complements a few other utilities in the uField Toolbox introduced in the previous 2-3 labs. You should have at least a basic understanding of what each does.
- uFldMessageHandler - A MOOS handler for incoming message from other vehicles.
- uFldNodeComms - A MOOS shoreside arbiter of inter-vehicle messages.
- uFldNodeBroker - A vehicle-side broker for configuring shared information to the shoreside.
- uFldShoreBroker - A shoreside broker for configuring shared information to the shoreside.
A summary of today's topics:
- Introduction to the Autonomous Collaborative Search challenge problem
- Obtain, understand and modify the baseline mission
- Assignment: Add inter-vehicle messaging to share search reports
- Assignment (optional): Add adaptive path planning
- Assignment (optional): Modify search and reporting using Classification results
The goal of the Collaborative Search lab is to begin exploring the relationship between autonomy, sensing and communications - the primary theme of the course. In this lab, the issue of inter-vehicle communications is introduced, with the sole limitation being a range dependency (any two vehicles need be within N meters to be able to communicate). Other than a range dependency, for now our inter-vehicle messaging is uninhibited. Later we will introduce restrictions on message frequency and message bandwidth.
In this lab, students are encouraged to work in pairs. Let us know if you need help in finding a lab partner.
2 Preliminaries
Make Sure You Have the Latest Updates [top]
Always make sure you have the latest code:
  $ cd moos-ivp
  $ svn update
And rebuild if necessary:
  $ ./build-moos.sh
  $ ./build-ivp.sh
Make Sure Key Executables are Built and In Your Path [top]
This lab does assume that you have a working MOOS-IvP tree checked out and installed on your computer. To verify this make sure that the following executables are built and findable in your shell path:
  $ which MOOSDB
  /Users/you/moos-ivp/bin/MOOSDB
  $ which pHelmIvP
  /Users/you/moos-ivp/bin/pHelmIvP
If unsuccessful with the above, return to the steps in Lab 1:
http://oceanai.mit.edu/ivpman/labs/machine_setup?
Where to Build and Store Lab Missions [top]
As with previous labs, we will use your version of the moos-ivp-extend tree, which by now you should have re-named something like moos-ivp-janedoe, where your email may be janedoe@mit.edu. In this tree, there is a missions folder:
  $ cd moos-ivp-janedoe
  $ ls
  CMakeLists.txt  bin/            build.sh*     docs/        missions/       src/
  README          build/          data/         lib/         scripts/
For each distinct assignment in this lab, there should be a corresponding subdirectory in a lab_12 sub-directory of the missions folder, typically with both a .moos and .bhv configuration file. See for the full requested file structure.
Documentation Conventions [top]
To help distinguish between MOOS variables, MOOS configuration parameters, and behavior configuration parameters, we will use the following conventions:
- MOOS variables are rendered in green, such as IVPHELM_STATE, as well as postings to the MOOSDB, such as DEPLOY=true.
- MOOS configuration parameters are rendered in blue, such as AppTick=10 and verbose=true.
- Behavior parameters are rendered in brown, such as priority=100 and endflag=RETURN=true.
More MOOS / MOOS-IvP Resources [top]
- The slides from class:
http://oceanai.mit.edu/2.680/docs/2.680-13-collaborative_search_2019.pdf - The uFldHazardSensor documentation
http://oceanai.mit.edu/ivpman/apps/uFldHazardSensor - The uFldHazardMetric documentation
http://oceanai.mit.edu/ivpman/apps/uFldHazardMetric - The uFldHazardMgr documentation
http://oceanai.mit.edu/ivpman/apps/uFldHazardMgr
3 Problem Description
This section describes the problem parameters, mission constraints and format for a vehicle to generate a report at the end of a mission. The following five points are discussed:
- A search region
- An object lay-down
- Metrics of success
- Mission and vehicle constraints
- Reporting criteria
Values for the first four components are discussed below, but may be altered at competition time. The idea is to have a canonical problem to focus on for development, which will be part of the competition, and have a to-be-determined variation of the problem also part of the competition. The latter will help judge how general the individual submitted solution may be.
3.1 The Search Region [top]
The simulated hazard region will be within a polygon with the following four vertices:
- (-150, -75)
- (-150, -400)
- (400, -400)
- (400, -75)
The initial search region is chosen to be rectilinear to simplify a lawnmower pattern generation for a waypoint behavior. See the documentation for this behavior. A pattern may be given to the behavior simply by specifying the characteristics of the lawnmower pattern without having to explicitly determine all the points.
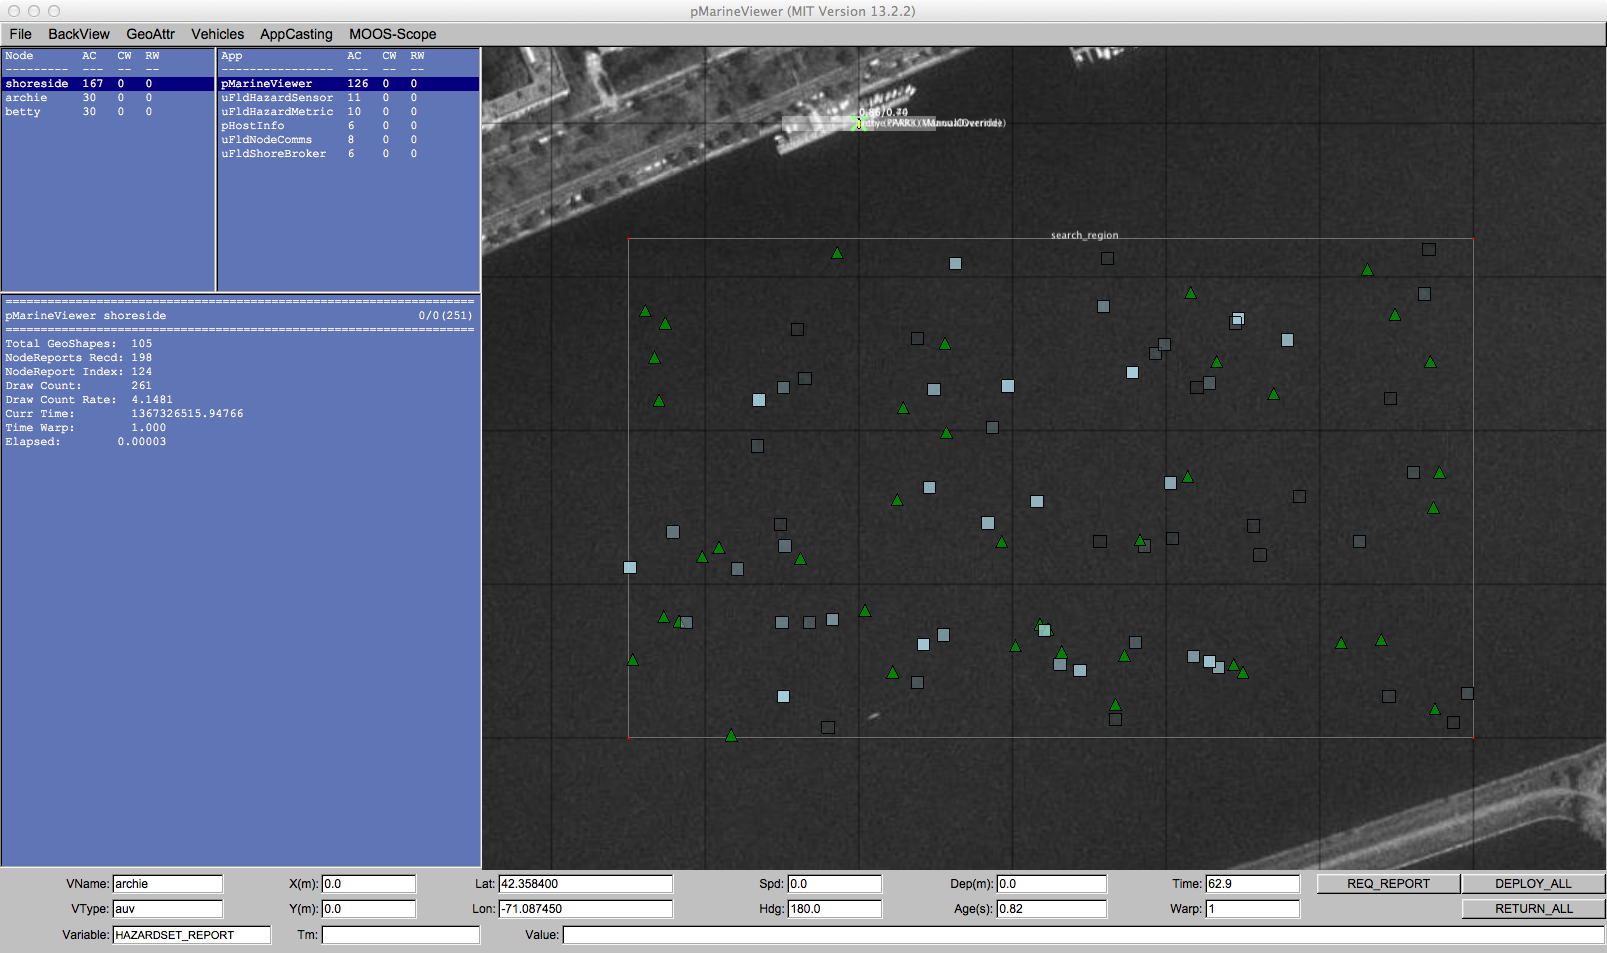
Figure 3.1: The search region is given in the local coordinates of the MIT Sailing Pavilion on the Charles River. The local (0,0) position is on the dock where vehicles are launched and recovered.
The search region may change slightly at the time of the competition.
3.2 The Object Laydown [top]
The object laydown is defined in a hazard file, not known to the vehicle at run time. It contains a set of objects, some of which are of type hazard and some of type benign. Identifying and correctly determining the type of these objects is the goal of the mission. For simulation testing and development purposes, a number of hazard files are provided in the baseline mission. A simple example, used as the default in the baseline mission, is shown in Figure 3.1.
3.2.1 Example File Format [top]
A hazard file is simply a text file, with line for each object. An example is below. This is discussed in greater detail in the uFldHazardSensor documentation.
 hazard = x=165,y=-91,label=32,type=hazard
 hazard = x=21,y=-88,label=85,type=hazard
 hazard = x=370,y=-219,label=23,type=hazard
 hazard = x=-149,y=-318,label=92,type=hazard
 o o o
 hazard = x=189,y=-326,label=75,type=benign
 hazard = x=52,y=-164,label=8,type=benign
 hazard = x=174,y=-190,label=46,type=benign
 hazard = x=357,y=-177,label=40,type=benign
 hazard = x=211,y=-315,label=38,type=benign
3.2.2 Generating Hazard Files [top]
A hazard file may be generated with a provided command line tool, to allow the user to perform more extensive tests of their choosing. The gen_hazards utility is distributed with the moos-ivp code, and an example command line invocation is below. This tool is discussed in greater detail in the uFldHazardSensor documentation.
$ gen_hazards --polygon=-150,-75:-150,-400:400,-400:400,-75 --objects=5,hazard --objects=8,benign
3.3 Metrics of Success [top]
The scoring metrics are as follows:
- 150: Penalty for missed hazard
- 25: Penalty for false alarm
- 300: Penalty for being late (later than 7200 seconds)
- 0.25: Additionaly late penalty applied to each second of lateness.
3.4 Mission and Vehicle Constraints [top]
There are handful of mission and vehicle constraints enforced to keep everyone on the same playing field.
3.4.1 Time [top]
The maximum mission time is 7200 seconds, or 2.0 hours. This value was chosen, in part, since most computers can support a MOOS time warp of 10-20x realtime or much higher on newer systems. A time warp of 20 allows a full mission to be simulated in less than ten minutes. The mission time constraint has a variable penalty associated with it:
- 300: Penalty for being late (1 second later than 7200 seconds), and
- 0.25: Additional late penalty applied to each second of lateness.
3.4.2 Top Speed [top]
Vehicles will be limited to a speed of 2.0 meters per second. There is no penalty in terms of sensor performance or comms for moving at the top speed. Vehicles moving over the top speed will essentially automatically disable their own sensors until the speed is reduced.
3.4.3 Limits on Inter-Vehicle Communication [top]
Communications between vehicles will limited in range, frequency and bandwidth. This will need to be accounted for both during the mission for collaboration, and at the end of the mission for fusing the two vehicles' belief states into a single hazardset report. The restrictions will be
- Range: Communications limited to 100 meters
- Frequency: Communications will be limited to once per 60 seconds
- Bandwidth: Each message will be limited to 100 characters
These configurations are enforced in the uFldNodeComms configuration. This module is on the shoreside and will be configured by the competition organizers, and is configured with these values in the baseline mission. You will be running your own shoreside MOOS community during development, but you should not change this configuration in your uFldNodeComms configuration to ensure you are developing in an environment similar to the competition. Remember that a message that fails to be sent, due to one of the above criteria, will not be queued for later re-sending. You should handle the possibility that message may be dropped.
3.4.4 Sensing During Turns [top]
The simulated sensor will be rendered off during turns of 1.5 degrees per second or more. This is discussed in greater detail in the uFldHazardSensor documentation.
3.4.5 Sensor Configuration Options and Configuration Frequency [top]
Vehicles will be allowed to set their sensor configuration once at the outset. Attempts to switch configurations after the outset will simply be ignored. You may, however, switch the the  setting (and corresponding PFA setting) as often as you like.
Your sensor configuration options will be:
   sensor_config = width=5, exp=8, class=0.88, max=1
   sensor_config = width=10, exp=6, class=0.70
   sensor_config = width=25, exp=4, class=0.63
   sensor_config = width=50, exp=2, class=0.55
See the documentation for uFldHazardSensor on what this entails in terms of the ROC curve performance of the sensor, and how the vehicle may request a particular configuration. The first sensor setting, with width=5 may be enabled for at most one vehicle.
3.5 Dynamic Changes to the Rules [top]
As mentioned at the outset, baseline values are provided for the initial development and first phase of the competition for the following parameters:
- A search region
- An object lay-down
- Metrics of success
- Mission and vehicle constraints
Part of the competition will test exactly on the given baseline parameters. Part of the competition will test on parameters only known at competition time. How will those parameters be made available? They will be set on the shoreside in the uFldHazardMetric application and posted to the shoreside MOOSDB and shared out to the vehicles.
 UHZ_MISSION_PARAMS = "penalty_missed_hazard=150,penalty_false_alarm=25,max_time=600,
                       penalty_max_time_over=300,penalty_max_time_rate=0.5,
                       search_region=pts={-150,-75:-150,-400:400,-400:400,-75}"
If you run the baseline mission and scope the MOOSDB on one of the vehicles, you will notice that a publication similar to the above has been made, originating in the shoreside in the uFldHazardMetric application. For example, after launching the baseline mission, in a separate terminal window you should see something like:
  $ cd moos-ivp/ivp/missions/m10_jake
  $ uXMS targ_betty.moos UHZ_MISSION_PARAMS
  Mission File was provided: targ_betty.moos
  uXMS_630 thread spawned
  starting uXMS_630 thread
  ----------------------------------------------------
  |       This is an Asynchronous MOOS Client        |
  |       c. P. Newman U. Oxford 2001-2012           |
  ----------------------------------------------------

  o o o

  ===================================================================
  uXMS_630 betty                                               0/0(1)
  ===================================================================
  VarName             (S)ource          (T)  (C)ommunity  VarValue (SCOPING:EVENTS)
  ------------------  ----------------  ---  ----------  -------------------------
  UHZ_MISSION_PARAMS  uFldHaz..dMetric       shoreside   "penalty_missed_hazard=150,
  penalty_false_alarm=25,max_time=600,penalty_max_time_over=300,penalty_max_time_rate=0.5,
  search_region=pts={-150,-75:-150,-400:400,-400:400,-75}"
Presently, in the baseline mission, this information is not being handled by either vehicle. If the mission were to change, the vehicle would not adjust. But this is why it is a baseline mission; it's not complete and is meant to be a competition starting point.
In this competition, the only parameters that will change are the penalty values, and the threat lay-down, and perhaps the search area and communications constraints. The top vehicle speed and sensor properties will not be changed. You can assume the values used in the baseline mission.
4 The Jake Kasper Baseline Mission
The Jake Kasper mission is distributed with the MOOS-IvP code and was designed to highlight four things:
- The uFldHazardSensor application,
- The uFldHazardMetric application,
- The uFldHazardMgr application, and
- How each of the above work together, in a straw-man solution to the hazard search challenge problem.
The example mission contains a default hazard field and a few other hazard fields for testing. Assuming the reader has downloaded the source code available at www.moos-ivp.org and built the code successfully, the Jake Kasper Baseline mission may be launched by:
  $ cd moos-ivp/ivp/missions-2680/lab_10_jake_kasper_baseline/
  $ ./launch.sh 12
The argument, 12, in the line above will launch the simulation in 12x real time. Once this launches, pMarineViewer should launch and the mission may be initiated by hitting the DEPLOY_ALL button. Shortly thereafter, two vehicles named jake and kasper will begin simple lawnmower patterns, each over half of the search region, as shown in the video in below.
Figure 4.1: The Jake Kasper Baseline mission: Two vehicles are on independent lawn-mower shaped search patterns, each with a chosen swath width. Each vehicle will generate a hazardset report upon completion of their initial search. This is a straw-man solution to the hazard-search problem. Several changes or additions need to be made to improve the performance, but this mission constitutes a syntactically valid hazard-search mission. video:(0:32): https://vimeo.com/88824022
Any time after the vehicle has been deployed, the user may request the generation of a hazardset report. The REQ_REPORT button sends a HAZARDSET_REQUEST message to the vehicles, each running uFldHazardMgr. Repeated requests result in updated reports. The overall score of the reports tends higher as the mission progresses and more hazards are detected.
4.1 Module Topology in the Jake Kasper Mission [top]
The key components of the Jake Kasper mission are shown in below. The uFldHazardSensor and uFldHazardMetric apps run on the shoreside, the uFldHazardMgr runs on the vehicle. The latter is a straw-man implementation of a application to be implemented by individual developers in the hazard search competition. All three applications are described in detail in their own separate sections.
A high-level description of operation is that the vehicles (a) configure the hazard sensor, (b) process the sensor information as they move through the field, and finally (c) generate a hazardset report and send it back to the shoreside for evaluation.
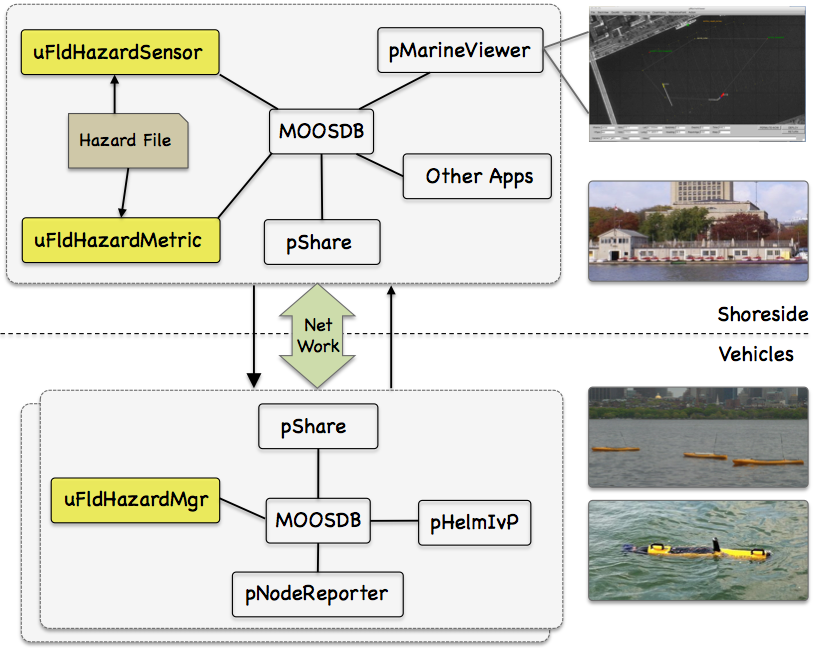
Figure 4.2: The Jake Kasper Baseline Mission Module Topology: The three key modules of the Jake mission are uFldHazardSensor, uFldHazardMetric, and uFldHazardMgr.
4.2 Key MOOS Variables in the Jake Kasper Mission [top]
To digest what is going on in this mission, familiarity with the key MOOS variables published by each key modules is needed. We list these here for reference in the following discussion. It's worth remembering that this information is always available on the command-line, by typing for example:
$ uFldHazardSensor --interface or -i
The above also provides example values for the key variables, whereas below just the variable names are listed.
uFldHazardSensor Interface [top]
- Publications: UHZ_DETECTION_REPORT, UHZ_HAZARD_REPORT, UHZ_CONFIG_ACK, UHZ_OPTIONS_SUMMARY, VIEW_CIRCLE, VIEW_MARKER, VIEW_POLYGON.
- Subscriptions: NODE_REPORT, UHZ_SENSOR_REQUEST, UHZ_CONFIG_REQUEST,UHZ_CLASSIFY_REQUEST.
uFldHazardMetric Interface [top]
- Publications: UHZ_MISSION_PARAMS, HAZARDSET_EVAL.
- Subscriptions: HAZARD_SEARCH_START, HAZARDSET_REPORT.
uFldHazardMgr Interface [top]
This information, and example values for each variable, may be obtained from the command-line by typing uFldHazardMgr -i.
- Publications: UHZ_CONFIG_REQUEST, UHZ_SENSOR_REQUEST, HAZARDSET_REPORT.
- Subscriptions: HAZARDSET_REQUEST, UHZ_CONFIG_ACK, UHZ_DETECTION_REPORT, UHZ_OPTIONS_SUMMARY.
4.3 General Description of Events in the Jake Kasper Mission [top]
There are roughly three phases to the Jake Kasper example mission, (a) initialization and startup, (b) search, and (c) reporting results. These are described below with some reference to what additional measures would be needed beyond the straw-man mission.
4.3.1 Phase 1: Sensor Configuration and Handling of Mission Parameters [top]
For each vehicle, there are two steps in the initialization phase, (a) initializing the hazard sensor, and (b) digesting the mission parameters.
Sensor Configuration [top]
The hazard sensor initialization is done in three steps. First uFldHazardSensor publishes the sensor options, with something similar to:
   UHZ_OPTIONS_SUMMARY = width=10,exp=6,class=0.91:width=25,exp=4,class=0.85:
                         width=50,exp=2,class=0.78
Once the vehicle knows the sensor options, it can pick one. In this case the uFldHazardMgr, running on vehicle jake posts something similar to:
UHZ_CONFIG_REQUEST = vname=jake,width=25,pd=0.9
Once the request has been received, uFldHazardSensor, will either accept the requested swath width outright, or map it to the closest legal option. After setting the value for PD, it will determine the PFA and PC, and post a confirmation to the following variable:
UHZ_CONFIG_ACK = vname=jake,width=20,pd=0.9,pfa=0.53,pclass=0.91
Once this is done, the sensor is configured. In the Jake Kasper mission, being a straw-man mission, some of the above steps are over-simplified. In the Jake Kasper mission, uFldHazardMgr on the vehicle does not handle the options summary and just blindly requests a particular sensor setting. It also does not handle the configuration acknowledgement. This may be something improved by a user extending this mission.
Handling of Mission Parameters [top]
Upon startup, the mission parameters are published by uFldHazardMetric on the shoreside and sent to each of the vehicles. The format of this message may look something like:
 UHZ_MISSION_PARAMS = penalty_missed_hazard=100,
              penalty_false_alarm=35,
              max_time=600,
              penalty_max_time_over=200,
              penalty_max_time_rate=0.45,
              search_region = pts={-150,-75:-150,-50:40,-50:40,-75}
The straw-man Jake Kasper mission however does not consume and react to these mission parameters. The search mission pattern is hard-coded and the penalties are disregarded, all detections are reported as hazards. This will almost certainly need to be handled by users wishing to improve on the baseline performance provided in the Jake Kasper mission.
4.3.2 Phase 2: Executing the Search Phase [top]
The activities during the search phase consist of two types of messages originating in the vehicle, and two types of messages originating in the hazard sensor back to the vehicle. Basic sensor operation is turned on when the vehicle publishes the variable:
UHZ_SENSOR_REQUEST = vname=jake
In the Jake Kasper mission, the above message originates in uFldHazardMgr. This is received on the shoreside by uFldHazardSensor. The hazard sensor regards the sensor to be on if, for the named vehicle, it has received a sensor request recently. If the sensor is on and the vehicle passes over an object and produces a detection, then a detection report is posted by the sensor and sent back to the vehicle:
UHZ_DETECTION_REPORT = x=51,y=11.3,label=12
The vehicle may decide to request a classification report for a given detection and publish:
UHZ_CLASSIFY_REQUEST = vname=jake,label=12,priority=80
However, in the Jake Kasper mission, no classify requests are generated. The vehicle simply interprets all detections to be hazards and generates a report without using the classify capability of the hazard sensor. This is another area where the user wishing to improve on the baseline mission would focus their effort. Classify requests are eventually answered by the uFldHazardSensor publishing:
UHZ_HAZARD_REPORT = x=51,y=11.3,type=hazard,label=12
4.3.3 Phase 3: Reporting Results [top]
The final phase of the mission involves sending a report from the vehicle to the shoreside, handled by uFldHazardMetric:
   HAZARDSET_REPORT = source=jake#
                      x=-151,y=-217.3,label=01#
                      x=-178.8,y=-234,label=15#
                      x=-59.8,y=-294.1,label=13
When is this report sent? In the Jake Kasper mission, this report is sent simply after the vehicles have completed their lawnmower pattern. Furthermore, in this mission, each vehicle sends their own report; there is no coordination or communication. The uFldHazardMetric evaluates a single latest report, so the earlier report in the mission is simply dropped. This is another obvious issue for improvement.
After receiving and evaluating a report, the uFldHazardMgr publishes the evaluation to the below variable, consisting partly of results, and partly reiterating the criteria for evaluation:
   HAZARDSET_EVAL  = vname=jake,
              report_name=jake_team,
              total_score=675,
              norm_score=37.5,
              score_missed_hazards=500,
              score_false_alarms=175,
              score_time_overage=0,
              total_objects=10,
              total_time=1284.91,
              received_time=1314.05,
              start_time=29.14,
              missed_hazards=5,
              correct_hazards=5,
              false_alarms=5,
              penalty_false_alarm=35,
              penalty_missed_hazard=100,
              penalty_max_time_over=100,
              penalty_max_time_rate=0.05,
              max_time=1800
In the Jake Kasper mission, the uFldHazardMgr also will publish a hazardset report upon request when it receives incoming mail HAZARDSET_REQUEST=true. In this baseline mission, the pMarineViewer GUI is configured to generate this request with one of the custom action buttons.
4.4 Required MOOS Variable Sharing [top]
The Jake Kasper mission requires MOOS variables to be be shared between the vehicle and shoreside community depicted in . The variables of key processes were described above in and . The sharing (also referred to as bridging) between MOOS communities is done with the pShare MOOS app distributed with MOOS. Configuration involves specifying which variables are to be sent to which other machine (IP address) along with the port where the other MOOSDB resides. This is configured on the shoreside for variables shared from the shoreside to the vehicles. A similar configuration exists on the vehicles for variables going in the other direction.
4.4.1 Variable Sharing from the Shoreside to the Vehicle [top]
Many of the variables shared from the shoreside to the vehicle were discussed in the previously in and . The variable share configuration is handled on the shoreside with the uFldShoreBroker application. Below is the configuration used in the Jake Kasper mission:
 ProcessConfig = uFldShoreBroker
 {
   AppTick       = 1
   CommsTick     = 1

   // Note: [qbridge = FOO]  is shorthand for
   //       [bridge = src=FOO_$V,  alias=FOO] and
   //       [bridge = src=FOO_ALL, alias=FOO]

   qbridge  = DEPLOY, RETURN, NODE_REPORT, NODE_MESSAGE
   qbridge  = MOOS_MANUAL_OVERRIDE

   bridge   = src=APPCAST_REQ
   bridge   = src=UHZ_MISSION_PARAMS
   bridge   = src=UHZ_OPTIONS_SUMMARY

   bridge   = src=UHZ_CONFIG_ACK_$V,       alias=UHZ_CONFIG_ACK
   bridge   = src=UHZ_HAZARD_REPORT_$V,    alias=UHZ_HAZARD_REPORT
   bridge   = src=UHZ_DETECTION_REPORT_$V, alias=UHZ_DETECTION_REPORT
   bridge   = src=HAZARDSET_REQUEST_ALL,   alias=HAZARDSET_REQUEST
 }
In addition to the sensor variables discussed previously, certain basic mission variables, e.g., DEPLOY, RETURN are shared to allow for basic command-and-control of the vehicles. More on uFldShoreBroker application can be found in the documentation for that application. In short, the application allows for configurable automatic point-to-point sharing of information as vehicles become known.
4.4.2 Variable Bridges from the Vehicle to the Shoreside [top]
Most of the variables shared from the vehicle to the shoreside were discussed in the previous secions, and . The variable share configuration, for variables sent fom the vehicle to the shoreside, is handled on vehicle with the uFldNodeBroker application. Below is the configuration used in the Jake Kasper mission:
 ProcessConfig = uFldNodeBroker
 {
   AppTick   = 1
   CommsTick = 1

   TRY_SHORE_HOST = pshare_route=multicast_9

   bridge = src=VIEW_POLYGON
   bridge = src=VIEW_POINT
   bridge = src=VIEW_SEGLIST
   bridge = src=APPCAST
   bridge = src=UHZ_CLASSIFY_REQUEST
   bridge = src=UHZ_SENSOR_REQUEST
   bridge = src=UHZ_CONFIG_REQUEST
   bridge = src=HAZARDSET_REPORT
   bridge = src=NODE_REPORT_LOCAL,  alias=NODE_REPORT
   bridge = src=NODE_MESSAGE_LOCAL, alias=NODE_MESSAGE
 }
In addition to the sensor variables discussed previously, a few geometry variables, e.g., VIEW_POLYGON, are shared to the shore for rendering thing such as the vehicle search path or search region in the shoreside display. More on the uFldNodeBroker application can be found in the documentation for that application. In short, the application allows for configurable autonomatic point-to-point sharing of information as the location of the shoreside is discovered, without requiring changes to the misison files if the shoreside location, i.e., IP address, changes.
4.5 Hazard Files in the Jake Kasper Mission [top]
There are several example hazard files included in the Jake Kasper mission. The default file used is hazards.txt, but there are additionally four other files:
- hazards_01.txt
- hazards_02.txt
- hazards_03.txt
- hazards_04.txt
They vary in (a) number of benign objects, (b) number of hazards, and (c) hazard resemblance of the benign objects. Each of these files was created with the gen_hazards utility distributed with moos-ivp. The first line of each file contains a comment, a line showing exactly the command-line invocation of gen_hazards used in making the file. You are welcome to create your own to test situations beyond those in the handful of files included in this mission.
To launch the mission with a different hazard file, the --hazards command-line switch is supported with the provided launch script. For example:
$ ./launch.sh --hazards=hazards_03.txt 10
As before, the 10 on the command-line specifies the time warp and individual machines may vary in the magnitude of time warp supported, correlated to the machines raw computing capacity.
5 Assignments
5.1 Assignment 1 (self check off) - Obtain and Run the Baseline Mission [top]
Our first step is to get and run the baseline mission we will be starting from in this lab. Get a copy and put it in your new lab_10 folder.
  $ cd moos-ivp/ivp/missions-2680
  $ cp -rp lab_10_jake_kasper_baseline moos-ivp-janedoe/missions/lab_12/jake_kasper_baseline
This mission is configured for two vehicles, jake and kasper, each doing a simple lawnmower search with the ability to return and station-keep at any time. It is described fully in . It should be launchable with
  $ cd jake_kasper_baseline
  $ ./launch.sh 15
It is our starting point for this lab, and should look something like the video posted at:
Figure 5.1: The Jake Kasper Baseline mission: Two vehicles are on independent lawn-mower shaped search patterns, each with a chosen swath width. Each vehicle will generate a hazardset report upon completion of their initial search. This is a straw-man solution to the hazard-search problem. Several changes or additions need to be made to improve the performance, but this mission constitutes a syntactically valid hazard-search mission. video:(0:32): https://vimeo.com/88824022
Any time after the vehicle has been deployed, the user may request the generation of a hazardset report. The REQ_REPORT button sends a HAZARDSET_REQUEST message to the vehicles, each running uFldHazardMgr. Repeated requests result in updated reports. The overall score of the reports tends higher as the mission progresses and more hazards are detected.
5.2 Assignment 2 (self check off) - Understand the Baseline and Key Modules [top]
Take some time to understand the components of the baseline mission. Read through the description of the baseline mission in . Read the description of the key apps in this lab, uFldHazardSensor, uFldHazardMetric, and uFldHazardMgr. Another suggestion is to run the baseline mission and confirm some of the postings by looking at the alog files from the vehicles and on the shoreside. Use aloggrep to confirm things. You want to be familiar with this tool later on for your own debugging.
5.3 Assignment 3 (self check off) - Make your own uFldHazardMgr [top]
The baseline mission has a straw-man implementation of uFldHazardMgr which will run on your vehicles. You will need to improve this with your own version. To get your own version:
  $ cd moos-ivp-janedoe/src
  $ cp -rp /Users/you/moos-ivp/ivp/src/uFldHazardMgr  ./uFldHazardMgrX
After you have made a copy of uFldHazardMgr named uFldHazardMgrX, add uFldHazardMgrX to your moos-ivp-janedoe/src/CMakeLists.txt file and re-build our code. Finally, replace the references to uFldHazardManager in your copy of the baseline mission, with references to your app instead. These references are at least in the meta_vehicle.moos file and plug_uFldHazardMgr.moos files. (Don't forget to put uFldHazardMgrX under your version control, e.g., svn or git.)
5.4 Assignment 4 (check off) - Merge Vehicle Reports [top]
As mentioned in the description of the baseline mission (Phase 3: Reporting Results), each vehicle is simply surveying half the search area, and posting its own HAZARDSET_REPORT. This results in two reports received by uFldHazardMetric on the shoreside. Both reports are destined to be poor, since they will have missed detections from the area being searched by the other vehicle.
Your objective in this assignment is to merge vehicle reports. The two vehicles should communicate their search results to each other to create a full report of the search area.
Things to consider:
- Your vehicles will need to talk to each other using the NODE_MESSAGE scheme from Lab 11. The baseline mission already has uFldNodeComms and uFldMessageHandler in place. Confirm that you can send messages, and then focus on how to share reports.
- You may want to make these changes in your uFldHazardMgrX application from Assignment 3.
- Your vehicles will need to be close enough to send messages. How will you accomplish this?
Things you don't need to consider (for now):
- You can still use the simple heuristic that every detection is reported as a hazard. The aim here is merging reports.
- You don't have to worry about submitting multiple reports. So for now both vehicles can simply submit the combined report. Later on, you may want it to come from just one vehicle.
5.5 Assignment 5 (self check off, optional) - Begin to Path Plan [top]
Presently the vehicle paths are simple lawn-mower patterns configured in the vehicle behavior file. You are encouraged to creat a pHazardPath MOOS app to run on both vehicles. This module should be where path planning is done. At the very least it should have configuration parameters that set the operation area. Eventually it should read the UHZ_MISSION_PARAMS variable produced on the shoreside which contains the operation area information. It is in this app also that you may implement something more complicated than lawn-mower pattern, such as a tour of hazard objects that need further sensor feedback before generating a report. This issue is optional in this lab, but will be key in the next lab on this problem, so it's a worthy area to get started on.
5.6 Assignment 6 (self check off, optional) - Begin to Use the Classify Report [top]
In the baseline mission, classify reports are not used. They are key to achieving high certainty in final reports. See if you can utilize this capability in your uFldHazardMgrX application to generate better reports. This issue is optional in this lab, but will be key in the next lab on this problem, so it's a worthy area to get started on.
6 Instructions for Handing In Assignments
6.1 Requested File Structure [top]
Here is the requested file structure:
   moos-ivp-janedoe/
     missions/
       lab_12/
         jake_kasper_baseline/       // Assignment 1 - self checkoff
         jake_kasper                 // Your own sandbox
     src/
       uFldHazardMgrX/               // Your version of the hazard manager
       pHazardPath/                  // Your implementation of path planning
6.2 Due Date [top]
You should aim to have this lab completed no later than the next lab, Thursday April 3rd. The following lab is a continuation of this lab, so it is vital to finish lab 12 before starting lab 13. Lab 13 will be handed out next lab (Thursday April 3rd) and will run for three lab sessions.
7 Hazard File Format
A hazard file is a simple text file that:
- describes a hazard field, typically with one object per line,
- is read by uFldHazardSensor to determine the simulated laydown,
- is read by uFldHazardMetric to have a ground truth to grade against,
- may be generated with the gen_hazards command line tool.
A typical hazard file is shown below. The first line is a comment indicating the command line invocation responsible for generating this particular file, using the gen_hazards utility described separately.
  // gen_hazards --polygon=-100,0:-100,-300:300,-300:300,0 --objects=5,hazard --objects=8,benign
  hazard = x=-151,y=-217.3,label=01,type=hazard
  hazard = x=263.2,y=-8.5,label=02,type=hazard
  hazard = x=48.5,y=-195.7,label=03,type=hazard
  hazard = x=165.9,y=-116.4,label=04,type=hazard
  hazard = x=101.3,y=-159.3,label=05,type=hazard
  hazard = x=257.6,y=-131.3,label=06,type=hazard
  hazard = x=217.3,y=-16.7,label=07,type=hazard
  hazard = x=-14.2,y=-293.60001,label=08,type=hazard
  hazard = x=260.2,y=-66.2,label=09,type=hazard
  hazard = x=-65.8,y=-125.2,label=10,type=hazard
  hazard = x=171.9,y=-253.7,label=11,type=benign
  hazard = x=-150.3,y=-117.5,label=12,type=benign
  hazard = x=-59.8,y=-294.1,label=13,type=benign
  hazard = x=98.2,y=-127.7,label=14,type=benign
  hazard = x=-178.8,y=-234,label=15,type=benign
  hazard = x=24,y=-61,label=16,type=benign
  hazard = x=250.3,y=-214.6,label=17,type=benign
  hazard = x=97.7,y=-245.5,label=18,type=benign
The gen_hazards utility will ensure that each hazard has a unique label. The uFldHazardSensor will complain if there are duplicate labels. The hazard file may also be further edited to change rendering hints for the default shape, color or size of the object. These hints are used, for example, by uFldHazardSensor to generate VIEW_MARKER postings consumable by pMarineViewer.
8 Generating Your Own Hazard Files
Random hazard field files may be generated with the gen_hazard utility. For example, the following command-line invocation will generate the file shown in :
$ gen_hazards --polygon=-100,0:-100,-300:300,-300:300,0 --objects=5,hazard --objects=8,benign
Hazard resemblance factors may be automatically generated with the --exp=N command line option. When this option is used, each benign object will have a initial resemblance factor chosen with a uniform random variable in the range of [0,1]. This number is then raise to the power of N. For example, the below command line invocation:
  $ gen_hazards --polygon=-100,0:-100,-300:300,-300:300,0 --objects=5,hazard --objects=8,benign
   --exp 3 > hazards.txt
would create a new file, hazards.txt, with the below content. The first line is a comment line that reflects the command line invocation responsible for the output.
 // gen_hazards --polygon=-150,-75:-150,-400:400,-400:400,-75 --objects=5,hazard --objects=8,benign
 --exp=3
 hazard = x=292,y=-253,label=22,type=hazard
 hazard = x=224,y=-322,label=51,type=hazard
 hazard = x=-1,y=-136,label=37,type=hazard
 hazard = x=131,y=-115,label=55,type=hazard
 hazard = x=-14,y=-201,label=76,type=hazard
 hazard = x=38,y=-230,label=87,type=benign,hr=0.0199
 hazard = x=228,y=-134,label=49,type=benign,hr=0.02172
 hazard = x=262,y=-346,label=9,type=benign,hr=0.06842
 hazard = x=30,y=-310,label=45,type=benign,hr=0.01544
 hazard = x=-29,y=-141,label=59,type=benign,hr=0.00417
 hazard = x=57,y=-343,label=23,type=benign,hr=0.17845
 hazard = x=148,y=-387,label=86,type=benign,hr=0.31861
 hazard = x=30,y=-313,label=84,type=benign,hr=0.37481
The gen_hazards tool does not generate output regarding the shape, color or width of an object. Those characteristics need to be added by hand in the hazard file if the user desires.
One caveat is that the polygon provided to gen_hazards, must be convex. For example, note the following erroneous invocation and output (two vertices do not constitute a convex polygon):
 $ gen_hazards --polygon=400,-400:400,-75 --objects=3,hazard --objects=3,benign
 Invalid/Non-convex polygon specified: 400,-400:400,-75
9 Hazard File Renderings
A hazard file may be rendered as shown in . In this case, the hazards are read by uFldHazardSensor, posted to the MOOSDB as VIEW_MARKER objects, and read and rendered by pMarineViewer.
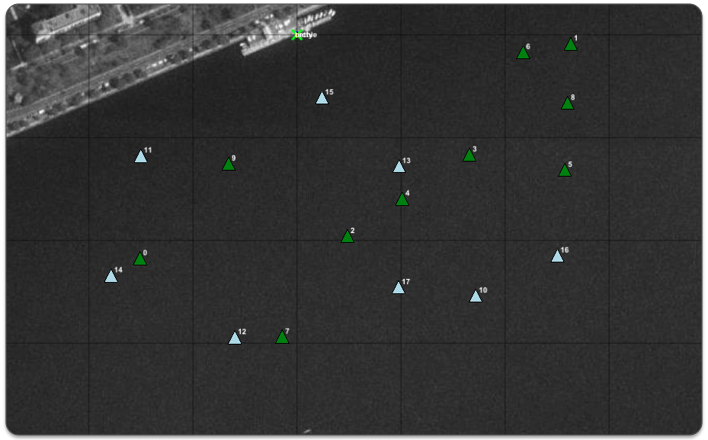
Figure 9.1: Simulated Hazard Field: A hazard field with 18 objects is shown, some are hazardous objects, some are benign objects.
Since the hazard (and benign) objects in pMarineViewer, are simply VIEW_MARKER objects, they may be toggled off and on with the 'm' key and the labels may be toggled off and on with the 'M' key. The can be rendered larger and smaller with alt-'m' and ctrl-'m' respectively, and returned to their original size with ctrl-alt-'m'.
The shapes and colors of both hazard and benign objects may also be altered within the uFldHazardSensor configuration. By default, both hazards and benign objects are rendered as triangles, and hazards by default are rendered green, and benign objects are light blue. Their rendered width by default is 8 meters. These defaults may be altered with the following six uFldHazardSensor configuration parameters:
   default_hazard_shape = triangle                 // default
   default_hazard_color = green                    // default
   default_hazard_width = 8                        // default

   default_benign_shape = triangle                 // default
   default_benign_color = light_blue               // default
   default_benign_width = 8                        // default
Other shapes allowable are square, circle, and diamond. These are default values. Rendering characteristics may be overridden for any particular object. For example, consider the following entry in a hazard file:
hazard = x=224,y=-322,label=51,type=hazard,shape=square,color=yellow,width=20
The specified shape=square, color=yellow and width=20 will override any defaults, making this particular object stand out visually.
10 Serialization of Hazard and HazardSet Information
In the lib_ufld_hazards library there are two classes defined relevant to this lab. The XYHazard class and the XYHazardSet class. The latter is essentially just a collection of the former. It is recommend that you use this data structure internally in your programs, but especially recommended that you use this data structure for serializing.
Serializing and De-serializing are explained further below, but perhaps the best explanation is by example in the straw-man uFldHazardMgr application. The handleMailDetectionReport() function handles incoming reports from the sensor and builds up a hazardset object for later posting to the MOOSDB.
10.1 Serializing and De-serializing XYHazard Objects [top]
Hazard objects are dealt with in the XYHazard class in lib_ufld_hazards. It may be best to just explore the class header file to understand its function, but the below example snippets should give the general idea:
  #include "XYHazard.h"

  // Build the hazard object
  XYHazard my_hazard;
  my_hazard.setX(5);
  my_hazard.setY(8);
  my_hazard.setType("hazard");
  my_hazard.setLabel("128");

  // Serialize the object into a string
  string msg = my_hazard.getSpec()

  // Post to the MOOSDB
  Notify("HAZARD_INFO", msg);
The above would result in the following posting to the MOOSDB:
HAZARD_INFO = "x=5,y=8,type=hazard,label=128"
In the reverse direction, creating an XYHazard object from a string:
  #include "XYFormatUtilsHazard.h"

  string msg = "x=5,y=8,type=hazard,label=128";

  XYHazard my_hazard = string2Hazard(msg);
  cout <<  my_hazard.getX() << ", ";
  cout <<  my_hazard.getY() << ", ";
  cout <<  my_hazard.getType() ", ";
  cout <<  my_hazard.getLabel() << endl;
The above would result in the following written to the terminal:
5, 8, hazard, 128
10.2 Serializing and De-serializing XYHazardSet Objects [top]
HazardSet objects are essentially collections of XYHazard objects. They are dealt with in the XYHazardSet class in lib_ufld_hazards. It may be best to just explore the class header file to understand its function, but the below example snippets should give the general idea:
  #include "XYHazardSet.h"

  // Build the hazards
  XYHazard hazard_01;
  hazard_01.setX(15);
  hazard_01.setY(18);
  hazard_01.setType("hazard");
  hazard_01.setLabel(128);

  XYHazard hazard_02;
  hazard_02.setX(35);
  hazard_02.setY(38);
  hazard_02.setType("benign");
  hazard_02.setLabel(92);

  // Build the hazardset
  XYHazardSet my_hazard_set;
  my_hazard_set.setSource("betty");
  my_hazard_set.addHazard(hazard_01);
  my_hazard_set.addHazard(hazard_02);

  // Serialize the hazardset
  string msg = my_hazard_set.getSpec()

  // Post to the MOOSDB
  Notify("HAZARDSET_REPORT", msg);
The above would result in the following posting to the MOOSDB:
    HAZARDSET_REPORT = "source=betty # x=15,y=18,type=hazard,label=128 #
                                       x=35,y=38,type=benign,label=92"
Document Maintained by: mikerb@mit.edu
Page built from LaTeX source using texwiki, developed at MIT. Errata to issues@moos-ivp.org. Get PDF