2.680 Labs
01 Machine Setup
02 Intro to C++
3A Version Control W/Git
03 Intro to MOOS
04 MOOS Programming
05 Helm Autonomy
06 Multi-Vehicles Pre-Lab
06 Multi-Vehicles
07 Distributed TSP
08 Multi-Machine TSP
09 Inter-Vehicle Messaging
10 Behavior Writing
11 Payload Autonomy
12 Operating MIT Herons
13 Autonomous Rescue (Pt1)
14 Autonomous Rescue (Pt2)
15 Autonomous Rescue (Pt3)
16 Autonomous Rescue (Pt4)
17 Autonomous Rescue (Pt5)
2.680 Retired Labs
12 Hazard Search
13 Hazard Search II
17 Front Estimation
18 In-Water Front Estimate
Ten Short C++ Labs
01 C++ Program Structure
02 C++ Cmd Line Args
03 C++ Functions
04 C++ I/O and Vectors
05 C++ Classes, Rand #'s
06 C++ Deserialization
07 C++ Build Systems
08 C++ Inheritance
09 C++ Coding Guidlines
10 C++ Style Guidelines
Lab 3A - Using Version Control with GitHub
Maintained by: tpaine@mit.edu  Get PDF
1 Overview and Objectives
1.1 Preliminaries
2 Obtaining Your Own Version of the moos-ivp-extend Repo
2.1 Create a New Repository by Importing an Existing Repository
2.2 Finding your Newly Created Repository
2.3 Provide TA Access (Adding a Collaborator)
3 Cloning your New Repo onto Your Local Computer
3.1 Cloning Code onto Your Computer
3.2 Configuring an SSH Key Pair
3.2.1 Create an SSH-Key Pair
3.2.2 Uploading the Public SSK-Key in Your GitHub Account
3.2.3 Loading your Private Key
3.2.4 Pulling code from the server
4 More Git: Configuring and Using Git
4.1 Configuring your Git environment
4.2 Saving your changes
1 Overview and Objectives
This lab will help new users get ready to use version control, before introducing MOOS in the upcoming labs. The goals of this lab are to (a) create a user-owned copy of the moos-ivp-extend baseline repository and (b) introduce git as a tool to track the user's software development progress (also known as version control).

The moos-ivp-extend baseline repository is a folder with a common structure for organizing and building the source code to be developed in 2.680. By having a common structure across students, this allow the 2.680 staff to pull student code into automated testing scripts. It also makes it easier for TAs to help students by having a familiar structure.
1.1 Preliminaries [top]
This lab assumes you have a working MOOS-IvP tree checked out and built on your computer. You will also need to have git installed. To verify this make sure that the following executable is findable in your shell path:
  $ which git
  /usr/bin/git     (the typical location in MacOS)
  /bin/git         (the typical location in Linux)
You will need a Git hosting service in MIT 2.680. The recommended and most common service is github.com. Please go to this website and obtain an account. A soft suggestion: make things a bit easier if you can by using your MIT email address and your MIT kerberos for a user name when prompted. If you have another Git hosting service you use already, such as gitlab.com, feel free to continue using that. We do not recommend using the MIT github service. Presumably if you use GitLab or similar, then you know how to map the below instructions for GitHub into the similar steps in the hosting service you currently used.
2 Obtaining Your Own Version of the moos-ivp-extend Repo
After signing up for a free github.com account, you can import a copy of the 2.680 course baseline repository into your account by following these steps:
2.1 Create a New Repository by Importing an Existing Repository [top]
Once you are logged into your github.com account you should see a pull-down menu option at the top of the page, similar to:
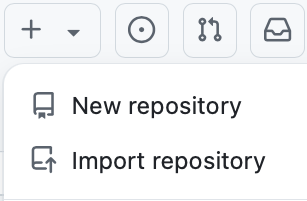
Select Import repository. This will bring you to a page where one of the first steps is to enter the URL for the project to import. It should look something like:

In this field enter: https://github.com/pavlab-mit/moos-ivp-extend. You can ignore the next two fields:

Since the repository you are importing is public, you do not need to enter a username or credentials information. Just leave this blank. The remaining fields, shown below, do need to be filled in. In the example below, my MIT kerberos name is mikerb and this is also my GitHub username. For the name of your repository, we suggest you replace "extend" with your MIT kerberos name, moos-ivp-mikerb in this example.
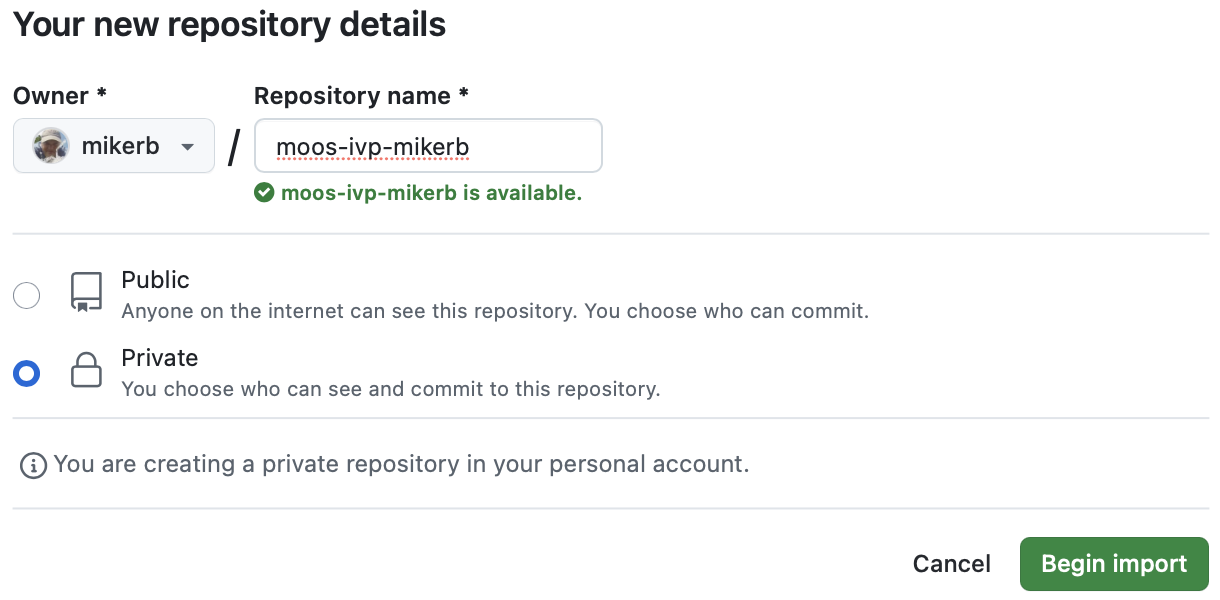
The URL https://github.com/mikerb/moos-ivp-mikerb is the goal for the name of the newly created repo. In the dialog box at the bottom, select Private. Then you are ready to hit the green button to Begin Import.
This may take a minute or two and you should see something like the below image while the import request is being processed.

GitHub will send you an email when the import has completed.
2.2 Finding your Newly Created Repository [top]
Once the repository is created, you can find it by using the pull-down menu at the very uppermost rightmost corner of your GitHub page. It may be a picture of you (if you uploaded one when you created your account) or one of the auto-generated pixel art pieces auto-generated by GitHub. In my case it looks like:

Click on the picture to get the pull-down menu, looking something like:
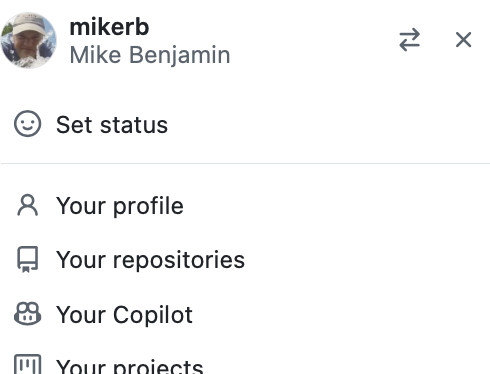
Select the Your repositories option. This should bring you to your account page where all (1 so far) repositories are listed. Using my name and repo as an example, you should see something like:

2.3 Provide TA Access (Adding a Collaborator) [top]
In the step, you are asked to provide access to your repository to the 2.680 staff. From the last step above, you should be in your GitHub account page and see the newly created repository as a link that you can select. Go ahead and select the link and this will take you to the repo main page, looking something like:
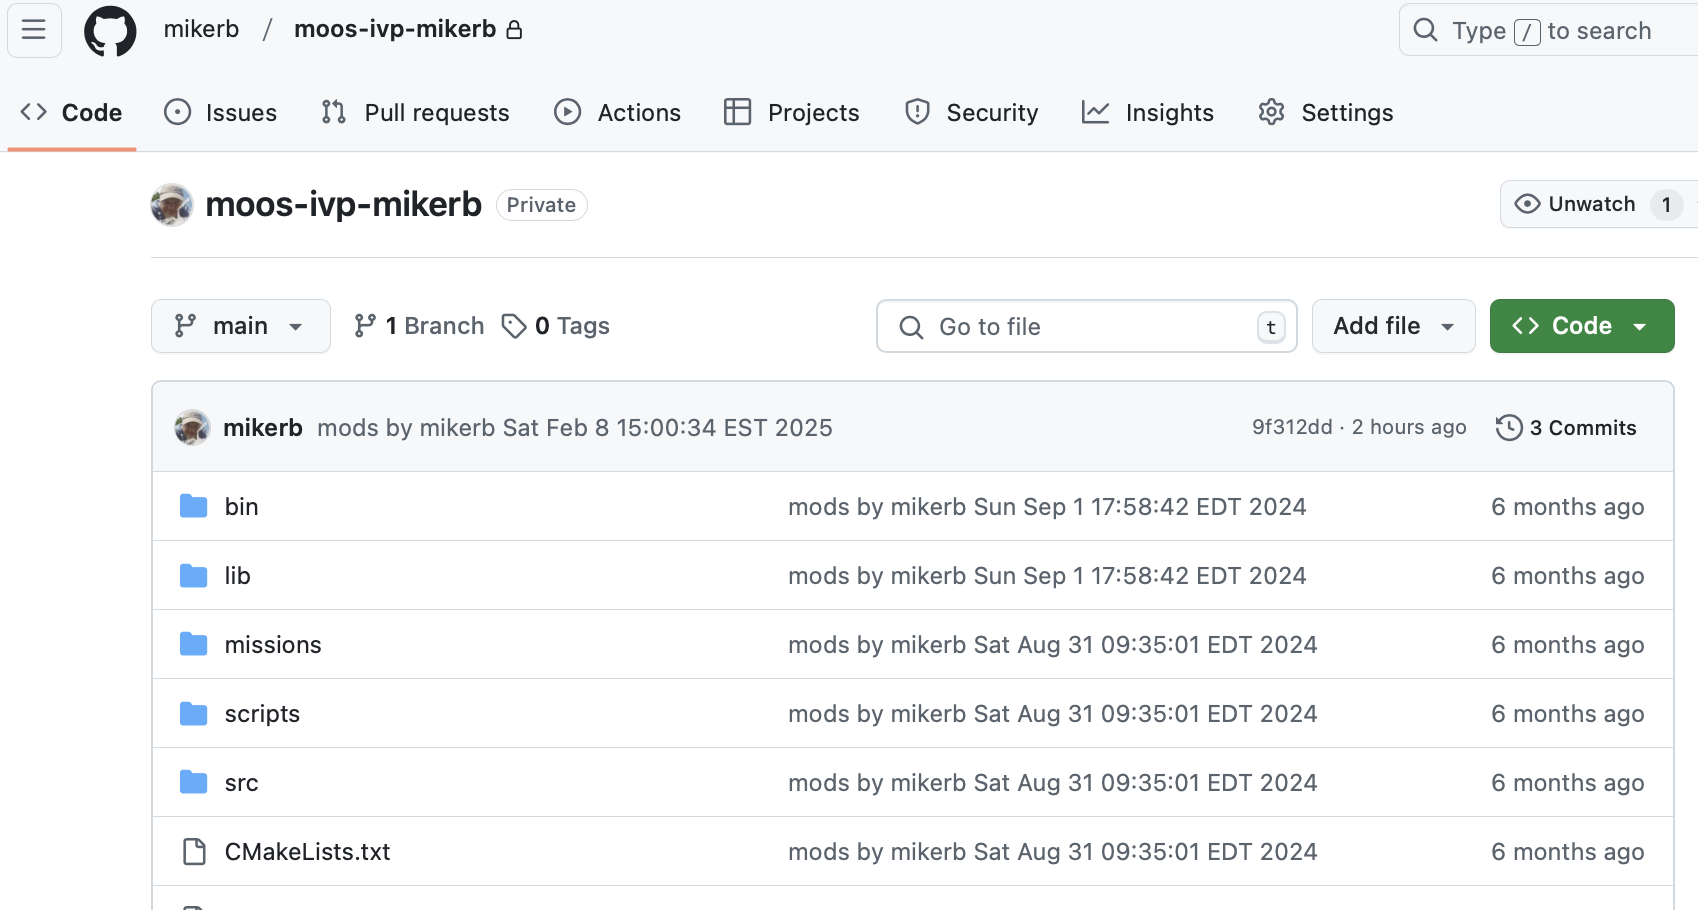
In the upper right-hand corner, select the Settings pull-down menu,
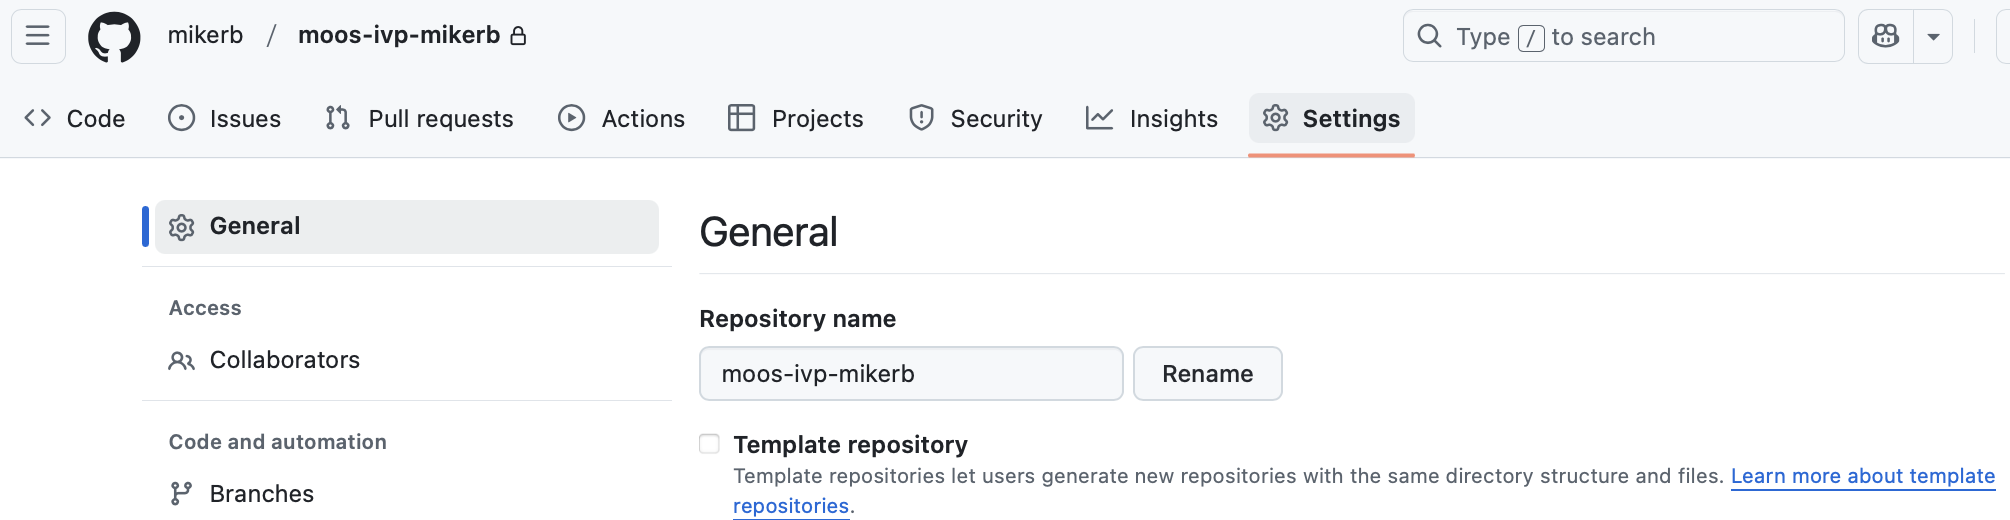
This will open a new page with many options for modifying the settings of your newly created repository. Lots to explore later here, but for now, notice in the upper left corner, in the left-hand menu, there is an item Collaborators in the Access section. Click the link for collaborators.
Note: often when modifying important settings, GitHub may want to confirm your identity before proceeding. It may prompt you at this stage to confirm your identity, depending on how long it has been since previously credentialing. Go ahead and confirm your identity if needed. (this may be a good point to consider getting the GitHub mobile app on your phone to facilitate credentialing with GitHub). The next page should look something like:
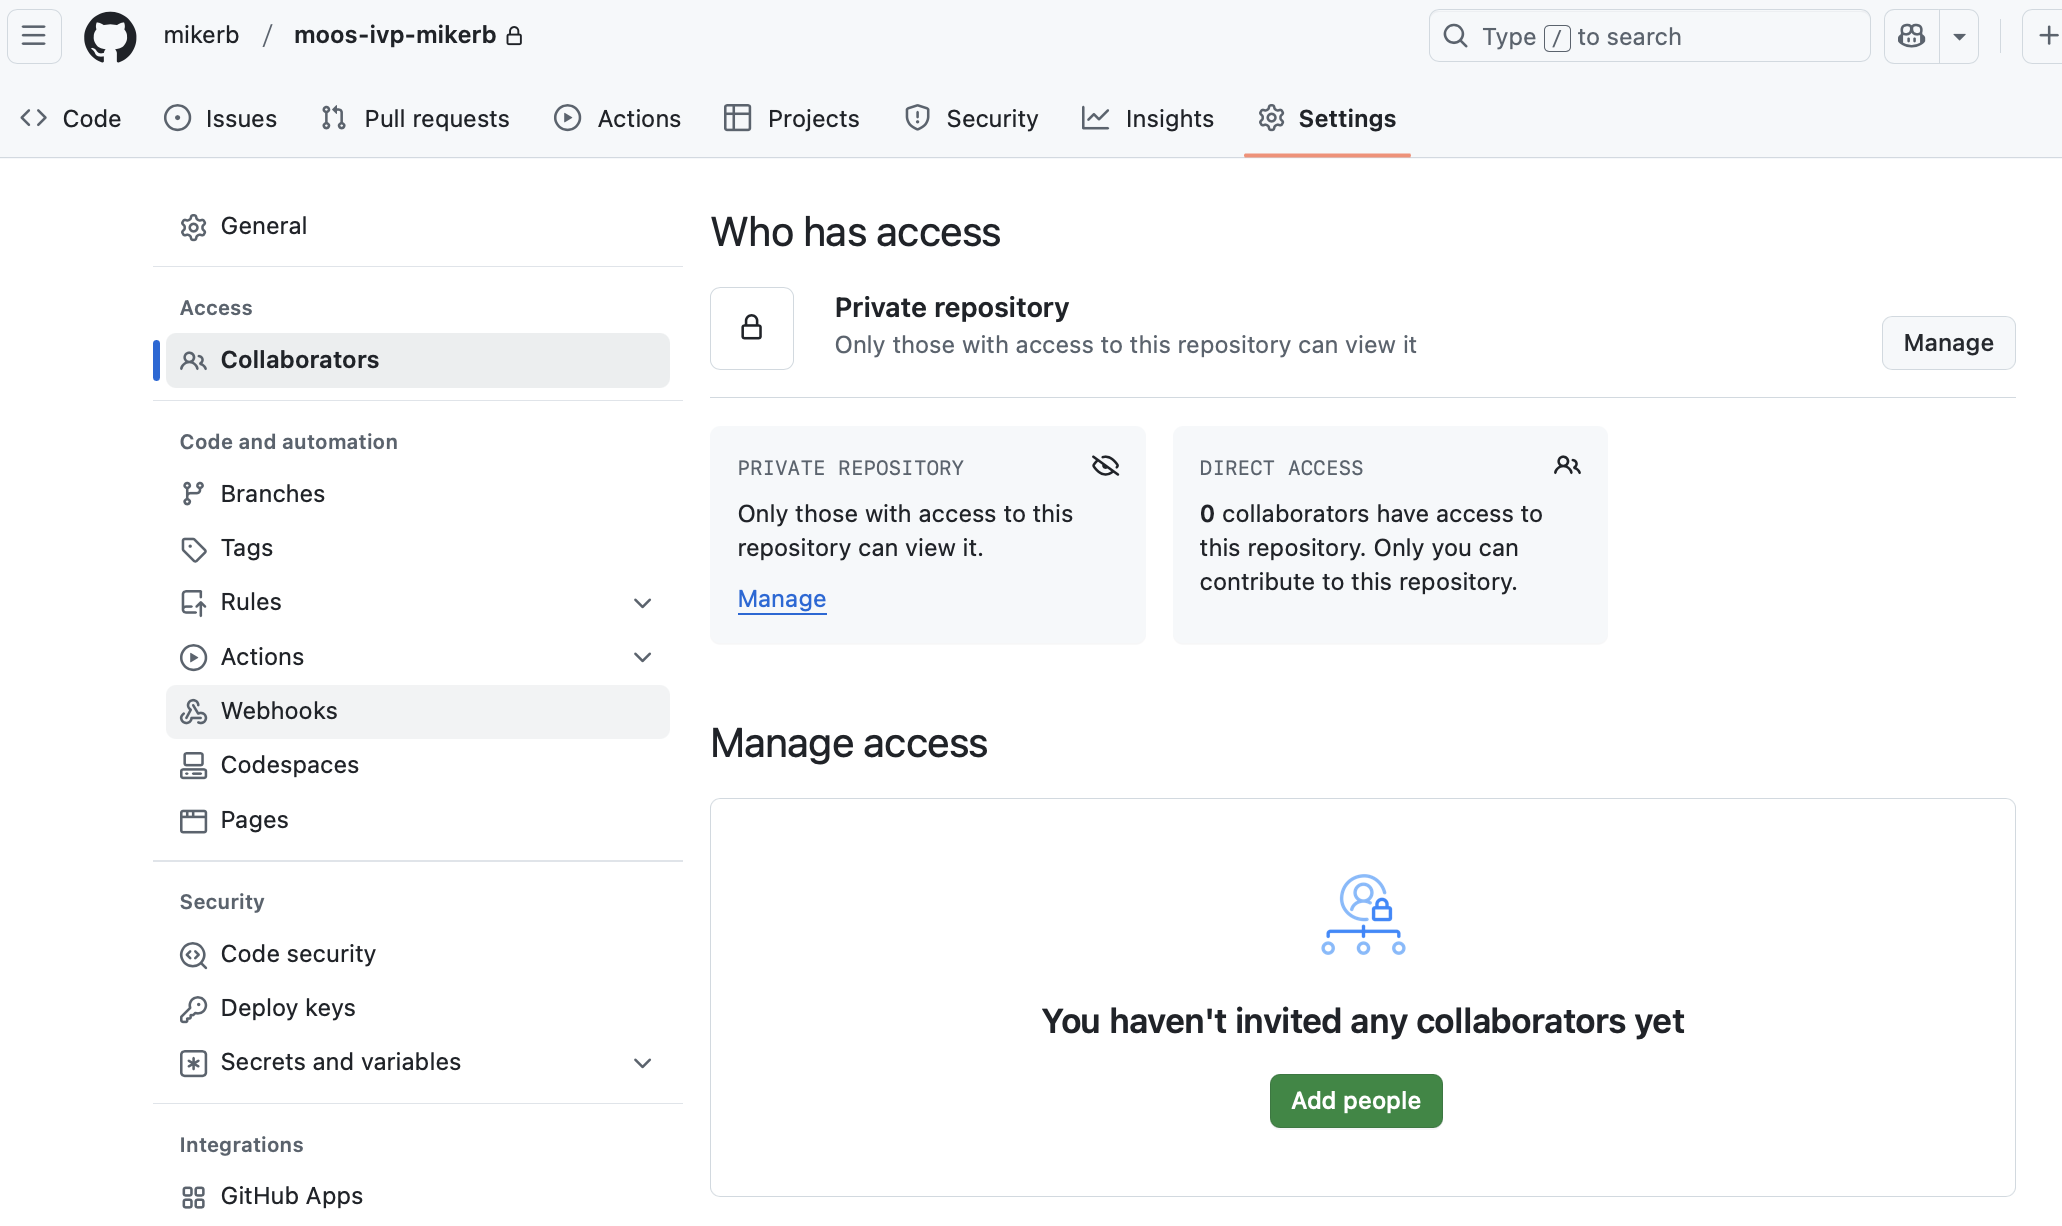
Click on the green button that says Add People. In the dialog box, enter mikerb and then select mikerb and the click the green button to Add mikerb. Do the same for painetyler (Tyler Paine) and herocc (Conlan Cesar).
The steps above will create an independent copy of the source repository, preserving the history of the original project up to that point. Unlike a fork (another method for creating a copy of a project's repository), it will detach from the original repository going forward. Forking a repository would enable you to make changes and then submit upstream merge requests (pull requests, PRs, in GitHub), for the consideration of the original project team.
3 Cloning your New Repo onto Your Local Computer
Once your new repository has been created in the github.com web interface, you can view the code through the browser. To further develop and modify your code, a copy must be made onto your local computer, and then you will use the tools of git to keep the two versions sychronized. Unlike tools like DrobBox, OneDrive, or other cloud services, the synchronization does not happen automatically. Only for the files you specify and upon your command, will files be synchronized in either direction.
3.1 Cloning Code onto Your Computer [top]
Recall in Section 2 that you created your own private new repository from the public moos-ivp-extedn repo. Because the latter is public, it can be cloned onto your computer without being prompted for credentials, with the following:
Not that you would want/need to do this, but you could get a copy of the public moos-ivp-extend repo with the following:
 $ git clone https://github.com/pavlab-mit/moos-ivp-extend.git
 Cloning into 'moos-ivp-extend'...
 remote: Enumerating objects: 44, done.
 remote: Counting objects: 100% (44/44), done.
 remote: Compressing objects: 100% (31/31), done.
 remote: Total 44 (delta 10), reused 43 (delta 9), pack-reused 0 (from 0)
 Receiving objects: 100% (44/44), 18.19 KiB | 3.03 MiB/s, done.
 Resolving deltas: 100% (10/10), done.
 $ cd moos-ivp-extend
 $ ls
 CMakeLists.txt  bin/            lib/            src/
 README          build.sh*       missions/       trying123.txt
 README.md       clean.sh*       scripts/
But if you tried to do this with a private repo like the one you created for yourself in Section 2, you would prompted for credentials.
To get a copy of your private repo onto your laptop, with the ability to later push changes to GitHub, you will need to create and and install an SSH key pair. One half of the pair remains on your machine, and the other half is loaded onto GitHub. This is described next.
3.2 Configuring an SSH Key Pair [top]
To set up credentialing with GitHub, to both access a private repo like the one you just created, and to be able to push changes back to GitHub, we will use SSH key pairs, as described below.
A key pair is created with a public and private half. The public half is uploaded to GitHub, and the private half remains on your computer. The private half normally has a pass-phrase, one of your choosing when the key pair is generated.
Three steps are described here:
- Generate an ssh-key pair
- Put each half where the need to be (one local, one on GitHub)
- Test that you can can clone your private repo onto your laptop.
3.2.1 Create an SSH-Key Pair [top]
On both MacOS and Linux machines, there should already installed a command called ssh-keygen. You can check:
   $ which ssh-keygen
   $ /usr/bin/ssh-keygen   (the typical location in MacOS)
   $ /bin/ssh-keygen       (the typical location in Linux)
To create a ssh-key pair:
$ ssh-keygen -t ed25519 -C "janedoe@github"
This command will generate a key pair for you. When prompted for the file where you want to save the key, press enter to accept the default. You can also secure the use of your key by setting a password. The argument -C above is just a comment, for the future when you may have multiple ssh-keys, it helps you remember which one was for what.
  > Generating public/private algorithm key pair.
  > Enter a file in which to save the key (/Users/you/.ssh/id_ed25519): [Press enter]
  > Enter passphrase (empty for no passphrase): [Type a passphrase]
  > Enter same passphrase again: [Type passphrase again]
Note the existence of the folder .ssh in your home directory. As a hidden folder remember you need to run ls -a to see it. At this point you should have the two halves of the ssh-key pair in this folder, in the files named:
   $ ls -a ~/.ssh
   id_ed25519   id_ed25519.pub
The one with the .pub suffix needs to be uploaded to github.com in your account. This is described next.
3.2.2 Uploading the Public SSK-Key in Your GitHub Account [top]
The next step is to add the public key to your GitHub account, so that the server recognizes your local computer. If you are an existing GitLab user, we presume you know how to do these steps already for GitLab.
First, copy (as in "copy/paste") the public key:
$ cat ~/.ssh/id_ed25519.pub
Note: on macOS, you can copy to the system clipboard from terminal using the pbcopy utility:
$ cat ~/.ssh/id_ed25519.pub | pbcopy
Please make sure you include the \*.pub suffix! Your private key will have the same base name but no suffix, and should remain secret for security reasons. Next, follow these instructions to add the key to your GitHub account:
- Sign in to GitHub.com
- Click on your profile photo (upper right corner), then click Settings
- On the sidebar, click on "SSH and GPG keys
- Click "New SSH key" or "Add SSH key"
- In the Title field, add a brief descriptionof which computer this is for (such as "2.680 laptop")
- In the Key field, paste the contents of your public key file
- Click "Add SSH key"
3.2.3 Loading your Private Key [top]
The key can be added to your agent using the following command:
$ ssh-add -t 432000 ~/.ssh/id_ed25519
The -t 432000 part is optional. This specifies the amount of time, in seconds (5 days in this example), before needing to add the key again.
Once it is loaded you can confirm with:
 $ ssh-add -l          (-l for "list")
 256 SHA256:wBe5h8kK7PZ8h7yPQ6+dRFLNDeCgiyK47U1Q+/nmdG1 janedoe@github (ED25519)
Note the "janedoe@github" part is whatever was specified with the -C comment option when the ssh-key was created, as described earlier.
If for some reason you would like to un-load your ssh-key:
 $ ssh-add -D          (-D for "Delete all Keys")
 $ ssh-add -l          (note now there are none listed)
3.2.4 Pulling code from the server [top]
Once you've added your SSH key to your account, you can clone your repository using the following commands:
$ git clone git@github.com:<user>/moos-ivp-<kerberos>
This will clone a copy of your repository to your local machine. As this is where you will be developing your new software, this is called a working copy.
Git is designed to facilitate development across multi-member teams. Even for single-member development, you may work from multiple computers, such as a robot's computer and your own laptop.
Along with this lab, you will need to get familiar with how to make local modifications and push those changes to GitHub. If new changes have been pushed to GitHub that are not yet on your local machine, you can pull these changes with:
$ git pull
4 More Git: Configuring and Using Git
4.1 Configuring your Git environment [top]
When committing changes to a repository, Git creates an attribution record so the author can be identified. You can tell Git what name and email address you want associated with your commits by setting the global defaults:
  $ git config --global user.email "your_email@example.com"
  $ git config --global user.name  "Your Name"
4.2 Saving your changes [top]
When you've changed files in your working copy and you want to save your progress, you will need to execute the following sequence of commands:
  $ git add <file(s) or path(s)>
  $ git commit -m "a comment about what changed"
  $ git push
The first command, git add, will create a temporary, local checkpoint of your changes. If you make additional modifications to the file before calling git commit, you can revert to the checkpoint created by git add. However, if you then call git add once again, the checkpoint will be replaced to include the additional changes.
The second command, git commit, essentially confirms that you want this checkpoint to become a permanent point in the version control history. The comment is intended as a brief reminder of what changes were made, in case you need to look back through the version history later on.
The checkpoint created by git commit will be only available on your current workstation until you share it with the server, which you can do with the third command in the series: git push.
To get started with Git, update the README.md file in your local copy (located in the top directory) to indicate that this is your personal repository. An update suggestion is to add a block at the top of the file, listing your name and kerberos, along with an indication that you are taking the class during Spring 2022.
Once you've modified the file locally using your preferred text editor, commit and push your changes using the following sequence:
  $ git status            # (to see what files have changed in the repo)
  $ git add README.md
  $ git commit -m "updating README.md to reflect ownership by <kerberos> "
  $ git push
You should be able to verify the changes to the README.md file by going to your repository's URL using a web browser.
Document Maintained by: tpaine@mit.edu
Page built from LaTeX source using texwiki, developed at MIT. Errata to issues@moos-ivp.org. Get PDF