Lab 15 - Autonomous Rescue Challenge - Part 3 Handling a Changing Playing Field
Maintained by: mikerb@mit.edu  Get PDF
1 Overview and Objectives
2 Preliminaries
2.1 Preliminaries: Documentation Conventions
2.2 Preliminaries: Pull Latest Code and Mission Files
2.3 Preliminaries: Pavilion Coordinates
2.4 Preliminaries: The Shell Path
2.5 Preliminaries: The Helm Behavior Path
3 Running the Baseline Mission
3.1 Running the Baseline Mission
3.2 Adding and Removing Swimmers Using the GUI
3.3 Assignment 1 (check off) - Handle Dropped Swimmers in Your Vehicle
3.4 Efficiency Hints for Running the Baseline Mission
4 Running Adversarial Missions
4.1 Running the Default Two-Vehicle Adversarial Simulation
4.2 Run-time Information in Two-Vehicle Simulations
4.2.1 Visual Markers and Colors
4.2.2 AppCasting Output of uFldRescueMgr
4.2.3 AppCasting Output of pGenRescue
4.3 Assignment 2 (check off) Run Your App on Both Simulated Vehicles
5 Optimizing Your Path Generation
5.1 Getting to More Swimmers More Quickly
5.2 Using Information about Your Adversary
5.3 Trying Your Optimized Path Planning
6 Instructions for Handing In Assignments
6.1 Requested File Structure
6.2 Due Date
1 Overview and Objectives
In the third part of the Autonomous Rescue Challenge lab we introduce the component of adversarial competition. Hereafter in this lab there will be two rescue robots, traversing the field of swimmers, with the objective of reaching more swimmers than the other rescue robot. Prior to this lab, you should have a working version of the pGenRescue app that is capable of receiving a series of swimmer alert messages, and is able to proceed along a path to visit all of them. A key objective of this lab is prepare for adversarial missions, by (a) processing information about which swimmers your adversary may have rescued, (b) consider path generation strategies that prioritize visiting clusters of swimmers even if they may be farther than the closest swimmer, and (c) incorporate information about what your adversary's likely imminent actions in your path planning considerations.

We will again work in teams of two, demonstrating one version of pGenRescue put forth by the team.
A summary of topics:
- Modify your path planning app to handle added and dropped swimmers.
- Begin adversarial simulation with a second rescue vehicle.
- Explore strategies beyond greedy path planning by reacting to your adversary.
- Prepare your PABLO for in-water experiments in the next lab.
2 Preliminaries
2.1 Preliminaries: Documentation Conventions [top]
To help distinguish between MOOS variables, MOOS App configuration parameters, MOOS App names, behavior parameters, we will use the following conventions:
- MOOS variables are rendered in green, such as IVPHELM_STATE, as well as postings to the MOOSDB, such as DEPLOY=true.
- MOOS configuration parameters are rendered in blue, such as AppTick=10 and verbose=true.
- Behavior parameters are rendered in brown, such as priority=100 and endflag=RETURN=true.
- MOOS-IvP applications are rendered in magenta, such as pShare, or pHelmIvP.
- General GNU/Linux commands are represented in dark purple, such as wget, mkdir, or cd.
When distinguishing between command-line actions on a PABLO, and on your laptop, the below convention is used:
        $ cd moos-ivp    (a command executed on your local laptop)
  PABLO $ cd moos-ivp    (a command executed on the PABLO computer)
2.2 Preliminaries: Pull Latest Code and Mission Files [top]
At each stage of the lab we need to be mindful of the code on both the laptop and the PABLO. Changes may be made to (a) course-provided code, (b) the course baseline mission, and (c) your own moos-ivp-extend code. Use this section as a reminder to update frequently.
To recap, here are the relevant trees:
- moos-ivp: All the core autonomy code, and MOOS middleware
- moos-ivp-2680: uFldRescueMgr, gen_swimmers, and the baseline BHV_Scout behavior in lib_bhv_scout.
- moos-ivp-extend: Your pGenRescue and your BHV_Scout behavior.
- moos-ivp-pavlab: (PABLO only) When running on the Heron, we need the iM300 app. This should already be on your provided PABLO.
- pablo-common: (PABLO only) Enviroment settings for the Heron. This should already be on your provided PABLO.
The pablo-common and moos-ivp-pavlab trees are only on your PABLO. The PABLO boot script is configured to automatically update the pablo-common tree when the PABLO boots and finds the Internet. If the moos-ivp-pavlab tree should happen to need an update, this would need to be done by entering the tree and performing an update and build. This is unlikely and only done if a change to iM300 needs a change during the course of the lab.
Ensure the Latest Code and Updates On your Laptop [top]
Updates will be needed on your laptop to run the initial simulations. You may also be using your laptop to act as the shoreside computer during field tests. You will need to update and possibly rebuild: the moos-ivp, moos-ivp-2680, and moos-ivp-extend trees:
 $ cd ~/moos-ivp; svn update; ./build-ivp.sh
 $ cd ~/moos-ivp-2680; svn update; ./build.sh
 $ cd ~/moos-ivp-extend; svn update (or git pull); ./build.sh
In the first rescue lab you may not already have the moos-ivp-2680 tree. It can be obtained as below, placing it alongside your moos-ivp and moos-ivp-extend trees. You will need to augment your shell path accordingly.
$ svn co https://oceanai.mit.edu/svn/moos-ivp-2680-aro/trunk moos-ivp-2680
Ensure the Latest Code and Updates On your PABLO [top]
Updates will also be needed on your PABLO. Re-connect your PABLO to your laptop with Internet Sharing enabled, and update the following trees:
- The moos-ivp tree, and build
- The moos-ivp-2680 tree, and build
- The moos-ivp-pavlab tree, and build
- The pablo-common tree (build not needed)
- The moos-ivp-extend tree, and build
The first four trees above are on your PABLO when you received it, but may need updating if changes were made during the course of the lab. The moos-ivp-extend tree was not on your PABLO when you received it (since it is your individual work), but should be on your PABLO as part of Lab 11 Introduction to the PABLO.
 $ cd ~/moos-ivp; svn update; ./build-ivp.sh
 $ cd ~/moos-ivp-2680; svn update; ./build.sh
 $ cd ~/moos-ivp-pavlab; svn update; ./build.sh
 $ cd ~/moos-ivp-extend; svn update (or git pull); ./build.sh
 $ cd ~/pablo-common; svn update
Note: In a pinch, you can do any of the above steps while your PABLO is connected to a Heron, but the more you can do before you work with the Heron, the better. This will free up Heron time and TA time for other users.
2.3 Preliminaries: Pavilion Coordinates [top]
The MIT Sailing Pavilion is the center of operations for the Pavlab, or Marine Autonomy Lab. The (0,0) coordinates, or datum, is located at: 42.358456, -71.087589. These datum coordinates are declared in the top of every .moos file in this lab, and set in the plug file plug_origin_warp.moos:
 // MIT Sailing Pavilion
 LatOrigin  = 42.358456
 LongOrigin = -71.087589
All other coordinates are usually configured in local coordinates relative to the above datum.
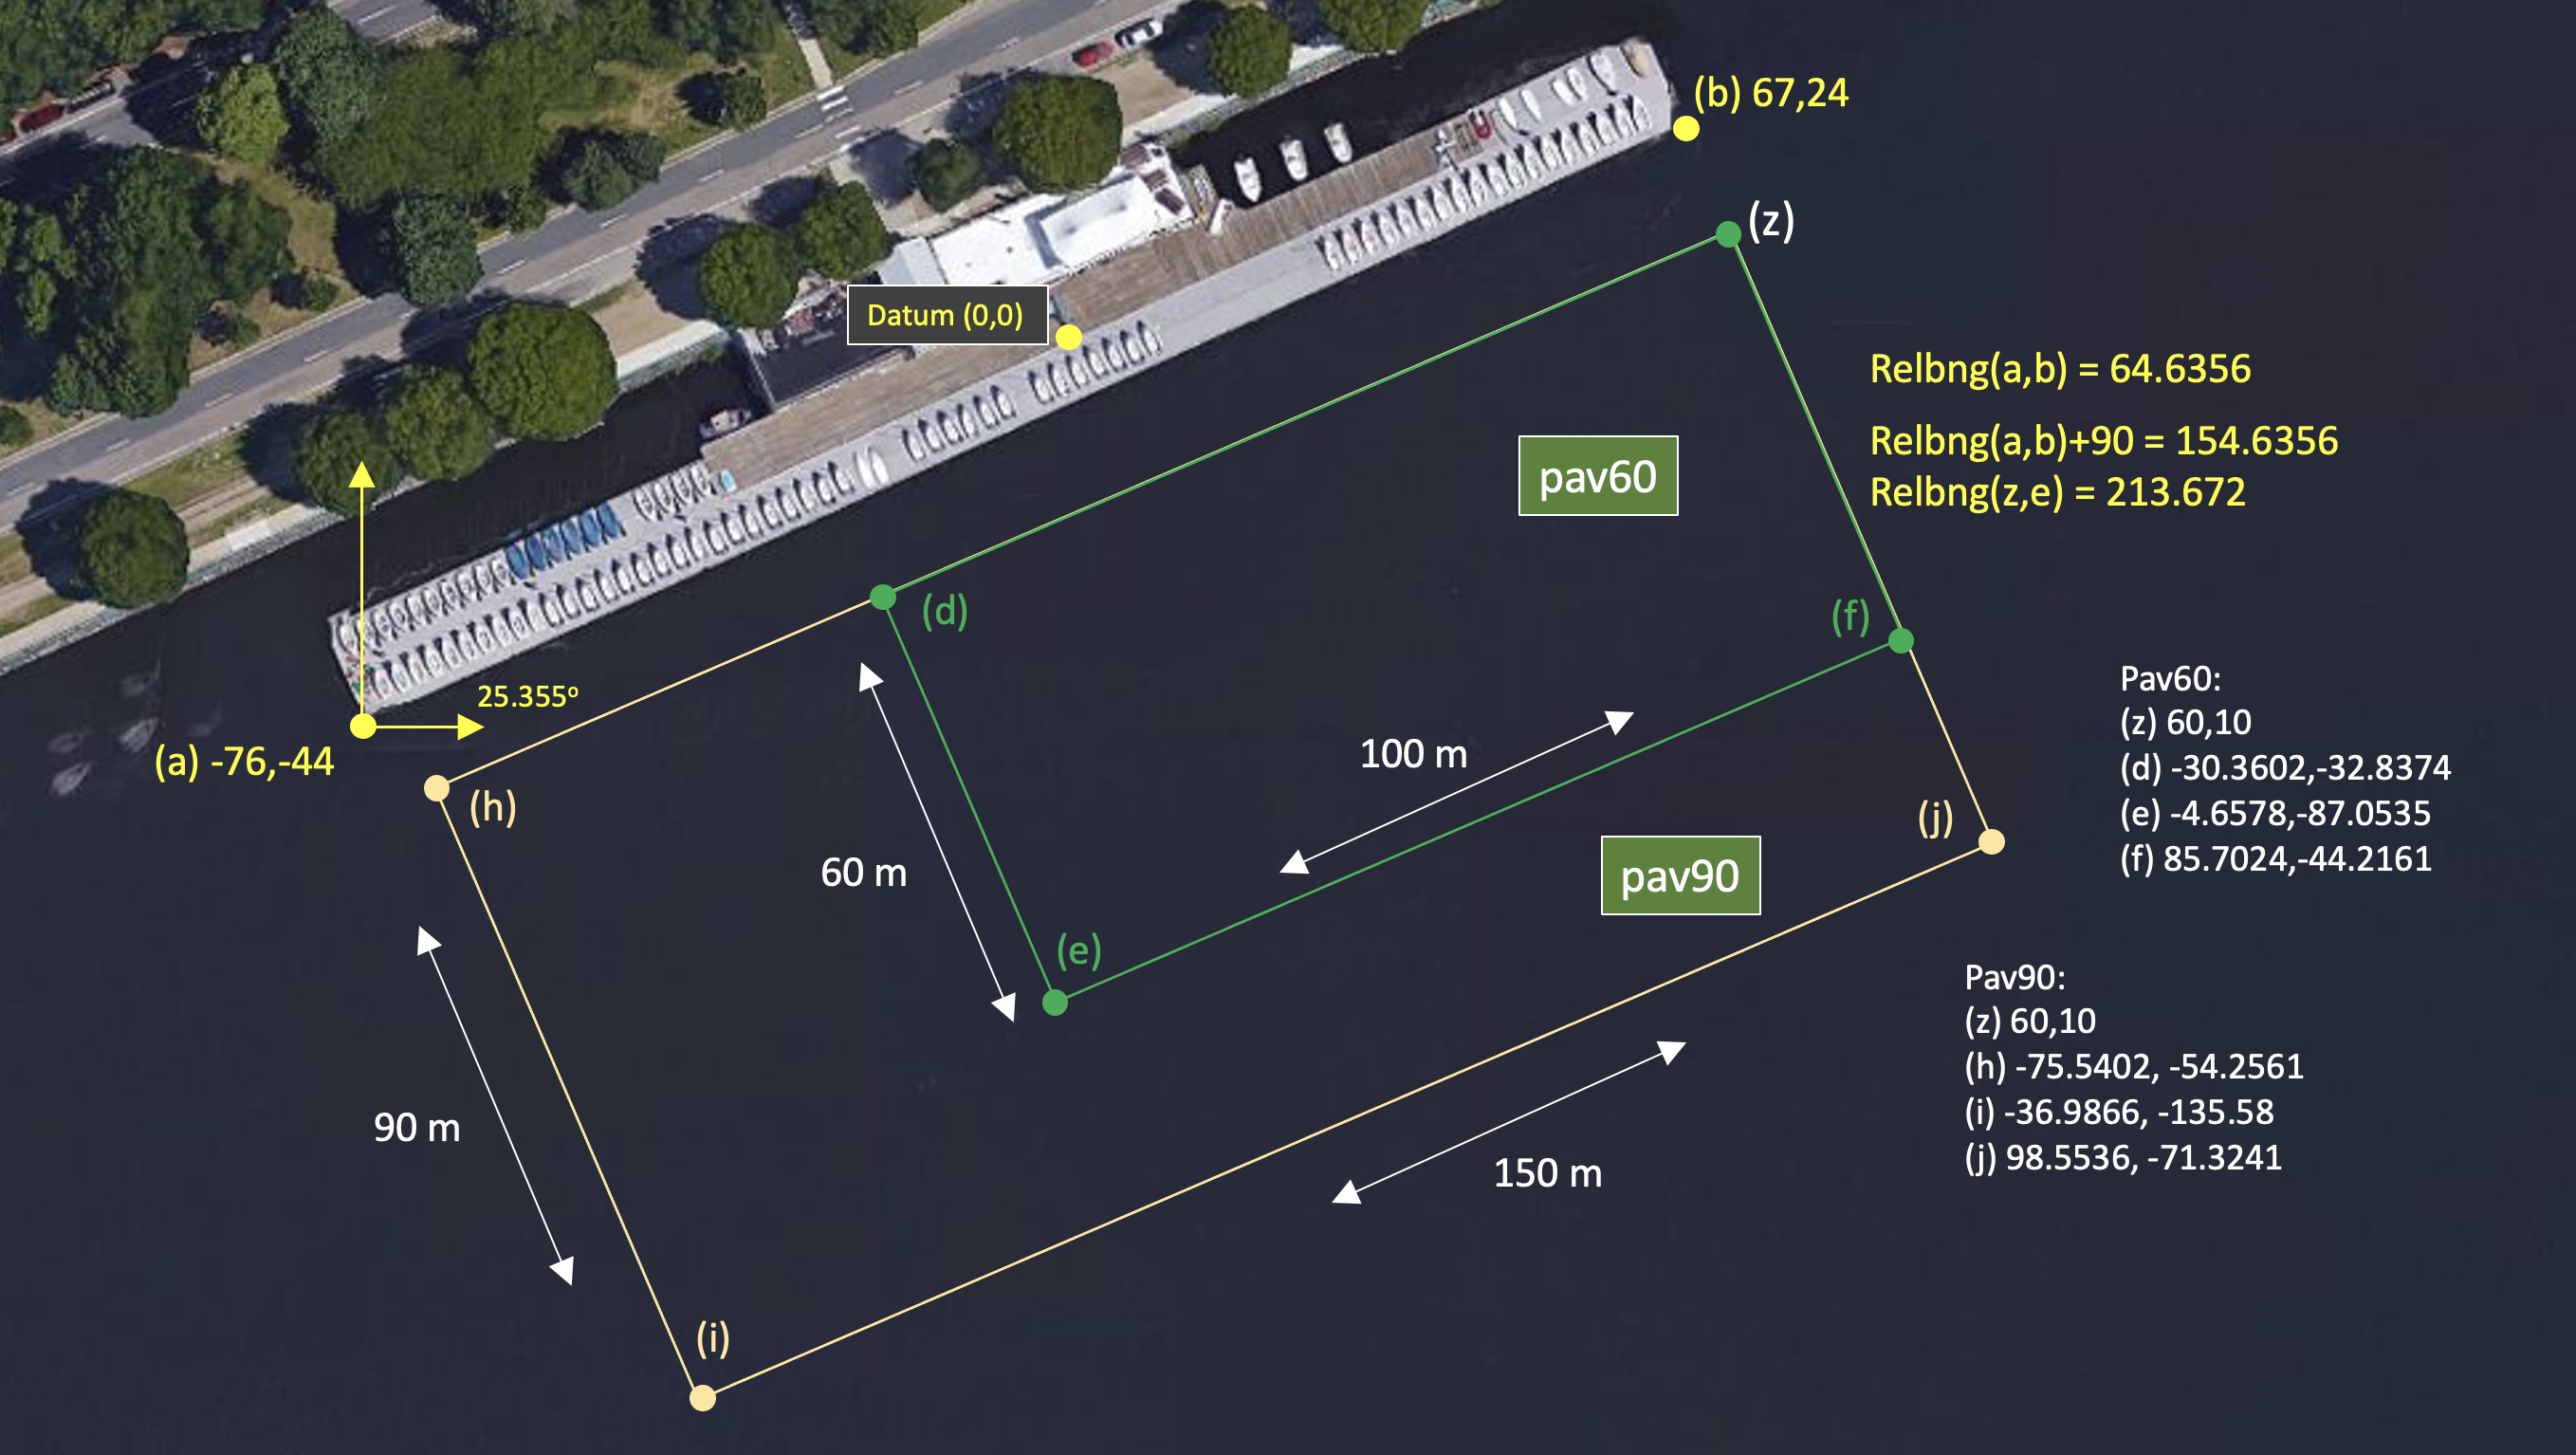
Figure 2.1: Useful coordinates related to the rescue lab. There are two playing field rectangles, a large one ("pav90") roughly the extent of the docks, and a smaller region ("pav60") closer to the Pavlab doors on the East end of the dock.
Note there are two rectangles representing a small and large operation area. The smaller area (pav60) is typically used for in-water tests involving one or two vehicles. The larger area (pav90) is typically used for in-water tests involving two-on-two competitions.
These two regions can be passed to the gen_swimmers app:
 $ gen_swimmers = --pav60 --swimmers=15
 $ gen_swimmers = --pav90 --swimmers=17 --unreg=11
Likewise, in the baseline mission, a new set of random swimmer locations can be generated at launch time with either of the two MIT regions:
 $ ./launch.sh --pav60 --rescue 10
 $ ./launch.sh --pav90 --rescue-rescue --swimmers=17 10
The boundaries of the playing field are read in by uFldRescueMgr from the swim file. The swim file is a key config parameter for this app, and it contains the location of all the swimmers. The region will will be communicated to the vehicles, through the MOOS variable RESCUE_REGION. For example, for the larger region above:
RESCUE_REGION = pts={60,10:99,-71:-37,-136:-76,-54}
The region message is received by the vehicle and is ingested by the OpRegion behavior in the helm, so the vehicle will know the playing field.
2.4 Preliminaries: The Shell Path [top]
This lab sequence will use applications in the following locations:
- moos-ivp/bin
- moos-ivp/scripts
- moos-ivp-2680/bin
- moos-ivp-extend/bin (your code)
The moos-ivp-2680 tree will hold a few apps specific to this lab, e.g., uFldRescueMgr, and the moos-ivp-extend tree will hold your app, pGenRescue. To augment your path, edit your .bashrc file as below:
 PATH+=:~/moos-ivp/bin             (this was likely already there)
 PATH+=:~/moos-ivp/scripts         (this was likely already there)
 PATH+=:~/moos-ivp-extend/bin
 PATH+=:~/moos-ivp-2680/bin
 export PATH                       (this was likely already there)
You can confirm this by examining the contents of the $PATH bash environment variable:
$ echo $PATH
Confirmation can also be done with the GNU/Linux which function:
  $ which pHelmIvP
  /Users/you/moos-ivp/bin/pHelmIvP              (or /home/you/... in GNU/Linux)
  $ which uFldRescueMgr
  /Users/you/moos-ivp-2680/bin/uFldRescueMgr    (or /home/you/... in GNU/Linux)
There exists a convenience function in moos-ivp/scripts called path_shell.sh. This command will list your $PATH environment variable in a more human readable format. Normally the output is one long line with each directory separated by a colon:
  $ echo $PATH
  /usr/bin:/usr/local/bin:/bin:/Users/janedoe/bin:/Users/janedoe/project-pavlab/utils/bin:
  /Users/janedoe/moos-ivp-janedoe/bin:/Users/janedoe/moos-ivp-pavlab/bin:/Users/janedoe/mo
  os-ivp-extend/bin:/Users/janedoe/moos-ivp-2680/trunk/bin:/Users/janedoe/moos-ivp/trunk/b
  in:/Users/janedoe/pablo-common/bin
The path_shell.sh utility will separate each directory out to a single line:
  $ path_shell.sh
  1: /usr/bin
  2: /usr/local/bin
  3: /bin
  4: /Users/janedoe/bin
  5: /Users/janedoe/project-pavlab/utils/bin
  6: /Users/janedoe/moos-ivp-janedoe/bin
  7: /Users/janedoe/moos-ivp-pavlab/bin
  8: /Users/janedoe/moos-ivp-extend/bin
  9: /Users/janedoe/moos-ivp-2680/trunk/bin
  10: /Users/janedoe/moos-ivp/trunk/bin
  11: /Users/janedoe/pablo-common/bin
2.5 Preliminaries: The Helm Behavior Path [top]
Two behavior library folders need to be in your behavior path. They are:
- moos-ivp-extend/lib
- moos-ivp-2680/lib
The moos-ivp-extend tree will hold your Scout behavior when needed in the final part of this lab sequence. The 2680 library folder contains the staw-man version of the Scout behavior used for testing until replaced with your behavior. Important: When you are ready to use your Scout behavior, comment out the 2680 library from your behavior path.
If not done already, on your laptop and PABLO, augment your .bashrc file to augment the IVP_BEHAVIOR_DIRS to the following:
 IVP_BEHAVIOR_DIRS+=~/moos-ivp-2680/lib      (comment out when you have your own)
 IVP_BEHAVIOR_DIRS+=:~/moos-ivp-extend/lib
 export IVP_BEHAVIOR_DIRS
Confirm your path afterwards by examining the $IVP_BEHAVIOR_DIRS environment variable:
$ echo $IVP_BEHAVIOR_DIRS
Note: The helm will not complete its startup process if it detects a behavior of the same name in two locations in the IVP_BEHAVIOR_DIRS. That may happen in this lab since the BHV_Scout behavior exists in the moos-ivp-2680 tree, and then you will make your version in your moos-ivp-extend tree. Using the same name has its benefits since it allows us to have a common mission meta_vehicle.bhv file.
There exists a convenience function in moos-ivp/scripts called path_bhv.sh. This command will list your $IVP_BEHAVIOR_DIRS environment variable in a more human readable format. Normally the output is one long line with each directory separated by a colon:
  $ echo $IVP_BEHAVIOR_DIRS
  /home/janedoe/moos-ivp-foo/trunk/lib:/home/janedoe/moos-ivp-bar/lib:/home/jane\
  doe/moos-ivp-2680/lib:/home/janedoe/moos-ivp-foobar/trunk/lib
The path_bhv.sh utility will separate each directory out to a single line:
  $ path_bhv.sh
  1: /home/janedoe/moos-ivp-foo/trunk/lib
  2: /home/janedoe/moos-ivp-bar/lib
  3: /home/janedoe/moos-ivp-2680/lib
  4: /home/janedoe/moos-ivp-foobar/trunk/lib
3 Running the Baseline Mission
We will continue to use the same baseline mission for this next phase of the lab. You should also make the recommended aliases described earlier to make it easier to navigate to this mission folder.
3.1 Running the Baseline Mission [top]
This mission can be run with either one or two vehicles. To start with, try running with one vehicle:
   $ cd moos-ivp-2680/missions/rescue_baseline
   $ ./launch.sh --rescue --swim_file=mit_02.txt 10
It should look something the video in Figure 3.1. It may differ because you will be running your version of pGenRescue instead of mine.
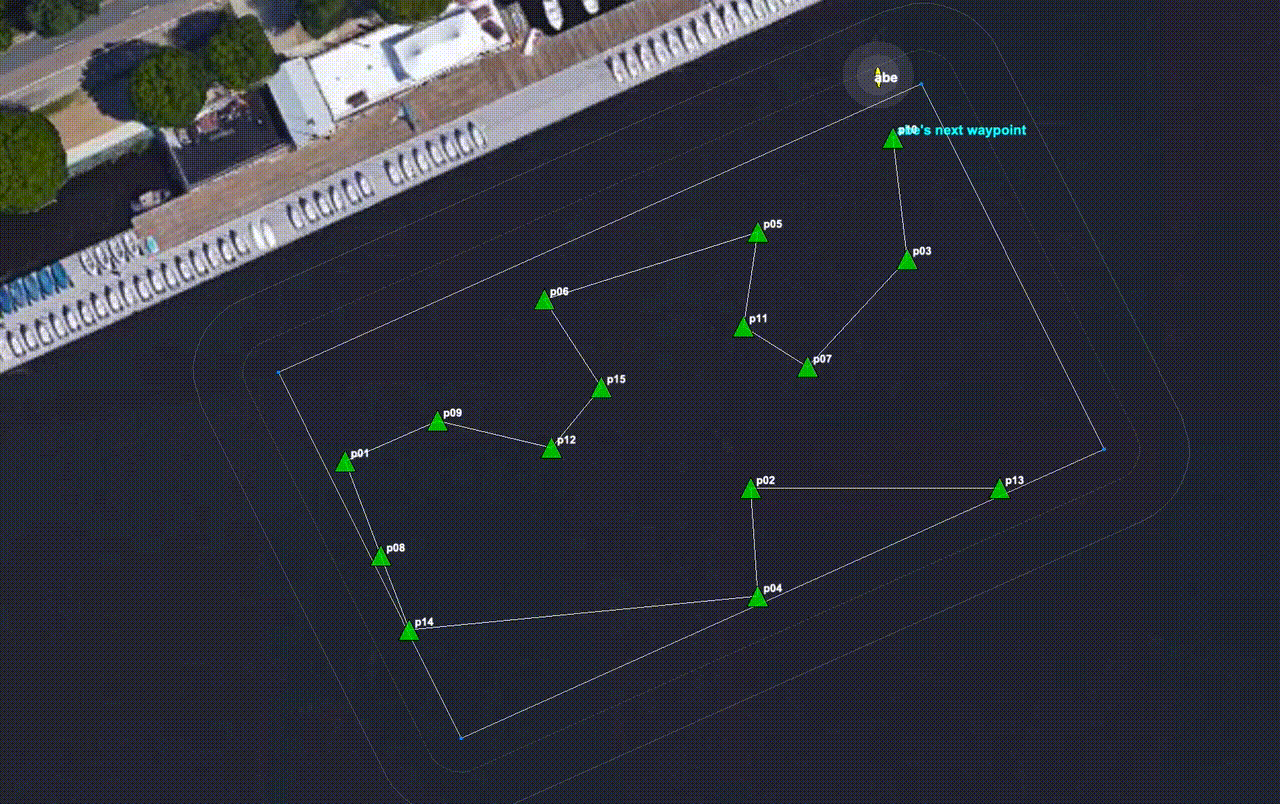
Figure 3.1: The vehicle proceeds to each point, in a greedy path tour, and then returns home.
To start with, un-rescued swimmers will be green triangles. As they are rescued, the will turn to the color of the vehicle that has made the rescue.
3.2 Adding and Removing Swimmers Using the GUI [top]
As the mission progresses, new swimmer alerts can come at any time. In the previous lab you were asked to handle a new swimmer alert mid-mission. And this was tested within pMarineViewer with a left-mouse click. The mouse click would drop a new swimmer at the mouse location and generate a new SWIMMER_ALERT message shared to the vehicles.
In this lab, we focus on the opposite. The vehicle periodically receives FOUND_SWIMMER messages as it visits each swimmer location. This was also handled in the previous lab to ensure each swimmer was only visited once. In this lab, the vehicle may receive FOUND_SWIMMER messages due to swimmer rescues by others. As we prepare for adversarial missions, the FOUND_SWIMMER messages will be coming from the shore for both you and your adversary. You will want to adjust your path to remove any swimmer already found by your adversary.
To test this logic before introducing a second vehicle, pMarineViewer in the rescue_baseline mission has been configured to use the right mouse click (ctrl left-mouse click on a Mac) to simulate a rescued swimmer. When the right mouse click is made, the swimmer closest to the mouse location (but within 10 meters), will be rescued. A FOUND_SWIMMER message is sent to all vehicles. It will have content that looks like:
FOUND_SWIMMER = id=17, finder=nature
Your vehicle (pGenRescue) should handle this new information and drop the swimmer from the list of swimmers to visit and generate a new path to be sent to the behavior. In the example video below, a similar mission is launched, but in this case, several right mouse clicks (ctrl left-mouse click on a Mac) are performed during the mission.
When swimmers are rescued by an actual vehicle, the finder field above will be replaced by the name of the vehicle that performed the rescue.
Figure 3.2: A vehicle proceeds along a greedy path to rescue a set of swimmers provided prior to the vehicle departure. Along the way, the user selects swimmers through the GUI for removal. The vehicle immediately adjusts its path to drop the user-removed swimmers from its new path. Removed swimmers are shown in gray markers. Yellow markers indicate swimmers visited by the yellow vehicle. Green markers indicate swimmers that have yet to be visited or removed. The mission is run 8x faster than simulated real time.
Note the edge case situation where the vehicle is proceeding toward its final swimmer, and the final swimmer is removed prior to the vehicle arrival. In this case the vehicle should immediately transition into a return-home behavior.
3.3 Assignment 1 (check off) - Handle Dropped Swimmers in Your Vehicle [top]
Following the example in Figure 3.2, where the version of pGenRescue was provided by staff, demonstrate that your app is able to similarly handle information mid-mission about a swimmer that has been rescued by someone other than your vehicle.
Your mission should demonstrate:
- The general case of dropping a swimmer with a right-click of the mouse (ctrl-left click on a Mac).
- Demonstrate that dropping the last swimmer results in a return home behavior.
3.4 Efficiency Hints for Running the Baseline Mission [top]
Approach this lab with the mind-set that you'll be (re)launching this mission many times. First create an alias to get to the folder:
alias cdrb='cd ~/moos-ivp-2680/missions/rescue_baseline
This alias is also available on the PABLO as student2680, by virtue of updating the pablo-common tree.
In this mission we are still working on making sure all MOOS processes are properly killed in all manners of launching. My preference with this lab is to (a) kill any dangling processes and (b) clear existing log files prior to each launch. Launching as follows may be useful:
$ ktm; ./clean.sh; ./launch.sh --rescue 10
Consider the alias:
alias lll='ktm; ./clean.sh; ./launch.sh'
4 Running Adversarial Missions
The next step is to begin working with adversarial missions. To start with, a two vehicle adversarial mission will be launched, where both vehicles are using your version of pGenRescue. Essentially both vehicles are clones in terms of their algorithm, and if run in large enough test missions, each should win about half the time. Later in this lab, when we return to the water, each team will launch with their own version of pGenRescue, and presumably the team with the most effective optimizations to pGenRescue will win. To start with, in this section, we explore the mechanics of running two-vehicle adversarial missions and explain how in-mission information is presented in the GUI display windows.
4.1 Running the Default Two-Vehicle Adversarial Simulation [top]
In the first adversarial mission, you will run a two-vehicle version of the baseline mission. To do this, we will launch as before using the --rescue-rescue flag or the or the -rr flag for short. By default, each launch will generate a new random placement of 15 swimmers in the smaller operating region (See Section 2.3). We will use all the default command line switches to run a first simulation with two vehicles:
   $ cd moos-ivp-2680/missions/rescue_baseline
   $ ktm; ./clean.sh; ./launch.sh -rr --rand 10
The mission should look something like that in Figure 4.1 below. Again, your results will look different because (a) you are using your version of pGenRescue, (b) different random swimmer location, (c) different random starting location.
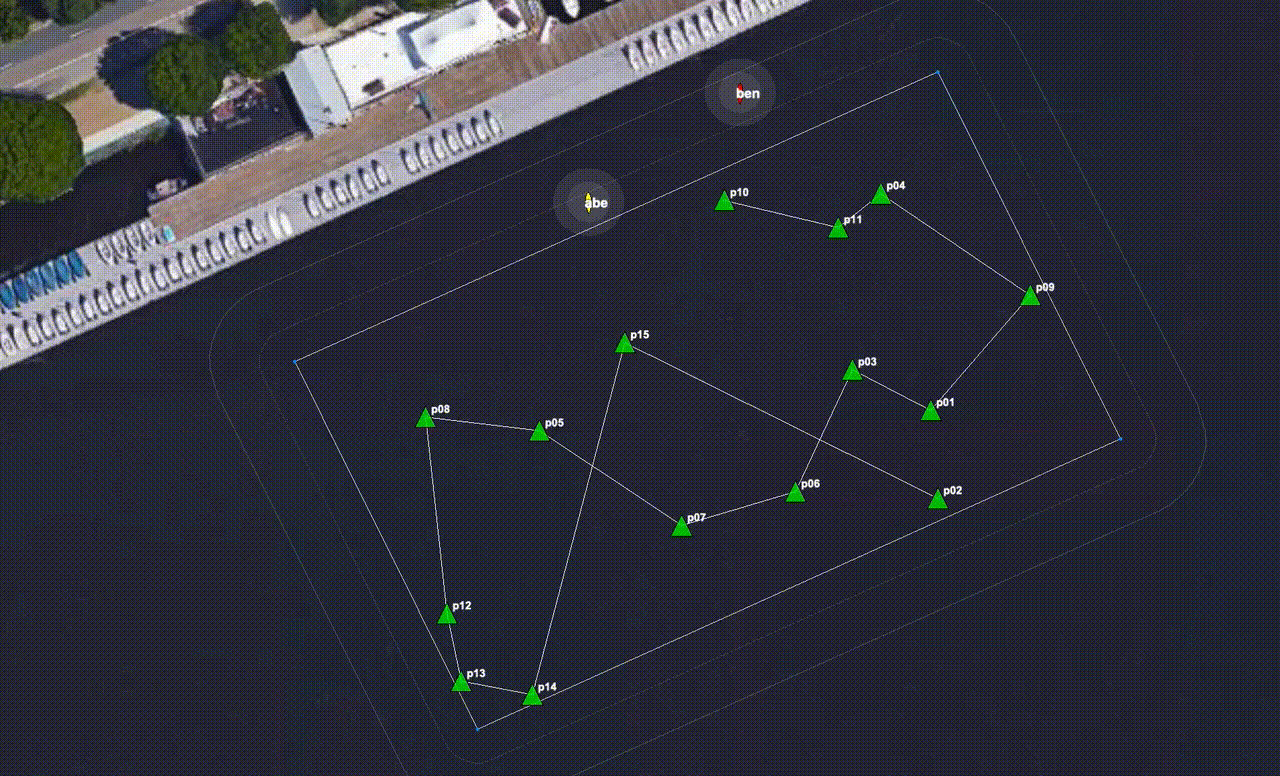
Figure 4.1: Two vehicles are given the same set of swimmers and locations. They each depart at the same time, each using a greedy path to traverse the set of swimmer locations and tally rescues. Swimmers rescued by the yellow vehicle are indicated by the light-yellow markers. Swimmers rescued by the red vehicle are indicated by light red markers. If some markers are brighter in color this indicates a differential between total swimmers rescued between the two vehicles. This mission was run at 10x realtime.
Note: When creating a random swim file during the launch, as above with the --rand flag, the launch script will create a temporary fille called mit_rand.txt. If you wish to re-run a mission using exactly this file, you can launch with --swim_file=mit_rand.txt.
4.2 Run-time Information in Two-Vehicle Simulations [top]
During the two-vehicle simulation, as well as in-water experiments, there are several places to find status information.
4.2.1 Visual Markers and Colors [top]
Perhaps the most direct information during a simulation is the swimmer markers. Initially they are all set to a default color, lime. This default color is set in the uFldRescueMgr configuration block in the shoreside mission file. As a vehicle rescues a swimmer, the marker color is changed to the color of the vehicle. The vehicle color is set to a unique color in simulation, and chosen based on Heron name when running on the water. (In short, you should never have to take measures to set vehicles to have unique colors.)
Markers will have either a light or bright color. As each vehicle tallies rescued swimmers, the most recent markers are colored brightly. The first N markers for each vehicle are colored lightly, where N is the lower common tally for the two vehicles. In this way, you can visually see which vehicle is winning. If it is currently a tie, all markers for both vehicles will be light. If say vehicle abe has one more marker than the adversary, then abe will have one bright marker and the others will be lightly colored. And the one bright marker will represent the swimmer most recently rescued. This is the situation in the example in Figure 4.1.
4.2.2 AppCasting Output of uFldRescueMgr [top]
The uFldRescueMgr app running on the shoreside is where all the simulation specific to this lab takes place. The appcasting output holds the full status details for each swimmer and each vehicle. The output looks similar to Figure 4.2.
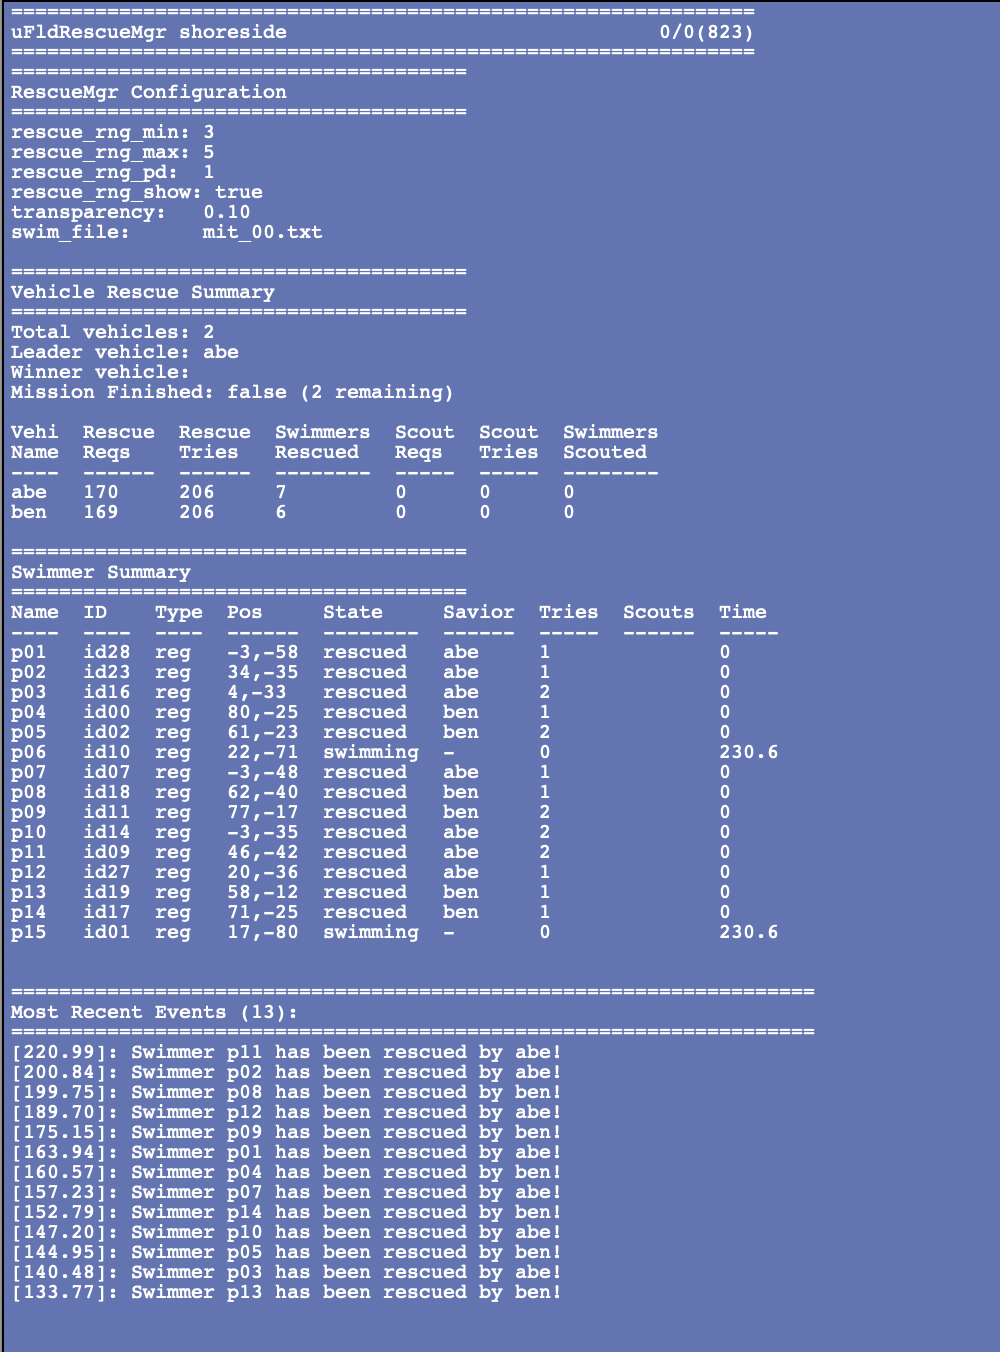
Figure 4.2: The appcasting output of the uFldRescueMgr app will show the status of each swimmer, and the status of each vehicle. It will also confirm the configuration parameter, e.g., the prevailing swim file. At the bottom of the window, the most recent events are shown with time stamps. Events are typically when a swimmer has been found.
For the most part, in terms of marker status and vehicle tallies, you should be able to discern what you need just from the marker colors and brightness, but you can see all the details in the two main tables of the appcasting output.
4.2.3 AppCasting Output of pGenRescue [top]
You should also strongly consider building meaningful appcasting output for your pGenRescue app. This is up to you, but it nearly always pays off in a major way to post updates on your app's internal state and post important events.
4.3 Assignment 2 (check off) Run Your App on Both Simulated Vehicles [top]
5 Optimizing Your Path Generation
At this point you should have a working pGenRescue which properly handles new swimmer alerts and found swimmer messages. So far the path planning has consisted to a greedy search algorithm. If we stopped here, then everyone's autonomy system should have a roughly 50-50 shot of out-performing an adversary on the water or in simulation. This is where things get fun. We consider here two ways to begin optimizing, (1) forming a smarter path that leads to more swimmers, in a shorter amount of time, and (2) reasoning about what your adversary is doing in considering the generated path.
5.1 Getting to More Swimmers More Quickly [top]
The greedy path tour is fairly simple to calculate and does a decent job of quickly formulating a reasonably efficient tour. However, consider the case in Figure 5.1:
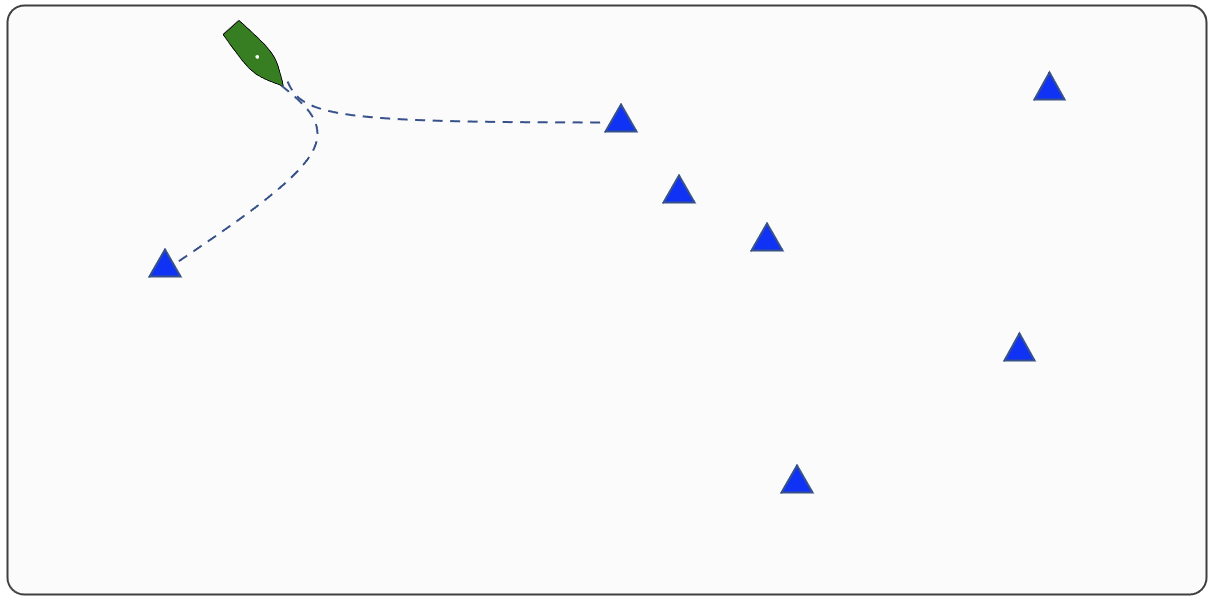
Figure 5.1: If a greedy tour is applied, the vehicle will first head toward the swimmer to the south-west. However, by heading to the first marker east of the vehicle, several swimmers can be visited in rapid succession.
In this case, if the vehicle proceeded to the closest swimmer, this will yield only one rescue before reversing direction across the field. By the time the cluster of three swimmers to the east has been reached, they may have already been rescued by your adversary.
Consider a modified greedy algorithm that, instead of looking only at the single next leg, looks at the next two legs. Instead of evaluating a candidate next vertex based solely on its distance to the current point, evaluate the vertex based on both the distance to the current point plus the distance to its closest other vertex.
For N swimmers, the run-time performance of the default "one-vertex-look-ahead" algorithm is  . This is better than the full optimal TSP algorithm which is
  . The "two-vertex-look-ahead" greedy algorithm could be implemented in
  which would still be essentially instantaneous on problems where
  as in this lab.
5.2 Using Information about Your Adversary [top]
The expression "best laid plans": A proverbial expression used to signify the futility of making detailed plans when the ability to fully or even partially execute them is uncertain. (Wiktionary)
Consider the situation in Figure 5.2. If the orange vehicle planned with a greedy algorithm, it would follow the blue vehicle to the same two swimmers, which of course would be rescued by the blue vehicle before the orange vehicle arrived.
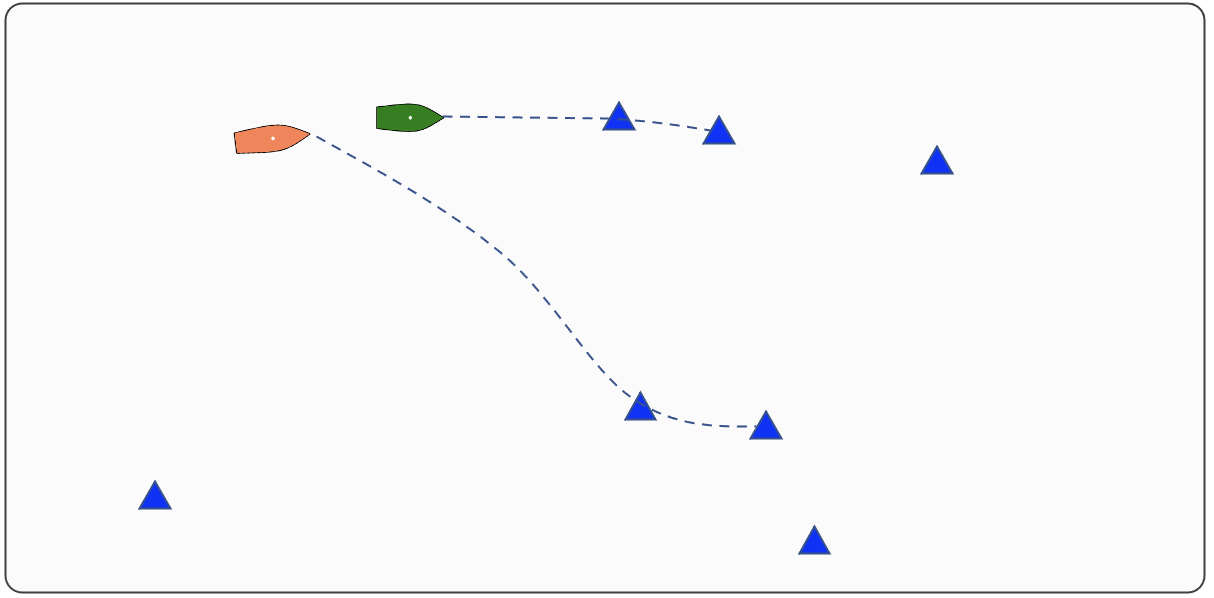
Figure 5.2: If a greedy tour is applied, the orange vehicle will proceed the same swimmer as the green vehicle. Since both vehicles have the same max speed, the green vehicle will certainly rescue these two swimmers. The orange vehicle would be better off to consider a path that concedes the swimmer(s) closest to the green vehicle.
A vehicle, regardless of its path planning algorithm, whether it be simple greedy, two-vertex-look-ahead, full TSP and so on, that does not take into consideration the imminent actions of an adversary, will likely be dominated on the field by an adversary that does.
So, what kinds of adjustments can be made, and how to get the information to make those adjustments? Two things can be noted: your vehicle is already performing collision avoidance with your adversary, and your adversary is (for now) the only other vehicle in the playing field. Collision avoidance is enabled by obtaining the position of the contact to be avoided, in this case through the MOOS variable NODE_REPORT. In case you're wondering, outgoing node reports, sent to your adversary, are posted locally as NODE_REPORT_LOCAL. An incoming node report looks like:
   NODE_REPORT = NAME=abe,X=10.21,Y=-5.83,SPD=0,HDG=304.45,DEP=0,LAT=42.35840577,
                 LON=-71.08746328,TYPE=KAYAK,COLOR=yellow,
                 MODE=MODE@ACTIVE:STATION-KEEPING,ALLSTOP=clear,
                 INDEX=18374,YAW=2.5403267,TIME=16509326983.74,LENGTH=4
The primary components of this message that will be useful will be the position and heading. In your pGenRescue app, you can register for the variable NODE_REPORT and start by keeping track of the contact position and heading.
Hint: In MOOS-IvP/C++ a node report is typically stored in the C++ class NodeRecord, which will help in de-serializing the incoming messages. Here is a code snippet with the basic idea:
 #include "NodeRecord.h"
 #include "NodeRecordUtils.h"

 // Presumably the below string will have arrived in OnNewMail()
 string str = "NAME=abe,X=10.21,Y=-5.83,SPD=0,HDG=304.45,DEP=0,....";

 NodeRecord my_record = string2NodeRecord(str);
 double contact_xpos = my_record.getX();
 double contact_ypos = my_record.getY();
 double contact_hdg  = my_record.getHeading();
If you use this class in your code, you will also need to link to the library "contacts" in your app's CMakeLists.txt file.
Armed with this information about your adversary, what can you do with it? Here are a few ideas. They all have the aim of identifying one or more swimmers that we should concede. By conceding swimmers to our adversary, then we can formulate a path tour over a smaller set of swimmers and likely will be more successful since we hopefully will not be reaching for swimmers that are not obtainable.
- Given the adversary position, which un-rescued swimmer is closest to the adversary. Concede that swimmer. Maybe concede the two closest swimmers, or all swimmers within say 15 meters of the adversary.
- Given the adversary position and heading, which swimmers are close and have a relative bearing to the adversary of close to zero? Concede that swimmer(s).
- Given the adversary position, and knowledge of all remaining swimmers, calculate a greedy path (or any path), from the perspective of your adversary. Then concede the first swimmer on that path. Or the first N swimmers on that path. Or all swimmers in the first N meters on that path.
You are not limited to the above strategies. If you have a better one, go for it. Or perhaps try implementing one or more of these strategies and see what other ideas come up along the way. My hunch is that some combination of these two groups of strategies will be more effective than either one alone.
5.3 Trying Your Optimized Path Planning [top]
If you successfully create an advanced version of your pGenRescue app, you probably want to test it, against an adversary that is not using the advanced version. However, the baseline mission is structured to run two identically configured vehicles. How do we run two differently configured vehicles?
The baseline mission has one method for handling this. This presumes that different vehicle configurations can be set solely through different configuration parameters for your pGenRescue app. The meta_vehicle.moos file contains the configuration block of the pGenRescue:
 ProcessConfig = pGenRescue
 {
 #ifdef VNAME abe
 	// foo = true
 #elseifdef VNAME ben
 	// foo = false
 #else
 	// foo = maybe
 #endif
 }
Note that, regardless of the vehicle name, the resulting configuration will simply have one commented line. In our two vehicle simulations, the vehicle names will always be abe and ben. When you have a heuristic implemented in your pGenRescue, try to enable a configuration parameter such as heuristic_type=alpha, and use this configuration line in the pGenRescue block above such that only one vehicle is using the heuristic.
6 Instructions for Handing In Assignments
6.1 Requested File Structure [top]
The assignment for this lab is to (a) demonstrate a working mission in simulation using your pGenRescue app that demonstrates baseline capability of handling a two-vehicle adversarial mission, dropping swimmers rescued by the other vehicle and re-planning accordingly, (b) begin improving on the path planning algorithm to consider adversarial intent, and greedy search that includes time. You are encouraged to use the rescue_baseline mission in the provided moos-ivp-2680 tree, so the only addition in your codebase is the pGenRescue app:
   moos-ivp-extend/
      src/
         pGenRescue
6.2 Due Date [top]
This lab should be completed by the end of day Tuesday, April 30th, 2024.
Document Maintained by: mikerb@mit.edu
Page built from LaTeX source using texwiki, developed at MIT. Errata to issues@moos-ivp.org. Get PDF