2.680 Labs
01 Machine Setup
02 Intro to C++
3A Version Control W/Git
03 Intro to MOOS
04 MOOS Programming
05 Helm Autonomy
06 Multi-Vehicles Pre-Lab
06 Multi-Vehicles
07 Distributed TSP
08 Multi-Machine TSP
09 Inter-Vehicle Messaging
10 Behavior Writing
11 Payload Autonomy
12 Operating MIT Herons
13 Autonomous Rescue (Pt1)
14 Autonomous Rescue (Pt2)
15 Autonomous Rescue (Pt3)
16 Autonomous Rescue (Pt4)
17 Autonomous Rescue (Pt5)
2.680 Retired Labs
12 Hazard Search
13 Hazard Search II
17 Front Estimation
18 In-Water Front Estimate
Ten Short C++ Labs
01 C++ Program Structure
02 C++ Cmd Line Args
03 C++ Functions
04 C++ I/O and Vectors
05 C++ Classes, Rand #'s
06 C++ Deserialization
07 C++ Build Systems
08 C++ Inheritance
09 C++ Coding Guidlines
10 C++ Style Guidelines
Lab 14 - Autonomous Rescue Challenge - Part 2
Maintained by: mikerb@mit.edu  Get PDF
1 Overview and Objectives
2 Preliminaries
2.1 Preliminaries: Documentation Conventions
2.2 Preliminaries: Pull Latest Code and Mission Files
2.3 Preliminaries: Handy PABLO Aliases
2.4 Preliminaries: Pavilion Coordinates
2.5 Preliminaries: The Shell Path
3 Running the Baseline Mission on the Water
3.1 Assignment 1 (Check Off) - Run the Baseline Mission on the Heron
3.1.1 Connect to the Heron PABLO and Perform Updates
3.1.2 Launch the Shoreside Mission on your Laptop
3.1.3 Launch the Mission on the Heron
3.1.4 Launch the Vehicle and Run the In-water Mission
3.2 Assignment 2 (Optional) Demonstrate Adaptive Re-planning
4 Instructions for Handing In Assignments
4.1 Requested File Structure
4.2 Due Date
1 Overview and Objectives
The second part of the Autonomous Rescue Challenge lab involves the Heron robots at the MIT Sailing Pavilion. In the first part of the lab, the goal was to build a pGenRescue app that would receive a series of swimmer alerts, and subsequently generate a waypoint path to the helm. The successful demonstration of this in simulation is a pre-requisite for this lab. In this lab, our goal is to run the same app, but on the river. The staff (or lab partner) will run the shoreside mission, generating a to-be-revealed set of swimmer locations. A bonus goal of this lab will be the handling of swimmer alerts communicated to the vehicle mid-mission.

We will work in teams of two, demonstrating one version of pGenRescue put forth by the team.
A summary of topics:
- Revisiting the PABLO operation of the Heron robot.
- Demonstration of student-provided path planning module, pGenRescue
2 Preliminaries
This section contains preliminary steps - reminders for considering before delving into the main part of the lab.
2.1 Preliminaries: Documentation Conventions [top]
To help distinguish between MOOS variables, MOOS App configuration parameters, MOOS App names, behavior parameters, we will use the following conventions:
- MOOS variables are rendered in green, such as IVPHELM_STATE, as well as postings to the MOOSDB, such as DEPLOY=true.
- MOOS configuration parameters are rendered in blue, such as AppTick=10 and verbose=true.
- Behavior parameters are rendered in brown, such as priority=100 and endflag=RETURN=true.
- MOOS-IvP applications are rendered in magenta, such as pShare, or pHelmIvP.
- General GNU/Linux commands are represented in dark purple, such as wget, mkdir, or cd.
When distinguishing between command-line actions on a PABLO, and on your laptop, the below convention is used:
        $ cd moos-ivp    (a command executed on your local laptop)
  PABLO $ cd moos-ivp    (a command executed on the PABLO computer)
2.2 Preliminaries: Pull Latest Code and Mission Files [top]
At each stage of the lab we need to be mindful of the code on both the laptop and the PABLO. Changes may be made to (a) course-provided code, (b) the course baseline mission, and (c) your own moos-ivp-extend code. Use this section as a reminder to update frequently.
To recap, here are the relevant trees:
- moos-ivp: All the core autonomy code, and MOOS middleware
- moos-ivp-2680: uFldRescueMgr, gen_swimmers, and the baseline BHV_Scout behavior in lib_bhv_scout.
- moos-ivp-extend: Your pGenRescue and your BHV_Scout behavior.
- moos-ivp-heron: (PABLO only) When running on the Heron, we need the iM300 app. This should already be on your provided PABLO.
- pablo-common: (PABLO only) Enviroment settings for the Heron. This should already be on your provided PABLO.
The pablo-common and moos-ivp-heron trees are only on your PABLO. The PABLO boot script is configured to automatically update the pablo-common tree when the PABLO boots and finds the Internet. If the moos-ivp-heron tree should happen to need an update, this would need to be done by entering the tree and performing an update and build. This is unlikely and only done if a change to iM300 needs a change during the course of the lab.
Ensure the Latest Code and Updates On your Laptop [top]
Updates will be needed on your laptop to run the initial simulations. You may also be using your laptop to act as the shoreside computer during field tests. You will need to update and possibly rebuild: the moos-ivp, moos-ivp-2680, and moos-ivp-extend trees:
 $ cd ~/moos-ivp; git pull; ./build-ivp.sh
 $ cd ~/moos-ivp-2680; git pull; ./build.sh
 $ cd ~/moos-ivp-extend; git pull; ./build.sh
In the first rescue lab you may not already have the moos-ivp-2680 tree. It can be obtained as below, placing it alongside your moos-ivp and moos-ivp-extend trees. You will need to augment your shell path accordingly.
$ git clone git@github.com:mit2680/moos-ivp-2680.git
Ensure the Latest Code and Updates On your PABLO [top]
Updates will also be needed on your PABLO. Re-connect your PABLO to your laptop with Internet Sharing enabled, and update the following trees:
- The moos-ivp tree, and build
- The moos-ivp-2680 tree, and build
- The moos-ivp-heron tree, and build
- The pablo-common tree (build not needed)
- The moos-ivp-extend tree, and build
The first four trees above are on your PABLO when you received it, but may need updating if changes were made during the course of the lab. The moos-ivp-extend tree was not on your PABLO when you received it (since it is your individual work), but should be on your PABLO as part of Lab 11 Introduction to the PABLO.
 $ cd ~/moos-ivp; git pull; ./build-ivp.sh
 $ cd ~/moos-ivp-2680; git pull; ./build.sh
 $ cd ~/moos-ivp-heron; git pull; ./build.sh
 $ cd ~/moos-ivp-extend; git pull; ./build.sh
Note: In a pinch, you can do any of the above steps while your PABLO is connected to a Heron, but the more you can do before you work with the Heron, the better. This will free up Heron time and TA time for other users.
2.3 Preliminaries: Handy PABLO Aliases [top]
On the PABLO there are a few nice aliases that will be handy:
 alias  cdmi2='cd ~/moos-ivp-2680'
 alias cdmi2m='cd ~/moos-ivp-2680/missions'
 alias   cdrb='cdmi2m; cd rescue_baseline'
2.4 Preliminaries: Pavilion Coordinates [top]
The MIT Sailing Pavilion is the center of operations for the Pavlab, or Marine Autonomy Lab. The (0,0) coordinates, or datum, is located at: 42.358456, -71.087589. These datum coordinates are declared in the top of every .moos file in this lab, and set in the plug file plug_origin_warp.moos:
 // MIT Sailing Pavilion
 LatOrigin  = 42.358456
 LongOrigin = -71.087589
All other coordinates are usually configured in local coordinates relative to the above datum.
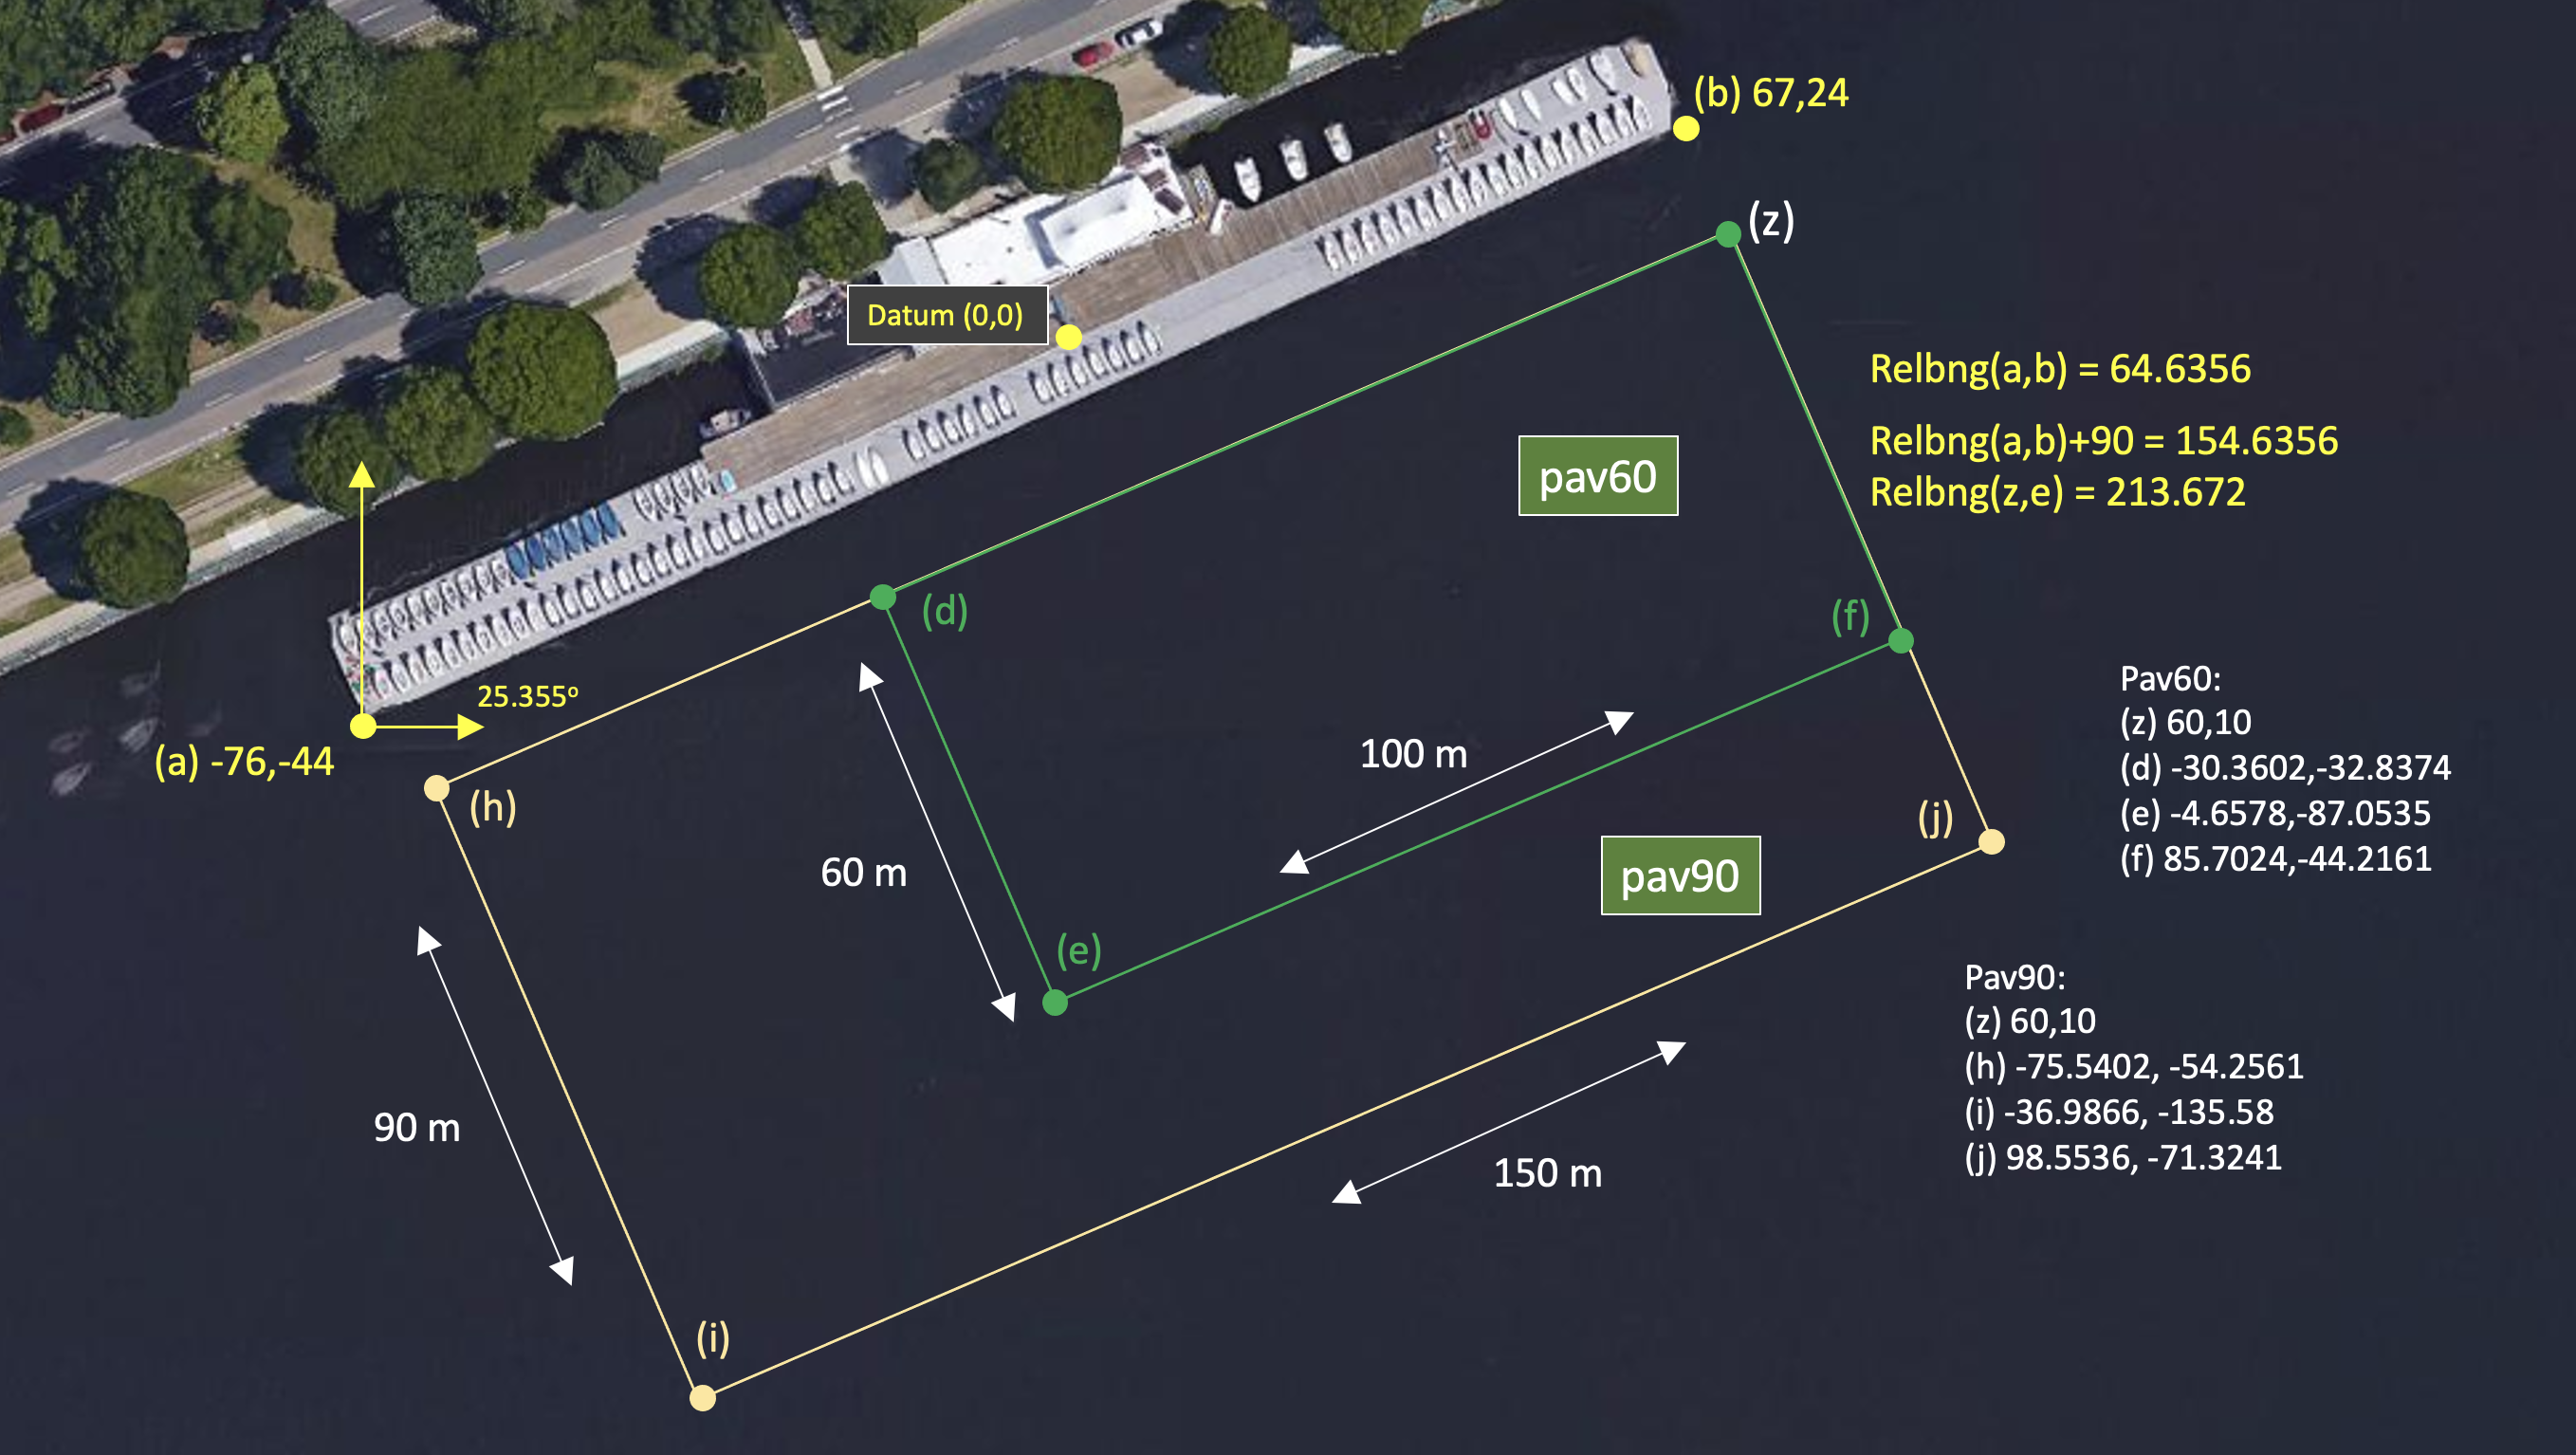
Figure 2.1: Useful coordinates related to the rescue lab. There are two playing field rectangles, a large one ("pav90") roughly the extent of the docks, and a smaller region ("pav60") closer to the Pavlab doors on the East end of the dock.
Note there are two rectangles representing a small and large operation area. The smaller area (pav60) is typically used for in-water tests involving one or two vehicles. The larger area (pav90) is typically used for in-water tests involving two-on-two competitions.
These two regions can be passed to the gen_swimmers app:
 $ gen_swimmers = --pav60 --swimmers=15
 $ gen_swimmers = --pav90 --swimmers=17 --unreg=11
Likewise, in the baseline mission, a new set of random swimmer locations can be generated at launch time with either of the two MIT regions:
 $ ./launch.sh --pav60 -r1 10
 $ ./launch.sh --pav90 -r2 --swimmers=17 10
The boundaries of the playing field are read in by uFldRescueMgr from the swim file. The swim file is a key config parameter for this app, and it contains the location of all the swimmers. The region will will be communicated to the vehicles, through the MOOS variable RESCUE_REGION. For example, for the larger region above:
RESCUE_REGION = pts={60,10:99,-71:-37,-136:-76,-54}
The region message is received by the vehicle and is ingested by the OpRegionV24 behavior in the helm, so the vehicle will know the playing field.
2.5 Preliminaries: The Shell Path [top]
This lab sequence will use applications in the following locations:
- moos-ivp/bin
- moos-ivp/scripts
- moos-ivp-2680/bin
- moos-ivp-extend/bin (your code)
The moos-ivp-2680 tree will hold a few apps specific to this lab, e.g., uFldRescueMgr, and the moos-ivp-extend tree will hold your app, pGenRescue. To augment your path, you may need to edit your .bashrc file as below:
 PATH+=:~/moos-ivp/bin             (this was likely already there)
 PATH+=:~/moos-ivp/scripts         (this was likely already there)
 PATH+=:~/moos-ivp-extend/bin
 PATH+=:~/moos-ivp-2680/bin
 export PATH                       (this was likely already there)
You can confirm this by examining the contents of the $PATH bash environment variable:
$ echo $PATH
Confirmation can also be done with the GNU/Linux which function:
  $ which pHelmIvP
  /Users/you/moos-ivp/bin/pHelmIvP              (or /home/you/... in GNU/Linux)
  $ which uFldRescueMgr
  /Users/you/moos-ivp-2680/bin/uFldRescueMgr    (or /home/you/... in GNU/Linux)
There exists a convenience function in moos-ivp/scripts called path_shell.sh. This command will list your $PATH environment variable in a more human readable format. Normally the output is one long line with each directory separated by a colon:
  $ echo $PATH
  /usr/bin:/usr/local/bin:/bin:/Users/janedoe/bin:/Users/janedoe/project-pavlab/utils/bin:
  /Users/janedoe/moos-ivp-janedoe/bin:/Users/janedoe/moos-ivp-heron/bin:/Users/janedoe/mo
  os-ivp-extend/bin:/Users/janedoe/moos-ivp-2680/bin:/Users/janedoe/moos-ivp/bin:
  /Users/janedoe/pablo-common/bin
The path_shell.sh utility will separate each directory out to a single line:
  $ path_shell.sh
  1: /usr/bin
  2: /usr/local/bin
  3: /bin
  4: /Users/janedoe/bin
  5: /Users/janedoe/project-pavlab/utils/bin
  6: /Users/janedoe/moos-ivp-janedoe/bin
  7: /Users/janedoe/moos-ivp-heron/bin
  8: /Users/janedoe/moos-ivp-extend/bin
  9: /Users/janedoe/moos-ivp-2680/bin
  10: /Users/janedoe/moos-ivp/bin
  11: /Users/janedoe/pablo-common/bin
3 Running the Baseline Mission on the Water
Once you have (a) completed the preparation of pGenRescue from the previous lab, and (b) updated the code on your PABLO as described in Section 2.2, you are ready to run your mission on the Heron.
3.1 Assignment 1 (Check Off) - Run the Baseline Mission on the Heron [top]
Follow the following steps:
- Confirm ability to log onto Heron. Perform updates if needed.
- Launch shoreside mission on your laptop.
- Launch vehicle mission on your Heron.
- Run the mission, confirm performance.
3.1.1 Connect to the Heron PABLO and Perform Updates [top]
Your next step is to connect your PABLO to the Heron, and log in. Connect to the Pavlab WiFi kayak-local-5GHz. Refer to Lab 12 (Section "Connecting to WiFi at the Pavilion") if needed. The IP addresses for the Herons, and the alias shortcuts were also given in Lab 12. If you created aliases in Lab 12 but you forgot them, recall that you can always see which aliases are currently defined with:
$ alias
Or, even better, if you remember part of the alias, such as the term student2680, you can use:
$ alias | grep student2680
This should give you a much smaller set of aliases. In any event, find your bearings, and log into the Heron. If you have faithfully followed recommendations so far, you have aliases installed locally on your laptop and ssh-keys installed on your PABLO. Logging into say the max vehicle would be the following, with no password prompt.
$ sshm
Hopefully you can avoid the much longer un-cool version (for max):
$ ssh -l student2680@192.168.20.100 (followed by PABLO password prompt)
If you're not in the cool kids' club yet, there's still time. Let us know if we can help.
3.1.2 Launch the Shoreside Mission on your Laptop [top]
Either you or your lab partner can use their computer to act as the shoreside. This can be a laptop out on the deck, or in the Pavlab room, even connecting to the large monitor if you like and if it's available. Whoever is shoreside, they should update the moos-ivp-2680 tree, as updates to the mission (the shoreside part in this case), are likely to be posted even as the lab progresses, when or if we find bugs or improvements.
Launch the shoreside mission with:
   $ cd ~/moos-ivp-2680/missions/rescue_baseline
   $ ./launch_shoreside.sh --swim_file=mit_03.txt
As before, with the Alpha mission in Lab 12, if you do not see a 192.168.1.x address at the top of pMarineViewer, determine your IP address and relaunch the shoreside mission with:
   $ cd ~/moos-ivp-2680/missions/rescue_baseline
   $ ./launch_shoreside.sh --swim_file=mit_03.txt  --ip=192.168.1.233 (or your IP)
3.1.3 Launch the Mission on the Heron [top]
Then, on the Heron (PABLO), launch the mission with:
   PABLO $ cd ~/moos-ivp-2680/missions/rescue_baseline
   PABLO $ ./launch_vehicle.sh --shore=192.168.1.218    (or your shore IP)
When the vehicle connects to the shoreside, you're almost ready to push the vehicle into the water and launch. If you haven't done so already:
- Double check the connectors and caps on the PABLO boxes.
- Double check the payload compartment lid has the four latch keys inserted.
- Make sure you have the RC controller for your vehicle. Turn it on and give it a bit of forward thrust to ensure it's the right one and connected.
- Make sure there are no configuration or run warnings showing in the terminal window on the PABLO after running launch_vehicle.sh. If there are warnings, address them before launching!
3.1.4 Launch the Vehicle and Run the In-water Mission [top]
Slide the vehicle stern first into the water, and try to rotate it away from the dock and give it a push straight out. Use the RC to drive it a bit further away from the dock if you like. Then hit the DEPLOY button. It should look something like the trajectory shown in Figure 3.1. (Your path will be different due to the starting position and any changes you made to pGenRescue.)
Figure 3.1: The swimmer locations shown are from swimmer file mit_02.txt. The vehicle proceeds to each point, in a greedy path tour, and then returns home.
3.2 Assignment 2 (Optional) Demonstrate Adaptive Re-planning [top]
In the next step, we will run the baseline mission using a different swimmer file, and test the functionality of your code when presented with a new swimmer location, midway through your mission. Handling new information is not strictly required in this lab, but it will be critical in the next lab. In this case, we will add a new swimmer simply by clicking on a location in pMarineViewer. In the next lab, "new" information will also include notifications that certain swimmers have been rescued by your competitor, and you will instead need to remove that swimmer from your path plan.
Once again launch the shoreside mission as before:
   $ cd ~/moos-ivp-2680/missions/rescue_baseline
   $ ./launch_shoreside.sh --swim_file=mit_03.txt  --ip=192.168.1.233 (or your IP)
By the way, if you launch the shoreside mission with the --help, -h option, you will see that shorthand switches, -1, -2, ... -6, are supported for swim files --swim_file=mit_01.txt up through --swim_file=mit_06.txt.
Launching your vehicle is the same as in the first assignment.
Once your vehicle is launched, on the water, and proceeding along its path, it should look something Figure 3.2, depending on where your vehicle was launched from. During the mission, on your shoreside display, click on a new location, similar to that shown in Figure 3.2. Your vehicle should adapt to accommodate the new point.
Note: For this example in Figure 3.2, for these points and this starting position, the inefficiency of the "greedy" path happens to be quite evident!
Figure 3.2: The swimmer locations shown are from swimmer file mit_03.txt. The vehicle proceeds to each point, in a greedy path tour. During the mission, a new point is added by the shoreside user, and the path is adjusted. Finally the vehicle then returns home.
4 Instructions for Handing In Assignments
4.1 Requested File Structure [top]
The assignment for this lab is to (a) demonstrate a working mission on the Heron using your pGenRescue app, and (b) optionally demonstrate that your app is able to handle new swimmer coordinates mid-mission and replan the path to accommodate the new information. You are encouraged to use the rescue_baseline mission in the provided moos-ivp-2680 tree, so the only addition in your codebase is the pGenRescue app:
   moos-ivp-extend/
      src/
         pGenRescue
4.2 Due Date [top]
This lab should be completed by the end of day Thursday, April 24th, 2025.
Document Maintained by: mikerb@mit.edu
Page built from LaTeX source using texwiki, developed at MIT. Errata to issues@moos-ivp.org. Get PDF