Lab 6 - Pre-Lab for Multi-Vehicle Operations
Maintained by: mikerb@mit.edu  Get PDF
1 Overview and Objectives
2 Preliminaries
3 The Shoreside (Topside) / Vehicle Topology
4 Experimenting with pShare
4.1 Assignment 1 (self check-off) - Configure pXRelay with pShare
4.1.1 Make a Copy of the pXRelay Mission
4.1.2 Split the xrelay Mission up into Two Separate MOOS Communities
4.1.3 Launch the two communities and confirm that sharing works
4.2 Assignment 2 (self check off) - The Alpha pShare Mission
4.2.1 Make a Copy of the Alpha Mission
4.2.2 Split the Alpha Mission Into Two Separate MOOS Communities
4.2.3 Launch the Two Communities and Confirm that Sharing Works
5 Instructions for Handing In Assignments
5.1 Requested File Structure
1 Overview and Objectives
In Lab 6 we begin shifting our focus to autonomy configurations involving multiple vehicles. This pre-lab covers a few initial steps of Lab 6 for those who wish to get a jump on Lab 6. Our first focus will be on communications between two independently running MOOSDB processes, where typically a single MOOSDB, or "MOOS Community" is associate with a single vehicle. Ultimately the inter-MOOSDB or inter-vehicle communication may come over an acoustic modem link or a satellite link, our primary initial focus is on communications over an Internet connection, even if the multiple "nodes" are all running on your one laptop.

Gaining familiarity with this mode of operation will be essential for later labs and operation of vehicles on the water.
- The Shoreside and Vehicle(s) Topology
- Introduction to pShare via the xrelay mission
- Converting the Alpha Mission to use a Shoreside / Vehicle Topology
2 Preliminaries
Make Sure You Have the Latest Updates [top]
It is possible we will be making changes to the MOOS-IvP tree during the semester. Always make sure you have the latest code:
  $ cd moos-ivp
  $ svn update
If you see see a response similar to the below, indicating that no updates were pulled in from the server, then you shouldn't need to re-build the software. (The revision number presented to you may be higher than what is shown however.)
 Updating '.':
 At revision 10516.
Otherwise you will need to rebuild:
  $ ./build-moos.sh
  $ ./build-ivp.sh
Make Sure Key Executables are Built and In Your Path [top]
This lab does assume that you have a working MOOS-IvP tree checked out and installed on your computer. To verify this make sure that the following executables are built and findable in your shell path:
  $ which MOOSDB
  /Users/you/moos-ivp/bin/MOOSDB
  $ which pHelmIvP
  /Users/you/moos-ivp/bin/pHelmIvP
If unsuccessful with the above, return to the steps in Lab 1:
http://oceanai.mit.edu/ivpman/labs/machine_setup
Where to Build and Store Lab Missions [top]
As with previous labs, we will use your version of the moos-ivp-extend tree. In this tree, there is a missions folder:
  $ cd moos-ivp-extend
  $ ls
  CMakeLists.txt  bin/          build.sh*      docs/        missions/       src/
  README          build/        data/          lib/         scripts/
For each distinct assignment in this lab, there should be a corresponding subdirectory in a lab_06 sub-directory of the missions folder, typically with both a .moos and .bhv configuration file. See Section 5.1 for the full requested file structure.
Documentation Conventions [top]
To help distinguish between MOOS variables, MOOS configuration parameters, and behavior configuration parameters, we will use the following conventions:
- MOOS variables are rendered in green, such as IVPHELM_STATE, as well as postings to the MOOSDB, such as DEPLOY=true.
- MOOS configuration parameters are rendered in blue, such as AppTick=10 and verbose=true.
- Behavior parameters are rendered in brown, such as priority=100 and endflag=RETURN=true.
- MOOS-IvP applications are rendered in magenta, such as MOOSDB, or pHelmIvP.
- General GNU/Linux commands are represented in dark purple, such as wget, ls, or cd.
More MOOS / MOOS-IvP Resources [top]
A few further resources are worth mentioning for following up this lab with your own exploration.
- The pShare documentation
- The slides from today's class which give a bit more background into marine autonomy and the IvP Helm.
- The IvP Helm and Utilities documentation: http://oceanai.mit.edu/ivpman
- The moos-ivp.org website: http://www.moos-ivp.org
3 The Shoreside (Topside) / Vehicle Topology
The layout of interconnected MOOS communities used in this lab is depicted in the figure below. This layout will be used for the remainder of the course, including during operations on the river. You will experience different versions of this arrangement. In the simplest arrangement, in the lab, the Shoreside and vehicle communities will all be running on your computer. As we mentioned previously, A MOOS community is a collection of MOOS apps, each connected to a single MOOSDB for that community. The Shoreside topology is sometimes also referred to as the uField topology since the uField Toolbox is a set of utility applications for facilitating the Shoreside arrangement.
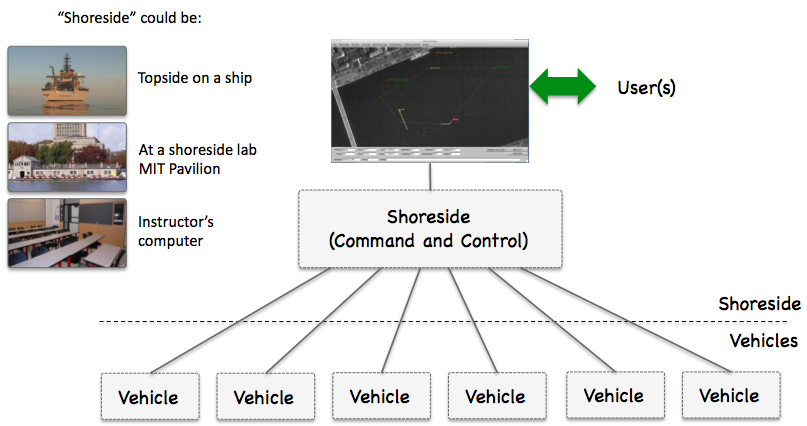
Figure 3.1: Shoreside to Multi-Vehicle Topology: A number of vehicles are deployed with each vehicle maintaining some level of connectivity to a shoreside command and control computer. Each node (vehicles and the shoreside) are comprised of a dedicated MOOS community. Modes and limits of communication may vary.
Communications between apps within a single MOOS community are typically high bandwidth with little or negligible latency. This is all handled over TCP communications between the app and the MOOSDB through the publish-subscribe protocol described thus far in class. Communications between MOOS communities will typically be much lower in bandwidth with higher latency. Communication modalities may also vary, but include WiFi, underwater acoustic modems, satellite networks like Iridium, and others. In these cases there can also be messages that are simply lost.
Because of these limitations, communications are also typically more deliberately arranged ahead of time. Communications within a MOOS community can be quite dynamic in the sense that any app can publish anything at any time, and any app can Register for information at any time. In autonomy systems where there are communications between MOOS communities, the allowed inter-node messages are usually declared beforehand, and there may also be message priorities and upper limits on message frequency for certain variables.
In our class, both in simulation and on the water, the app pShare is used for inter-node communications (comms between MOOS communities). Each MOOS community runs an instance of pShare as shown in Figure 3.2 below.
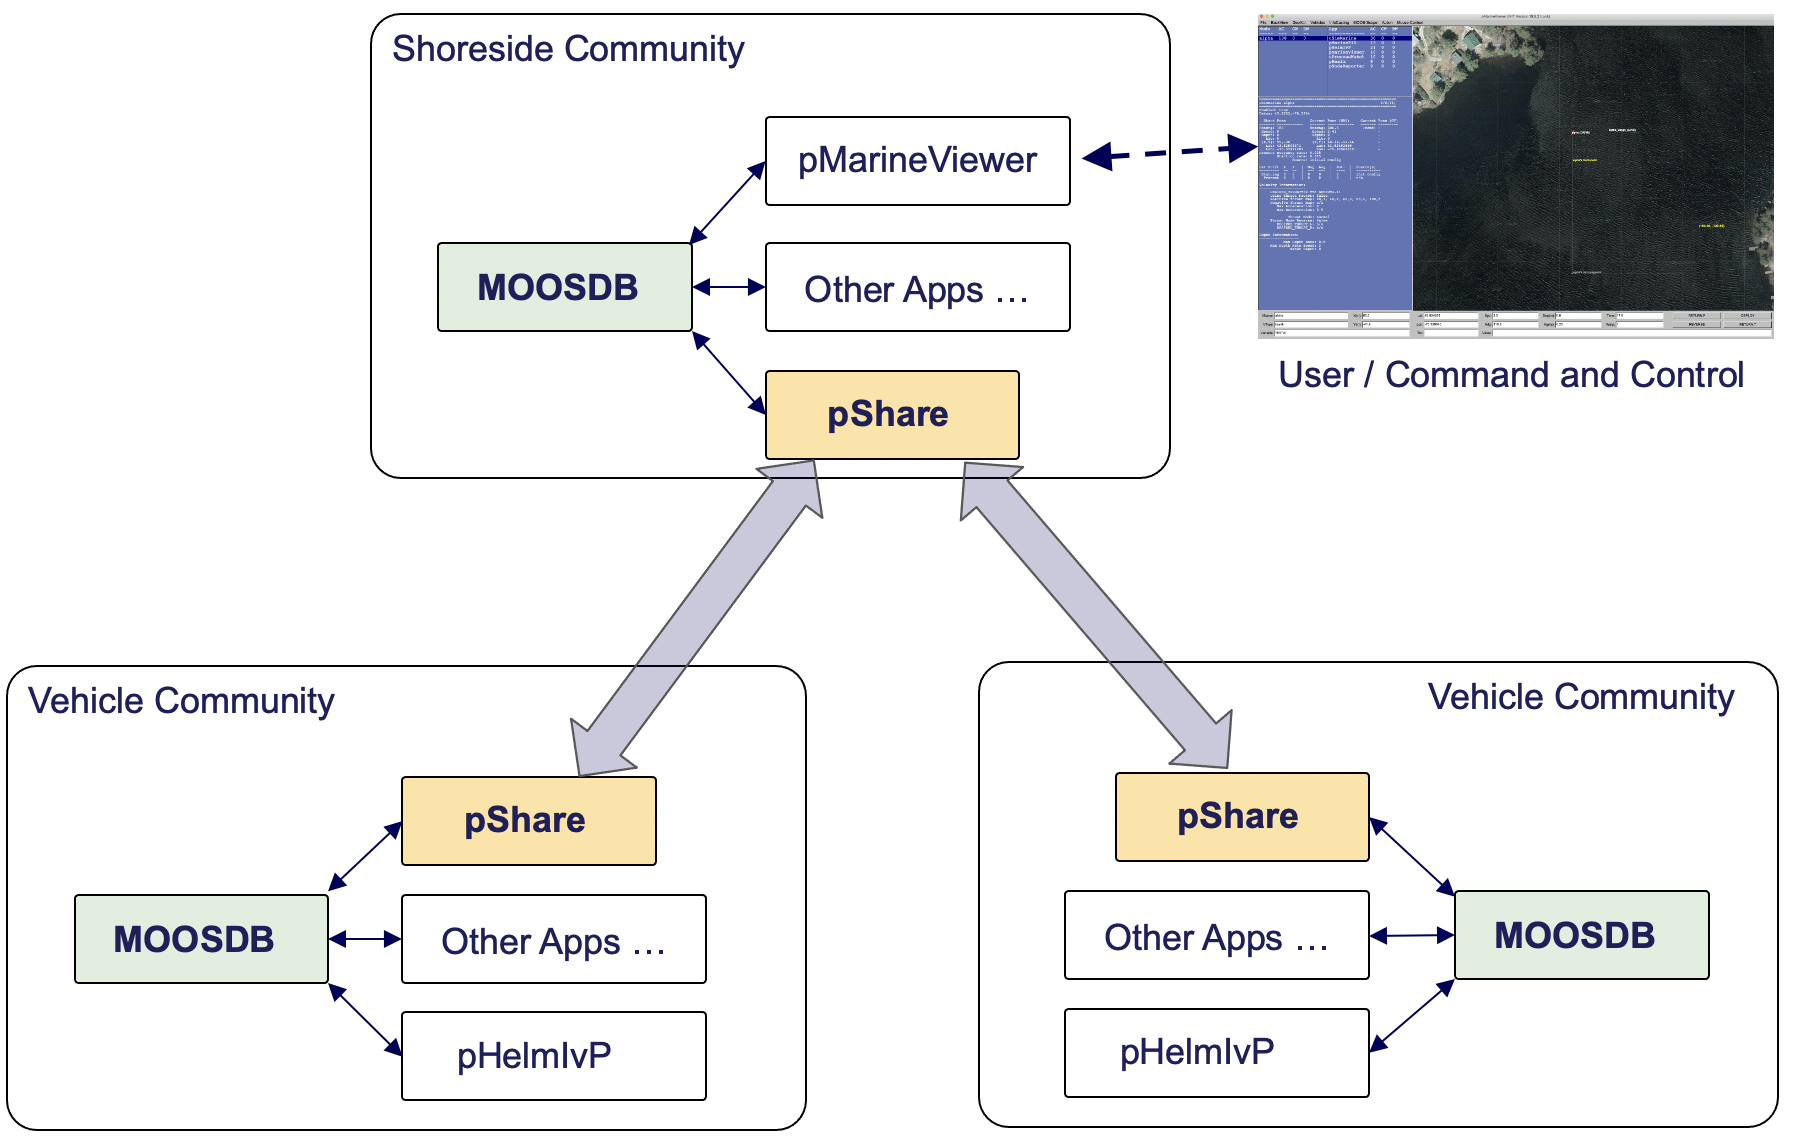
Figure 3.2: Inter MOOS Community Communications: Apps within a single MOOS community communicate over TCP, while communication between communities is assumed to be lossy. The pShare app is use in simulations in some field test environments to share a small configurable set of information between platforms.
Each instance of pShare is configured to listen on a unique channel. The channel is defined by its IP address and port number. Therefore, when multiple MOOS communities are simulated on a single machine (same IP address), the port numbers need to be different. When the multiple MOOS communities are on different platforms, each with its own unique IP address, then each pShare app may have the same port number.
In addition to specifying the channel for incoming messages, pShare needs to be configured to specify outgoing messages. An outgoing message configuration consists of specifying a MOOS variable in the local (source) community, and the destination of the message in terms of the IP address and port number of the receiving pShare app in the destination community. It is also possible to change the name of MOOS variable as it arrives in the destination community. So each pShare configuration will consist of two parts:
- The incoming listen port
- One or more MOOS variables mapped to a destination community.
When finally configured, a publication to a local MOOS variable involved in a pShare, will result in a near instantaneous similar publication in the destination community. Note that pShare works over UDP, and messages do not have the same guarantee of arrival as they do with TCP. Messages can and will drop. You are unlikely to experience a dropped message when simulating inter-node comms on a single computer, or even over reasonably strong WiFi connection. But there will be dropped messages when working on the Charles River when the robots have lossy comms to the shore. There are no mechanisms built into pShare to detect a dropped message. If a message is critical, the user will have to implement their own acknowledgment and re-send protocol.
Note: In an separate development branch, a new 2023 app called pMediator has been developed to such an ack and re-send protocol. Ask if you're interested, but we won't need it in our labs in simulation.
Normally in our setups, the pShare communications are solely between the shoreside MOOS community and the one or more vehicle MOOS communities. We typically don't share information directly between vehicles, although there is nothing about pShare that would disallow this. While inter-vehicle communication is certainly desired, and part of our future labs, we implement all inter-vehicle communications to be routed through the Shoreside community. For reasons further explained in later labs, we use this "comms routed through the shoreside" arrangement so that we can simulate comms limitations often experienced in the field. We can drop comms based on inter-vehicle range, or we can limit the bandwidth between vehicles to simulate communications with similar limits, like satellite or underwater acoustic comms.
4 Experimenting with pShare
In the first exercise in the pre-lab, the goal is to become familiar with pShare. In these first couple of missions, we will be configuring pShare explicitly in our .moos files. In later missions, we will be using components of the uField Toolbox to automatically configure the share configurations.
4.1 Assignment 1 (self check-off) - Configure pXRelay with pShare [top]
In this part we will:
- Prepare a copy of the xrelay mission for experimenting.
- Create two .moos files to launch two MOOSDB processes.
- Launch the two communities and confirm that sharing between two MOOS communities works with pShare.
4.1.1 Make a Copy of the pXRelay Mission [top]
The first step is to copy the xrelay example mission from your moos-ivp tree in your own moos-ivp-extend tree.
$ cp -rp moos-ivp/ivp/missions/xrelay moos-ivp-extend/missions/lab_06/xrelay_pshare
The original xrelay mission had a single .moos mission configuration file, with a single MOOSDB and two pXRelay apps.
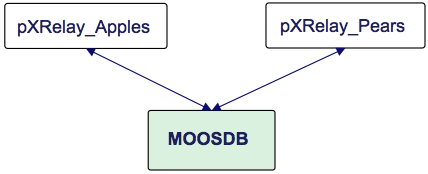
Figure 4.1: The original xrelay mission contained a single MOOSDB with two pXRelay applications uniquely named.
This will be transformed by you into two mission files, each launching a single MOOSDB, each with a unique community name:
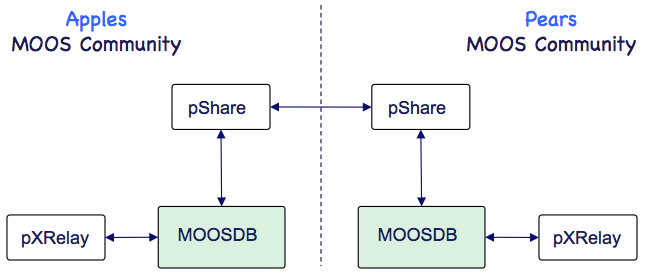
Figure 4.2: The new xrelay mission contains two MOOSDBs each with their own pXRelay application. The pXRelay application does not need to be uniquely named, but the MOOS communities are uniquely named.
Recall in the earlier XRelay mission, where two versions of pXRelay were launched and connected to the same MOOSDB, each version had to be launched with a unique name, like pXRelay_apples. Since we now will be launching two MOOS Communities, with one instance of pXRelay in each community, each pXRelay instance can simply remain named pXRelay.
4.1.2 Split the xrelay Mission up into Two Separate MOOS Communities [top]
The xrelay mission, as originally configured, has three essential apps launched. The MOOSDB, and two pXRelay apps. In this experiment, you will create two .moos files, each launching a MOOSDB and one pXRelay app. You will also need the pShare app launched in each community.
Note: You will need to configure each .moos file with a unique community name (with the Community parameter), and port number (with the ServerPort parameter). The ServerHost parameter can remain "localhost" for now. Note each of those pieces of information since you will need it in the configuration of pShare in both files.
Some quick documentation on pShare can be found by just typing "pShare --help" on the command line. Or you can find more complete documentation here:
http://oceanai.mit.edu/2.680/oxmoos/pshare.html
Your pShare configuration block will look something like (removing the comments of course):
 ServerHost = localhost
 ServerPort = 9000                   <-- needs to be unique between files
 Community  = apples                 <-- needs to be unique between files

 ProcessConfig = pShare
 {
   AppTick    = 4
   CommsTick  = 4

   input  = route = localhost:9200    <-- needs to be unique between files

   output = src_name=APPLES, route=localhost:9201
 }
Note that the port on which pShare is listening is not the same port on which the MOOSDB is serving. And remember that the same share configuration will not work for both sides. They must complement each other, in terms of the variable name being shared, the share input route, the destination host IP and port number. The following figure may help:
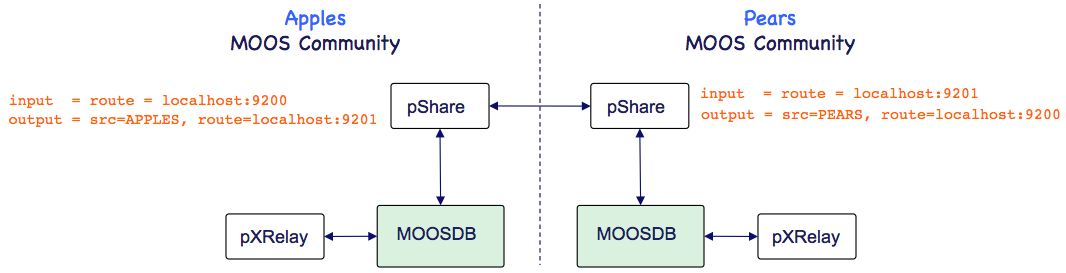
Figure 4.3: The new xrelay mission needs to have pShare configured to share the APPLES and PEARS messages with complementary configurations.
4.1.3 Launch the two communities and confirm that sharing works [top]
Using perhaps two separate terminal windows, launch both MOOS communities and confirm that the modified xrelay mission works as before. You will still need to poke one of the communities to get things going. Confirm things are working by opening a scope in one of the communities. Enable the "Community" field on scoped items, either by launching uXMS with the --show=community parameter, or just toggling this field on with the 'c' key after uXMS is launched. You should see postings from both the local community, and the second remote community.
If things are not working, consider the following trouble-shooting points:
- Make sure the port specified in the share input route on each side matches the destination port on the other, and vice versa.
- Make sure the port numbers used are not the same as the MOOSDB port numbers.
- Make sure the MOOSDB port numbers are unique, like 9000 and 9001. This is the ServerPort parameter in the .moos file.
- Try just poking with uPokeDB to test the sharing. For example, poking APPLES=99 in the community that is configured to export the the APPLES variable, and opening a scope in the destination community.
4.2 Assignment 2 (self check off) - The Alpha pShare Mission [top]
In this part we will:
- Prepare a copy of the alpha mission for experimenting.
- Create two .moos files to launch two MOOSDB processes.
- Implement the Alpha mission with two MOOS communities using pShare.
- Launch the two communities and confirm that sharing works.
4.2.1 Make a Copy of the Alpha Mission [top]
The first step is to copy the alpha example mission from the moos-ivp class tree into your own moos-ivp-extend tree.
$ cp -rp moos-ivp/ivp/missions/s1_alpha moos-ivp-janedoe/missions/lab_06/alpha_pshare
You won't be handing this in, but it's not a bad idea to check it in under your version control system.
4.2.2 Split the Alpha Mission Into Two Separate MOOS Communities [top]
In this step you will create two separate MOOS communities: a shoreside community and an alpha vehicle community, by creating two separate .moos files. In the shoreside community there will be a MOOSDB and pMarineViewer. In the alpha community will be a MOOSDB and everything but pMarineViewer. In both communities you will also need to add a pShare configuration block and add pShare to the Antler configuration block.
The primary challenge here is to consider which variables to configure for sharing in each direction. One hint is that, from the vehicle to the shoreside you will need to share the NODE_REPORT. This is the message generated from pNodeReporter containing much of the vehicle state, and used by pMarineViewer to render the vehicle. It is generated locally on the vehicle as NODE_REPORT_LOCAL and should arrive in the shoreside as NODE_REPORT. The configuration in alpha's pShare config block will look something like:
output = src_name=NODE_REPORT_LOCAL, dest_name=NODE_REPORT, route=localhost:9200
You will also want to share the VIEW_POLYGON and VIEW_POINT variables to enable pMarineViewer on the shoreside to have the visual feedback of the vehicle waypoints. What variables do you need to share from the shoreside to the vehicle?
4.2.3 Launch the Two Communities and Confirm that Sharing Works [top]
Using perhaps two separate terminal windows, launch both MOOS communities and confirm that the modified Alpha mission works as before. You still should be able to deploy and return the vehicle with the buttons in pMarineViewer. Consider what is being poked when hitting those buttons. You can always find this out by looking at the pMarineViewer configuration block in the mission file. Or, recent versions of pMarineViewer, you can hover your mouse over each button, and after a second a small pop-up window will appear showing which variables are being poked with that button. Make sure those variables are being properly shared to the alpha vehicle community.
If things are not working, consider the following trouble-shooting points:
- Make sure the port specified in the share input route on each side matches the destination port on the other, and vice versa.
- Make sure the port numbers used are not the same as the MOOSDB port numbers.
- Try just poking with uPokeDB to test the sharing. For example, poking DEPLOY=true in the shoreside community, and opening a uXMS scope in the destination (alpha) community. Even easier: use the realmcasting interface built into pMarineViewer as of 2022, to verify that messages like DEPLOY are being shared from shore to the vehicle. Ask a TA for help if haven't used the realmcasting utility yet.
- You should see a vehicle in the pMarineViewer window even before deploying the vehicle. If you don't check the pShare configuration on the vehicle side.
The result should look just like the basic alpha mission from Lab 1, but, under the hood, things are just running in two separate MOOS communities:
Figure 4.4: The Alpha mission. video:(0:19): https://vimeo.com/84549446
5 Instructions for Handing In Assignments
5.1 Requested File Structure [top]
You are encouraged to continue to upload all mission files. Here is the requested file structure:
   moos-ivp-extend/
     missions/
       lab_06/
         xrelay_pshare/              // Assignment 1 - self check off
         alpha_pshare/               // Assignment 2 - self check off
         alpha_bravo_pshare/         // Assignment 3 - check off
         henry_gilda_baseline/       // Assignment 4 - self check off
         henry_gilda_refuel/         // Assignment 5 - self check off
         henry_gilda_auto_refuel/    // Assignment 6 - check off
Document Maintained by: mikerb@mit.edu
Page built from LaTeX source using texwiki, developed at MIT. Errata to issues@moos-ivp.org. Get PDF