uXMS: Scoping the MOOSDB from the Console
Maintained by: mikerb@mit.edu  Get PDF
src: project-pavlab/appdocs/app_uxms
1 Overview
2 The uXMS Refresh Modes
2.1 The Streaming Refresh Mode
2.2 The Events Refresh Mode
2.2.1 The Paused Refresh Mode
3 The uXMS Content Modes
3.1 The Scoping Content Mode
3.2 The History Content Mode
3.3 The Processes Content Mode
4 Configuration File Parameters for uXMS
4.1 The colormap Configuration Parameter
4.2 The content_mode Configuration Parameter
4.3 The display* Configuration Parameters
4.4 The history_var Configuration Parameter
4.5 The refresh_mode Configuration Parameter
4.6 The source Configuration Parameter
4.7 The term_report_interval Configuration Parameter
4.8 The trunc_data Configuration Parameter
4.9 The wrap_data and wrap_data_len Configuration Parameters
4.10 The var Configuration Parameter
5 Command Line Usage of uXMS
6 Console Interaction with uXMS at Run Time
7 Running uXMS Locally or Remotely
8 Connecting multiple uXMS processes to a single MOOSDB
9 Using uXMS with Appcasting
10 Publications and Subscriptions for uXMS
10.1 Variables Published by uXMS
10.2 Variables Subscribed for by uXMS
1 Overview
uXMS is a terminal based MOOS app for scoping the MOOSDB. It has no graphics library build dependencies and is easily launched from the command line to scope on just what the user wants, from everything to just one important variable. For example, typing the following on the command line after say the alpha example mission is launched, will result in Figure 1.1.


$ uXMS alpha.moos NAV_X NAV_Y DEPLOY RETURN IVPHELM_STATE


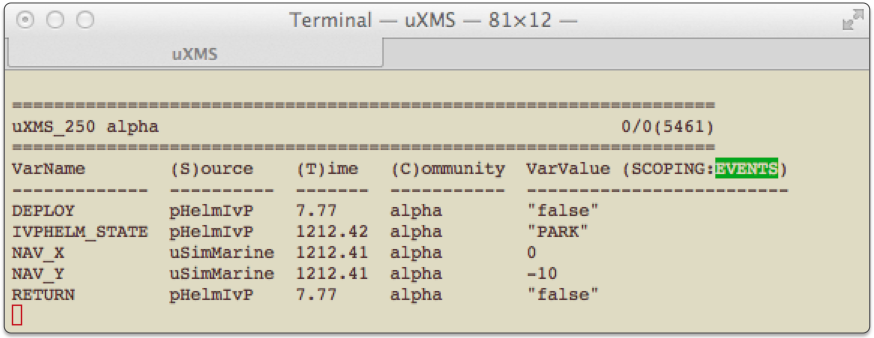
Figure 1.1: A simple scope on five variables with uXMS: A line is used for each variable showing the variable name, the time of the most recent posting, the source, and the current value.


Scoping on the MOOSDB is a very important tool in the process of development and debugging. The uXMS tool has a substantial set of configuration choices for making this job easier by bringing just the right data to the user's attention. The default usage, as shown above, is fairly simple, but there are other options discussed in this section that are worth exploiting by the more experienced user.

- Use with appcasting: uXMS is appcast enabled meaning its terminal reports may be viewed with tools other than the terminal window. It is possible to configure multilple uXMS scopes to automatically launch with a mission and viewer each of them in remote appcast viewing tools. More on this topic in Section 9.
- Scoping on history: uXMS may be configured to scope on the history of a variable to view not just its current state but recent values.
- Remote low-bandwidth scoping: uXMS can be launched and connected to a remote MOOSDB over a low-bandwidth link, with refresh requests made only on the user's request. uXMS can also be on a remote vehicle via an ssh session.
- Dynamic changes to the scope list: The set of scoped variables may be altered dynamically by selecting MOOS apps to include or exclude from the scope list.

At any time the user may hit the 'h' key to see a list of help commands.

2 The uXMS Refresh Modes
Reports such as the one shown in Figure 1.1 are generated either automatically or specifically when the user asks for it. The latter is important in situations where bandwidth is low. This feature was the original motivation for developing uXMS. When a new report is sent to the terminal is determined by the refresh mode. The three refresh modes are shown in Figure 2.1 along with the key strokes for switching between modes.

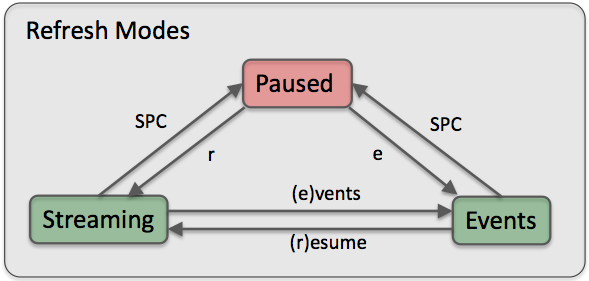
Figure 2.1: Refresh Modes: The uXMS refresh mode determines when a new report is written to the screen. The user may switch between modes with the shown keystrokes.


The refresh mode may be changed by the user as uXMS is running, or it may be given an initial mode value on startup from the command line with --mode=paused, --mode=streaming, or --mode=events. The latter is the default. It may also be set in the uXMS configuration block in the mission file with the refresh_mode parameter. The current refresh mode is shown in parentheses in the report header as shown in Figure 1.1 where it is in the events refresh mode.

2.1 The Streaming Refresh Mode [top]
In the streaming refresh mode, a new report is generated and written to stdout on every iteration of the uXMS application. The frequency is limited from above by the apptick setting in the MOOS configuration block. It is also limited from above by the parameter term_report_interval, which is by default 0.6 seconds. Each report written to the terminal will show an incremented counter at the end of the first line, in parentheses. This counter represents the uXMS iteration counter. This mode may be entered by hitting the 'r' key, or chosen as the initial refresh mode at startup from the command line with the --mode=streaming option.


2.2 The Events Refresh Mode [top]
In the events refresh mode, the default refresh mode, a new report is generated only when new mail is received for one of the scoped variables. Note this does not necessarily mean that the value of the variable has changed, only that it has been written to again by some process. As with the streaming mode, the report frequency is limited by the apptick and the term_report_interval setting. This mode is useful in low-bandwidth situations where a user cannot afford the streaming refresh mode, but may be monitoring changes to one or two variables. This mode may be entered by hitting the 'e' key, or chosen as the initial refresh mode at startup from the command line with the --mode=events option.

2.2.1 The Paused Refresh Mode [top]
In the paused refresh mode, the report will not be updated until the user specifically requests a new update by hitting the spacebar key. This mode is the preferred mode in low bandwidth situations, and simply as a way of stabilzing the rapid refreshing output of the other modes so one can actually read the output. This mode is entered by the spacebar key and subsequent hits refresh the output once. To launch uXMS in the paused mode, use the --mode=paused command line switch.


3 The uXMS Content Modes
The contents of the uXMS report vary between one of a few modes. In the scoping mode, a snapshot of a subset of MOOS variables is generated, similar to what is shown in Figure 1.1. In the history mode the recent history of changes to a single MOOS variable is reported.
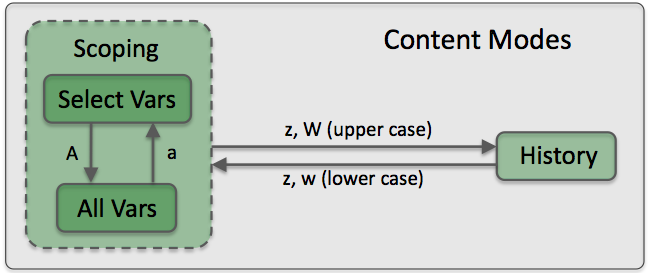
Figure 3.1: Content Modes: The uXMS content mode determines what data is included in each new report. The two major modes are the scoping and history modes. In the former, snapshots of one or more MOOS variables are reported. In the latter, the recent history of a single variable is reported.


3.1 The Scoping Content Mode [top]
The scoping mode has two sub-modes as shown in Figure 3.1. In the first sub-mode, the SelectVars sub-mode, the only variables shown are the ones the user requested. They are requested on the command-line upon start-up (Section 5), or in the uXMS configuration block in the .moos file provided on startup, or both. One may also select variables for viewing by specifying one or MOOS processes with the command line option --src=<process>,<process>,.... All variables from these processes will then be included in the scope list.

In the AllVars sub-mode, all MOOS variables in the MOOSDB are displayed, unless explicitly filtered out. The most common way of filtering out variables in the AllVars sub-mode is to provide a filter string interactively by typing the '/' key and entering a filter. Only lines that contain this string as a substring in the variable name will then be shown. The filter may also be provided on startup with the --filter=pattern command line option.

In both sub-modes, variables that would otherwise be included in the report may be masked out with two further options. Variables that have never been written to by any MOOS process are referred to as virgin variables, and by default are shown with the string "n/a" in their value column. These may be shut off from the command line with --mask=virgin, or in the MOOS configuration block by including the line display_virgins=false. Similarly, variables with an empty string value may be masked out from the command line with --mask=empty, or with the line display_empty_strings=false in the MOOS configuration block of the .moos file.


3.2 The History Content Mode [top]
In the history content mode, the recent values for a single MOOS variable are reported. Contrast this with the scoping mode where a snapshot of a variable value is displayed, and that value may have changed several times between successive reports. The output generated in this mode may look like that in Figure 3.2 which shows the desired heading of a vehicle going into the first turn of the alpha mission. This uXMS session can by launched from the command line with:


$ uXMS alpha.moos --history=DESIRED_HEADING


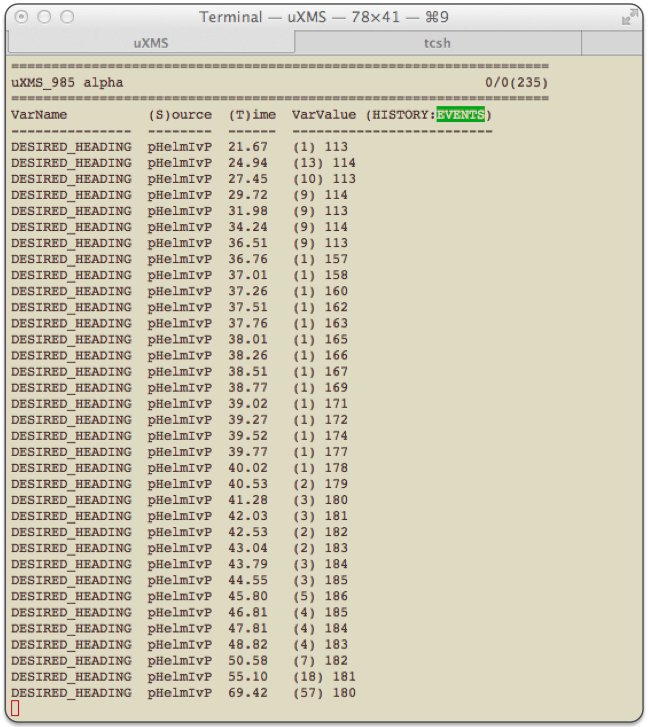
Figure 3.2: A uXMS scope on a single variable history: A vehicle's desired heading is monitored as it goes into the first turn of the alpha mission. Values in parentheses indicate the number of successive postings without a change of value.


The output structure in the history mode is the same as in the scoping mode in terms of what data is in the columns and header lines. Each line however is dedicated to the same variable and shows the progression of values through time. To save screen real estate, successive mail received for with identical source and value will consolidated on one line, and the number in parentheses is merely incremented for each such identical mail. For example, the last line shown in Figure 3.2, the value of DESIRED_HEADING has remained the same for 57 consecutives posts to the MOOSDB. %\index[vars]{DESIRED_HEADING}

The output in the history mode may be adjusted in a few ways:

- Modifying the number of history lines: The number of lines of history may be increased or descreased by hitting the '>' or '<' keys respectively. A maximum of 100 and minimum of 5 lines is allowed. The default is 40.
- Setting the history variable: The history variable may be set on the command line with --history=VAR, or set in the the mission file with history_var=<MOOSVar>. If set in both, the command line setting takes precedent.
- Hiding the history variable: To increase the available real estate on each line, the variable name column may be supressed or restored by toggling the 'j' key. The history variable is shown by default but may be configured to be off upon startup by setting display_history_var=false in the mission file.

Presently there is no way to dynamically change the history variable, or scope on more than one variable's history. (But you can open more than one uXMS session to scope on more than one variable's history.)


3.3 The Processes Content Mode [top]
In the processes content mode running processes may be monitored and selected for either including or excluding variables from the selected processes. This mode may be toggled with the 'p' key. For example, launching the alpha mission and then uXMS from the command line:


$ uXMS alpha.moos DESIRED_HEADING


After uXMS is launched, toggle into the procesess content mode with the 'p'. This should present something similar to Figure 3.3.

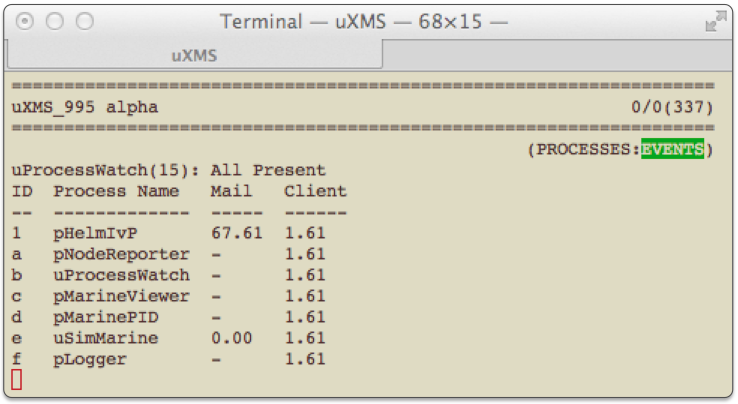
Figure 3.3: A uXMS processes content mode: All processes known to the scope (via the DB_CLIENTS variable) are shown. The Mail column shows the time since mail has been received from the client. The Client column shows the time since the client has shown up on the DB_CLIENTS list.


The first two columns show the processes known to uXMS and a process ID randomly assigned to each process. These IDs may be used select a process as explaine shortly. The last two columns show the time since mail was last received and the time since the process last appeared on the DB_CLIENTS list. Try killing one of the processes and see what happens.

By default uXMS tries to make use of information produced by uProcessWatch. The first line in the body of the report in Figure 3.3 shows the contents of the PROC_WATCH_SUMMARY variable. In this example, mail has only been received from pHelmIvP and uProcessWatch. The former because uXMS was launched from the command line scoping on DESIRED_HEADING, and the latter because uXMS is automatically configured to received the PROC_WATCH_SUMMARY mail from uProcessWatch. If uProcessWatch is not running the report will simply state so.

Perhaps the most useful feature of the processes content mode is the ability to select a process to either include or exclude variables published by that process on the watch list. To include variables from a process, type the '+' key, and a menu and prompt like that shown in Figure 3.4

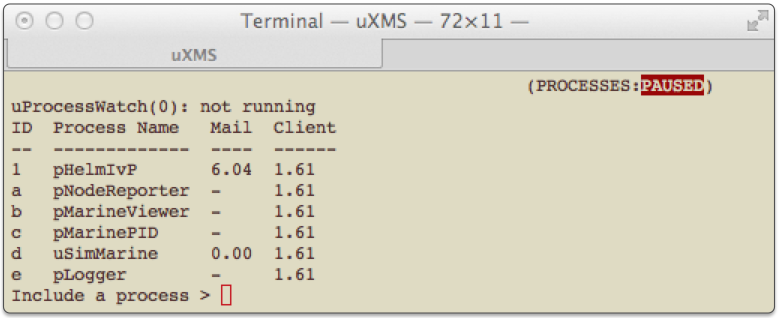
Figure 3.4: Adding watch-list variables based process inclusion: All processes known to the scope (via the DB_CLIENTS variable) are shown. Each process has a single-character ID which may be entered at the prompt to select the process for inclusion.


Once a process has been selected, uXMS will subscribe for all variables published by the selected process. Note this is different from subscribing for mail solely produced by the selected MOOS app since the same variable(s) may be also published by other MOOS applications. The example in Figure 3.4 is also from the alpha mission. If the pMarineViewer application were selected, a scoping report something like that below in Figure 3.5 would result.

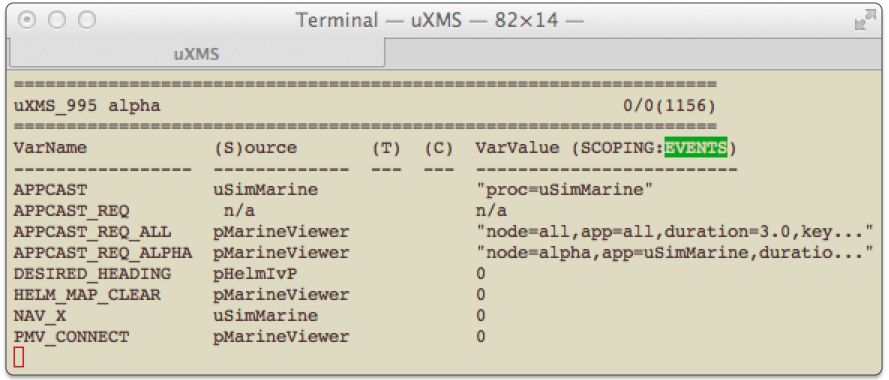
Figure 3.5: Augmented scoping report: The variables published by pMarineViewer are now included in the scoping report after this process was selected for inclusion.

Once a process has been added or excluded, its status will be indicated next time the processes mode is entered, with either a '+' or '-' next to the process ID. For example, the report shown in Figure 3.6 below is generated after hitting the '-' key to select a process for exclusion. The plus sign next to the pMarineViewer indicates that it has been selected for inclusion previously.

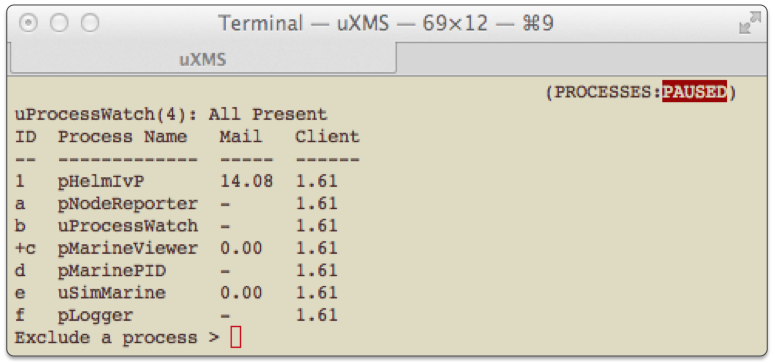
Figure 3.6: Excluding watch-list variables based on process origin: The process list includes an indicator to the left of the ID showing whether the process is presently included ('+') or excluded ('-'). In this case the pMarineViewer application has been included but no action has been taken regarding any other processes.


When a process or application has been selected for exclusion, this is handled in the following way. When a scoping report is being generated, if a particular variable has most recently been set by an excluded process, it is not include in the scoping report. Note, it may have also been published by another application not on the exclusion list.


4 Configuration File Parameters for uXMS
Configuraton of uXMS may be done from a configuration file (.moos file), from the command line, or both. Generally the parameter settings given on the command line override the settings from the .moos file, but using the configuration file is a convenient way of ensuring certain settings are in effect on repeated command line invocations. The following is short description of the parameters:

Listing 4.1 - Configuration Parameters for uXMS.

| colormap: | Associates a color for the line of text reporting the given variable. |
| content_mode: | Set content mode to either scoping, history, procs, or help. |
| display_all: | If true, all variables are reported in the scoping content mode. |
| display_aux_source: | If true, non-null auxilliary source is shown in place of source. |
| display_community: | If true, the Community column is rendered. |
| display_history_var: | If false, history var not shown in history mode. |
| display_source: | If true, the Source column is rendered. |
| display_time: | If true, the Time column is rendered. |
| display_virgins: | If false, variables never written to the MOOSDB are not reported. |
| history_var: | Names the MOOS variable reported in the history mode. |
| refresh_mode: | Determines when new reports are written to the screen. |
| source: | Names a MOOS app for which all variables will be scoped. |
| term_report_interval: | Time (secs) between report updates (default 0.6). |
| trunc_data: | If true, variable string values are truncated. |
| wrap_data: | If true, variable string values are multi-line wrapped. |
| wrap_data_len: | Content line length if wrapping string value output. Default is 45. |
| var: | A comma-separated list of variables to scope on in the scoping mode. |


An Example uXMS Configuration Block [top]
An example configuration is given in Listing 4.2. This may also be elicited from the command line:


$ uXMS --example or -e


Listing 4.2 - An example uXMS configuration block.

[[#uxms_config]]
   1  ProcessConfig = uXMS
   2  {
   3    AppTick   = 4
   4    CommsTick = 4
   5
   6    var    = NAV_X, NAV_Y, NAV_SPEED, NAV_HEADING
   7    var    = PROC_WATCH_SUMMARY
   8    var    = PROC_WATCH_EVENT
   9    source = pHelmIvP, pMarineViewer
  10
  11    history_var           = DB_CLIENTS
  12
  13    display_virgins       = true    // default
  14    display_source        = false   // default
  15    display_aux_source    = false   // default
  16    display_time          = false   // default
  17    display_community     = false   // default
  18    display_all           = false   // default
  19    trunc_data            = 40      // default is no trucation.
  20
  21    wrap_data             = false   // default
  22    wrap_data_len         = 45      // default
  23
  24    term_report_interval  = 0.6     // default (seconds)
  25
  26    color_map    = pHelmIvP, red   // All postings by pHelmIvP red
  27    color_map    = NAV_SPEED, blue // Only var NAV_SPEED is blue
  28
  29    refresh_mode = events     // default (or streaming/paused)
  30    content_mode = scoping    // default (or history,procs)
  31  }


4.1 The colormap Configuration Parameter [top]
Most of the the configurable options deal with content and layout of the information in the terminal window, but color can also be used to faciliate monitoring one or more variables. The parameter

colormap = <variable/app>, <color>

is used to request that a line the report containing the given variable or produced by the given MOOS application (source) is rendered in the given color. The choices for color are limited to red, green, blue, cyan, and magenta.


4.2 The content_mode Configuration Parameter [top]
The content mode determines what information is generated in each report to the terminal output (Section 3). This mode is set with the following parameter:

content_mode = <mode-type> // Default is "scoping"

The default setting is "scoping" to select the scoping content mode described in Section 3.1. It may also be set to "history" to select the history mode described in Section 3.2, or set to "procs" to select the processes mode described in Section 3.3.


4.3 The display* Configuration Parameters [top]
In the scoping and history content modes, the uXMS report has columns of data that may be optionally turned off to conserve real estate, the Time, Source and Community columns as shown in Figures 1.1, 3.2, and 3.5. By default they are turned off, and they may be toggled on and off by the user at run time. Their initial state may also be configured with the following three parameters:

      display_community  = <Boolean> // Default is false
      display_source     = <Boolean> // Default is false
      display_time       = <Boolean> // Default is false
      display_aux_source = <Boolean> // Default is false

The display_aux_source parameter, when true, not only activates this column, but also indicates that the auxilliary source is to be shown instead of the source. Not all MOOS variable postings have the auxilliary source field filled in. In the case of variables posted by the helm, however, this field contains the both the helm iteration and name of the behavior. If the auxilliary source is empty for a particular variable, the primary source is shown instead. To be clear what is being shown, the auxilliary source is always contained in brackets. For example, [241:waypoint_return], may indicate the variable was posted by the helm on iteration 241 by the waypoint return behavior.

The display_all parameter determines whether the scope list contains only those variables specified by the user, or all MOOS variables pubished by any MOOS process. The latter is useful at times when you can't quite remember the variable name you're looking for or who publishes it. When displaying all variables, certain variables may be masked out by selecting a process (MOOS app) to exclude, as described in Section 3.3. It may also be enabled with the 'A' key, and disabled with the 'a' key at the terminal at run time. It may also be enabled from the command line with the --all or -a switches.

display_all = <Boolean> // Default is false

Using the dipplay_virgins parameter, the report content may be further modified to mask out lines containing variables that have never been written to, and variables with an empty-string value. This is done with the below configuration line. It may also be toggled with the 'v' key at the terminal at run time, and it may also be specified from the command line with the --novirgins or -g switches.

display_virgins = <Boolean> // Default is true

In the history mode, the name of the variable is the same on each line. This makes it clear what variable is being shown, but takes up screen real estate and is redundant. It may be suppressed by setting display_history_var to false in the mission file. It may also be toggled with the 'j' key at the terminal at run time.

display_history_var = <Boolean> // Default is true


4.4 The history_var Configuration Parameter [top]
The variable reported in the history mode is set with the below configuration line:

history_var = <MOOSVar>

The history report only allows for one variable, and multiple instances of the above line will simply honor the last line provided. The history variable is also automatically added to the watch list used in the scoping mode. The history variable may also be set on the command line when uXMS is launched from the terminal, with --history=<MOOS-variable>. If set in both places, the command line choice overrides the choice in the mission file.


4.5 The refresh_mode Configuration Parameter [top]
The refresh mode determines when new reports are generated to the screen, as discussed in Section 2. It is set with the below configuration line:

refresh_mode = <mode> // Valid modes are "paused", "streaming", "events"

The initial refresh mode is set to "events" by default. The refresh mode set in the configuration file may be overridden from the command line with --mode=paused|events|streaming, or chosen interactively at run time with the 'e' key for events, the spacebar key for paused, or the 'r' key for streaming.


4.6 The source Configuration Parameter [top]
The variable scope list may be set or augmented by naming a particular MOOS app source with the below parameter:

source = <MOOSApp>, <MOOSApp>, ...

With this, uXMS will subscribe for any MOOS variable published by the named application(s). Since variables may be published by multiple applications, don't be surprised to see postings made by other applications. This is not a request to receive mail only from the named source(s). Sources may also be chosen from the command line with the --src=<MOOSApp>,<MOOSApp>,..K command line switch. Sources may also be included or excluded dynamically in the processes content mode as described in Section 3.3, with the '+' and '-' keys.


4.7 The term_report_interval Configuration Parameter [top]
The term_report_interval is a parameter defined for all AppCasting MOOS applications. It specifies the amount of time between success updates to the terminal. Report updates are not based on the application's apptick since this may be considerably faster than the human may absorb and wastes CPU resources. The default refresh rate is 0.6 seconds between refreshes. This may be overridden with:

term_report_interval = <Non-Zero Value> // Default is 0.6 seconds

The interval may also be specified on the command line with the --termint=<Non-Zero Value> switch. The accepted range, in seconds, is [0,10]. Keep in mind that report frequency cannot be any faster than the actual apptick set for uXMS.


4.8 The trunc_data Configuration Parameter [top]
The current value of a MOOS variable is shown in the VarValue column in both the scoping and history content modes. This value may be quite long and overwrap several lines and make things hard to read. The user can choose to truncate the content by setting trunc_data parameter:

trunc_data = <unsigned int> // Default is zero (no truncating)

Values are accepted in the range [10,1000]. Truncated string output will be further indicated by adding a trailing "..." to the end of the output. Truncation may be toggled on/off at run time by hitting the '`' (back-tick) key. The default truncation length is 40 characters. The length of truncated output may also be adjusted at run time with the '{' and `}' keys.


4.9 The wrap_data and wrap_data_len Configuration Parameters [top]
The current value of a MOOS variable is shown in the VarValue column in both the scoping and history content modes. This value may be quite long and overwrap several lines and make things hard to read. When view uXMS output in the appcasting window of pMarineViewer, it is really hard to see long output. The user can choose to wrap the content within the value column of the output by setting wrap_data parameter:

     wrap_data = true
     wrap_data_len = 30  // default is 45

Values for wrap_data_data are accepted in the range [10,120]. The default value is 45. The value of this parameter is set only in the configuration file and cannot be changed at run time. If uXMS is run from the terminal (rather than viewing content in an appcasting window), the wrapping can be toggled on and off with the 'w' character.


4.10 The var Configuration Parameter [top]
The variables reported on in the scoping mode, the scope list, are declared with configuration lines of the form:

var = <MOOSVar>, <MOOSVar>, ...

Multiple such lines, each perhaps with multiple variables, are accommodated. The scope list may be augmented on the command line by simply naming variables as command line arguments. The scope list provided on the command line may replace the list given in the configuration file if the --clean command line option is also invoked.


5 Command Line Usage of uXMS
Many of the parameters available for setting the .moos file configuration block can also be affected from the command line. The command line configurations always trump any configurations in the .moos file. As with the uPokeDB application, the server host and server port information can be specified from the command line too to make it easy to open a uXMS window from anywhere within the directory tree without needing to know where the .moos file resides. A uXMS session can be launched to connect to the MOOSDB of a remote vehicle on the network, if the IP address and port number are known, with:


$ uXMS --serverhost=10.25.0.191 --serverport=9000 --src=pHelmIvP


The basic command line usage for the uXMS application is the following:


$ uXMS --help or -h


Listing 5.1 - Command line usage for the uXMS tool.

[[#uxms_usage]]
    1  Usage: uXMS [file.moos] [OPTIONS]
    2  Options:
    3    --alias=<ProcessName>
    4        Launch uXMS with the given process name rather than uXMS.
    5    --all,-a
    6      Show ALL MOOS variables in the MOOSDB
    7    --clean,-c
    8      Ignore scope variables in file.moos
    9    --colormap=<MOOSVar>,<color>
   10      Display all entries where the variable, source, or community
   11      has VAR as substring. Allowable olors: blue, red, magenta,
   12      cyan, or green.
   13    --colorany=<MOOSVar>,<MOOSVar>,...
   14      Display all entries where the variable, community, or source
   15      has VAR as substring. Color auto-chosen from unused colors.
   16    --example, -e
   17        Display example MOOS configuration block.
   18    --help,-h
   19        Display this help message.
   20    --history=<MOOSVar>
   21      Allow history-scoping on variable
   22    --interface,-i
   23        Display MOOS publications and subscriptions.
   24    --novirgins,-g
   25      Don't display virgin variables
   26    --mode=[paused,EVENTS,streaming]
   27      Determine display mode. Paused: scope updated only on user
   28      request. Events: data updated only on change to a scoped
   29      variable. Streaming: updates continuously on each app-tick.
   30    --serverhost=<IPAddress>
   31    --mooshost=<IPAddress>
   32      Connect to MOOSDB at IP=value, not from the .moos file.
   33    --serverport=<PortNumber>
   34    --moosport=<PortNumber>
   35      Connect to MOOSDB at port=value, not from the .moos file.
   36    --show=[source,time,community,aux]
   37      Turn on data display in the named column, source, time, or
   38      community. All off by default enabling aux shows the
   39      auxilliary source in the souce column.
   40    --src=<MOOSApp>,<MOOSApp>, ...
   41      Scope only on vars posted by the given MOOS processes
   42    --trunc=value [10,1000]
   43      Truncate the output in the data column.
   44    --termint=value [0,10]  (default is 0.6)
   45      Minimum real-time seconds between terminal reports.
   46    --version,-v
   47      Display the release version of uXMS.
   48
   49  Shortcuts
   50
   51    -t  Short for --trunc=25
   52    -p  Short for --mode=paused
   53    -s  Short for --show=source
   55    -st Short for --show=source,time

Using the --clean switch will cause uXMS to ignore the variables or sources specified in the .moos file configuration block and only scope on the variables specified on the command line (otherwise the union of the two sets of variables is used). Typically this is done when a user wants to quickly scope on a couple variables and doesn't want to be distracted with the longer list specified in the .moos file. Arguments on the command line other than the ones described above are treated as variable requests.

If the serverhost or the serverport arguments are not provided on the command line, and a MOOS file is also not provided, the user will be prompted for the two values. Since the most common scenario is when the MOOSDB is running on the local machine ("localhost") with port 9000, these are the default values and the user can simply hit the return key.

  $ uXMS
  $ Enter Server: [localhost] <return>
      The server is set to "localhost"
  $ Enter Port: [9000] <return>
  $    The port is set to "9000"


6 Console Interaction with uXMS at Run Time
Many of the launch-time configuration parameters may be altered at run time through interaction with the console window. For example, the displaying of the Source column is configured to be false by default, may be configured in the mission file with display_source=true, and may be configured on the command line with --show=source. It may also be toggled at run time by typing the 's' character at the console window. A list of run-time key mappings may be shown at any time by typing the 'h' key for help. Re-hitting this key resumes prior scoping. Listing 6.1 shows the contents of the help menu.

Listing 6.1 - The help-menu on the uXMS console.

[[#uxms_console_help]]
    1  KeyStroke    Function         (HELP)
    2  ---------    ---------------------------
    3      s        Toggle show source of variables
    4      t        Toggle show time of variables
    5      c        Toggle show community of variables
    6      v        Toggle show virgin variables
    7      x        Toggle show Auxilliary Src if non-empty
    8      d        Content Mode: Scoping Normal
    9      h        Content Mode: Help. Hit 'R' to resume
   10      p        Content Mode: Processes Info
   11      z        Content Mode: Variable History
   12    > or <     Show More or Less Variable History
   13    } or {     Show More or Less Truncated VarValue
   14      /        Begin entering a filter string
   15      `        Toggle Data Field truncation
   16      ?        Clear current filter
   17      a        Revert to variables shown at startup
   18      A        Display all variables in the database
   19     u/SPC     Refresh Mode: Update then Pause
   20      r        Refresh Mode: Streaming
   21      e        Refresh Mode: Event-driven refresh


7 Running uXMS Locally or Remotely
The choice of uXMS as a scoping tool was designed in part to support situations where the target MOOSDB is running on a vehicle with low bandwidth communications, such as an AUV sitting on the surface with only a weak RF link back to the ship. There are two distinct ways one can run uXMS in this situation and its worth noting the difference. One way is to run uXMS locally on one's own machine, and connect remotely to the MOOSDB on the vehicle. The other way is to log onto the vehicle through a terminal, run uXMS remotely, but in effect connecting locally to the MOOSDB also running on the vehicle.
The difference is seen when considering that uXMS is running three separate threads. One accepts mail delivered by the MOOSDB, one executes the iterate loop of uXMS where reports are written to the terminal, and one monitors the keyboard for user input. If running uXMS locally, connected remotely, even though the user may be in paused mode with no keyboard interaction or reports written to the terminal, the first thread still may have a communication requirement perhaps larger than the bandwidth will support. If running remotely, connected locally, the first thread is easily supported since the mail is communicated locally. Bandwidth is consumed in the second two threads, but the user controls this by being in paused mode and requesting new reports judiciously.

8 Connecting multiple uXMS processes to a single MOOSDB
Multiple versions of uXMS may be connected to a single MOOSDB. This is to simultaneously allow several people a scope onto a vehicle. Although MOOS disallows two processes of the same name to connect to MOOSDB, uXMS generates a random number between 0-999 and adds it as a suffix to the uXMS name when connected. Thus it may show up as something like uXMS_871 if you scope on the variable DB_CLIENTS. In the unlikely event of a name collision, the user can just try again.

9 Using uXMS with Appcasting
Appcasting allows a really useful way of using uXMS, especially in the case of multiple deployed vehicles. Prior to appcasting, the only way to use uXMS is through a terminal window. With appcasting the uXMS report may also be published to the MOOSDB for remote viewing via a uMAC utility or with pMarineViewer.

For example, consider a case where some number of vehicles are deployed, each with an interface to their batteries, compass and GPS. The interfaces may be named iBatteryMonitor, iCompass, and iGPS. Each interface publishes several MOOS variables including health status messages. A mission could be configurd with three uXMS processes launched at mission startup with something similar to:

Listing 9.1 - Launching several uXMS processes with appcasting.

[[#lst_uxms_appcast]]
   1  ProcessConfig = ANTLER
   2  {
   3    MSBetweenLaunches = 200
   4
   5    Run = MOOSDB          @ NewConsole = false
   6    // Other MOOS Apps
   7    Run = iGPS            @ NewConsole = false
   8    Run = iBatteryMonitor @ NewConsole = false
   9    Run = iCompas         @ NewConsole = false
  10    Run = uXMS            @ NewConsole = false ~ uXMS_GPS
  11    Run = uXMS            @ NewConsole = false ~ uXMS_BATTERY_MONITOR
  12    Run = uXMS            @ NewConsole = false ~ uXMS_COMPASS
  13  }
  14
  15  ProcessConfig = uXMS_GPS
  16  {
  17    SOURCE = iGPS
  18  }
  19  ProcessConfig = uXMS_BATTERY_MONITOR
  20  {
  21    SOURCE = iBatteryMonitor
  22  }
  23  ProcessConfig = uXMS_COMPASS
  24  {
  25    SOURCE = iCompass
  26  }

With this configuration the three uXMS processes will launch, each without a terminal window open, and each with a different descriptive name. The uXMS reports are accessible with any of the appcast viewing tools, uMAC, uMACView, and pMarineViewer. In the latter two tools for example, the uXMS reports may appear in a menu selection like that shown in Figure 9.1.
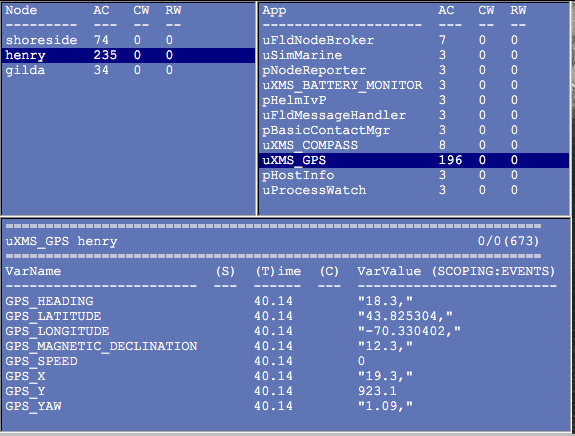
Figure 9.1: Appcasting and uXMS: Multiple vehicles are each configured with three dedicated uXMS processes to scope on variables particular to a given device or sensor. The uMAC viewer interface allows the user to select any vehicle and select a uXMS report to see the desired information for that vehicle and device.

In this way the user may monitor the health of these three instruments across all fielded vehicles with a single GUI without having to write any special code for these devices.

10 Publications and Subscriptions for uXMS
The interface for uXMS, in terms of publications and subscriptions, is described below. This same information may also be obtained from the terminal with:


$ uXMS --interface or -i


10.1 Variables Published by uXMS [top]

- APPCAST: Contains an appcast report identical to the terminal output. Appcasts are posted only after an appcast request is received from an appcast viewing utility. Section 9.


10.2 Variables Subscribed for by uXMS [top]

- APPCAST_REQ: A request to generate and post a new apppcast report, with reporting criteria, and expiration. Section 9.
- DB_CLIENTS: To handle requests to scope on all variables.
- DB_UPTIME: To determine the MOOSDB start time. All uXMS times reported are times since MOOSDB started.
- PROC_WATCH_SUMMARY: As a convenience this summary is displayed in the processes content mode. It is posted by uProcessWatch.
- USER-DEFINED: The variables subscribed for are those on the scope list, augmented with the var and source parameters described in Sections 4.7 and 4.11.


Document Maintained by: mikerb@mit.edu
Page built from LaTeX source using texwiki, developed at MIT. Errata to issues@moos-ivp.org.
 Get PDF
