
- pMarineViewer
- uHelmScope
- Geometry Utilities
- uTimerScript
- pContactMgrV20
- uProcessWatch
- uLoadWatch
- pNodeReporter
- uXMS
- uSimMarineV22
- pMissionHash
- pMissionEval
- pHostInfo
- uPokeDB
- uQueryDB
- uMayFinish
- pEchoVar
- pDeadManPost
- pObstacleMgr
- iSay
- pRealm
- pSearchGrid
- pSpoofNode
- uTermCommand
- uSimCurrent
- uFldNodeBroker
- uFldShoreBroker
- uFldNodeComms
- uFldMessageHandler
- uFldBeaconRangeSensor
- uFldContactRangeSensor
- uFldCollisionDetect
- uFldCollObDetect
- uFldObstacleSim
- uFldScope
- uFldPathCheck
2.680 Competition Apps

uFldHazardMgr: On-Board Management of a Hazard Sensor
Maintained by: mikerb@mit.edu  Get PDF
1 Overview
2 Using uFldHazardMgr
2.1 Required MOOS Variable Bridges
2.2 Configuration Parameters of uFldHazardMgr
2.3 An Example MOOS Configuration Block
2.4 Configuring the Swath Width
2.5 Configuring the Probability of Detection Setting
3 Under the Hood - Interacting with the Hazard Sensor
4 Under the Hood - Processing Data and Generating Reports
5 Publications and Subscriptions for uFldHazardMgr
5.1 Variables Published by uFldHazardMgr
5.2 Variables Subscribed for by uFldHazardMgr
6 Terminal and AppCast Output
7 The Jake Kasper Example Mission Using uFldHazardMgr
1 Overview
The uFldHazardMgr application is straw man module for interacting with an on-board hazard sensor. It does two basic things as implied in Figure 1.1:
- Interacts with the sensor: It decides a sensor configuration setting and sends this to the hazard sensor. It may change settings during the course of the mission to its advantage. It interacts with the sensor by sending sensor requests, and receiving sensor reports. It has some knowledge of the sensor properties and configuration options.
- Generates a hazardset report: It builds an internal belief state regarding the identification and location of hazards, and reports this belief state upon request.
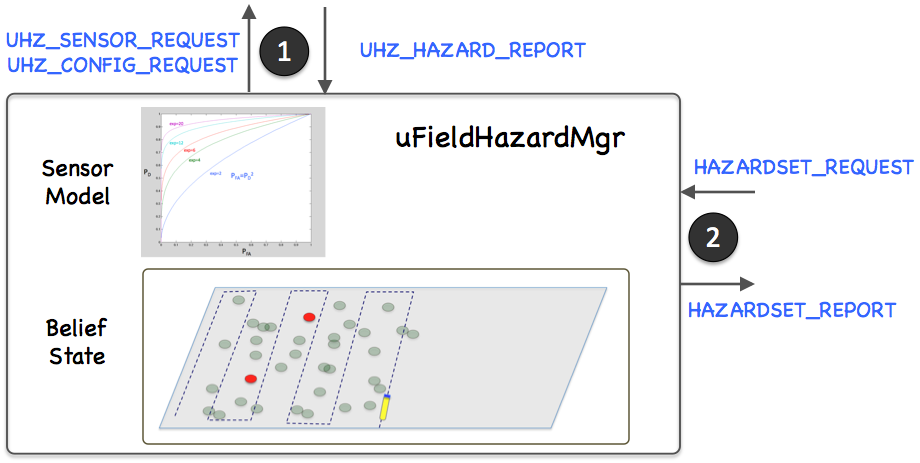
Figure 1.1: The uFldHazardMgr: interacts with the on-board sensor and processes sensor information and generates a report, upon request, regarding the identification and location of hazards. The arrows indicate the key MOOS variables used for interacting with the sensor and generating reports.
There are many ways to interpret sensor data and ultimately decide upon a hazardset report. For this reason we regard uFldHazardMgr as a straw man module. It implements the key syntactic steps to minimally configure and interact with the sensor and produce a syntactically correct hazardset report. The intention is that users may wish to use this as a starting point.
A further aspect one may wish to include in this module would be a form of reasoning about the vehicle's path through the hazard field. This module, and accompanying example mission, was written with the vehicle simply performing a lawnmower exhaustive search through the field. This module could be used in conjunction with the helm to decided follow-up search patterns or collaborative strategies with other vehicles. Again, this is not part of uFldHazardMgr since the objective of this module is to provide a syntactically valid starting point for managing sensor information.
2 Using uFldHazardMgr
Typical Simulator Topology [top]
The typical module topology is shown in Figure 2.1 below. The uFldHazardMgr is situated in the vehicle MOOS community. It interacts with the uFldHazardSensor situated in the shoreside MOOS community. The vehicle communicates with the shoreside community using pShare. The shoreside knows the location of all vehicles from node reports received from each vehicle running pNodeReporter. The uFldHazardMgr first initializes the sensor by sending a configuration request via UHZ_CONFIG_REQUEST. The hazard sensor acknowledges the configuration with a UHZ_CONFIG_ACK message. Thereafter the hazard manager may interact with the sensor by sending sensor requests with UHZ_SENSOR_REQUEST and periodically receiving reports of detections with UHZ_DETECTION_REPORT.
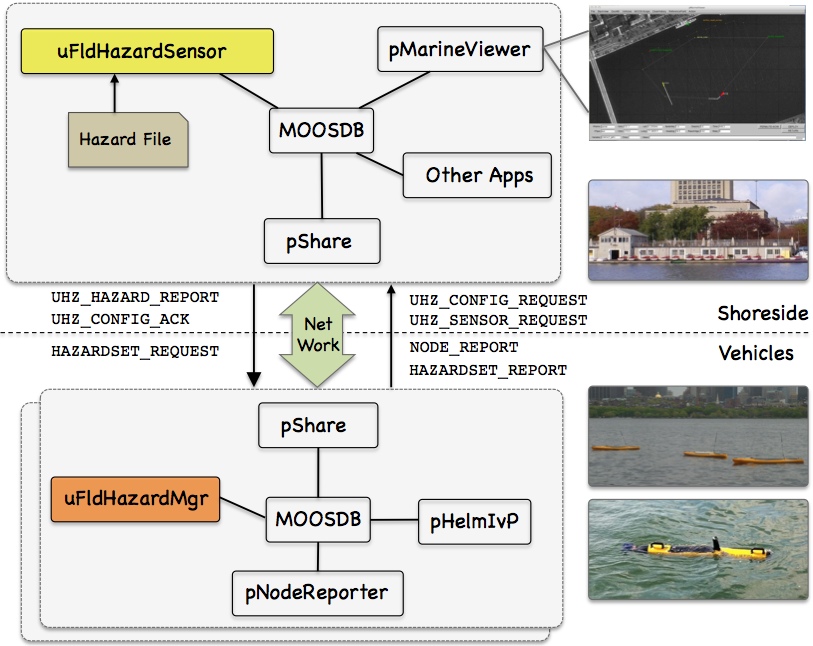
Figure 2.1: Typical uFldHazardMgr Topology: The simulator runs in a shoreside computer MOOS community and is configured with a hazard field containing both hazards and benign objects. Vehicles accessing the simulator send a steady stream of messages (UHZ_SENSOR_REQUEST) and node reports to the shoreside community. The simulator continuously checks the connected vehicle's position against objects in the hazard field, and the sensor settings. When/if an object comes into sensor range, the simulator rolls the dice and if a detection is made, will send a UHZ_DETECTION_REPORT message to the vehicle. The vehicle may periodically re-configure its sensor setting by posting to UHZ_CONFIG_REQUEST. If the configuration request is acceptable, the simulator will respond with a message to UHZ_CONFIG_ACK bridged back out to the vehicle.
The hazard manager maintains a history of reported detections and listens for requests, via the variable HAZARDSET_REQUEST, to generate a hazardset report. It will respond to the request by posting a hazardset report in the variable HAZARDSET_REPORT.
2.1 Required MOOS Variable Bridges [top]
Using uFldHazardMgr requires certain information flowing between the shoreside and vehicles communities as shown in Figure 2.1. The bridging is done by pShare, but the pShare configuration is handled dynamically using the uFldNodeBroker and uFldShoreBroker applications, we discuss here the necessary configuration entries for these two applications. From the vehicle to the shoreside, five variables need to be bridged. The below five lines should appear in the uFldNodeBroker configuration block on all vehicles.
   // Bridges from Vehicle to Shoreside - in uFldNodeBroker configuration

   bridge =  src=APPCAST
   bridge =  src=NODE_REPORT_LOCAL, alias=NODE_REPORT
   bridge =  src=UHZ_SENSOR_CONFIG
   bridge =  src=UHZ_SENSOR_REQUEST
   bridge =  src=HAZARDSET_REPORT
The first two lines above would likely already be present due to their use in other applications. The latter three variables are generated by uFldHazardMgr with the intended recipient being uFldHazardSensor on the shoreside. The latter variable, HAZARDSET_REPORT, constitutes the hazardset report generated by uFldHazardMgr. The above five lines may also be found in the vehicle configuration for the Jake Kasper example mission discussed in Section 7.
The below four lines should appear in the uFldShoreBroker configuration block in the shoreside MOOS community. See uFldShoreBroker documentation for a discussion on the syntax.
   // Bridges from Shoreside to Vehicle - in uFldShore Broker configuration

   bridge =  src=APPCAST_REQ
   bridge =  src=UHZ_CONFIG_ACK_$V,       alias=UHZ_CONFIG_ACK
   bridge =  src=UHZ_DETECTION_REPORT_$V, alias=UHZ_DETECTION_REPORT
   bridge =  src=HAZARDSET_REQUEST_$V,    alias=HAZARDSET_REQUEST
The first line deals with appcasting and would likely be present anyway due to its use in other applications as well. The second line allows sensor configuration acknowledgments to be sent to the vehicle (Section 2.5). The third line allows detection reports to be sent to the vehicle (Section 3). The last line allows an app running on the shoreside to bridge requests to the vehicle for a hazardset report. The above four lines may also be found in the shoreside configuration for the Jake Kasper example mission discussed in Section 7.
2.2 Configuration Parameters of uFldHazardMgr [top]
The following parameters are defined for uFldHazardMgr. A more detailed description is provided in other parts of this section. Parameters having default values are indicated so.
Listing 2.1 - Configuration Parameters for uFldHazardMgr.
| swath_width: | The desired sensor swath width. Legal values: the set of widths available to the sensor. The default is 25. If the requested swath width setting is not available, the result will be the closest setting available. 2.5. |
| pd: | The chosen probability of detection on the ROC curve determined by the sensor swath width. Legal values: the range [0,1]. The default is 0.9. Section 2.6. |
2.3 An Example MOOS Configuration Block [top]
To see an example MOOS configuration block, enter the following from the command-line:
$ uFldHazardMgr --example or -e
This will show the output shown in Listing 2.2 below.
Listing 2.2 - Example configuration of the uFldHazardMgr application.
[[#lst_uhma_econfig]]
   1  ===============================================================
   2  uFldHazardMgr Example MOOS Configuration
   3  ===============================================================
   4
   5  ProcessConfig = uFldHazardMgr
   6  {
   7    AppTick   = 4
   8    CommsTick = 4
   9
  10    swath_width = 25       // the default
  11    sensor_pd   = 0.9      // thd default
  12  }
2.4 Configuring the Swath Width [top]
Part of the initial responsibility of the hazard manager is to select the sensor settings. There are two primary settings, the swath_width and sensor_pd setting. The swath width refers to the width, stetching outward away from the sides of the vehicle. The selected width refers to the length on one side, so the total swath width is twice the swath_width setting.
Physical sensors are usually built with no more than a few swath width settings. These choices are known ahead of time. It is reasonable therefore to expect the configuration of uFldHazardMgr to reflect one of those choices. In our case, the available choices are the prevailing values configured of uFldHazardSensor. In the Jake example mission, the hazard sensor is configured to support sensor swath widths of 10, 25, and 50 meters. A sensor configuration request is made to the sensor by the hazard manager making a post to the UHZ_CONFIG_REQUEST variable similar to:
UHZ_CONFIG_REQUEST = "vname=archie,width=25,pd=0.85"
The request width sent by the hazard manager is set in the uFldHazardMgr configuration block: (See also Listing 2.2.)
swath_width = 25
The hazard sensor, once it has received the configuration request, posts a configuration acknowledgement, which is bridged back to the vehicle:
UHZ_CONFIG_ACK = "vname=archie,width=25,pd=0.85,pfa=0.53,pclass=0.91"
2.5 Configuring the Probability of Detection Setting [top]
The second component of setting the sensor is choosing a probability of detection setting. The PD is a number in the range of [0,1] and is accompanied by a corresponding probability of false alarm, PFA. The relationship between PD and PFA is determined by the ROC curve related to the chosen sensor swath. This relationship is described in the documentation for uFldHazardSensor.
3 Under the Hood - Interacting with the Hazard Sensor
After the initial configuration, the hazard manager interacts with the hazard sensor by posting sensor requests, and periodically receiving detection reports. These may look something like:
   UHZ_SENSOR_REQUEST   = "vname=archie"
   UHZ_DETECTION_REPORT = "x=-150.3,y=-117.5,label=12"
The request contains only the vehicle name. The hazard sensor is already receiving reports of the vehicle position, and has knowledge of the hazard field. So the sensor only needs to know that the vehicle indeed wishes to be sent detection reports.
Detection reports are only sent by the sensor when a detection is made. The simulated sensor does not send sensor images or data, but simulated results of sensor data, in the form of a declared detection. The simulated hazard sensor makes life a bit artificially easier by posting a detection label. This allows the user to make multiple passes over the same area and be sure that one hazard is not showing up as several hazards each with a slightly different location.
4 Under the Hood - Processing Data and Generating Reports
Hazardset reports are generated on-demand. First a request is received, immediately followed by the posting of a report. They may look similar to:
   HAZARDSET_REQUEST = "true"
   HAZARDSET_REPORT  = "source=archie#x=-151,y=-217.3,label=01#x=-178.8,y=-234,label=15#
                       x=-59.8,y=-294.1,label=13#x=-150.3,y=-117.5,label=12#
                       x=-14.2,y=-293.60001,label=08#x=-65.8,y=-125.2,label=10"
The content of the HAZARDSET_REQUEST does not matter to uFldHazardMgr. It will interpret this mail as a request to generate a report regardless of the request content.
The HAZARDSET_REPORT content consists of a series of packets separated by the '#' character. The first packet names the source of the report and the remaining packets each declare the presence of a hazardous object and its location and label. The format of the report is embodied in the class XYHazardSet in lib_ufld_hazards. The class is populated with the hazards and the string representation is produced by calling the getSpec() function on a class instance.
As mentioned previously, uFldHazardMgr is a strawman approach for compiling sensor results and generating reports. The algorithm used here is dead-simple and easily improved upon: any detection ever made will be reported as a hazard. There is no further consideration of follow-on passes over the same area, even if the lack of detection may indicate that a prior initial detection was likely to be a false alarm.
5 Publications and Subscriptions for uFldHazardMgr
The interface for uFldHazardMgr, in terms of publications and subscriptions, is described below. This same information may also be obtained from the terminal with:
$ uFldHazardMgr --interface or -i
5.1 Variables Published by uFldHazardMgr [top]
The primary output of uFldHazardMgr to the MOOSDB is the posting of requests for sensor information and the generation of hazardset reports.
- APPCAST: Contains an appcast report identical to the terminal output. Appcasts are posted only after an appcast request is received from an appcast viewing utility. Section 6
- HAZARDSET_REPORT: A hazardset report summarizing the hazard manager's present belief about location of hazards. Section 4.
- UHZ_CONFIG_REQUEST: A message sent to the hazard simulator requesting a particular sensor configuration. Sections 2.5 and 2.6.
- UHZ_SENSOR_REQUEST: A message sent to uFldHazardSensor to request sensor/detection results be sent to the uFldHazardMgr as they become available. Section 3.
5.2 Variables Subscribed for by uFldHazardMgr [top]
The uFldHazardMgr application will subscribe for the following four MOOS variables:
- APPCAST_REQ: A request to generate and post a new apppcast report, with reporting criteria, and expiration.
- HAZARDSET_REQUEST: A request asking uFldHazardMgr to produce immediately a hazardset report. Section 4.
- UHZ_DETECTION_REPORT: A report sent by the uFldHazardSensor indicating the detection of a hazardous object and its location. Section 3.
- UHZ_CONFIG_ACK: A message sent by uFldHazardSensor confirming the requested sensor configuration information. Sections 2.5 and 2.6.
Command Line Usage of uFldHazardMgr [top]
The uFldHazardMgr application is typically launched as a part of a batch of processes by pAntler, but may also be launched from the command line by the user. To see command-line options enter the following from the command-line:
$ uFldHazardMgr --help or -h
This will show the output shown in Listing 5.1 below.
Listing 5.1 - Command line usage for uFldHazardMgr.
[[#lst_uhma_usage]]
   1  ==========================================================
   2  Usage: uFldHazardMgr file.moos [OPTIONS]
   3  ==========================================================
   4
   5  Options:
   6    --alias=<ProcessName>
   7        Launch uFldHazardMgr with the given process name.
   8    --example, -e
   9        Display example MOOS configuration block.
  10    --help, -h
  11        Display this help message.
  12    --interface, -i
  13        Display MOOS publications and subscriptions.
  14    --version,-v
  15        Display release version of uFldHazardMgr.
6 Terminal and AppCast Output
The uFldHazardMgr application produces some useful information to the terminal and identical content through appcasting. An example is shown in Listing 6.1 below. On line 2, the name of the local community or vehicle name is listed on the left. On the right, "0/0(1414) indicates there are no configuration or run warnings, and the current iteration of uFldHazardMgr is 1414. Lines 4-13 convey the requested and prevailing sensor configuration settings.
Listing 6.1 - Example uFldHazardMgr console output.
[[#lst_uhma_appcast]]
   1  ===================================================================
   2  uFldHazardMgr archie                                      0/0(1414)
   3  ===================================================================
   4  Config Requested:
   5      swath_width_desired: 38
   6               pd_desired: 0.86
   7     config requests sent: 118
   8                    acked: 1
   9  ------------------------
  10  Config Result:
  11         config confirmed: true
  12      swath_width_granted: 50
  13               pd_granted: 0.86
  14
  15  --------------------------------------------
  16
  17                 sensor requests: 2003
  18               detection reports: 7
  19
  20     Hazardset Reports Requested: 1
  21        Hazardset Reports Posted: 1
  22
  23  ===================================================================
  24  Most Recent Events (7):
  25  ===================================================================
  26  [1046.43]: New Detection, label=08, x=-14.2, y=-293.6
  27  [935.39]: New Detection, label=08, x=-14.2, y=-293.6
  28  [928.03]: New Detection, label=13, x=-59.8, y=-294.1
  29  [799.39]: New Detection, label=12, x=-150.3, y=-117.5
  30  [700.65]: New Detection, label=13, x=-59.8, y=-294.1
  31  1[525.17]: New Detection, label=15, x=-178.8, y=-234.0
  32  [522.15]: New Detection, label=01, x=-151.0, y=-217.3
Lines 17 shows the number of sensor requests sent to the hazard sensor. This message is sent continuously so it is not surprising to be high. Line 18 shows the number of detection reports received. Lines 20-21 show the number of time a hazardset report has been requested and posted. The events in lines 23-32 are typically only contain the arrival of a new detections from the sensor simulator.
7 The Jake Kasper Example Mission Using uFldHazardMgr
The Jake Kasper mission is distributed with the MOOS-IvP source code and contains a ready example of the uFldHazardMgr application, configured with hazard field in an included text file. Assuming the reader has downloaded the source code available at www.moos-ivp.org and built the code according to the documentation, the Jake Kasper mission may be launched by:
  $ cd moos-ivp/ivp/missions-2680/lab_10_jake_kasper_baseline
  $ ./launch.sh 10
The argument, 10, in the line above will launch the simulation in 10x real time. Once this launches, the pMarineViewer GUI application should launch and the mission may be initiated by hitting the DEPLOY button.
Document Maintained by: mikerb@mit.edu
Page built from LaTeX source using texwiki, developed at MIT. Errata to issues@moos-ivp.org. Get PDF