Help with Mac OS X
Adding a User
Installing XCode
Installing MacPorts
Find the Command Line
Help with Emacs
Getting Emacs (Mac/Linux)
Survival Emacs
Configure Emacs
Emacs Tricks
MOOS Mode for Emacs
Help with SSH, SSH-Keys, SCP
SSH Keys
Help with Command Line
Terminal Survival Basics
Making and Removing Things
Moving and Copying Files
Augment Your Shell Path
Customize Your Shell
Command Line Aliases
Using Interactive Mode
Tar Files
Help with Git
Starting with Git
The git log Command
The git move Command
The git clone Command
The git status Command
The git pull Command
The git add, rm Commands
The git commit Command
Help with Subversion
Starting with SVN
The svn checkout Command
The svn info, log Commands
The svn update Command
The svn status Command
The svn add, rm Commands
The svn mv Command
The svn commit Command
Set Up Your Own Repository
Help with LaTeX
Starting with LaTex
LaTex Starter Examples
Help with Course Software
Dowload Course Software
Run the Course Software
Launching the MOOSDB
Scoping the MOOSDB
Poking the MOOSDB
Launching MOOS w/ pAntler
Scripted MOOS Pokes
The MOOSApp Class
MOOS-IvP Message Parsing
MOOS-IvP String Utils
MOOS-IvP String Parse Utils
Behavior Utility Functions
2.680 Lab Submissions
Help Topic: Setting up Your Own SVN Repository
Maintained by: mikerb@mit.edu  Get PDF
Setting Up Your Own SVN Repository
At some point soon you'll need your own repository. This is most obvious when you begin to collaborate with labmates on projects. But it's also very useful to have even if it's just for yourself. Having your own repo lets you:

- back up your code in case your computer is damaged or stolen,
- revert to previous versions if need be,
- work on a project over multiple computers,
- checkout your bench developed code onto a robot.
So far the repositories in our examples have resided on the MIT oceanai server. For example, the moos-ivp and moos-ivp-extend trees. While you have read access to these, you do not have write access and do not have access for making your own repo. That's the focus here.
Online Subversion Hosting Services [top]
Online Subversion hosting services allow you to: set up a user account, upload an initial repository, and begin using their servers to access and develop your repository with other developers. MIT has some services in this regard connected to Athena and in CSAIL. But as far as I can tell, this seem to have grown underutilized and less supported. Perhaps because there are several online services that do the same thing, often for free.
A quick Google search on "subversion hosting services" turns up several options, and by adding the word "comparison", you can find several pages that compare features and costs across providers. Two I found were:
http://www.svnhostingcomparison.com
After weighing some options, the CloudForge service looked good based on cost (free) and features. So we'll describe next how to set up your very own repo, using that service as an example. But really you should weigh the options applying your own criteria.
Setting up an account on the CloudForge service [top]
The CloudForge service can be found here:
To get started, click on the orange "Pricing, Plans, Signup" button.

Figure 1.1: The initial homepage screen of CloudForge.com.
Choose one of the two more reasonable starter options (I chose the $0 option):

Figure 1.2: CloudForge service plan options
Fill in your contact information to setup and create your account. After you click the Create button, wait a minute or so and you should see something similar to:
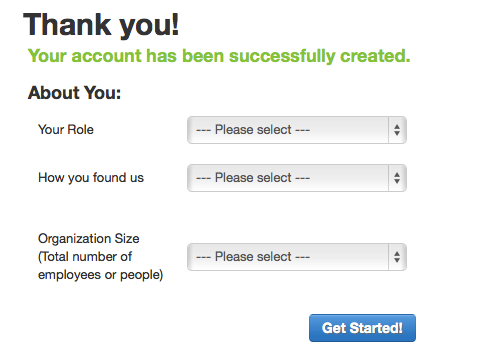
Figure 1.3: What your CloudForge window looks like after setup is completed. (Screen shot is from ~2018. It may be a bit different in 2020)
Answer the few little questions, if you like, hit the Get Started button.
Create a project using CloudForge [top]
Once you have set up your account you should see a set of options for creating a new project:
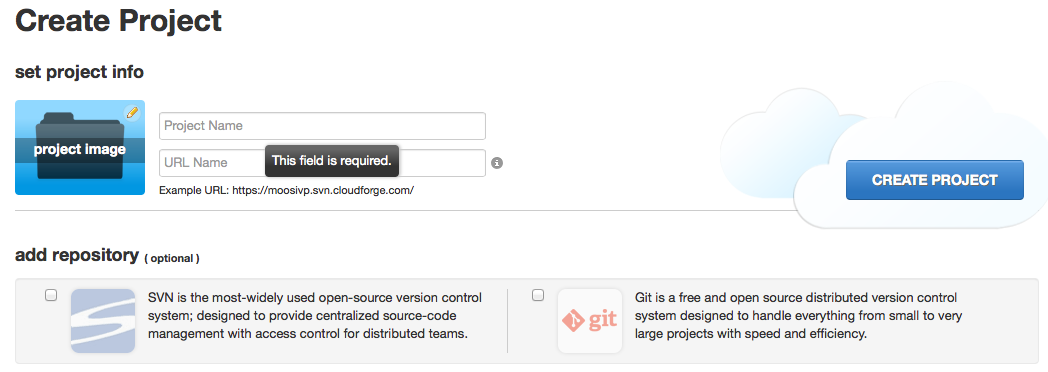
Figure 1.4: Options for creating a new project on CloudForge. (Screen shot is from ~2018. It may be a bit different in 2020)
There are three things to do here:
- Choose a project name in the field Project Name. I interpret this as choosing a repository name. I expect to have several of them under my account. If you're a team of say two lab partners who expect to work on several labs, you may want to create a separate project for each lab if the code is distinct.
- If you'd like your project to have an image/icon, click on the project image blue folder in the top left and it will let you upload an image from your computer.
- Add repository. Here you will click SVN (you of course can go the git route if you know and like git). Once you do this it will ask you whether you want a "Blank Repository" or "Best Practice" repository. If you're starting from scratch, choose "Best Practice". If you have an existing tree structure already with a best practice layout, and you'll just be moving that into the new repository, then choose "Blank Repository".
Then click the blue "Create Project" button to the right. After a moment you'll come to a project screen. On the right you'll see a pane entitled "Quick URLs":
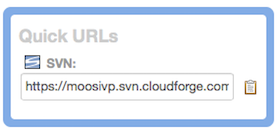
Figure 1.5: Where to find the URL of your newly created repository. (Screen shot is from ~2018. It may be a bit different in 2020)
Copy the URL on to the command line and check out a local copy of your new repository:
$ svn co <your-new-url>
If you created your CloudForge account with a different username than the one on your local machine, then pass your username on the command line like this:
$ svn --username me_on_cloudforge co <your-new-url>
After this you should be free to add to, commit to and otherwise develop your repository as you see fit with all the svn tools in your toolbox.
Document Maintained by: mikerb@mit.edu
Page built from LaTeX source using texwiki, developed at MIT. Errata to issues@moos-ivp.org. Get PDF