Help with Mac OS X
Adding a User
Installing XCode
Installing MacPorts
Find the Command Line
Help with Emacs
Getting Emacs (Mac/Linux)
Survival Emacs
Configure Emacs
Emacs Tricks
MOOS Mode for Emacs
Help with SSH, SSH-Keys, SCP
SSH Keys
Help with Command Line
Terminal Survival Basics
Making and Removing Things
Moving and Copying Files
Augment Your Shell Path
Customize Your Shell
Command Line Aliases
Using Interactive Mode
Tar Files
Help with Git
Starting with Git
The git log Command
The git move Command
The git clone Command
The git status Command
The git pull Command
The git add, rm Commands
The git commit Command
Help with Subversion
Starting with SVN
The svn checkout Command
The svn info, log Commands
The svn update Command
The svn status Command
The svn add, rm Commands
The svn mv Command
The svn commit Command
Set Up Your Own Repository
Help with LaTeX
Starting with LaTex
LaTex Starter Examples
Help with Course Software
Dowload Course Software
Run the Course Software
Launching the MOOSDB
Scoping the MOOSDB
Poking the MOOSDB
Launching MOOS w/ pAntler
Scripted MOOS Pokes
The MOOSApp Class
MOOS-IvP Message Parsing
MOOS-IvP String Utils
MOOS-IvP String Parse Utils
Behavior Utility Functions
2.680 Lab Submissions
Help Topic: Scoping the MOOSDB
Maintained by: mikerb@mit.edu  Get PDF
Scoping the MOOSDB
A MOOS scope is a tool for examining the state of the MOOSDB. The MOOSDB does not keep a history of prior values for a given variable, but rather just the most recent value posted. This means that the state of the MOOSDB may be regarded as the set of current MOOS variables, their values, and who made the last posting to the variable and when. Scoping allows a view into the current state (or even recent history) of the MOOSDB. There are multiple tools for scoping the DB, each providing conveniences of one kind or another. Here we describe the uXMS, uMS, and pRealm tools, the three favorites of our own lab.

More info on these two tools can be found at:
You can also navigate to the above two web pages by launching the app with the --web or -w option.
   $ uXMS --web
   $ pRealm -w
Most MOOS-IvP distributed apps support this command-line option.
Scoping the MOOSDB with uXMS [top]
Your goals in this part are:
- Open a terminal window and launch the MOOSDB as done at the end of the previous exercise:
 $ MOOSDB
 ------------------- MOOSDB V10 -------------------
 Hosting  community                "#1"
 Name look up is                   off
 Asynchronous support is           on
 Connect to this server on port    9000
 --------------------------------------------------
 network performance data published on localhost:9020
 listen with "nc -u -lk 9020"
The MOOSDB is normally launched with a mission file specifying the ServerHost and ServerPort parameters. When launched from the command line as above with no command line arguments, these two parameters default to localhost and 9000.
- Open a second terminal window and launch uXMS, passing it the --all command line switch. Just hit ENTER when prompted for the IP address and Port number, accepting the defaults of localhost and 9000. It should look something like:
 $ uXMS --all
 Enter IP address:  [localhost]
 Enter Port number: [9000]
 ***************************************************
 *  uXMS_632 starting ...
 ***************************************************
 uXMS_632 is Running:
 |-Baseline AppTick   @ 5.0 Hz
 |--Comms is Full Duplex and Asynchronous
 -Iterate Mode 0 :
 |-Regular iterate and message delivery at 5 Hz
After the above initial standard MOOSApp output, you should see a sequence of uXMS reports similar to:
 ==============================================================
 uXMS_443                                               0/0(31)
 ==============================================================
 VarName            (S)  (T)  (C)  VarValue (SCOPING:EVENTS)
 -----------------  ---  ---  ---  -------------------------
 DB_CLIENTS                        "uXMS_443,"
 DB_EVENT                          "connected=uXMS_443"
 DB_QOS                            "uXMS_443=0.448942:0.573874:0.364065:0.490189,"
 DB_TIME                           1424028179.877422
 DB_UPTIME                         16.741557
 UXMS_443_ITER_GAP                 1.019045
 UXMS_443_ITER_LEN                 0.00024
 -- displaying all variables --
Notice the number in parentheses on the second line is incrementing. This indicates that the report has been refreshed to your terminal. If you launched as above, the scope should come up in a mode that refreshes the report any time a scoped variable changes values. In this case, the MOOSDB is updating DB_TIME and DB_UPTIME about once per second. By default, uXMS only scopes on the variables named on the command line. In the above case, the --all option was used to tell uXMS to scope on all variables known to the MOOSDB.
The five variables shown beginning with DB_ are all published by the MOOSDB. The user may choose whether or not to show the variable (S)ource, (T)ime of post, or (C)ommunity from where the post was made. A key feature of uXMS vs. uMS is the ability to specify on the command-line exactly which subset of variables to scope, possibly with color-coding. This is helpful when there are hundreds of variables in the DB.
More Suggested Tinkering with uXMS [top]
Try a few other things:
- Hit the 'h' key to see some keyboard interaction options that are available anytime the scope is running. Hit 'h' again any time to return to the previous mode.
- Hit the space-bar to pause the stream of reports. This is useful if numbers are changing rapidly and you just need to take a close look at something. Return to the previous mode by hitting 'e'.
- Hit the 's' key to expand the (S)ource column. This column tells you which app made the last posting. Try the same for the (T)ime and (C)ommunity columns.
- The whole purpose of a scope is to give you the key information you're looking for, without needing to sift through a lot of unwanted information, with as little effort as possible. In this step we'll pretend to be interested in focusing our attention on the DB_UPTIME variable. Try launching uXMS with an additional command line argument:
$ uXMS --all --colormap=DB_UPTIME,blue
This may seem unnecessary when there are only three variables, but in real applications there may be hundreds of variables. In fact, the variable you're looking for may have scrolled off the window!
- A similar way to focus on a single variable is to only scope on the one variable we're looking for:
$ uXMS DB_UPTIME
- uXMS only shows you the current snapshot of the variables in the MOOSDB. What if you would like to see how a variable is changing? In our case, we know how the DB_UPTIME variable is changing, but for the sake of showing this feature, try:
$ uXMS --history=DB_UPTIME
Scoping with uMS [top]
The uMS scope is a graphical MOOS scope, often preferred by those inclined to like GUIs vs. command line tools. It has some other advantages over uXMS as well.
Your goals in this part are:
- If you don't still have a MOOSDB running, open a terminal window and launch the MOOSDB as done previously:
$ MOOSDB
- Open a second terminal window and launch uMS, passing it the same mission file as an argument:
$ uMS
You should see a window open and, after clicking on the Connect button, you should see something similar to:
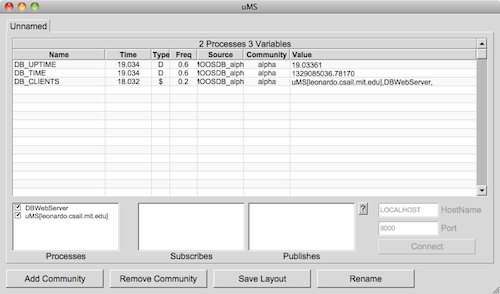
Figure 1.1: The uMS MOOS Scope
Pros/Cons of uXMS vs uMS [top]
The choice of uXMS vs uMS is often just a matter of taste. A couple of differences are noteworthy however.
- uMS allows for connections to multiple MOOSDBs, on perhaps multiple vehicles, simultaneously. The user may select the vehicle with the tab at the top of the screen.
- uXMS allows the user to scope on as few as one single variable, or to name the variable scope list explicitly. uMS scopes on all variables all the time, with a few mechanisms for reducing the scope list based on process name.
- uXMS may be a better choice if one is scoping on a remote MOOSDB, perhaps on a robot with a poor connection. It is a low-bandwidth client compared to uMS. If running on a remote terminal, its bandwidth back to the user is zero in the paused mode.
- uXMS has provisions for at least limited scoping on a variable history.
- uXMS will display a variable's "auxiliary source" information. This is a secondary field associated with each posting describing the source of the posting. This is key when using the IvPHelm. Variables posted by helm behaviors will have a source of pHelmIvP and an auxiliary source showing the behavior responsible for the posting.
Scoping with pRealm [top]
Realmcasting is a feature first introduced in 2021. It complements Appcasting, which is the default set of windows open to the left of the GUI when running pMarineViewer in say the Alpha mission. If you are running a mission with pMarineViewer, it may be the only scoping tool you need. You can scope on selected vehicle (MOOS community), and selected app, as shown in Figure 1.2.
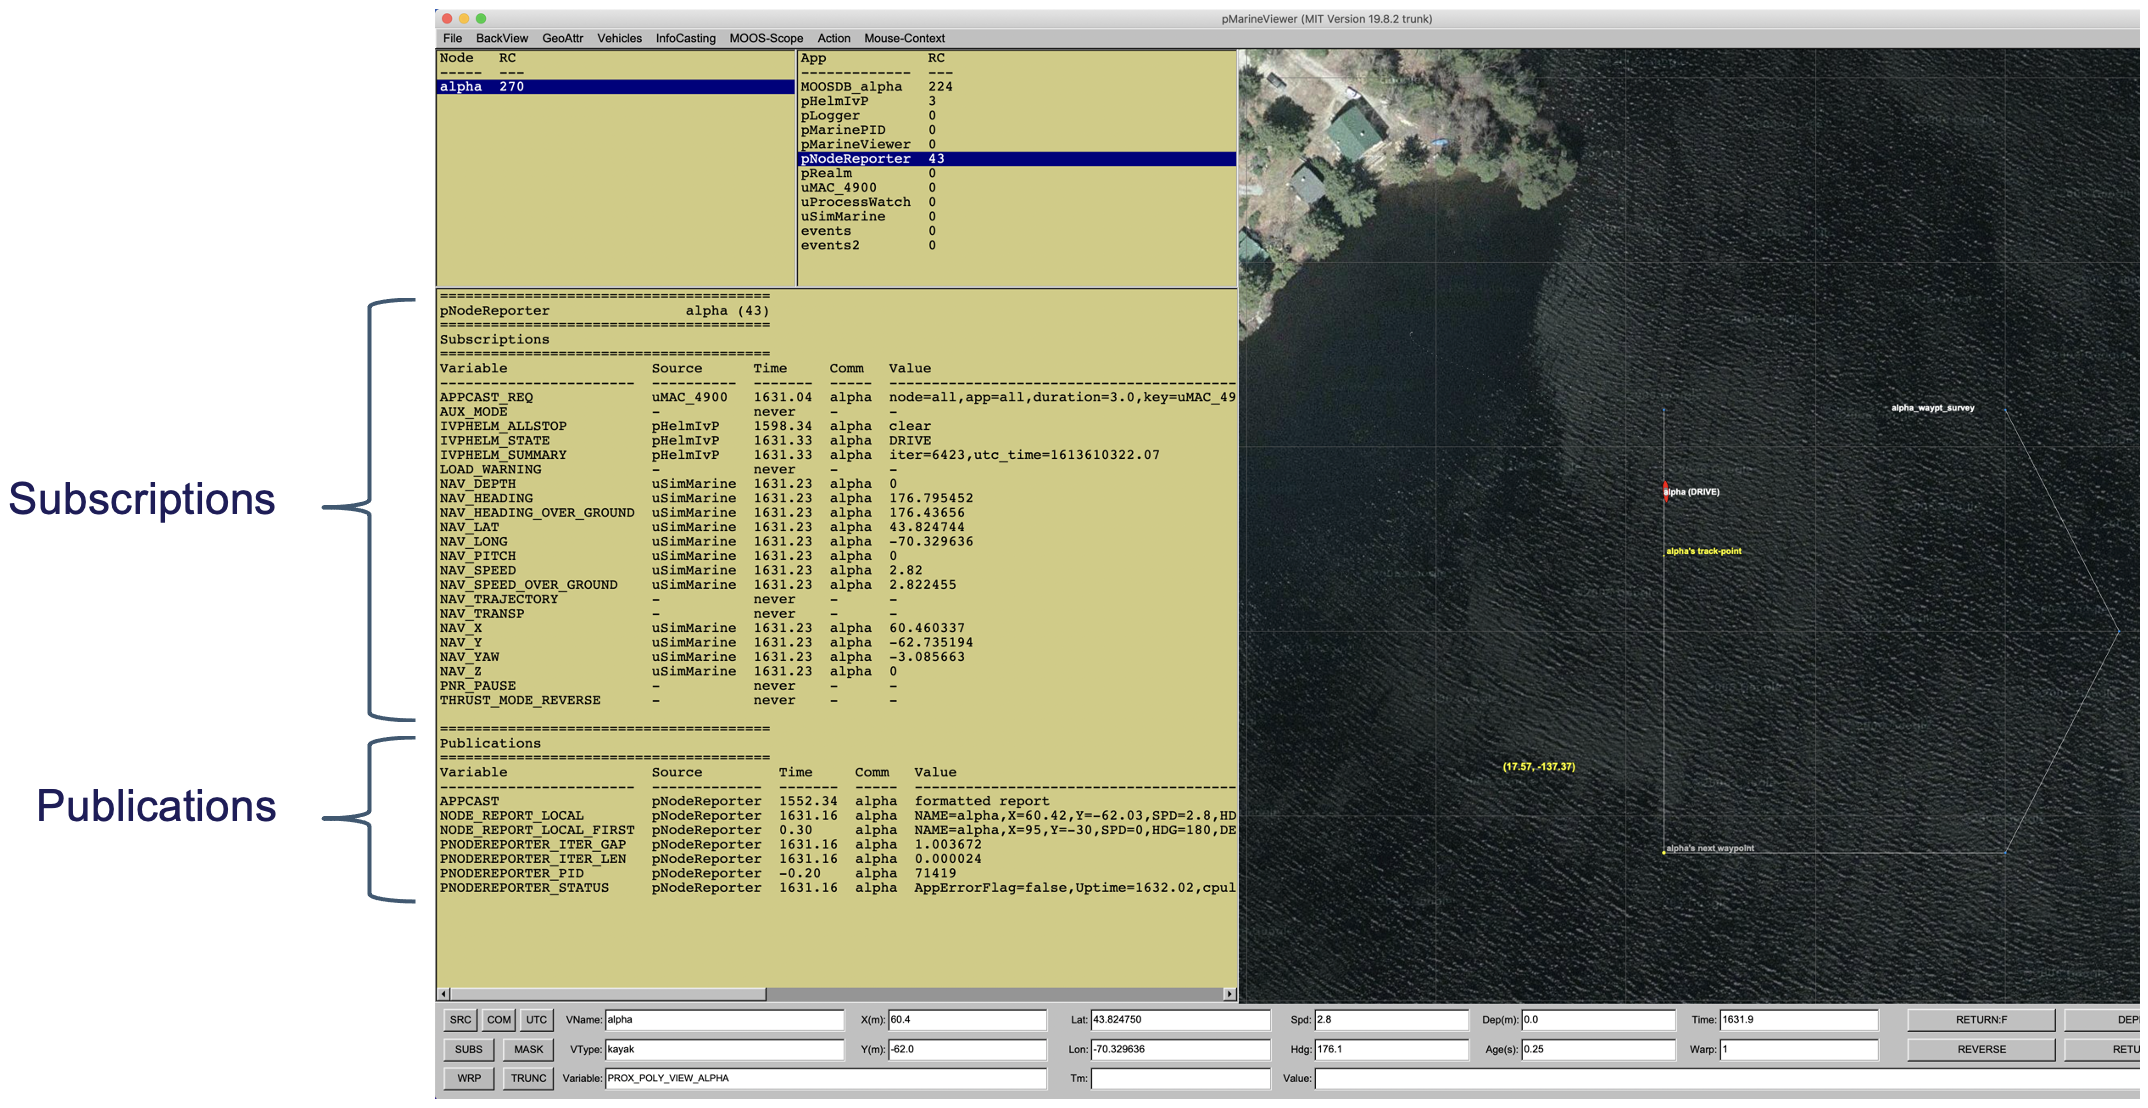
Figure 1.2: The RealmCasting interface in pMarineViewer is the lefthand side of the GUI comprising the three panels shown. Toggling between AppCasting and RealmCasting is done with the 'a' key.
The realmcasting pane on the lower-left is the primary output. It is split into two parts. On the top is a scope on all variables subscribed for by the selected application. The bottom half is a scope on all variables published by the application.
If you are running pMarineViewer and do not see any content in this window, it is most likely due to the omission of running pRealm in both the shoreside and vehicle communities. It is enabled by default in the Alpha mission. Most other example missions also have realmcasting enabled.
Document Maintained by: mikerb@mit.edu
Page built from LaTeX source using texwiki, developed at MIT. Errata to issues@moos-ivp.org. Get PDF