Docker Lab 4 - Running the uField Alpha Mission on a Containerized Helm
Maintained by: mikerb@mit.edu  Get PDF
1 Overview and Objectives
2 The uField Alpha Mission
2.1 The Alpha Mission
2.2 The uField Alpha Mission
3 Overview of the Container-Host uField Alpha Mission
4 The MOOS-IvP Docker Image
5 Running the Containerized uField Alpha Mission
5.1 First a Word about Ports
5.2 Launching the uFleld Alpha Mission in Two Steps
5.2.1 Launching the Shoreside
5.2.2 Launching the Vehicle
5.3 Launching the Vehicle with an Entry Script
5.3.1 Create the entrypoint.sh Script
5.3.2 Augment the moos-ivp Dockerfile
5.3.3 Launching the uField Alpha Mission in One Step
5.4 Passing Arguments to the Entry Script Upon Launch
5.4.1 Passing Arguments During the Docker Run Command
5.4.2 Modifying the Entry Script to Handle Arguments
5.4.3 Preparing the Vehicle Launch Script
5.4.4 An Additional Word on Passing Environment Variables
1 Overview and Objectives
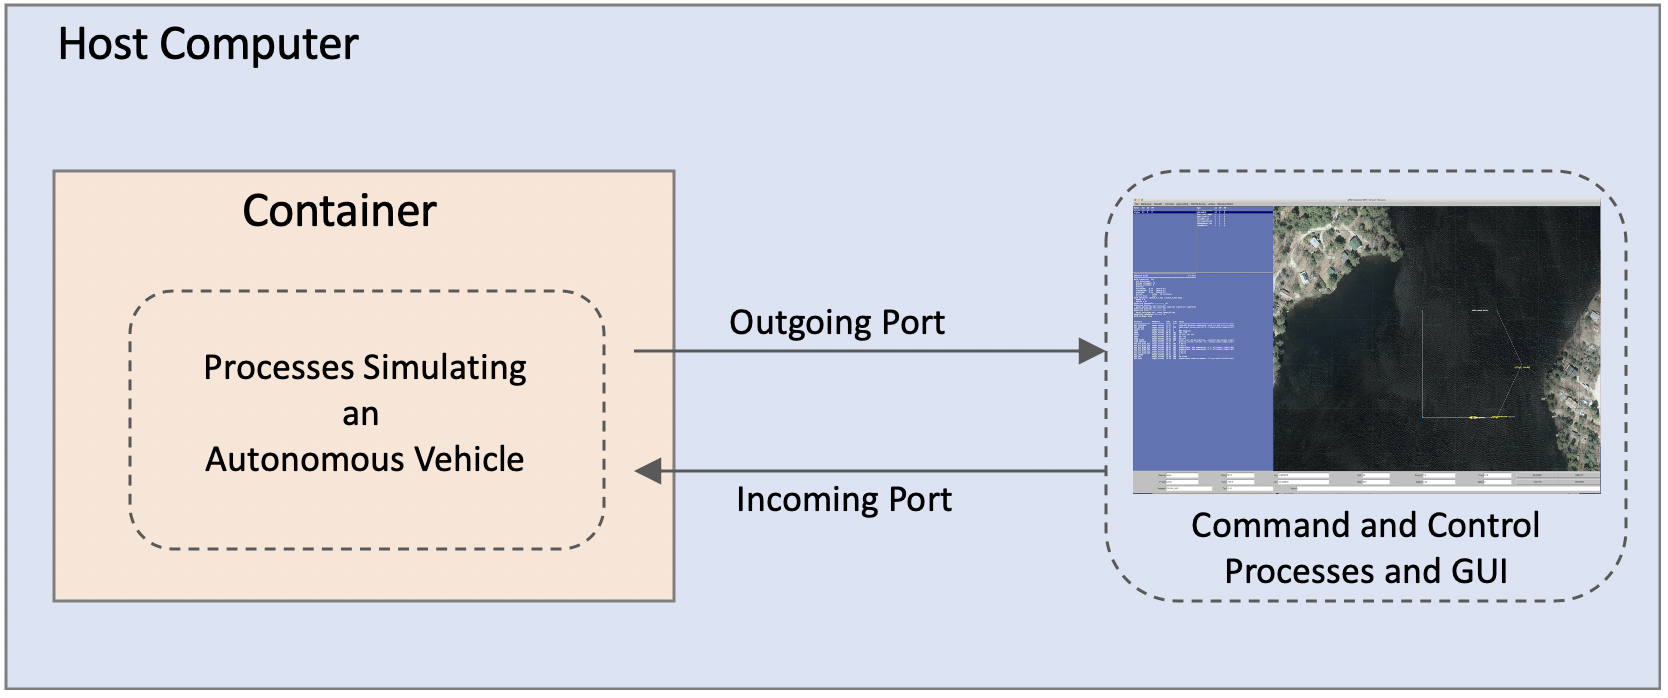
In this lab we will continue working with Ubuntu containers built from our custom Docker files. Our goal of this lab is to build a Ubuntu container with the MOOS-IvP autonomy system installed and built. We will run a simple simulated vehicle on the container, while connecting the simulated vehicle on the container to a command and control interface running in the operating system of computer hosting the container.


Figure 1.1: The uField Alpha mission will be run with the simulated vehicle and autonomy components running in a Ubuntu container, and the command and control components running on the OS of the computer hosting the container.


This lab assumes some familiarity with MOOS-IvP and the uField Toolbox, but this will be reviewed in the first section. A Dockerfile for creating a Ubuntu/MOOS-IvP image will then be provided, to enable our target simulation. Along the way a couple further capabilities of Dockerfiles will be discussed. The last step of the lab is to run the simulation depicted in Figure 1.1. To summarize, our focus for this lab is:

- Overview of the uField Alpha Mission
- Overview of the Container-Host version of the uField Alpha Mission
- A Dockerfile for creating the Containerized MOOS-IvP Helm
- Running the uField Alpha Mission using our container
- Passing arguments to the mission at Docker Run time.


2 The uField Alpha Mission
The uField Alpha Mission is a version of the Alpha mission, extended to be run over two computers. One computer serves as command-and-control, while the other represents the autonomous vehicle. In this section we briefly review the Alpha mission and the uField Alpha mission.

2.1 The Alpha Mission [top]
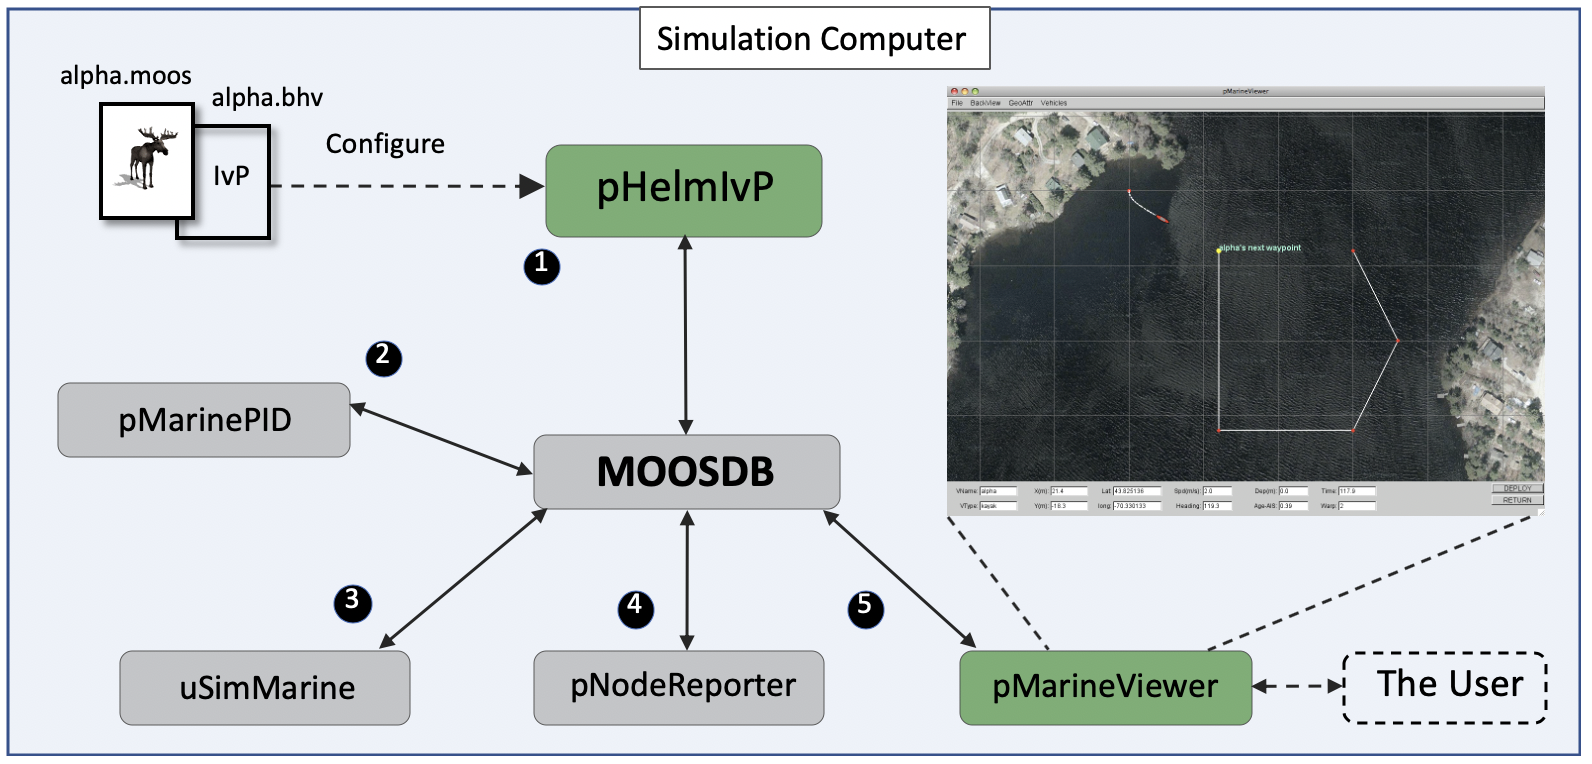
The Alpha mission is a simple one-vehicle mission configured to be simulated on a single computer with minimal complexity. This serves as a Hello World style first mission to launch when MOOS-IvP is first downloaded. In this mission, the vehicle starts at position (0,0) in local coordinates and traverses to a set of five waypoints comprising a home-plate pattern. The simulation consists of five core MOOS applications, plus the MOOSDB process handling inter-application communications. For those with some AI background and familiar with the notion of a Sense-Plan-Act loop, these components can be seen in this set of apps. (1) The helm notes current vehicle position compared to the next waypoint and publishes a desired vehicle heading and speed. (2) The PID controller notes the desired heading and speed and the current rudder and thrust and produces an adjusted rudder and thrust. (3) The vehicle simulator notes the vehicle's current position, heading and speed, and the new rudder and thrust values, and produces an updated vehicle position, heading and speed. (4) The node reporter gathers all the vehicle state information and makes it available back to the Helm to enable the next helm decision, but also makes it available to the marine viewer GUI which graphically updates the situation to the user.


Figure 2.1: The Alpha Mission is a simple one-vehicle mission coupled with a simple command-and-control interface. This mission is comprised of a handful of MOOS apps, including the IvP Helm which provides the vehicle autonomy. It is routinely used as the Hello World initial mission in MOOS-IvP documentation and labs. It runs out-of-the-box with any MOOS-IvP initial download.

Here is a bit of what the Alpha mission should look like:

Figure 2.2: The Alpha mission. video:(0:19): https://vimeo.com/84549446


2.2 The uField Alpha Mission [top]
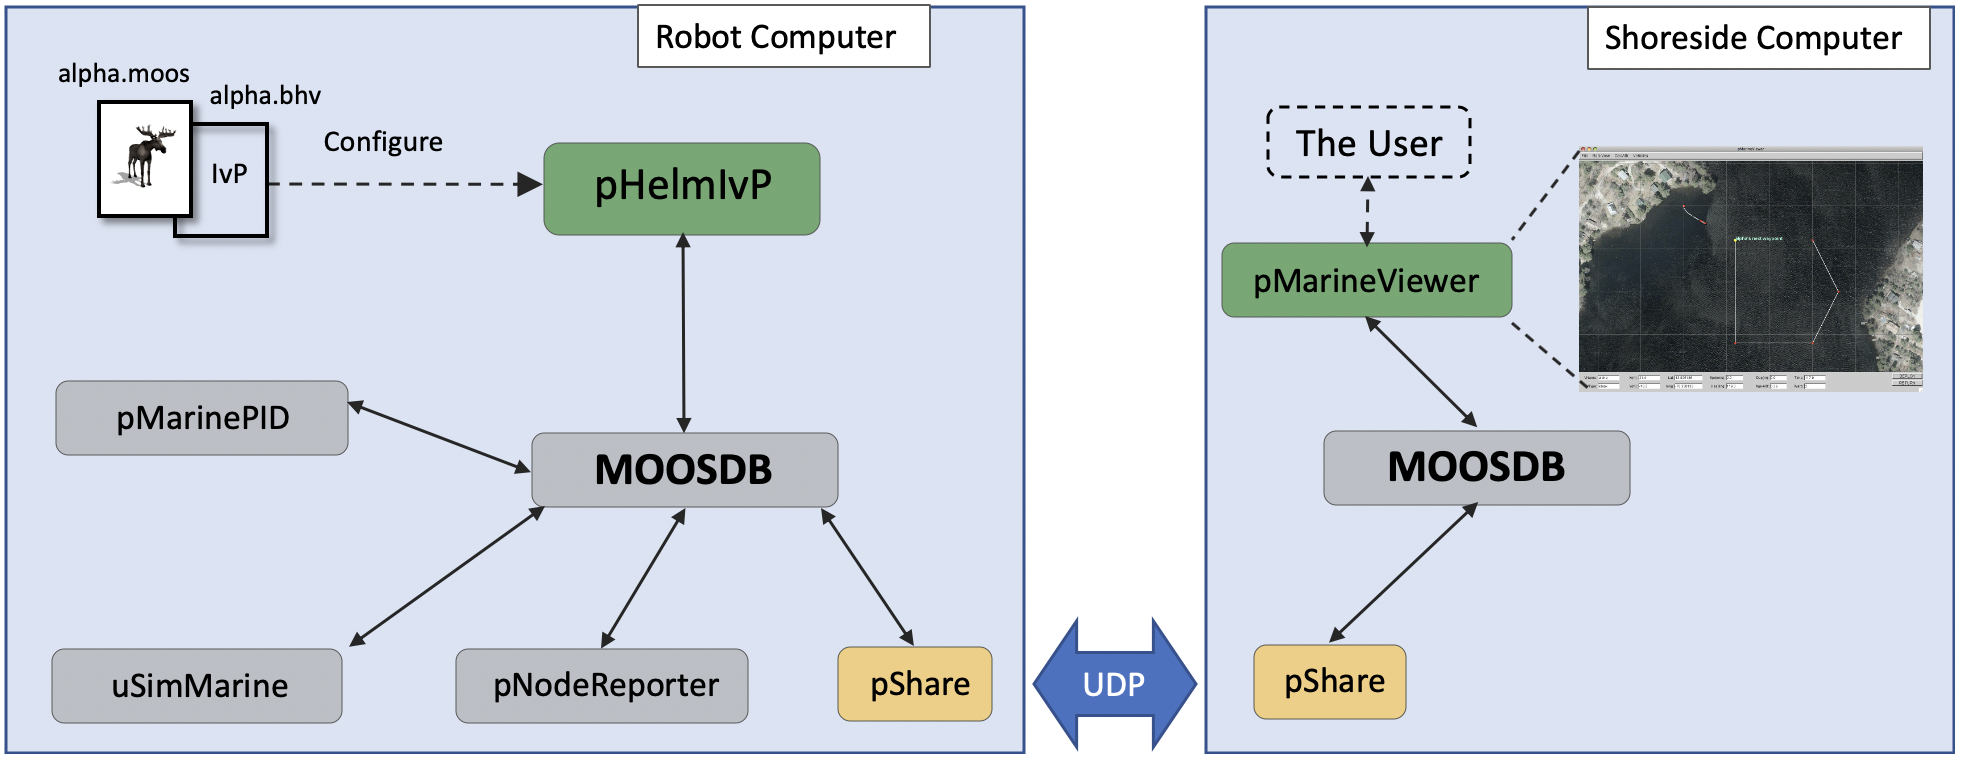
The uField Alpha mission is a variant of the Alpha mission with two distinct clusters of applications (or MOOS communities. The command-and-control community runs on a separate computer from the autonomous vehicle community, as it would obviously need to be on a fielded robotic system. Communication over a UDP link is relatively low bandwidth, consisting of status updates and commands to the field from the user. The pShare MOOS app is the additional application that runs in this scenario, with each community running an instance and configured to share the desired information from its community to a target community. The pShare apps are only ever configured to push information to the receiver.


Figure 2.3: The uField Alpha Mission: Like the Alpha mission, this is a simple one-vehicle mission coupled with a simple command-and-control interface. In the uField variant, the vehicle simulation and the command-and-control components are separated into two distinct clusters of applications. Information flows over two UDP ports. While both clusters can run on the same OS, they can be run on distinct machines on the network. This mission is a first-look at how vehicles running MOOS-IvP in the field are connected to remote command-and-control stations.


This mission is also distributed with the MOOS-IvP public codebase and can be found in missions folder shown below. Both communities can be run on a single computer and this is worth doing as a sanity check. You will need two separate console windows.

In the first console window, launch the shoreside community:


 $ cd moos-ivp/ivp/missions/ufld_alpha
 $ ./launch_shoreside.sh


The pMarineViewer app should appear, with no vehicle yet. Now launch the vehicle in the second console window:


 $ cd moos-ivp/ivp/missions/ufld_alpha
 $ ./launch_vehicle.sh


Both terminals remain interactive with the user, running the uMAC interface. This mission could be launched from a single console by starting the shoreside community in non-interactive mode:


 $ cd moos-ivp/ivp/missions/ufld_alpha
 $ ./launch_shoreside.sh -a [=&=]
 $ ./launch_vehicle.sh


Although both communities can be run on the same machine, the uField Alpha mission is more interesting when it is split between two machines. Try the following if you have access to two machines on the network with MOOS-IvP installed. In our example, the two IP addresses are:


   Machine One: 192.168.7.9
   Machine Two: 192.168.7.10


On Machine One:


 $ cd moos-ivp/ivp/missions/ufld_alpha
 $ ./launch_shoreside.sh --ip=192.168.7.9


And on Machine Two:


 $ cd moos-ivp/ivp/missions/ufld_alpha
 $ ./launch_vehicle.sh --shore=192.168.7.9 --ip=192.168.7.10


3 Overview of the Container-Host uField Alpha Mission
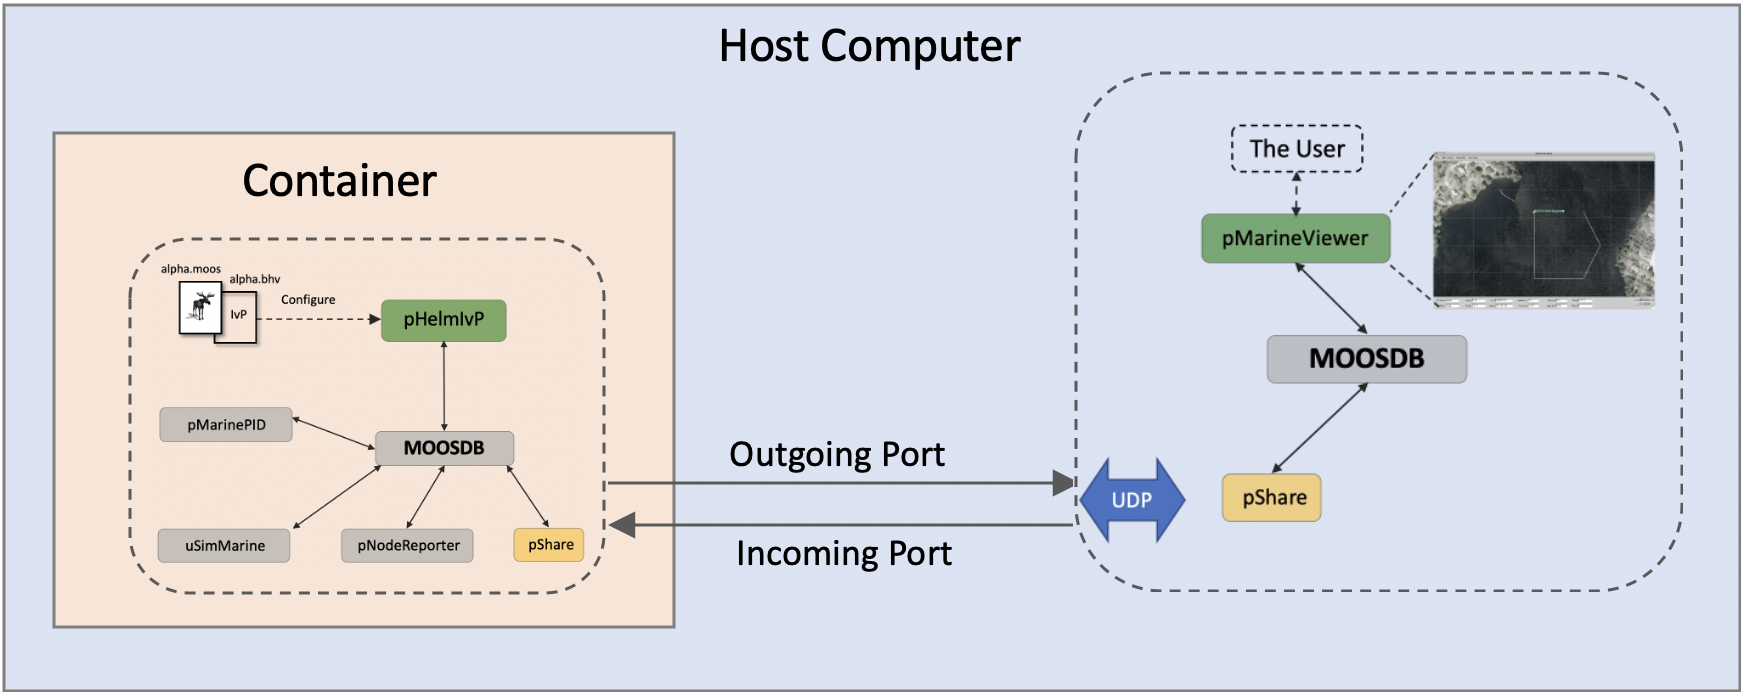
The next goal is to run the uField Alpha mission, with the simulated vehicle running in a container on the host machine. The outline of Figure 1.1 is expanded a bit in Figure 3.1 below:


Figure 3.1: The uField Alpha mission will be run with the simulated vehicle and autonomy components running in a Ubuntu container, and the command and control components running on the OS of the computer hosting the container.


Our remaining steps, in the next sections, are:

- Build a Docker image with MOOS-IvP installed and built, to serve as our simulated vehicle in a running container.
- Launch the simulated vehicle from the command line within the container, and launch the shoreside GUI on the host computer and verify that the mission works.
- Configure the container such that when it is created, the mission is automatically started and waiting for a shoreside connection.

The last step is key. It is in the spirit of using containers that are ephemeral entities that simply need to be started and stopped with no interactive shell session required.

4 The MOOS-IvP Docker Image
To run the simulated vehicle in a container, we will create a bare-bones moos-ivp image based on a Ubuntu image with the following parts:

- Based on Ubuntu 20.04
- Augment the shell path for using the MOOS-IvP apps required for the simulation
- Add a new and default "moos" user account
- Add the required packages for building C++ software
- Download the MOOS-IvP public codebase
- Build the MOOS-IvP codebase


Note this image, or essentially the same image, can currently be found on DockerHub in a couple locations


You can either run:


   $ docker pull mikerbenj/moos-ivp
   $ docker pull herocc/moos-ivp


Or you can past the below into your own local Dockerfile and build the image on your machine.

Below is the Dockerfile for this image used for the uField Alpha Mission.


  1 FROM ubuntu:20.04
  2 LABEL maintainer = Mike Benjamin <mikerb@mit.edu>
  3
  4 # Set the default shell to bash
  5 SHELL ["/bin/bash", "-c"]
  6
  7 # Add MOOS variables to the env
  8 ENV PATH="/home/moos/moos-ivp/bin:${PATH}"
  9 ENV IVP_BEHAVIOR_DIRS="/home/moos/moos-ivp/lib"
 10
 11 # Install required MOOS dependencies
 12 RUN apt-get update -y && \
 13    DEBIAN_FRONTEND=noninteractive \
 14    apt-get install -y cmake build-essential subversion && \
 15    apt-get clean
 16
 17 # Make a user to run the MOOS apps and set as default user
 18 RUN useradd -m -p "moos" moos && usermod -aG sudo moos
 19 USER moos
 20
 21 # Set the default entry directory to the moos user's home
 22 WORKDIR "/home/moos"
 23
 24 RUN svn co https://oceanai.mit.edu/svn/moos-ivp-aro/trunk /home/moos/moos-ivp
 25
 26 # Build the MOOS-IvP tools
 27 RUN cd "$HOME/moos-ivp" && ./build-moos.sh --minrobot --release && ./build-ivp.sh --nogui


In the first five lines we indicate this image is to be built on Ubuntu 20.04 and bash is set as the default shell. In lines 8-9, bash environment variables are augmented to include all the moos-ivp executables in the shell path. And the IVP_BEHAVIOR_DIRS path is augmented for loading share-library behaviors of the helm.

In Lines 12-15 software packages are installed that needed for getting and building the MOOS-IvP codebase. In lines 18-19 the image is configured with an additional non-root user, moos, and is configured with a simple password. Finally on lines 16 and 18, the moos user is set to be the current user, and the working directory is the home directory of the user. In lines 24 and 27, the MOOS-IvP code is download via subversion and built. The build is a partial build. None of the MOOS or IvP GUI applications are built since this image will only be used to simulate a vehicle.

After building this image:


$ docker build -t ubuntu_20.04_ivp .


You can launch a container with a bash session and confirm that the MOOS-IvP codebase has been built:


   $ docker run -it --rm ubuntu_20.04_ivp bash
   ivpuser@7a70a514c816:~$ which pHelmIvP
   /home/ivpuser/moos-ivp/bin/pHelmIvP


5 Running the Containerized uField Alpha Mission
Now we're ready to run the uField Alpha mission, with the vehicle running in a container. Each community is launched separately.

5.1 First a Word about Ports [top]
In MOOS-IvP communities connected using pShare, each community is "listening" on a specific port. By default the shoreside community is listening on port 9200, and connected vehicles are listening on 9201 for the first vehicle and 920N for the Nth vehicle if there are N vehicles being simulated on a single computer.

For a container, communicating to a port on the host requires no configuration. For the host to communicate to a container, on a particular port, this requires an extra configuration step. When the container is launched, we will map port 9201 on the host to port 9201 on the container. The following command line argument will be provided when running the container:


-p 9201:9201/udp


Keep an eye out for this in Section 5.3 below.


5.2 Launching the uFleld Alpha Mission in Two Steps [top]
We will launch to uField Alpha Mission by first launching the shoreside on our local native computer, and then the vehicle in a container.

5.2.1 Launching the Shoreside [top]
The process for launching the shoreside is unchanged - as it should be, since the shoreside should act the same whether it is connected to a simulated vehicle on the same host computer, on a remote computer, or in a container. Or a fielded vehicle for that matter.


 $ cd moos-ivp/ivp/mission/ufld_alpha
 $ ./launch_shoreside.sh


It is worth noting the IP address of the host computer. For our example, the IP address is 192.168.7.9.


5.2.2 Launching the Vehicle [top]
To launch the vehicle, first the container is launched, then the mission is launched. In the vehicle simulation, incoming comms from the shoreside, is through port 9201. Incoming comms includes command-and-control messages to deploy or return the vehicle and so on. In launching the container, port 9201 is attached to port 9201 on the host machine. The shoreside community sends messages to the vehicle at localhost on port 9201 and this is passed through to the container.

The steps are as follows:


 $ docker run -it --rm -p 9201:9201/udp mikerbenj/moos-ivp bash
 ivpuser@0f43117bf459:home/ivpuser $ cd moos-ivp/ivp/missions/ufld_alpha
 ivpuser@0f43117bf459:missions/ufld_alpha $ ./launch_vehicle.sh --shore=192.168.7.9 --ip=127.0.0.1


Once the container and the mission is launched, the user can simply hit the deploy button in the pMarineViewer window to initial the simulated vehicle along its path.


5.3 Launching the Vehicle with an Entry Script [top]
In the example above, launching the vehicle required two steps:


- Start container with a bash session
- Change directories into the mission and launch the vehicle


We would like to make this one step. And to do so we will augment our image by creating an entrypoint.sh script to automatically launch the mission when the container is started.

5.3.1 Create the entrypoint.sh Script [top]
The entrypoint.sh script is created, typically alongside the Dockerfile defining the image. In our case it will be the following three lines:


 #!/bin/bash
 cd moos-ivp/ivp/missions/ufld_alpha
 ./launch_vehicle.sh --shore=192.168.7.5 --ip=127.0.0.1


For now, the IP address is hard-coded into the above entrypoint.sh file. We will come back to this issue.


5.3.2 Augment the moos-ivp Dockerfile [top]
The moos-ivp image needs to be augmented to copy the entrypoint.sh file to the container, and declare this script to be the entry point when the container starts. We will create a new image, moos-ivp-ualpha, conveying that it is essentially the moos-ivp image plus steps for launching the ufld_alpha mission. This Dockerfile for this new image looks like


 # Filename: Dockerfile
 FROM mikerbenj/moos-ivp
 LABEL maintainer = Mike Benjamin <mikerb@mit.edu>

 COPY entrypoint.sh /
 ENTRYPOINT ["/entrypoint.sh"]


You can either copy the above Dockerfile to create your own image, or you can use mikerbenj/moos-ivp-ualpha.


5.3.3 Launching the uField Alpha Mission in One Step [top]
To launch the ufld_alpha mission, first we will launch the shoreside mission as before, described in Section 5.2.1. Then the vehicle mission can be launched with the below command which both starts the container and launches the vehicle mission:


$ docker run -it -p 9201:9201/udp --rm moos-ivp-ualpha


You can either


5.4 Passing Arguments to the Entry Script Upon Launch [top]
Using the entrypoint.sh script simplifies things to the point where the vehicle container and mission can all be launched on a single line. However, our example so far is brittle in a couple ways:

- The IP address of the shoreside is hard coded in entrypoint.sh
- Other launch command line args, like the MOOS time warp, are also hard coded.


In this next step, we explore how to launch the vehicle container and mission while passing these arguments at launch time without having to modify the Docker image moos-ivp-ualpha.

5.4.1 Passing Arguments During the Docker Run Command [top]
The two arguments for time warp and shore IP address are passed on the command line when running the image in a new container.

We augment the previously used command:


$ docker run -it -p 9201:9201/udp --rm moos-ivp-ualpha


with:


$ docker run -it -p 9201:9201/udp --rm -e TIME_WARP=5 -e SHORE_IP=192.168.7.5 moos-ivp-ualpha


Note, as environment variables, their scope is not only passed to the entrypoint.sh script, but also to its child processes, e.g. the launch_vehicle.sh script launched within the entry script.


5.4.2 Modifying the Entry Script to Handle Arguments [top]
The entrypoint.sh script, if you recall from Section 5.3.1, is executed upon running the container. This is the file where the shore IP address and the time warp were hard coded. We will replace the older version, which is short enough to re-state here:


 #!/bin/bash
 cd moos-ivp/ivp/missions/ufld_alpha
 ./launch_vehicle.sh --shore=192.168.7.5 --ip=127.0.0.1


with the following:


 #!/bin/bash
 cd moos-ivp/ivp/missions/ufld_alpha
 ./launch_vehicle.sh --ip=127.0.0.1


5.4.3 Preparing the Vehicle Launch Script [top]
The vehicle launch script in the ufld_alpha mission is launch_vehicle.sh. This script accepts multiple command line arguments. Run with the --help argument to see the full list. But we will focus on two arguments, the time warp and shore IP address. Normally this script can be launched with:


 $ cd moos-ivp/ivp/missions/ufld_alpha
 $ ./launch_vehicle.sh --shore=192.168.7.5 10


We would like the option of passing in these two parameters as environment variables, so that we could launch instead with:


 $ cd moos-ivp/ivp/missions/ufld_alpha
 $ export SHORE_IP=192.168.7.5
 $ export TIME_WARP=10
 $ ./launch_vehicle.sh


Or, equivalently and even shorter:


 $ cd moos-ivp/ivp/missions/ufld_alpha
 $ SHORE_IP=192.168.7.5 TIME_WARP=10 ./launch_vehicle.sh


When the launch_vehicle.sh script is invoked from the entrypoint.sh script, which is invoked by the the docker run command, the environment variables passed from the docker run command will pass their scope to the entrypoint.sh script, which will pass the scope to the launch_vehicle.sh script.
To support this, inside the launch_vehicle.sh script, we will change the following two lines:


 TIME_WARP=1
 SHORE_IP=localhost


to:


 TIME_WARP=${TIME_WARP:-1}
 SHORE_IP=${SHORE_IP:-localhost}


With this setup, (a) the variables will be initialized to the value of the environment variables if they have been set in the calling process, (b) otherwise the variabless will default to the same default values as before, and (c) the variables will still be overridden if command line arguments are provided, regardless of (a) or (b).


5.4.4 An Additional Word on Passing Environment Variables [top]
In our example, the command to run the container included the environment variables as part of the command. From before:


$ docker run -it -p 9201:9201/udp --rm -e TIME_WARP=5 -e SHORE_IP=192.168.7.5 moos-ivp-ualpha


If we have a lot of variables, these can be placed in a local environment file, e.g., .env. For example:


 # The file .env
 TIME_WARP=10
 SHORE_IP=192.168.7.5


Then the file can be referenced in the docker run command:


$ docker run -it -p 9201:9201/udp --rm --env-file .env moos-ivp-ualpha


For further discussion about this, see [3].

URL References

[1] Mouat, Adrian. Using Docker: Developing and Deploying Software with Containers (Kindle Locations 488-490). O'Reilly Media. Kindle Edition.
[2] https://www.baeldung.com/linux/bash-variables-export%%
[3] https://towardsdatascience.com/a-complete-guide-to-using-environment-variables- and-files-with-docker-and-compose-4549c21dc6af


Document Maintained by: mikerb@mit.edu
Page built from LaTeX source using texwiki, developed at MIT. Errata to issues@moos-ivp.org.
 Get PDF
