Lab 6 - Underwater Navigation
1 Objectives
2 Configuring your own vehicle
2.1 Creating a git branch for your vehicle
2.2 Creating a vehicle definition file for your vehicle
2.2.1 Changing the vehicle name
2.2.2 Changing the vehicle ID
2.2.3 Changing the network port table
2.3 Running a software-in-the-loop simulation to test the newly configured vehicle definition
2.4 Pushing your software to the git remote server
3 Updating the software on the embedded computers
3.1 Updating the software on the Raspberry Pi
3.2 Updating the software on the PocketBeagle
3.3 Running a hardware-in-the-loop simulation to test the newly configured vehicle definition
4 Exercise: IMU quality vs. navigation drift
4.1 Test out the lab_6_navigation cruise
4.2 Change the quality of the IMU and observe the rate of navigation drift
4.2.1 Heading bias
4.2.2 Heading random error
4.2.3 Sensor dynamics for roll and pitch measurements
4.3 Destroy local code changes
5 Exercise: Optimizing the vehicle dynamic model
5.1 Optimizing the vehicle navigation model in software-in-the-loop simulations
5.2 Pushing your optimized vehicle navigation model to the git remote server
5.3 Testing your optimized vehicle navigation model in hardware-in-the-loop simulations
1 Objectives
- Learning how to create a new vehicle definition file for your own AUV.
- Learning how to push and pull code changes into and from github remote server.
- Understanding the importance of virtual ocean for sensor evaluation.
- Understanding the variation of navigation drift with the quality of the AHRS.
- Understanding the concept of vehicle navigation models.
2 Configuring your own vehicle
During the first part of today's lab, you will make a configuration file for your own AUV in missions-seabeaver. In order to minimize human error, we would like to avoid editing software directly on the embedded computers whenever possible. The advised approach is to edit software on your laptop (i.e. the topside computer), commit and push the edits to the git remote server in https://github.com/supun-randeni/missions-seabeaver, and pull these changes to the embedded computers from the remote server.
The instructors often update the MITFrontseat, MITFrontseat-drivers and missions-seabeaver repositories. Therefore, you should always start with updating these repositories and re-building the software if necessary. If you don't remember how to update software, please follow the instructions given in Lab 5. Please note that you do not need to clone the software repositories or install dependencies since you have already done that.
2.1 Creating a git branch for your vehicle [top]
Once you updated (and re-built) MITFrontseat, MITFrontseat-drivers and missions-seabeaver on the topside computer, change the directory to missions-seabeaver. Before you edit any files, we would like you to create a new git branch with your AUV's name (mine is named avi) in missions-seabeaver, so that you will be able to modify code without interfering with others' workflow:

 $ cd ~/missions-seabeaver/
 $ git pull
 $ git checkout  -b avi 2.s01
 Switched to a new branch 'avi'
The commands git checkout -b avi 2.s01 will create a new git branch called avi, based off of our previous branch 2.s01. That is, the software in avi branch is currently equal to that in 2.s01 (since you haven't done any code edits yet). Let's push (or upload) this new branch to the git remote server (called origin):
 $ git push -u origin avi
 Total 0 (delta 0), reused 0 (delta 0)
 remote:
 remote: Create a pull request for 'avi' on GitHub by visiting:
 remote:      https://github.mit.edu/supun-randeni/missions-seabeaver/pull/new/avi
 remote:
 To github.mit.edu:supun-randeni/missions-seabeaver.git
  * [new branch]      avi -> avi
 Branch 'avi' set up to track remote branch 'avi' from 'origin'.
2.2 Creating a vehicle definition file for your vehicle [top]
Now that you have your own git branch for missions-seabeaver, you can create a definition file for your own AUV. Vehicle definition files are located at: missions-seabeaver/vehicle. Change your directory to missions-seabeaver/vehicle and explore the files in this directory:
 $ cd ~/missions-seabeaver/vehicle/
 $ ls
 current_sensor_config.txt  sb2_alpha.def                template_uuv.def
 current_vehicle.def        sb2_alpha_sensor_config.txt  template_uuv_sensor_config.txt
At a minimum, you will see the definition files for the AUVs sb2_alpha and template_uuv. A you can see, each AUV has two files; i.e., sb2_alpha.def file and sb2_alpha_sensor_config.txt. Open these files and look at the content. See if you can recognize/guess what each of these parameters mean.
In order to create a vehicle definition for a new AUV, you need to create both *.def and *_sensor_config.txt files. Easiest way is to copy the sb2_alpha.def and sb2_alpha_sensor_config.txt files and rename them with your vehicle:
 $ cp sb2_alpha.def  avi.def
 $ cp sb2_alpha_sensor_config.txt avi_sensor_config.txt
 $ ls
 avi.def                    sb2_alpha.def
 avi_sensor_config.txt      sb2_alpha_sensor_config.txt
 current_sensor_config.txt  template_uuv.def
 current_vehicle.def        template_uuv_sensor_config.txt
Now you have two new *.def and *_sensor_config.txt files with your vehicle name (e.g., avi.def and avi_sensor_config.txt). But you still need to make some changes to these files. Edit the avi.def file using your favorite test editor and change the following values accordingly:
2.2.1 Changing the vehicle name [top]
Change the vehicle name: #define VEHICLE SB2_ALPHA to #define VEHICLE AVI
2.2.2 Changing the vehicle ID [top]
Your vehicle ID is the last two digits of your IP addrress; for example,if you IP address is 192.168.0.50, your vehicle ID is 50.
Change the vehicle ID: #define VEHICLE_ID 3 to #define VEHICLE_ID 50
2.2.3 Changing the network port table [top]
Following network ports should change for your vehicle, corresponding to your vehicle ID:
- MOOS_PORT_COMBINED = 91ID
- MOOS_PORT_BACKSEAT = 92ID
- MOOS_PORT_FRONTSEAT = 93ID
- MOOS_PORT_HYDROMAN = 94ID
- INTERFACE_PORT_VECTORS = 95ID
- PSHARE_PORT_TOPSIDE = 90ID
For example, if the last two digits of the vehicle IP address is 55, the ID should replace with 55. I.e., change: #define MOOS_PORT_COMBINED 9150 to #define MOOS_PORT_COMBINED 9155.
2.3 Running a software-in-the-loop simulation to test the newly configured vehicle definition [top]
Once you created the definition files for your vehicle, let's test it by running a software-in-the-loop simulation on the topside:
- Configure the architecture to seabeaver_ii.
- Configure the vehicle to your AUV (i.e. the definition that you just created).
- Configure the cruise to shipwreck_search.
- Launch the mission in simulation.
If you have created the vehicle definition without errors, you should see the same seabeaver_ii mission on the pMarineViewer window that you saw during the last lab.
2.4 Pushing your software to the git remote server [top]
Once you successfully created the vehicle definition, you should push (or upload) this new code to the git remote server, so that other collaborators (e.g. your lab partner, instructors) can also see the code. Pushing the code to the git remote server also allows you to pull the code to the embedded computers, without having to make the same changes on the RasPi and the PocketBeagle. We strongly recommend you to read on git version control on your own time (https://git-scm.com/book/en/v2/Getting-Started-About-Version-Control).
If you use the command $git status when you are in missions-seabeaver directory, or in one of its sub-directories, you can see the all the updated files:
 $ git status
 On branch avi
 Your branch is up to date with `origin/avi'.

 Untracked files:
   (use "git add <file>..." to include in what will be committed)
 	vehicle/avi.def
 	vehicle/avi_sensor_config.txt

 nothing added to commit but untracked files present (use "git add" to track)
In order to commit a change, you need to add both files (i.e. changes) that needs to be committed:
 $ git add vehicle/avi.def
 $ git add vehicle/avi_sensor_config.txt
If you run $git status now, you will see something like this:
 $ git status
 On branch avi
 Your branch is up to date with `origin/avi'.

 Changes to be committed:
   (use "git restore --staged <file>..." to unstage)
 	new file:   vehicle/avi.def
 	new file:   vehicle/avi_sensor_config.txt
Now the changes are staged to commit. You can commit these changes with the command $git commit -m "Adding the vehicle definition for the AUV Avi". The -m flag allows your to add a short message with the commit, so you and your collaborators know what this change is about:
 $ git commit -m "Adding the vehicle definition for the AUV Avi"
 [avi 15e9fd6] Adding the vehicle definition for the AUV Avi
  2 files changed, 142 insertions(+)
  create mode 100644 vehicle/avi.def
  create mode 100644 vehicle/avi_sensor_config.txt
Now you can use $git status command again to double check if everything is as expected:
 $ git status
 On branch avi
 Your branch is ahead of `origin/avi' by 1 commit.
   (use "git push" to publish your local commits)

 nothing to commit, working tree clean
Finally, you can push the commit(s) to the git remote server:
 $ git push origin avi
 Enumerating objects: 5, done.
 Counting objects: 100% (5/5), done.
 Delta compression using up to 16 threads
 Compressing objects: 100% (3/3), done.
 Writing objects: 100% (3/3), 322 bytes | 322.00 KiB/s, done.
 Total 3 (delta 2), reused 0 (delta 0)
 remote: Resolving deltas: 100% (2/2), completed with 2 local objects.
 To github.mit.edu:supun-randeni/missions-seabeaver.git
    e7eae27..15e9fd6  avi -> avi
3 Updating the software on the embedded computers
Now we will pull these new commits to the embedded computers and run a hardware-in-the-loop simulation to test the newly configured vehicle definition.
3.1 Updating the software on the Raspberry Pi [top]
You have updated and (re)built software on the Raspberry Pi in your previous lab. Therefore, we will not exhaust you by walking though each step. Instead, we will list out the main steps. You can always refer back to the previous lab(s) or ask the instructors if you run into issues:
- Update MITFrontseat repository using $git pull command.
- Re-build MITFrontseat. Note that you do not need to re-install dependencies.
- Update MITFrontseat-drivers repository using $git pull command.
- Re-build MITFrontseat-drivers. Note that you do not need to re-install dependencies.
- On missions-seabeaver, switch to the new branch that you just created; e.g. avi in my case.
3.2 Updating the software on the PocketBeagle [top]
Use the same steps to update and re-build the node on the PocketBeagle:
- Update MITFrontseat repository using $git pull command.
- Re-build MITFrontseat. Note that you do not need to re-install dependencies.
- Update MITFrontseat-drivers repository using $git pull command.
- Re-build MITFrontseat-drivers. Note that you have to use the $build.sh --vehicle flag on the PocketBeagle.
- On missions-seabeaver, switch to the new branch that you just created; e.g. avi in my case.
3.3 Running a hardware-in-the-loop simulation to test the newly configured vehicle definition [top]
Using the same steps as the previous lab, run a hardware-in-the-loop simulation of the shipwreck_search mission using your newly create vehicle definition:
- Log into the RaspBerry Pi
- Configure the architecture to seabeaver_ii.
- Configure the vehicle to your AUV (i.e. the definition that you just created).
- Configure the cruise to shipwreck_search.
- Launch the mission in simulation.
- On a separate terminal window, launch the topside on your topside computer.
4 Exercise: IMU quality vs. navigation drift
In the Underwater Navigation lecture, we discussed about how the quality of navigation sensors can affect the navigation accuracy. Our virtual ocean environment, VECTORS, allows us to simulate various sensor dynamics and observe their affects on the navigation accuracy and overall autonomy. In this exercise, we will change the dynamics of the AHRS/IMU and observe its affects in software-in-the-loop simulations.
4.1 Test out the lab_6_navigation cruise [top]
Before we make changes to the IMU sensor dynamics, let's see if you can run the lab_6_navigation cruise that was designed for this lab. On the topside computer:
- Configure the architecture to seabeaver_ii.
- Configure the vehicle to your AUV (i.e. the definition that you just created).
- Configure the cruise to lab_6_navigation.
- Launch the mission in simulation. You may choose to run the simulation at higher time warps using $ ./launch_simulation.sh 5
You will see a mission similar to that shown in Figure 4.1. The vehicle with the name suffix _GT is the ground-truth position of the simulated vehicle. The other vehicle is the computed navigation solution; i.e. where the AUV thinks it is at. Note how the autonomy helm makes decisions based on where the AUV thinks it is at.
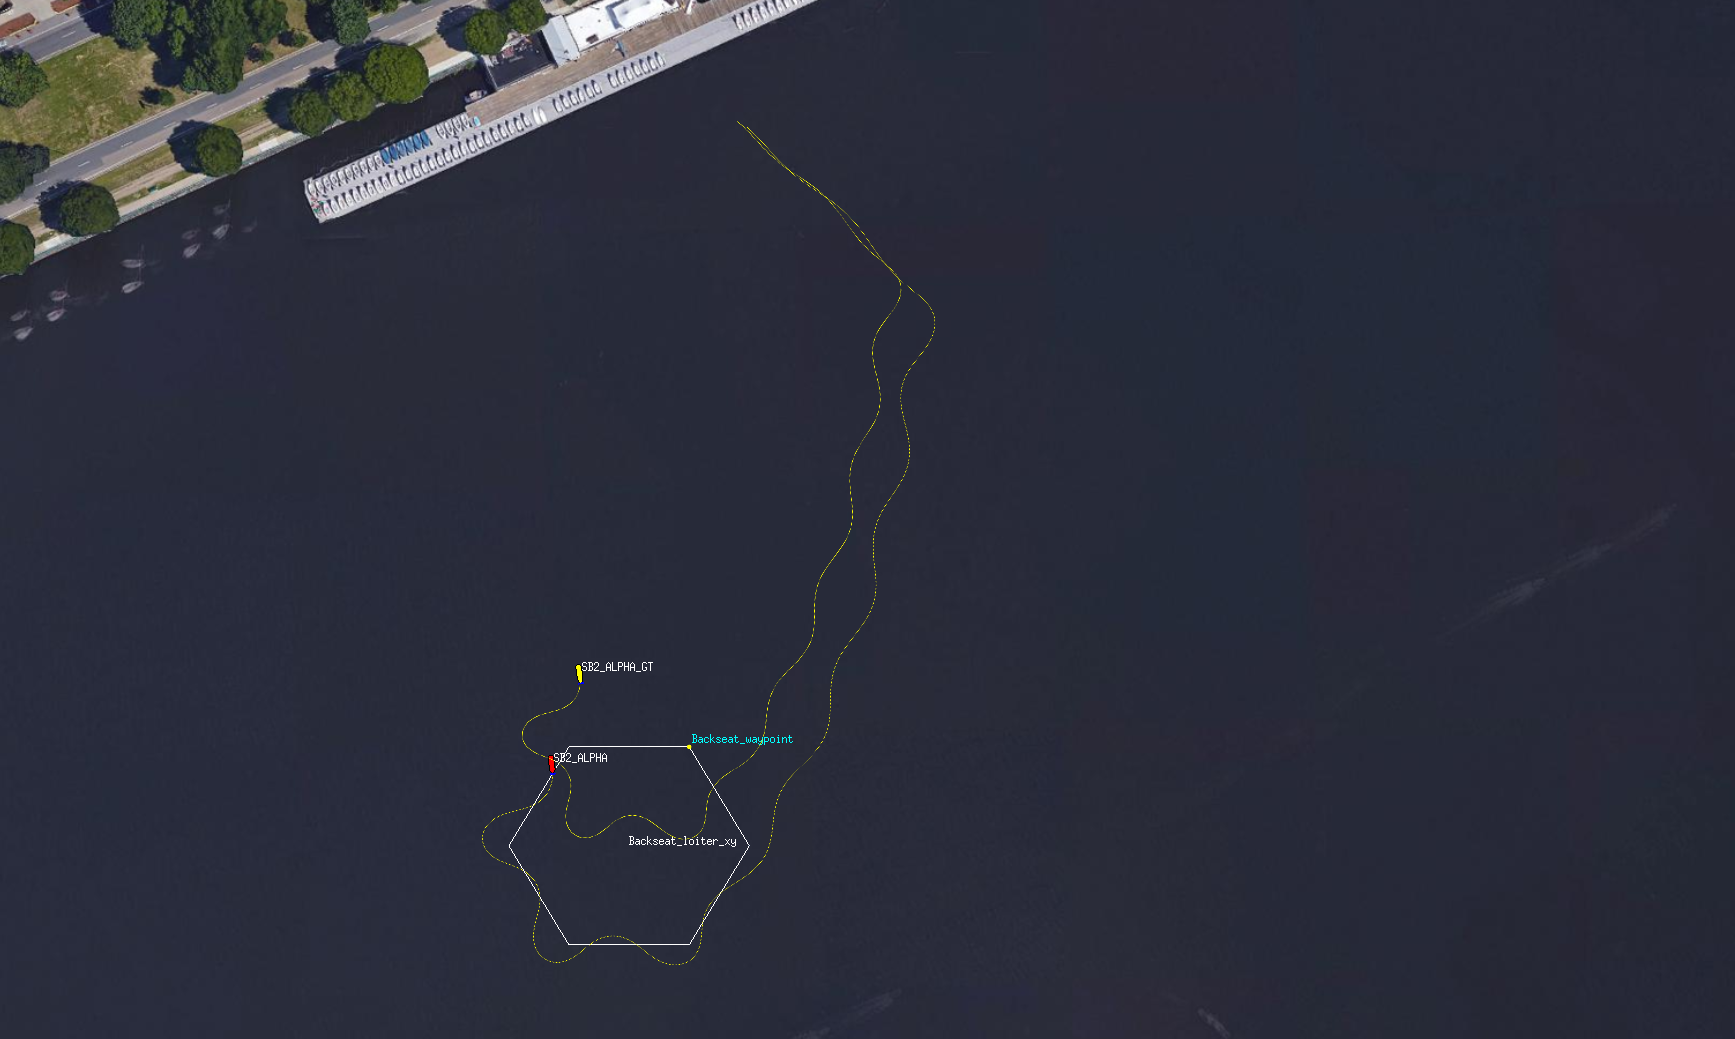
Figure 4.1: The lab_6_navigation mission
4.2 Change the quality of the IMU and observe the rate of navigation drift [top]
The IMU/AHRS simulation MOOS app of VECTORS virtual environment is called uSimVECTORS_IMU. The configuration plug of this app is located at: missions-seabeaver/plugs/vectors_plugs/uSimVECTORS_IMU.plug. Open this file with your favorite test editor and observe the various configuration parameters:
 //------------------------------------------------
 // uSimVECTORS_IMU config block

 ProcessConfig = uSimVECTORS_IMU
 {
    AppTick   = 4
    CommsTick = 4

    platform_id      = $(VEHICLE_ID)
    sensor_id        = 1

    imu_scale_error  = 0.1
    imu_random_error = 0.5
    pitch_bias_error = 0.2
    roll_bias_error  = 0.2

    heading_scale_error  = 0.1
    heading_bias_error   = 0.5
    heading_random_error = 0.5

    // imu_scale_error      -> Roll [=&=] pitch scale error
    // imu_random_error     -> Roll [=&=] pitch random error
    // pitch_bias_error     -> Pitch bias error
    // roll_bias_error      -> Roll bias error
    // heading_scale_error  -> Heading scale error
    // heading_bias_error   -> Heading bias error
    // heading_random_error -> Heading random error
 }
The sensor dynamics for heading measurements are modeled using the parameters:
- heading_scale_error
- heading_bias_error
- heading_random_error
The sensor dynamics for roll and pitch measurements are modeled using the parameters:
- imu_scale_error
- imu_random_error
- pitch_bias_error
- roll_bias_error
Let's play with the sensor dynamics for heading measurements first since it is more visible in pMarineViewer.
4.2.1 Heading bias [top]
Try the following heading bias values, one at a time, and observe the navigation drift:
- heading_bias_error = 20
- heading_bias_error = 10
- heading_bias_error = 5
When the high heading bias value is large, you will see a large navigation drift as shown in Figure 4.2.
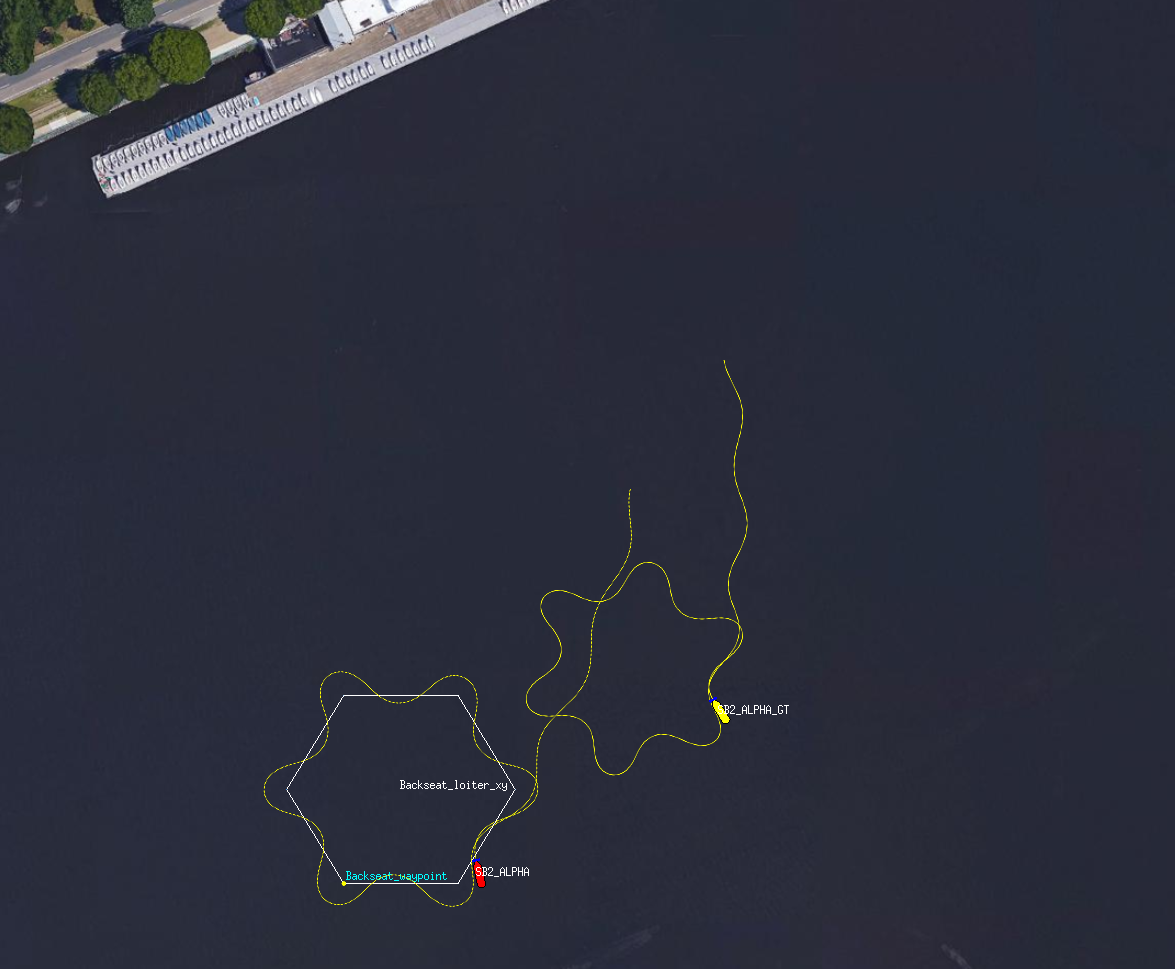
Figure 4.2: The lab_6_navigation mission with a high heading sensor bias
4.2.2 Heading random error [top]
Try the following heading random error values, one at a time, and observe the response:
- heading_random_error = 10
- heading_bias_error = 5
- heading_bias_error = 2
4.2.3 Sensor dynamics for roll and pitch measurements [top]
Similarly, you can also change the pitch_bias_error and imu_random_error values and observe the response.
4.3 Destroy local code changes [top]
At this point, we have made some temporary changes to the missions-seabeaver sensor model configurations, that we do not wish to commit. We can see those changes using $git status command:
 $ git status
 On branch avi
 Your branch is up to date with `origin/avi'.

 Changes not staged for commit:
   (use "git add <file>..." to update what will be committed)
   (use "git restore <file>..." to discard changes in working directory)
 	modified:   ../plugs/vectors_plugs/uSimVECTORS_IMU.plug

 no changes added to commit (use "git add" and/or "git commit -a")
We can destroy those changes by using the command $ git reset --hard:
 $ git reset --hard
 HEAD is now at 15e9fd6 Adding the vehicle definition for the AUV Avi
5 Exercise: Optimizing the vehicle dynamic model
In the Underwater Navigation lecture, we discussed various velocity aiding navigation sensors. In this class, our SeaBeaver AUVs use a very simple vehicle navigation model to predict the surge velocity (followed by the inertial navigation solution) based on the propeller speed:
surge_speed = prop_percent_sq x prop_speed x prop_speed + prop_percent x prop_speed
where, prop_percent_sq and prop_percent are vehicle dependant parameters configured in the vehicle definition file; e.g. in missions-seabeaver/vehicle/avi.def:
 // *********************************************************************************
 // HydroMAN navigation related
 // *********************************************************************************
 #define HYDROMAN_MODEL_SURGE    hydroman_surge_model: prop_percent_sq=0, prop_percent=0.045
5.1 Optimizing the vehicle navigation model in software-in-the-loop simulations [top]
In this exercise, we will try to optimize these parameters (i.e. prop_percent_sq and prop_percent) within the virtual ocean by conducting software-in-the-loop simulations using a trial-and-error approach.
Edit your vehicle definition file (e.g. missions-seabeaver/vehicle/avi.def) and try different values for prop_percent_sq and prop_percent and re-run simulations to see if your improved model reduces the navigation drift. For example, you can try values such as:
 // *********************************************************************************
 // HydroMAN navigation related
 // *********************************************************************************
 #define HYDROMAN_MODEL_SURGE    hydroman_surge_model: prop_percent_sq=0, prop_percent=0.02
By doing this, you are trying to optimize the vehicle navigation model for the simulated vehicle's dynamics.
5.2 Pushing your optimized vehicle navigation model to the git remote server [top]
Once you are satisfied with the performance of your improved vehicle navigation model, we need to conduct a hardware-in-the-loop simulation using this updated model. So let's commit these changes and push them to your branch in the git remote server. If you don't remember how to do this, please follow the instruction given in Section 2.4.
5.3 Testing your optimized vehicle navigation model in hardware-in-the-loop simulations [top]
Once you pushed the changes to your branch in the git remote server, pull these updates to the RaspBerry Pi and PocketBeagle. Now you can run the lab_6_navigation mission with your improved navigation model in hardware-in-the-loop simulation style.
Document Maintained by: supun@mit.edu
Page built from LaTeX source using texwiki, developed at MIT. Errata to issues@moos-ivp.org.  Get PDF