Sea Beaver II Lab - Unit Testing and Simulations
1 Overview and Objectives
2 How to login to SeaBeaver II -- Wireless
2.1 Connect to the SeaBeaverNetwork WiFi router
2.2 SSH to the Raspberry Pi
2.3 Ensure that the Raspberry Pi has internet
2.4 SSH to the PocketBeagle
2.5 Ensure that the PocketBeagle has internet
3 Unit testing sensors
3.1 Depth sensor
3.2 Barometer sensor
3.3 Attitude and heading reference system (AHRS)
3.4 Global Positioning System (GPS)
4 Unit testing actuators
4.1 Control surfaces
4.2 Main propulsion thruster
4.3 Light Emitting Diode (LED) indicators
5 Software-in-the-loop (SITL) simulations
5.1 Defining the vehicle architecture
5.2 Defining the vehicle
5.3 Defining the cruise
5.4 Launching a software-in-the-loop simulated mission
5.5 Killing the mission
6 Hardware-in-the-loop (HITL) simulations
6.1 Defining the architecture, vehicle and cruise
6.2 Launching the topside
6.3 Launching the hardware-in-the-loop simulation mission
6.4 Killing the mission
7 Running "in real life" (unsimulated)
7.1 Killing the mission
1 Overview and Objectives
- Goal - Learning how to log onto and off of the AUV
- Goal - Learning what are the base sensors and actuators inside SeaBeaver II AUVs
- Goal - Mastering how to login to the vehicle's embedded computers
- Goal - Learning how to unit test individual sensors and actuators to ensure they are in working order
- Goal - Learning how to run a purely software simulation
- Goal - Learning how to run a hardware-in-the-loop (HITL) simulation
- Goal - Learning how to run a "bench test" mission on actual AUV hardware
2 How to login to SeaBeaver II -- Wireless
You can use the wireless approach when the AUV and you are both in proximity to the SeaBeaverNetwork WiFi router. That is, you can only complete this section when you are in the classroom or at the MIT Sailing Pavilion. If you are doing this lab at home, please skip this section to the next.
2.1 Connect to the SeaBeaverNetwork WiFi router [top]
Connect your topside laptop to the SeaBeaverNetwork WiFi access-point. The DHCP server in the router will assign you an IP address in the range 192.168.0.100-200. If you like, you can check your IP address by using ifconfig command:

$ ifconfig
2.2 SSH to the Raspberry Pi [top]
The wireless interface of Seabeaver II Raspberry Pi computers are configured with a unique static IP address in the range 192.168.0.50-80. The static IP address assigned for your training kit will be clearly labeled on the side of the kit. If otherwise, please ask the instructors. Now connect to the Raspberry Pi via SSH:
 $ ssh seabeaver-raspi@192.168.0.[last.digits.of.your.ip]
 eg:
 $ ssh seabeaver-raspi@192.168.0.51
Now you will be asked to enter the password:
seabeaver-raspi@10.42.0.5's password:
Enter the password (password will be provided to you by the instructors). Now you are successfully logged into the SeaBeaver's Raspberry Pi.
2.3 Ensure that the Raspberry Pi has internet [top]
You can check if the Raspberry Pi has internet access via the router by pinging google.com:
$ ping google.com
If you have internet access, you will see an output similar to this.
 PING google.com (142.251.40.142) 56(84) bytes of data.
 64 bytes from lga25s80-in-f14.1e100.net (142.251.40.142): icmp_seq=1 ttl=55 time=8.96 ms
 64 bytes from lga25s80-in-f14.1e100.net (142.251.40.142): icmp_seq=2 ttl=55 time=11.5 ms
 64 bytes from lga25s80-in-f14.1e100.net (142.251.40.142): icmp_seq=3 ttl=55 time=11.1 ms
 64 bytes from lga25s80-in-f14.1e100.net (142.251.40.142): icmp_seq=4 ttl=55 time=11.7 ms
 64 bytes from lga25s80-in-f14.1e100.net (142.251.40.142): icmp_seq=5 ttl=55 time=10.2 ms
To exit from pinging, press ctrl+c.
2.4 SSH to the PocketBeagle [top]
Once you have logged onto the RasPi, you can SSH into the PocketBeagle. The ip address is always the same:
$ ssh debian@192.168.7.2
Now you will be asked to enter the password:
 Debian GNU/Linux 10

 BeagleBoard.org Debian Buster IoT Image 2020-04-06

 Support: http://elinux.org/Beagleboard:BeagleBoneBlack_Debian

 default username:password is [debian:temppwd]
2.5 Ensure that the PocketBeagle has internet [top]
Similar to the RasPi, you can ensure that the PocketBeagle has internet access via the RasPi by pinging google.com:
$ ping google.com
If you have internet access, you will see an output similar to this.
 PING google.com (142.251.40.142) 56(84) bytes of data.
 64 bytes from lga25s80-in-f14.1e100.net (142.251.40.142): icmp_seq=1 ttl=55 time=8.96 ms
 64 bytes from lga25s80-in-f14.1e100.net (142.251.40.142): icmp_seq=2 ttl=55 time=11.5 ms
 64 bytes from lga25s80-in-f14.1e100.net (142.251.40.142): icmp_seq=3 ttl=55 time=11.1 ms
 64 bytes from lga25s80-in-f14.1e100.net (142.251.40.142): icmp_seq=4 ttl=55 time=11.7 ms
 64 bytes from lga25s80-in-f14.1e100.net (142.251.40.142): icmp_seq=5 ttl=55 time=10.2 ms
To exit from pinging, press ctrl+c.
3 Unit testing sensors
As shown in Figure 3.1, the PocketBeagle serves as a hub that interfaces with the sensors and actuators of the vehicle. Throughout the AUV's life; that is, starting from the initial breadboard design phase to printed circuit board (PCB) testing, pre vehicle assembly, post vehicle assembly and during in-water operations; it is necessary to check if individual sensor and actuator components work as a single unit. To support that, we have developed a set of low-level programs to unit test individual components.
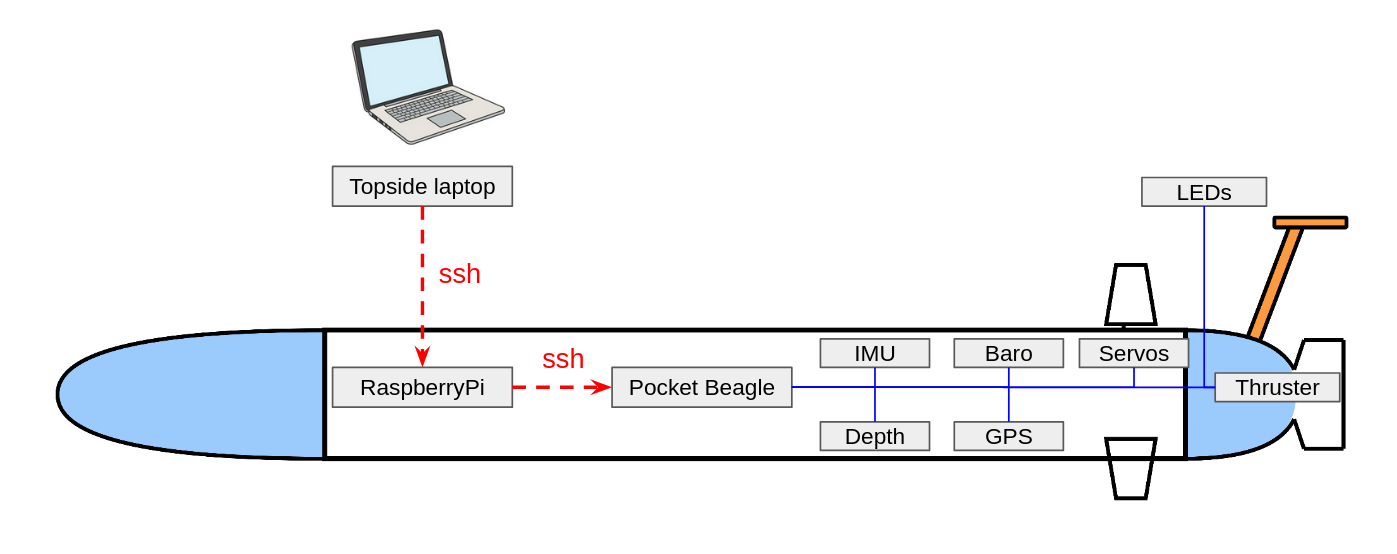
Figure 3.1: Sensors and actuators of SeaBeaver II AUVs are connected to the PocketBeagle
In order to perform unit tests and other activities such as simulations you will first need to SSH into the PocketBeagle, as described in the previous section.
3.1 Depth sensor [top]
The depth sensor of an AUV measures the vehicle's current depth, by measuring the external hydrostatic water pressure and converting it to depth, using the equation:

where P is the measured hydrostatic pressure,  is the density of water, and g is the gravitational acceleration). In SeaBeaver II AUVs, we use a BlueRobotics Bar30 depth sensor: https://bluerobotics.com/store/sensors-cameras/sensors/bar30-sensor-r1/
This sensor is connected to the PocketBeagle via the Inter-Integrated Circuit (I2C) interface. When the depth sensor is plugged in to the daughter board, you can run the test_br_depth program to test if the depth sensor is connected to the PocketBeagle, and is in proper working order:
$ test_br_depth
If the depth sensor is working as expected, you will see an output similar to this:
 debian@beaglebone:~$ test_br_depth
 Acquired PROM contents
 crc_data: 28673, c1: 30169, c2: 29708, c3: 18186, c4: 18854, c5: 28659, c6: 26886
 Raw temp: 7386608, raw pressure: 4304880
 dT: 4716612, ti: 49904
 Depth: -0.09 m, Pressure: 1004.10 mbar, Temperature: 21.59 C
 Raw temp: 7387120, raw pressure: 4305392
 dT: 4716612, ti: 50416
 Depth: -0.06 m, Pressure: 1007.10 mbar, Temperature: 21.61 C
 Raw temp: 7387632, raw pressure: 4305392
 dT: 4716612, ti: 50928
 Depth: -0.06 m, Pressure: 1007.10 mbar, Temperature: 21.63 C
 Raw temp: 7387120, raw pressure: 4305392
 dT: 4716612, ti: 50416
Press ctrl+c to exit. If the depth sensor is not properly connected or faulty, you will see an output similar to this:
 debian@beaglebone:~$ test_br_depth
 ERROR: in rc_i2c_send_bytes, system write returned -1, expected 1
 ERROR: Can not send reset
Troubleshooting:
- Make sure that the depth sensor is plugged into the J4 connector of the daughter board.
- If you have a different depth sensor that you know that works (perhaps a depth sensor that has been tested by a classmate), try it. This will help isolate the problem.
- Talk to an instructor.
3.2 Barometer sensor [top]
SeaBeaver II AUVs come with an internal barometer that measures the pressure inside the pressure hull. As you will learn later in this class, observing internal pressure is important to check if the pressure hull has leaks (i.e. once you assembled the vehicle, you will pull the air inside the pressure hull out to create a vacuum. If the vacuum leaks out at a rate higher than what is acceptable, that means your pressure hull has a leak somewhere!).
In SeaBeaver II, we have a MPL3115A2 barometric pressure sensor (https://cdn-shop.adafruit.com/datasheets/1893_datasheet.pdf) connected to the PocketBeagle via I2C interface. You can unit test the internal barometer using the test_barometer program:
$ test_barometer
If the barometer functions as expected, you will see an output similar to this:
 debian@beaglebone:~$ test_barometer
  Pressure: 100.227. Alt: 92. Temparature (C): 28.375
  Pressure: 100.228. Alt: 397537. Temparature (C): 28.375
  Pressure: 100.232. Alt: 397537. Temparature (C): 28.375
  Pressure: 100.228. Alt: 397538. Temparature (C): 28.375
Press ctrl+c to exit. If you get an error, talk to an instructor to debug.
3.3 Attitude and heading reference system (AHRS) [top]
The attitude and heading reference system (AHRS) is essentially an Inertial Measurement Unit (IMU) with a fusion algorithm that outputs the roll, pitch and heading angle of the vehicle. These are crucial parameters for underwater navigation.
In Seabeaver II, we use a XSens MTi-3 Micro-Electro-Mechanical systems (MEMS) AHRS
https://www.xsens.com/hubfs/Downloads/Leaflets/MTi-3.pdf
The IMU is connected to the PocketBeagle using a universal asynchronous receiver/transmitter (UART) interface. You can unit test this sensor using the test_xsens_mti3 program.
$ test_xsens_mti3
If the sensor is connected and is in the working order, you will be asked to check if the latitude and longitude currently written in the sensor's non-volatile memory is correct. (The MTi-3 AHRS corrects for the magnetic declination; therefore, it is important that it knows our approximate operational area):
 debian@beaglebone:~$ test_xsens_mti3
 Testing the Xsens MTi-3 IMU
 First scanning for USB devices...
 No USB device found. Scanning: /dev/ttyO4 at baud rate: 115200
 Found a device with ID: 038898CE @ port: /dev/ttyO4, baudrate: 115200
 Opening port...
 Device: MTi-3-8A7G6, with ID: 038898CE opened.
 Putting device into configuration mode...
 Configuring the device...

  Current Latitude: 52.2405 | Longtitude: 6.83822 | Altitude: 1.29442e-312
 Do you want to change the position for magnetic declination?
 Enter Y to change Lat/Long. Any other input to keep them.
In this example, latitude and longitude do not represent Horta (latitude 38.5348, longitude -28.6300), and this will most likely be the case for the AHRS in a brand new training-kit or one previously configured at MIT. In this case, press Y and hit return:
  Current Latitude: 52.2405 | Longtitude: 6.83822 | Altitude: 1.29442e-312
 Do you want to change the position for magnetic declination?
 Enter Y to change Lat/Long. Any other input to keep them.
 y
 Enter the new Latitude..
Then you will be asked to enter your latitude, so enter the latitude of Horta (38.5348):
  Current Latitude: 52.2405 | Longtitude: 6.83822 | Altitude: 1.29442e-312
 Do you want to change the position for magnetic declination?
 Enter Y to change Lat/Long. Any other input to keep them.
 y
 Enter the new Latitude..
 38.5348
 Enter the new Longitude..
Enter the longitude of Horta (-28.6300, note the minus!) Then the sensor will start outputting raw data and you will see an output similar to this:
  New Latitude: 38.5348 | Longitude: -28.6300 | Altitude: 9.54898e-313
 Putting device into measurement mode...

 Reading data...
 Acc X:1.06, Acc Y:-0.15, Acc Z:9.70 |Gyr X:0.01, Gyr Y:0.01, Gyr Z:-0.00
 |Mag X:0.09, Mag Y:0.36, Mag Z:-0.56 |Roll:-0.91, Pitch:-6.29, Yaw:37.35, Hdg:232.65
Stretch out the terminal window to get a whole line of IMU data, then move the training-kit around and observe how the raw acceleration, gyroscope and magnetometer readings, as well as fused roll, pitch and heading angles vary. Press ctrl+c to exit.
3.4 Global Positioning System (GPS) [top]
While GPS does not work underwater, AUVs use GPS to initialize the position while on the water surface. SeaBeaver II vehicles use an Adafruit Ultimate GPS Breakout V3 as the GPS module (https://cdn-learn.adafruit.com/downloads/pdf/adafruit-ultimate-gps.pdf). This module is connected to the PocketBeagle via the UART interface.
You can unit test the GPS by using the linux minicom tool (https://linux.die.net/man/1/minicom). Minicom will display the NMEA strings that the GPS outputs.
$ minicom -D /dev/ttyO0 -b 9600 -w
If the GPS is connected to the PocketBeagle properly, and is it working order, you will see an output similar to this:
 Welcome to minicom 2.7.1

 OPTIONS: I18n
 Compiled on May  6 2018, 10:36:56.
 Port /dev/ttyO0, 22:10:29

 Press CTRL-A Z for help on special keys

 $GPGGA,222359.000,4221.5879,N,07106.2830,W,1,06,1.24,3.5,M,-33.7,M,,*51
 $GPGSA,A,3,06,12,05,11,25,19,,,,,,,1.56,1.24,0.95*04
 $GPRMC,222359.000,A,4221.5879,N,07106.2830,W,0.40,139.56,300324,,,A*74
 $GPGGA,222400.000,4221.5880,N,07106.2831,W,1,06,1.24,3.5,M,-33.7,M,,*5D
 $GPGSA,A,3,06,12,05,11,25,19,,,,,,,1.56,1.24,0.95*04
 $GPRMC,222400.000,A,4221.5880,N,07106.2831,W,0.41,139.56,300324,,,A*79
 $GPGGA,222401.000,4221.5881,N,07106.2831,W,1,06,1.24,3.5,M,-33.7,M,,*5D
 $GPGSA,A,3,06,12,05,11,25,19,,,,,,,1.56,1.24,0.95*04
 $GPRMC,222401.000,A,4221.5881,N,07106.2831,W,0.45,139.56,300324,,,A*7D
Try to figure out what these data strings mean (hint: these are NMEA sentences.) Note: The GPS may not be able to receive satellite signals inside! To exit from minicom, press ctrl+A and then X.
4 Unit testing actuators
Now let's focus on unit testing the actuators.
4.1 Control surfaces [top]
The servo motors that actuates the control surfaces of the SeaBeaver II AUVs are driven by Pulse-Width Modulation (PWM) commands provided by the PocketBeagle. The signal lines of the servo motors are connected to certain Programmable Real-time Unit (PRU) output pins of the PocketBeagle that are configured to generate necessary PWM signals. Within the range, each PWM command corresponds to a certain position/angle of the servo motor.
You can test the servo motors that run the control surfaces by running test_control_surfaces program:
$ test_control_surfaces
If the servos are properly connected to the J6 pins of the daughter board, you will observe the servos moving, one at a time. Press ctrl+c to exit.
4.2 Main propulsion thruster [top]
WARNING: Always consider that the main thruster is live. Do NOT put fingers near the propeller while the thruster is plugged in!
SeaBeaver II AUVs use a Blue Robotics T200 thrusters (https://bluerobotics.com/store/thrusters/t100-t200-thrusters/t200-thruster-r2-rp/) as the main propulsion thruster. Similar to the servo motors, the main thruster is driven by PWM signals signals. However, in this case, PWM signals correspond to a speed value of the thruster. You can test the main thruster by running test_br_thruster program:
$ test_br_thruster
Now you will be asked to provide a thruster percentage value. If you are testing the actual Blue Robotics T200 thruster, please do not provide a value beyond 50%. 20% is a good value to test the Blue Robotics T200 thrusters.
 debian@beaglebone:~$ test_br_thruster
 Enter thruster percentage between 100 and -100. ctrl-c to exit: 20
If everything is in proper order, you will now see the propeller turning. {\color{red} Note: Please do not run the Blue Robotics T200 thruster in air for more than 10 seconds as it will overheat.} You may run the mockup main motor provided in your training-kit as long as you like.
4.3 Light Emitting Diode (LED) indicators [top]
While the LED indicators are not crucial for SeaBeaver II AUVs, they can make the vehicle operators' lives easier by indicating the current status of the vehicle, increasing the mission success rate. They are connected to the PocketBeagle using the general purpose input/output (GPIO) pins. You can test them by running the test_leds program:
$ test_leds
If everything is working as expected, the LEDs should now start blinking, one at a time. Press ctrl+c to exit.
5 Software-in-the-loop (SITL) simulations
The missions-seabeaver launch framework is designed in a way that we are able to simulate the mission, either software-in-the-loop (i.e. in the topside laptop) or hardware-in-the-loop (i.e. on the vehicle itself) fashion; and deploy the same mission in the field in runtime mode. This way we can ensure that the mission has been setup correctly and the hardware is working properly, before deploying a vehicle in the field. In SITL simulations, as shown in Figure 5.1, the frontseat, backseat and VECTORS MOOS communities are all launched in the topside computer.
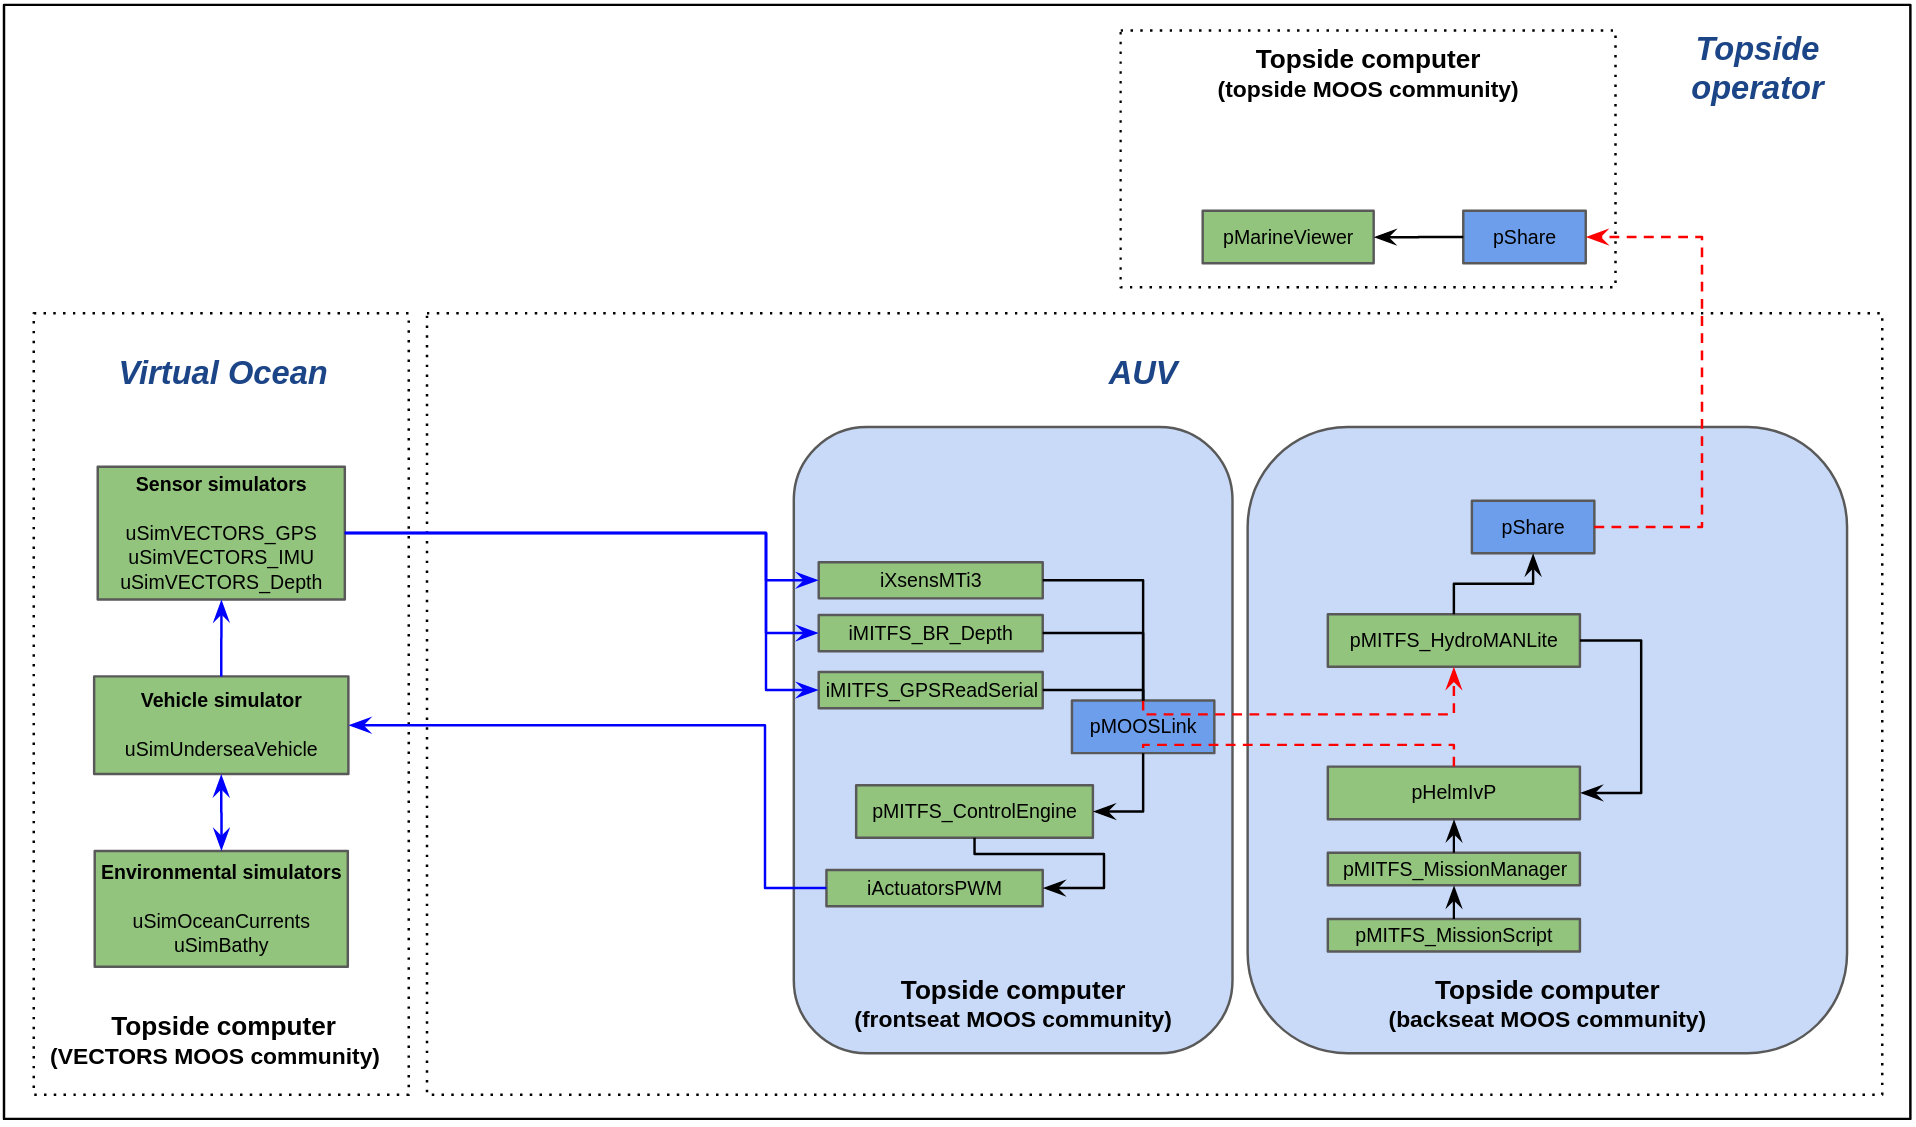
Figure 5.1: In software-in-the-loop simulations, frontseat, backseat and VECTORS MOOS communities are all launched on the topside computer
Before launching a mission using missions-seabeaver, you need to configure three things:
- The vehicle architecture: This is the vehicle class; SeaBeaver II in our case.
- The vehicle name: Sometimes each vehicle has have slightly unique parameters. So we need to define what our vehicle is.
- The cruise (or mission): This is will tell the mission-specific parameters.
Configuring and launching is done in the launch_scripts directory on the topside computer (class laptop.) So let's go there:
Open a new Terminal window on your class laptop, then:
$ cd ~/missions-seabeaver/launch_scripts/
5.1 Defining the vehicle architecture [top]
First, configure the vehicle architecture. Run the following command to list all the available architectures, and you should get a similar output:
 $ ./configure_architecture.sh
 usage: ./architecture_config.sh {architecture-name}

 current architecture is set to:
 (not set)

 available architectures include:
 seabeaver_ii.def
 template_architecture.def
As you can see, there are two available architectures (1) seabeaver_ii, and (2) template_architecture. Let's select our vehicle architecture; i.e. seabeaver_ii:
$ ./configure_architecture.sh seabeaver_ii
note: make sure that you exclude the suffix [.def]. I.e. do NOT configure like this: ./configure_architecture.sh seabeaver_ii.def
5.2 Defining the vehicle [top]
Now let's configure the vehicle name. Run the ./configure_vehicle.sh script to list all the available vehicles, and you should get a similar output:
$ ./configure_vehicle.sh
It will give you an output similar to this:
 $ ./configure_vehicle.sh
 usage: ./vehicle_config.sh {vehicle-name}

 current vehicle is set to:
 (not set)

 current sensor_config.txt is set to:
 (not set)

 available vehicles include:
 sb2_alpha.def
 template_uuv.def
At a minimum, there will be two vehicles: (1) sb2_alpha, and (2) template_uuv. In later sessions, you will create a definition file for your own vehicle. But for now, let's use the sb2_alpha AUV's definition. Configure the vehicle:
$ ./configure_vehicle.sh sb2_alpha
5.3 Defining the cruise [top]
Finally, we will configure the cruise, or the mission, that we need to run. Run the ./configure_cruise.sh script to list all the available cruises:
 $ ./configure_cruise.sh
 usage: ./cruiseconfig.sh {cruisename}

 current cruise definition is set to:
 b_zigzag.def

 current pMITFS_MissionScript plug is set to:
 b_zigzag_pMITFS_MissionScript.plug

 available cruise names include:
 a_confidence.def
 bench_test.def
 b_zigzag.def
 lab_4_do_nothing_log_data.def
 shipwreck_search.def
 template_cruise.def
In this lab, we are going to simulate the shipwreck_search mission. Let's select that:
 $ ./configure_cruise.sh shipwreck_search
 Successfully configured the cruise to shipwreck_search in sb-topside-4!
5.4 Launching a software-in-the-loop simulated mission [top]
Now we can launch the mission as a software-in-the-loop simulation by executing launch_simulation.sh script on the topside computer (class laptop):
$ ./launch_simulation.sh
On the terminal, you will see an output similar to this:
 $ ./launch_simulation.sh

 Launching Frontseat-Backseat mode..
 SITL launch in process..
 Launching mode is: FRONTBACK_FRONT
 Part 3: Assembling targ_ Frontseat .moos ... Done
 Part 3: Assembling targ_ Frontseat .bhv ... Done
 Launching Frontseat MOOS Community. WARP is 1
 Done
 SITL launch in process..
 Launching mode is: FRONTBACK_BACK
 Part 3: Assembling targ_ Backseat .moos ... Done
 Part 3: Assembling targ_ Backseat .bhv ... Done
 Part 3: Assembling targ_ VECTORS .moos ... Done
 Launching Backseat MOOS Community. WARP is 1
 Done
 Launching VECTORS MOOS Community. WARP is 1
 Done
 uMAC launching as uMAC_5881

 uMAC_5881 thread spawned
 starting uMAC_5881 thread
 1713245491.3322 140123404248832-                           disabling nagle

 -------------- moos connect ----------------------
   contacting a MOOS server localhost:9250 -  try 00001
   Handshaking as uMAC_5881              [ok]
   DB reports async support is           [on]
   DB is running on                      sb-topside-4
   Timing skew estimation is             [off] (not needed)
 --------------------------------------------------

 uMAC_5881 is Running:
  |-Baseline AppTick   @ 5.0 Hz
  |--Comms is Full Duplex and Asynchronous
  -Iterate Mode 0 :
    |-Regular iterate and message delivery at 5 Hz

 ==================================================
 uMAC_5881:  Nodes (0)                   (1) EVENTS
 ==================================================
 AppCasts Recd: 0

 ID  Node  HMode  Recd  CWarns  RWarns
 --  ----  -----  ----  ------  ------

 ==================================================
 uMAC_5881:  Nodes (1)                   (2) EVENTS
 ==================================================
The pMarineViewer window will come up shortly. The mission will automatically start after 30 seconds, and will run for 7 minutes total. The mission is to go to the middle of the river, conduct a short zig-zag pattern search mission, and loiter until the 7 minute runtime is complete. Observe the followings:
- You will see two vehicle icons; one with the name SB2_ALPHA, and the other SB2_ALPHA_GT. The two vehicles will start at the same location, and then diverge. GT stands for the ground truth; that is, the actual position of the simulated vehicle. The SB2_ALPHA is the navigation solution computed by onboard navigation system; i.e. pMITFS_HydroMANLite application. During our underwater navigation session, we discuss the reasons for this divergence, and how to minimize it.
- You will also note that the vehicle is not able to conduct a clear zig-zag pattern, and it wiggles. During our controls session, we will discuss the reasons for this, and how to minimize it.
- Observe the heading, speed and depth values of the vehicle displayed on the bottom-side on the pMarineViewer window.
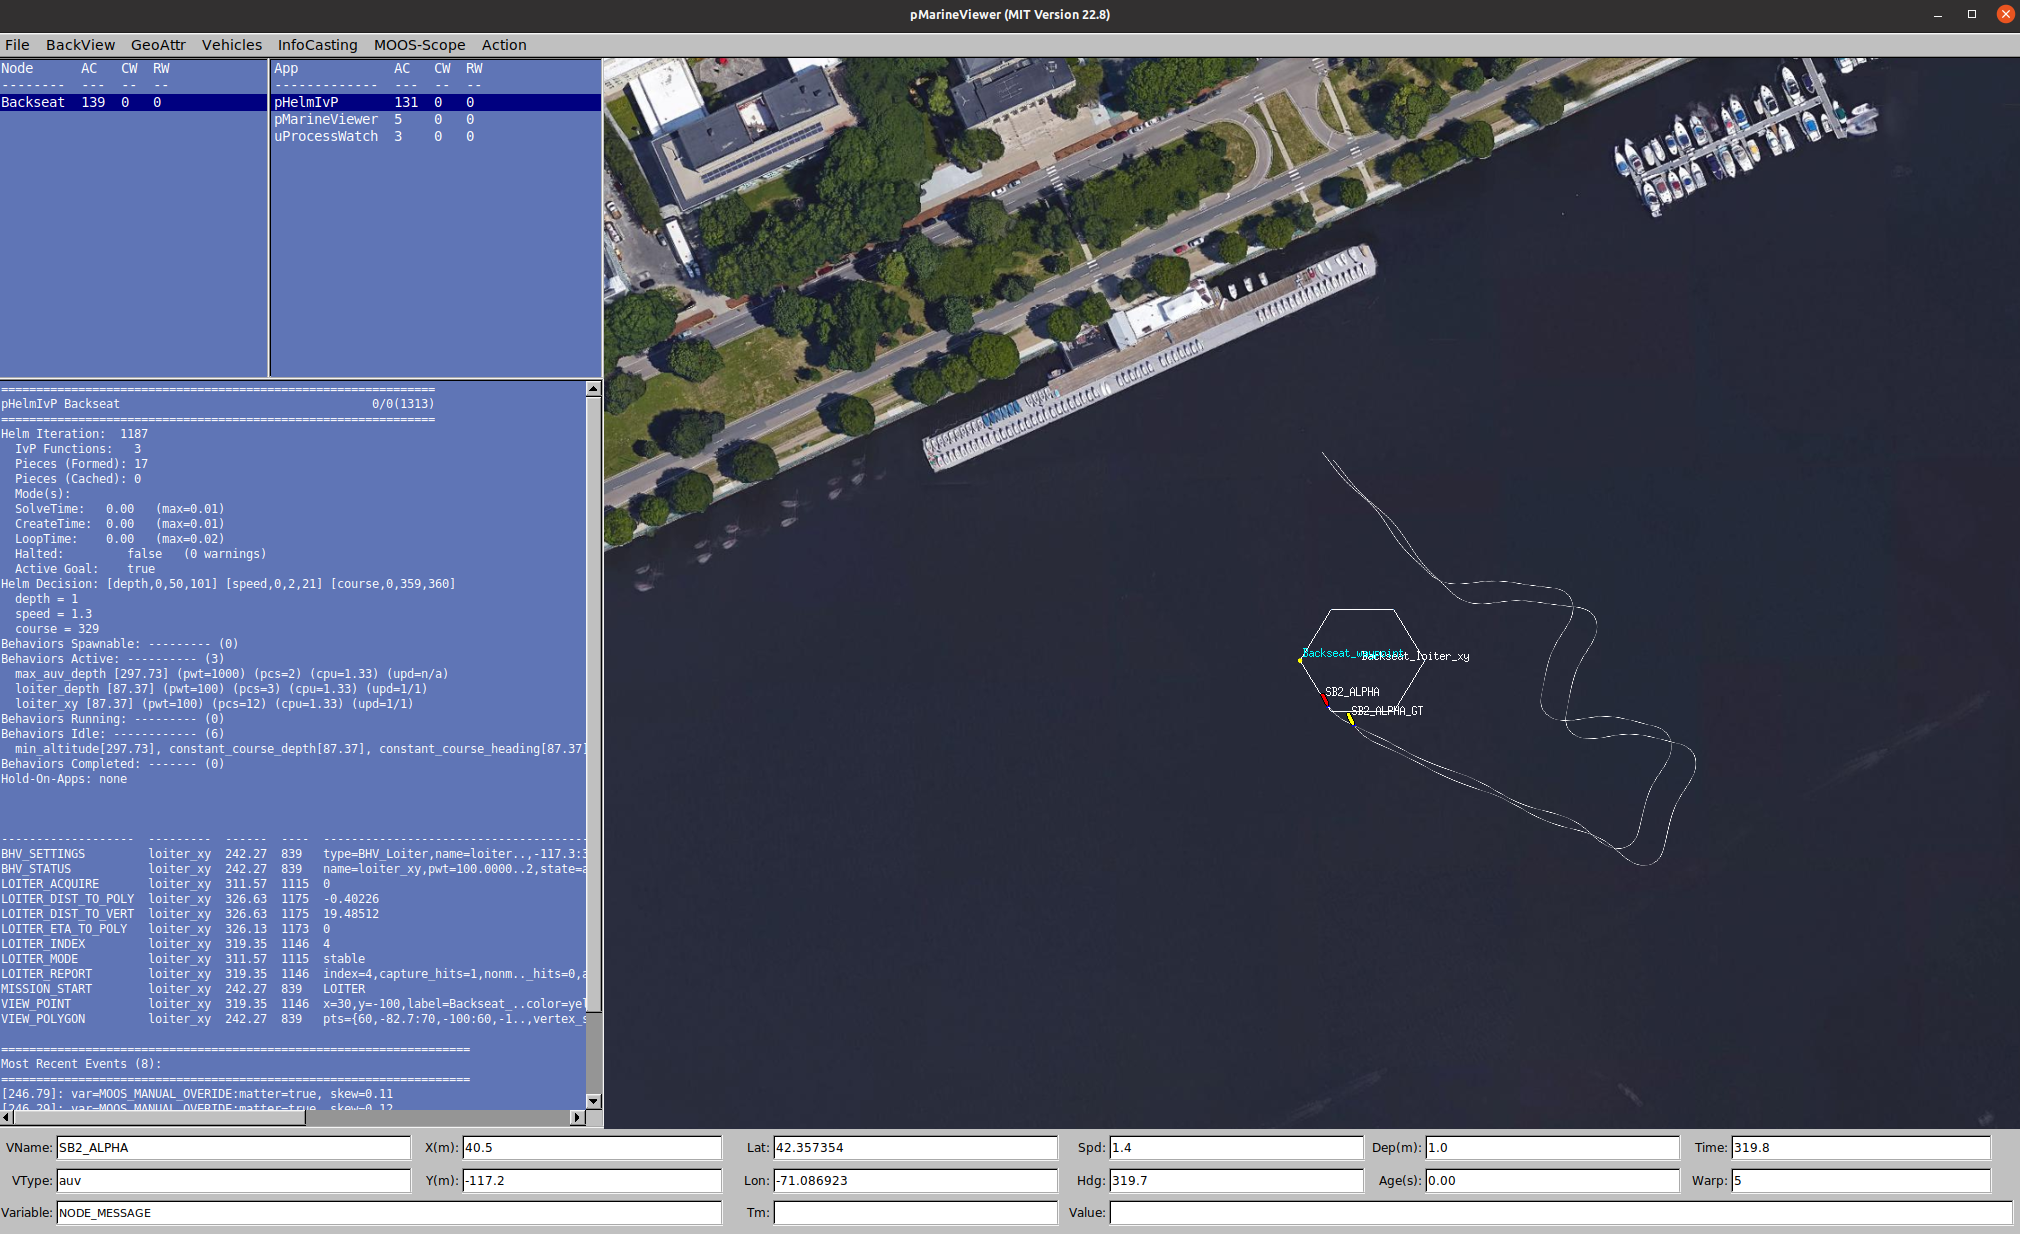
Figure 5.2: pMarineViewer window for the shipwreck_search mission
The software-in-the-loop simulations can be sped-up by time warping. That is, we can simulate missions faster than real time by appending the time warp factor at the end of ./launch_simulation.sh command. For example, if you want to run the simulation 5 times faster than real time:
$ ./launch_simulation.sh 5
Please do NOT time warp hardware-in-the-loop simulations since the servo motors and the thruster can be damaged.
5.5 Killing the mission [top]
You can press ctrl+c on the terminal to kill the mission. To be safe, you can also use ktm command (kill-the-moos) and kill all the MOOS processes.
6 Hardware-in-the-loop (HITL) simulations
Hardware-in-the-loop simulations allow us to test the majority of software and hardware components at a lower cost, minimizing the required in-water testing time and the risk of expensive failures. In SeaBeaver HITL simulations, we try to run the software in the respective computers where they are supposed to run during in-water operation to minimize any deviations. That is:
- The Frontseat MOOS community runs in the PocketBeagle.
- The Backseat MOOS community runs in the Raspberry Pi.
- The Topside MOOS community runs in the topside computer.
- The VECTORS MOOS community (simulating the ocean environment) runs in the Raspberry Pi. This is the only case where software is running that is not running during an actual mission.
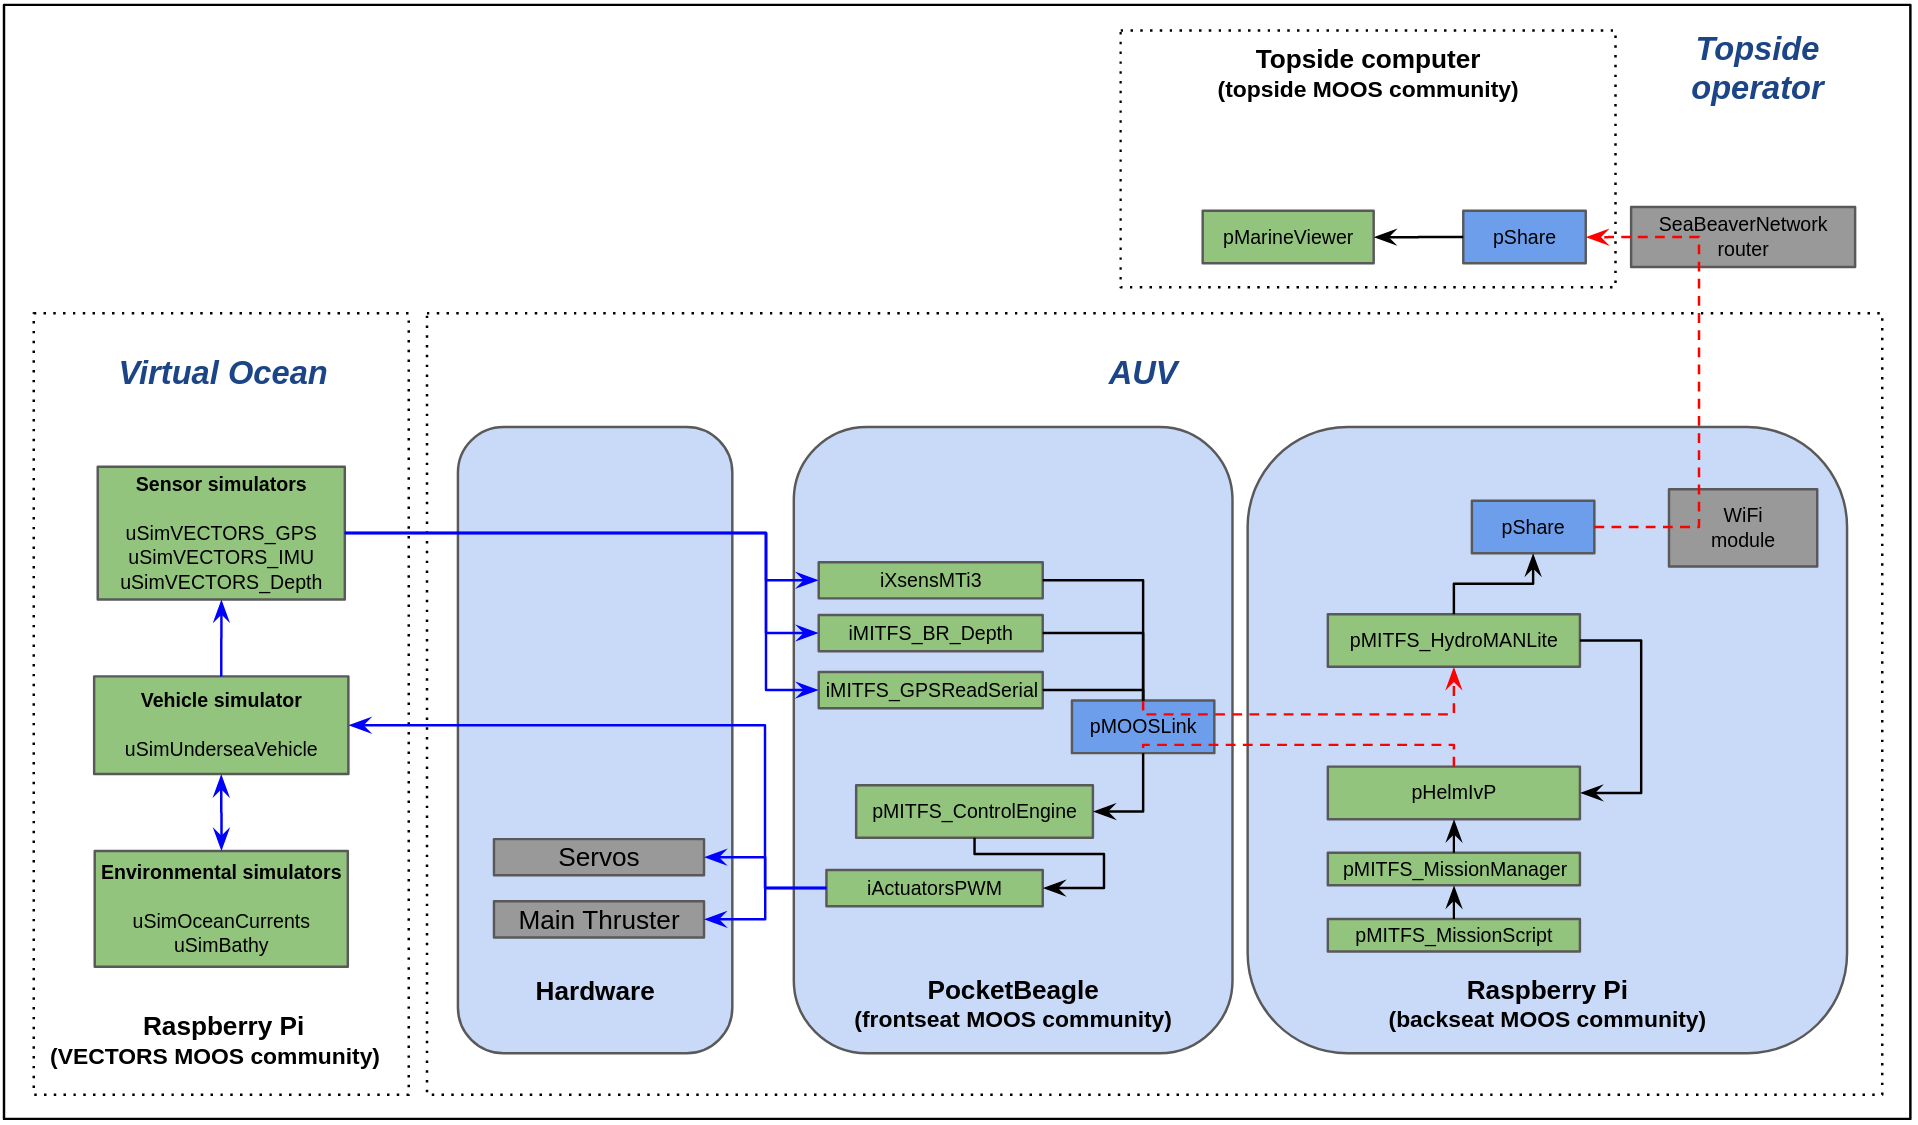
Figure 6.1: Four MOOS communities are launched during hardware-in-the-loop simulations
6.1 Defining the architecture, vehicle and cruise [top]
As in SITL simulation, we need to configure the architecture, vehicle, and cruise on the Topside computer. We also need to configure the mission on the Raspberry Pi and PocketBeagle. However, when run on the Raspberry Pi, the configuration scripts will automatically apply the same configuration to the PocketBeagle using remote SSH commands, so we do not have to do that. Let's try it.
Please log into the Raspberry Pi and change directory to missions-seabeaver.
$ cd ~/missions-seabeaver
On the Raspberry Pi, configure the architecture to seabeaver_ii by using the following command:
 $ cd launch_scripts/
 $ ./configure_architecture.sh seabeaver_ii
 Successfully configured the architecture to seabeaver_ii in seabeaver-raspi!
 Configuring the architecture on the PocketBeagle. Architecture name: seabeaver_ii
 Debian GNU/Linux 10

 BeagleBoard.org Debian Buster IoT Image 2020-04-06

 Support: http://elinux.org/Beagleboard:BeagleBoneBlack_Debian

 default username:password is [debian:temppwd]

 Successfully configured the architecture to seabeaver_ii in debian!
Similarly, configure the vehicle to sb2_alpha and cruise to shipwreck_search on the Raspberry Pi:
 $ ./configure_vehicle.sh sb2_alpha
 Successfully configured the vehicle to sb2_alpha in seabeaver-raspi!
 Configuring the vehicle on the PocketBeagle. Vehicle name: sb2_alpha
 Debian GNU/Linux 10

 BeagleBoard.org Debian Buster IoT Image 2020-04-06

 Support: http://elinux.org/Beagleboard:BeagleBoneBlack_Debian

 default username:password is [debian:temppwd]

 Successfully configured the vehicle to sb2_alpha in debian!

 $ ./configure_cruise.sh shipwreck_search
 Successfully configured the cruise to shipwreck_search in seabeaver-raspi!
 Configuring the cruise on the PocketBeagle. Cruise name: shipwreck_search
 Debian GNU/Linux 10

 BeagleBoard.org Debian Buster IoT Image 2020-04-06

 Support: http://elinux.org/Beagleboard:BeagleBoneBlack_Debian

 default username:password is [debian:temppwd]

 Successfully configured the cruise to shipwreck_search in debian!
6.2 Launching the topside [top]
We typically launch the topside MOOS community before launching the backseat or frontseat MOOS communities. Before launching the topside, we need to configure the architecture, vehicle, and cruise on the topside computer as well:
 $ cd ~/missions-seabeaver/launch_scripts/
 $ ./configure_architecture.sh seabeaver_ii
$ ./configure_vehicle.sh sb2_alpha
$ ./configure_cruise.sh shipwreck_search
We are almost ready to launch the topside, but first run ifconfig and get the ip address of the topside:
 $ ifconfig

 lo: flags=73<UP,LOOPBACK,RUNNING>  mtu 65536
         inet 127.0.0.1  netmask 255.0.0.0
         inet6 ::1  prefixlen 128  scopeid 0x10<host>
         loop  txqueuelen 1000  (Local Loopback)
         RX packets 379469  bytes 59747567 (59.7 MB)
         RX errors 0  dropped 0  overruns 0  frame 0
         TX packets 379469  bytes 59747567 (59.7 MB)
         TX errors 0  dropped 0 overruns 0  carrier 0  collisions 0

 wlp0s20f3: flags=4163<UP,BROADCAST,RUNNING,MULTICAST>  mtu 1500
         inet HERE IS THE IP! >>> 192.168.0.102 netmask 255.255.255.0  broadcast 192.168.0.255
         inet6 fe80::731f:7b8e:2326:8e73  prefixlen 64  scopeid 0x20<link>
         ether 14:75:5b:b9:db:42  txqueuelen 1000  (Ethernet)
         RX packets 4784758  bytes 5668111410 (5.6 GB)
         RX errors 0  dropped 0  overruns 0  frame 0
         TX packets 1548473  bytes 575385379 (575.3 MB)
         TX errors 0  dropped 0 overruns 0  carrier 0  collisions 0
In this case, the ip address is 192.168.0.102. Remember this!
Finally we are ready to launch the topside:
$ ./launch_topside.sh
The pMarineViewer window should open. However, you will not see any vehicles until you launch the backseat and frontseat.
6.3 Launching the hardware-in-the-loop simulation mission [top]
Similar to the configurations, if you launch the mission on the Raspberry Pi (i.e. backseat), it will automatically launch the frontseat on the PocketBeagle. We can use the ./launch_hitl.sh script to launch the mission. However, we do need to let the backseat MOOS community know the IP address of the designated topside laptop by using --topside= flag; for example, run this on the Raspberry Pi:
$ ./launch_hitl.sh --topside=192.168.0.102
Now the two vehicle icons (i.e., SB2_ALPHA, and SB2_ALPHA_GT) should appear, and they should start the same shipwreck_search mission that we can in SITL mode. However, this time the mock-up control surfaces and thruster on your training-kit should move.
Observe the following:
- Movement of the rudder with heading changes.
- Movement of the elevators with heading changes.
- Movement of the elevators with depth (note that the mission expects to run the vehicle at 1m depth).
Please do NOT time warp hardware-in-the-loop simulations since the servo motors and the thruster can be damaged.
6.4 Killing the mission [top]
You can press ctrl+c on the Raspberry Pi terminal to kill both the frontseat and the backseat. However, if the servo motors did not stop, please log into the PocketBeagle and use ktm command (kill-the-moos) and kill all the MOOS processes. Press ctrl+c on the topside terminal to kill the topside MOOS community.
7 Running "in real life" (unsimulated)
Although we will not be running the Training Kit in water, it behaves like the actual AUV, and we can use it to learn the launch procedures and see how the AUV would respond to changes in heading or pitch, for example. We will now run a very short and simple mission as the initial deployment, named a_confidence.
In this mission, the propeller will start to spin 10 seconds after you launched the mission. It will end (i.e. mission completion) at 120 seconds (i.e. one minute of flight time).
There is only one constant course mission in the mission profile, which will command the vehicle to go at a heading of 150 degree, depth of 1 m and a speed of 0.8 m/s.
Configure the vehicle using following commands on the Raspberry Pi:
 $ cd missions-seabeaver/launch_scripts
 $ ./configure_architecture.sh seabeaver_ii
 $ ./configure_vehicle.sh sb2_alpha
 $ ./configure_cruise.sh a_confidence
Launch the mission on the Raspberry Pi using the following command (no need to run the topside!)
$ launch_runtime.sh
The mission will start in 10 seconds. The white LED indicator will start to blink faster 10 seconds before the propeller starts to spin.
Try the following:
- Vary the heading (yaw.) What happens to the rudder? Can you find the heading that is called for by the mission?
- Vary the pitch of the Kit? Do the actions of the elevons make sense?
- Slowly roll the Kit? Do the actions of the fins make sense?
7.1 Killing the mission [top]
After the mission, you can enter ctrl+c to kill the mission.
Document Maintained by: supun@mit.edu
Page built from LaTeX source using texwiki, developed at MIT. Errata to issues@moos-ivp.org.  Get PDF