Lab 5 - Software and Hardware in the Loop Simulations
1 Objectives
2 Building the software stack on the topside computer
2.1 Building moos-ivp
2.2 Installing VECTORS and building MITFrontseat
2.3 Building MITFrontseat-drivers
2.4 Downloading missions-seabeaver
2.5 Adding to shell path
2.6 Self checkoff assessment
3 Software-in-the-loop (SITL) simulations
3.1 Defining the vehicle architecture
3.2 Defining the vehicle
3.3 Defining the cruise
3.4 Launching a software-in-the-loop simulated mission
3.5 Killing the mission
3.6 Self checkoff assessment
4 Building the software stack on the Raspberry Pi
4.1 Updating pablo-common
4.2 Updating MITFrontseat and installing VECTORS
4.3 Updating MITFrontseat-drivers
4.4 Updating missions-seabeaver
4.5 Self checkoff assessment
5 Building the software stack on the PocketBeagle
5.1 Updating the software repositories
5.2 Self checkoff assessment
6 Hardware-in-the-loop (HITL) simulations
6.1 Defining the architecture, vehicle and cruise
6.2 Launching the topside
6.3 Launching the hardware-in-the-loop simulation mission
6.4 Killing the mission
6.5 Self checkoff assessment
1 Objectives
- Setting up your topside computer - downloading and building the latest versions of MITFrontseat, MITFrontseat-drivers, VECTORS, missions-seabeaver and pablo-common software trees.
- Setting up the Raspberry Pi in your training-kit - updating and rebuilding MITFrontseat, MITFrontseat-drivers, VECTORS, missions-seabeaver and pablo-common software trees.
- Setting up the PocketBeagle in your training-kit - updating and rebuilding MITFrontseat, MITFrontseat-drivers, VECTORS, missions-seabeaver and pablo-common software trees.
- Learning how to run software-in-the-loop simulations on your topside computer.
- Learning how to run hardware-in-the-loop simulations using the training-kit and topside computer.
2 Building the software stack on the topside computer
First, we need to download and build the following MIT software projects on our topside as well as embedded computers, which are used in SeaBeaver II architecture.
- moos-ivp: This project contains our middleware, MOOS, and our autonomy helm software, pHelmIvP. It also includes a number of utility tools such as uXMS, uPokeDB, pMarineViewer, alogview, etc., that we will use throughout this class. We will build moos-ivp from its source-code, downloaded from an subversion (SVN) repository.
- VECTORS: This is our virtual ocean environment software. While this software is not used in runtime (i.e. when the vehicle is deployed in-water), we will use VECTORS for our software and hardware in the loop simulations. In 2.S01, we will not download the source-code repository of VECTORS. Instead, we will install it from a linux package distribution.
- MITFrontseat: This is our primary embedded software stack, which contains mission planning (pMITFS_MissionScript), mission commanding (pMITFS_MissionManager), underwater navigation (pMITFS_HydroMANLite) and control (pMITFS_ControlEngine) software. We will build MITFrontseat from its source-code, downloaded from a git repository.
- MITFrontseat-drivers: This contains the low-level software drivers that interfaces with hardware components of the SeaBeaver AUVs; for example the AHRS driver iXsensMTi3, actuator driver iActuatorsPWM, GPS driver iMITFS_GPSReadSerial, etc. We will build MITFrontseat-drivers from its source-code, downloaded from a git repository.
- missions-seabeaver: This is our mission launch framework. This repository primarily contains the configuration parameters of various MOOS apps that we use; and a number of shell scripts, carefully designed for seamless mission execution. This does not contain c++ code, hence building is not necessary. We download missions-seabeaver from a git repository.
- pablo-common: This is very small software project that contains some configuration parameters in the operating system level (e.g. the software that assigns the vehicle names for your training-kit, based on the MAC address of the computer). It is downloaded from a subversion (SVN) repository.
Some of these software projects have their own dependencies (for example, MITFrontseat depends on the Google Protocol Buffers and Boost C++ libraries, and MITFrontseat-drivers depends on the Robot Control Library).
2.1 Building moos-ivp [top]
At this point, you have already completed Lab A - Course Laptop Setup (https://oceanai.mit.edu/2.S01/labs), so we assume that you have successfully built moos-ivp on your topside laptop, and you are able to run the alpha mission example. If this is not the case, please complete Lab A - Course Laptop Setup.
2.2 Installing VECTORS and building MITFrontseat [top]
For the 2.S01 class, the VECTORS software package is provided to you with MITFrontseat repository; therefore, we need to download MITFrontseat first. Your topside and embedded computers are given permission to access MITFrontseat via https://github.com/supun-randeni/MITFrontseat. First you need to clone this repository to your home directory (e.g. /home/sb-topside-4/)

 $ cd ~
 $ git clone git@github.com:supun-randeni/MITFrontseat.git
If you successfully cloned MITFrontseat to your topside computer, you will see something similar to this.
 sb-topside-4@sb-topside-4:~$ git clone git@github.com:supun-randeni/MITFrontseat.git
 Cloning into 'MITFrontseat'...
 Warning: Permanently added the ECDSA host key for IP address '140.82.112.4' to
 the list of known hosts.
 remote: Enumerating objects: 583, done.
 remote: Counting objects: 100% (583/583), done.
 remote: Compressing objects: 100% (282/282), done.
 remote: Total 583 (delta 404), reused 477 (delta 298), pack-reused 0
 Receiving objects: 100% (583/583), 16.47 MiB | 7.14 MiB/s, done.
 Resolving deltas: 100% (404/404), done.
However, if you get the following error message, your permission is not properly set. Please contact an instructor:
 sb-topside-4@sb-topside-4:~$ git clone git@github.com:supun-randeni/MITFrontseat.git
 Cloning into 'MITFrontseat'...
 Warning: Permanently added the ECDSA host key for IP address '140.82.114.3' to
 the list of known hosts.
 git@github.com: Permission denied (publickey).
 fatal: Could not read from remote repository.

 Please make sure you have the correct access rights
 and the repository exists.
Once you cloned successfully, if you use the ls command, you can see MITFrontseat in your home directory:
 $ cd ~
 $ ls
 Desktop Documents   Downloads   MITFrontseat    moos-ivp
 Music   Pictures    Public  snap    Templates   Videos
Let's go to MITFrontseat and explore:
 $ cd ~/MITFrontseat/
 $ ls
 build.sh	cmake_modules		  README.md	     scripts
 CMakeLists.txt	COPYING-MITFrontseat.txt  release-notes.txt  src
The git version control system allows you to branch out your software, so that we can modify the code and create new features without affecting the main code in the master branch, and other people's workflow (we encourage you to read more about version control, git and git branching on your own time). MITFrontseat is currently used by several MIT and external programs. Therefore, we have created a branch called 2.s01 for this class, so that we don't interrupt those projects. You can check your current branch by using the git branch command. It will output something similar to this, which means you are currently in a branch called master:
 $ git branch
 * master
Let's switch to the 2.s01 branch by using the command git checkout 2.s01. If you successfully switched to the branch, you will see an output similar to this:
 $ git checkout 2.s01
 Branch '2.s01' set up to track remote branch '2.s01' from 'origin'.
 Switched to a new branch '2.s01'
You can use the git pull command to update the repository (i.e. to get the latest version of the code).
 $ git pull
 Already up to date.
Now that we are in 2.s01 branch with the most up-to-date code, we need to build MITFrontseat. However, we need to install the dependencies first, including VECTORS. To make things easier for you, we have created an automated script to do that. This script is located in MITFrontseat/scripts directory. Let's go there and execute this script:
 $ cd ~/MITFrontseat/scripts/
 $ sudo ./dependencies.sh
 [sudo] password for sb-topside-4:
Please enter the password of the topside computer when you are asked to do so. The dependency installation might take a several minutes. When it is done, you can check if VECTORS is successfully installed by using the command which iVECTORS_Gateway. It should give an output similar to follows. If you get a blank response, please talk to an instructor.
 $ which iVECTORS_Gateway
 /usr/local/bin/iVECTORS_Gateway
Now you have installed all the dependencies. It is time to build MITFrontseat:
 $ cd ~/MITFrontseat/
 $ ./build.sh
Let it build.. While it is building, check if it exits with errors.
2.3 Building MITFrontseat-drivers [top]
Your topside and embedded computers are given permission to access MITFrontseat-drivers via https://github.com/supun-randeni/MITFrontseat-drivers. Similar to MITFrontseat, first you need to clone this repository to your home directory (e.g. /home/sb-topside-4/)
 $ cd ~
 $ git clone git@github.com:supun-randeni/MITFrontseat-drivers.git
If you successfully cloned MITFrontseat-drivers to your topside computer, you will see it in your home directory:
 $ cd ~
 $ ls
 Desktop    Downloads    MITFrontseat-drivers  Music   Public  Templates
 Documents  MITFrontseat  moos-ivp   Pictures  snap  Videos
Let's go to MITFrontseat-drivers and explore:
 $ cd ~/MITFrontseat-drivers/
 $ ls
 build.sh    cmake_modules   README.md   scripts
 CMakeLists.txt  COPYING-MITFrontseat-drivers.txt  release-notes.txt  src
Similar to MITFrontseat, we need to switch to the 2.s01 branch of MITFrontseat-drivers by using the command git checkout 2.s01. If you successfully switched to the branch, you will see an output similar to this:
 $ git checkout 2.s01
 Branch '2.s01' set up to track remote branch '2.s01' from 'origin'.
 Switched to a new branch '2.s01'
You can use the git pull command to update the repository (i.e. to get the latest version of the code).
 $ git pull
 Already up to date.
Let's install the dependency software packages of MITFrontseat-drivers by running the dependencies.sh script located in in MITFrontseat-drivers/scripts directory:
 $ cd ~/MITFrontseat-drivers/scripts/
 $ sudo ./dependencies.sh
 [sudo] password for sb-topside-4:
Please enter the password of the topside computer when you are asked to do so. The dependency installation might take a several minutes. The screen shown in Figure 2.1 might pop-up when the robot control library is being installed. Please select the option none.
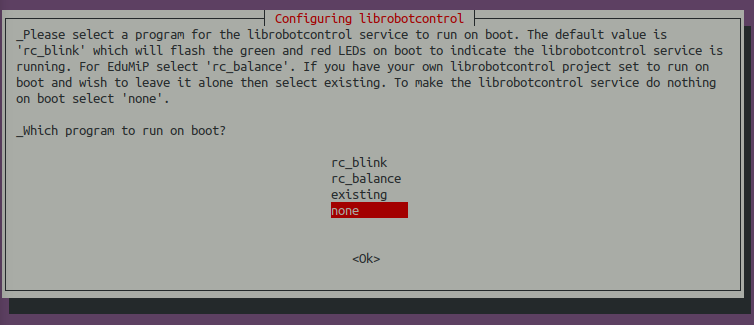
Figure 2.1: Configuring librobotcontrol pop-up window
When it is done, you can check if librobotcontrol is successfully installed by using the command which rc_test_drivers. It should give an output similar to follows. If you get a blank response, please talk to an instructor.
 $ which rc_test_drivers
 /usr/bin/rc_test_drivers
Now you have installed all the dependencies. It is time to build MITFrontseat-drivers:
 $ cd ~/MITFrontseat-drivers/
 $ ./build.sh
Let it build.. While it is building, check if it exits with errors.
2.4 Downloading missions-seabeaver [top]
Your topside and embedded computers are given permission to access missions-seabeaver via https://github.com/supun-randeni/missions-seabeaver. This repository only contains shell scripts and MOOS configuration files; therefore, it is not necessary to build the code. You only need to clone the repository to the home directory (e.g. /home/sb-topside-4/)
 $ cd ~
 $ git clone git@github.com:supun-randeni/missions-seabeaver.git
If you successfully cloned missions-seabeaver to your topside computer, you will see it in your home directory:
 $ cd ~
 $ ls
 Desktop Downloads    MITFrontseat   moos-ivp    Pictures    snap    Videos
 Documents   missions-seabeaver   MITFrontseat-drivers Music  Public   Templates
Let's go inside missions-seabeaver directory and explore:
 $ cd ~/missions-seabeaver/
 $ ls
 architecture  clean_logs.sh  clean.sh  cruise  launch_scripts  meta
 plugs  README.md  release-notes.txt  vehicle
Finally, let's switch to the 2.s01 branch by using the command git checkout 2.s01. If you successfully switched to the branch, you will see an output similar to this:
 $ git checkout 2.s01
 Branch '2.s01' set up to track remote branch '2.s01' from 'origin'.
 Switched to a new branch '2.s01'
You can use the git pull command to update the repository (i.e. to get the latest version of the code).
 $ git pull
 Already up to date.
2.5 Adding to shell path [top]
The locations of MITFrontseat and MITFrontseat-drivers binaries are required to be added to your shell path. In addition, we need to tell the locations of MITFrontseat and MITFrontseat-drivers libraries to the dynamic link loader by adding them to the LD_LIBRARY_PATH. To make your life easier, we have created a text file with these necessary information: MITFrontseat-drivers/scripts/dot_bash_seabeaver. We just need to call this text file from your .bashrc file, and dot_bash_seabeaver will take care of the rest.
Edit your .bashrc file using your favorite text editor, and append the following lines to the end of the file:
 if [ -f $HOME/MITFrontseat-drivers/scripts/dot_bash_seabeaver ]; then
     . $HOME/MITFrontseat-drivers/scripts/dot_bash_seabeaver
 fi
Don't forget to source the .bashrc file using the command:
$ source ~/.bashrc
2.6 Self checkoff assessment [top]
The following should be checked off:
- Ensure that MITFrontseat is built properly, and its binaries are in your shell path by running the following command:
 $ which iVECTORS_MITFS pMITFS_ControlEngine pMITFS_HydroMANLite pMITFS_MissionManager
 pMITFS_MissionScript
It should output something similar to this:
 $ which iVECTORS_MITFS pMITFS_ControlEngine pMITFS_HydroMANLite pMITFS_MissionManager
 pMITFS_MissionScript
 /home/sb-topside-4/MITFrontseat/bin/iVECTORS_MITFS
 /home/sb-topside-4/MITFrontseat/bin/pMITFS_ControlEngine
 /home/sb-topside-4/MITFrontseat/bin/pMITFS_HydroMANLite
 /home/sb-topside-4/MITFrontseat/bin/pMITFS_MissionManager
 /home/sb-topside-4/MITFrontseat/bin/pMITFS_MissionScript
- Ensure that MITFrontseat-drivers is built properly, and its binaries are in your shell path by running the following command:
 $ which calibrate_xsens_mti3 iMITFS_GPSReadSerial pMOOSLink test_br_thruster
 iActuatorsPWM iXsensMTi3 test_control_surfaces iMITFS_BR_Depth mitfs_safety_daemon
It should output something similar to this:
 $ which calibrate_xsens_mti3 iMITFS_GPSReadSerial pMOOSLink test_br_thruster
 iActuatorsPWM iXsensMTi3 test_control_surfaces iMITFS_BR_Depth mitfs_safety_daemon
 /home/sb-topside-4/MITFrontseat-drivers/bin/calibrate_xsens_mti3
 /home/sb-topside-4/MITFrontseat-drivers/bin/iMITFS_GPSReadSerial
 /home/sb-topside-4/MITFrontseat-drivers/bin/pMOOSLink
 /home/sb-topside-4/MITFrontseat-drivers/bin/test_br_thruster
 /home/sb-topside-4/MITFrontseat-drivers/bin/iActuatorsPWM
 /home/sb-topside-4/MITFrontseat-drivers/bin/iXsensMTi3
 /home/sb-topside-4/MITFrontseat-drivers/bin/test_control_surfaces
 /home/sb-topside-4/MITFrontseat-drivers/bin/iMITFS_BR_Depth
 /home/sb-topside-4/MITFrontseat-drivers/bin/mitfs_safety_daemon
3 Software-in-the-loop (SITL) simulations
The missions-seabeaver launch framework is designed in a way that we are able to simulate the mission, either software-in-the-loop (i.e. in the topside laptop) or hardware-in-the-loop (i.e. on the vehicle itself) fashion; and deploy the same mission in the field in runtime mode. This way we can ensure that the mission has been setup correctly and the hardware is working properly, before deploying a vehicle in the field. In SITL simulations, as shown in Figure 3.1, the frontseat, backseat and VECTORS MOOS communities are all launched in the topside computer.
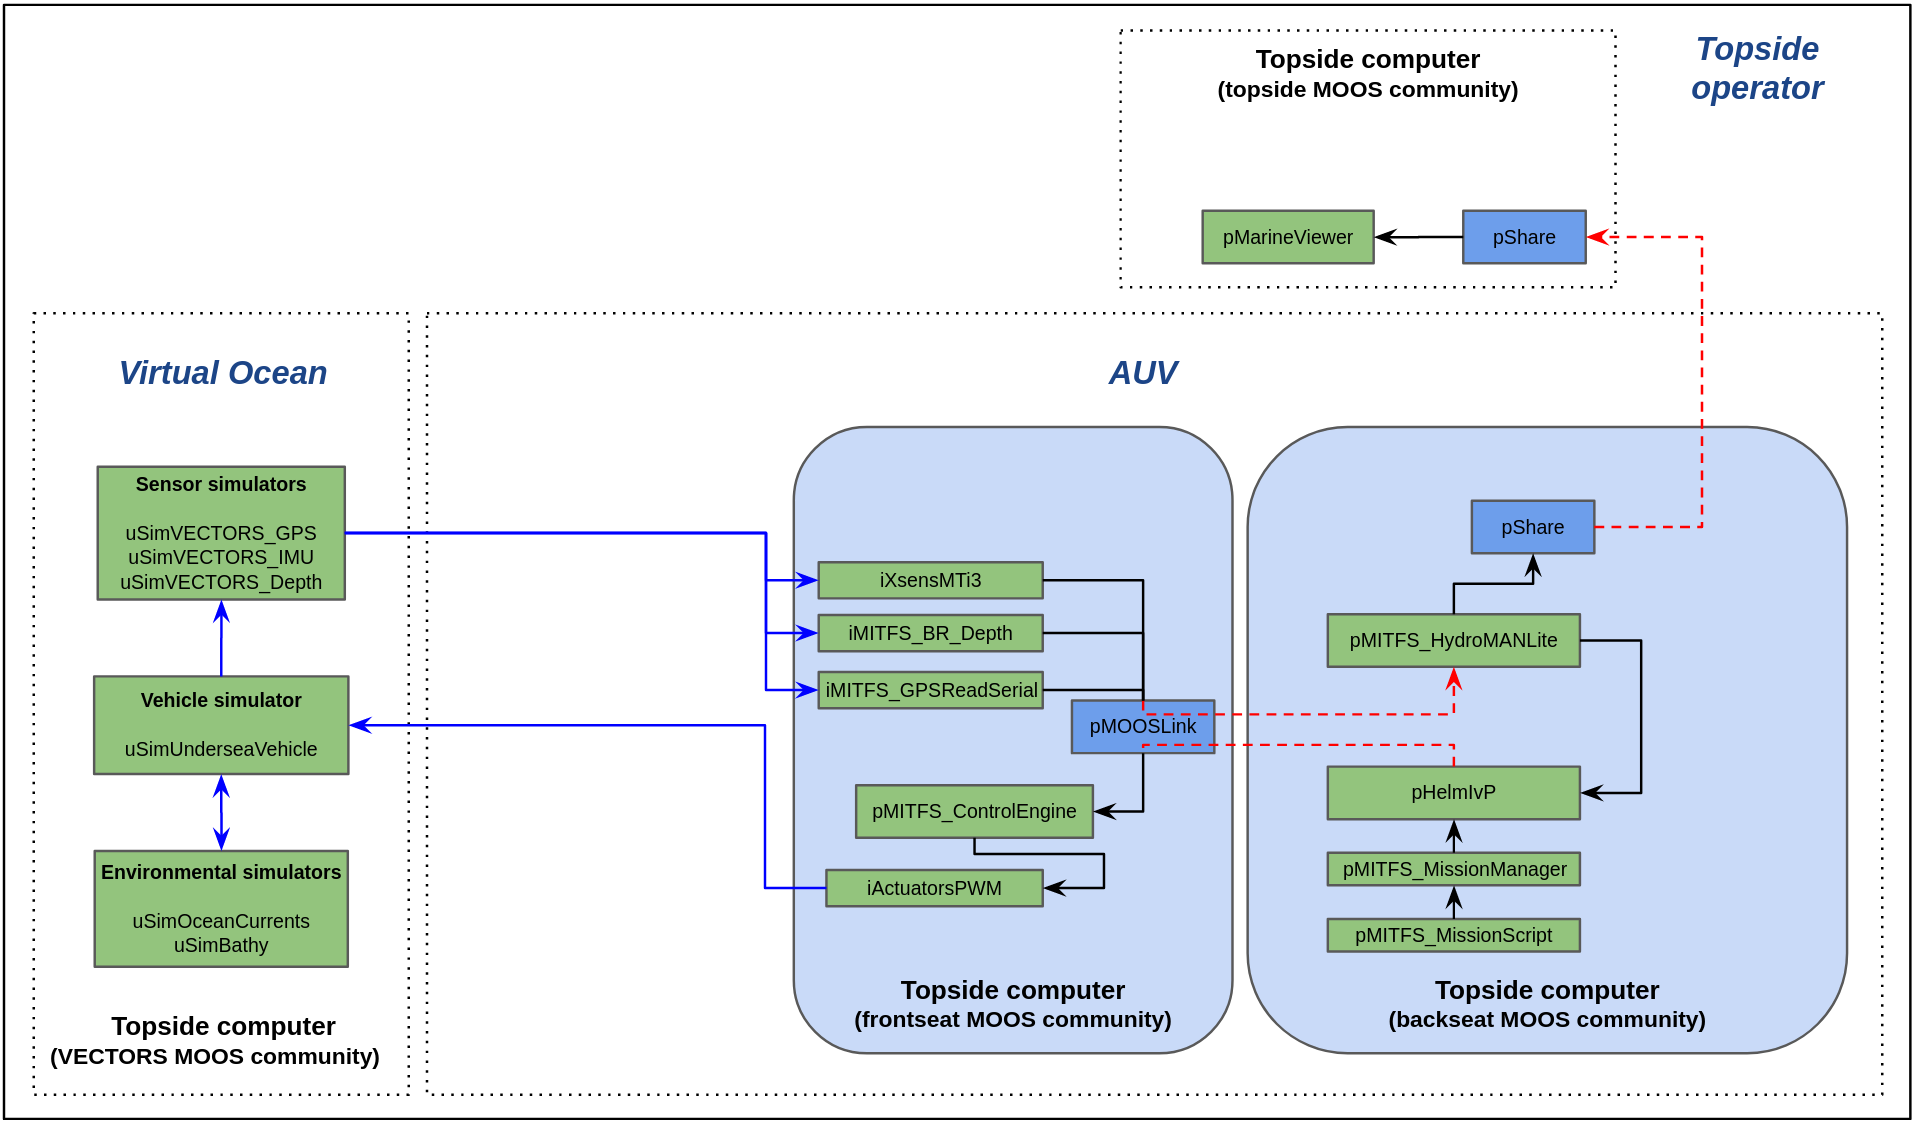
Figure 3.1: In software-in-the-loop simulations, frontseat, backseat and VECTORS MOOS communities are all launched on the topside computer
Before launching a mission using missions-seabeaver, you need to configure three things:
- The vehicle architecture: This is the vehicle class; SeaBeaver II in our case.
- The vehicle name: Sometimes each vehicle has have slightly unique parameters. So we need to define what our vehicle is.
- The cruise (or mission): This is will tell the mission-specific parameters.
Configuring and launching is done in the launch_scripts directory. So let's go there:
$ cd ~/missions-seabeaver/launch_scripts/
3.1 Defining the vehicle architecture [top]
First, configure the vehicle architecture. Run the following command to list all the available architectures, and you should get a similar output:
 $ ./configure_architecture.sh
 usage: ./architecture_config.sh {architecture-name}

 current architecture is set to:
 (not set)

 available architectures include:
 seabeaver_ii.def
 template_architecture.def
As you can see, there are two available architectures (1) seabeaver_ii, and (2) template_architecture. Let's select our vehicle architecture; i.e. seabeaver_ii:
$ ./configure_architecture.sh seabeaver_ii
note: make sure that you exclude the suffix [.def]. I.e. do NOT configure like this: ./configure_architecture.sh seabeaver_ii.def
3.2 Defining the vehicle [top]
Now let's configure the vehicle name. Run the ./configure_vehicle.sh script to list all the available vehicles, and you should get a similar output:
$ ./configure_vehicle.sh
It will give you an output similar to this:
 $ ./configure_vehicle.sh
 usage: ./vehicle_config.sh {vehicle-name}

 current vehicle is set to:
 (not set)

 current sensor_config.txt is set to:
 (not set)

 available vehicles include:
 sb2_alpha.def
 template_uuv.def
At a minimum, there will be two vehicles: (1) sb2_alpha, and (2) template_uuv. In later sessions, you will create a definition file for your own vehicle. But for now, let's use the sb2_alpha AUV's definition. Configure the vehicle:
$ ./configure_vehicle.sh sb2_alpha
3.3 Defining the cruise [top]
Finally, we will configure the cruise, or the mission, that we need to run. Run the ./configure_cruise.sh script to list all the available cruises:
 $ ./configure_cruise.sh
 usage: ./cruiseconfig.sh {cruisename}

 current cruise definition is set to:
 b_zigzag.def

 current pMITFS_MissionScript plug is set to:
 b_zigzag_pMITFS_MissionScript.plug

 available cruise names include:
 a_confidence.def
 bench_test.def
 b_zigzag.def
 lab_4_do_nothing_log_data.def
 shipwreck_search.def
 template_cruise.def
In this lab, we are going to simulate the shipwreck_search mission. Let's select that:
 $ ./configure_cruise.sh shipwreck_search
 Successfully configured the cruise to shipwreck_search in sb-topside-4!
3.4 Launching a software-in-the-loop simulated mission [top]
Now we can launch the mission as a software-in-the-loop simulation by executing launch_simulation.sh script:
$ ./launch_simulation.sh
On the terminal, you will see an output similar to this:
 $ ./launch_simulation.sh

 Launching Frontseat-Backseat mode..
 SITL launch in process..
 Launching mode is: FRONTBACK_FRONT
 Part 3: Assembling targ_ Frontseat .moos ... Done
 Part 3: Assembling targ_ Frontseat .bhv ... Done
 Launching Frontseat MOOS Community. WARP is 1
 Done
 SITL launch in process..
 Launching mode is: FRONTBACK_BACK
 Part 3: Assembling targ_ Backseat .moos ... Done
 Part 3: Assembling targ_ Backseat .bhv ... Done
 Part 3: Assembling targ_ VECTORS .moos ... Done
 Launching Backseat MOOS Community. WARP is 1
 Done
 Launching VECTORS MOOS Community. WARP is 1
 Done
 uMAC launching as uMAC_5881

 uMAC_5881 thread spawned
 starting uMAC_5881 thread
 1713245491.3322 140123404248832-                           disabling nagle

 -------------- moos connect ----------------------
   contacting a MOOS server localhost:9250 -  try 00001
   Handshaking as uMAC_5881              [ok]
   DB reports async support is           [on]
   DB is running on                      sb-topside-4
   Timing skew estimation is             [off] (not needed)
 --------------------------------------------------

 uMAC_5881 is Running:
  |-Baseline AppTick   @ 5.0 Hz
  |--Comms is Full Duplex and Asynchronous
  -Iterate Mode 0 :
    |-Regular iterate and message delivery at 5 Hz

 ==================================================
 uMAC_5881:  Nodes (0)                   (1) EVENTS
 ==================================================
 AppCasts Recd: 0

 ID  Node  HMode  Recd  CWarns  RWarns
 --  ----  -----  ----  ------  ------

 ==================================================
 uMAC_5881:  Nodes (1)                   (2) EVENTS
 ==================================================
The pMarineViewer window will come up shortly. The mission will automatically start after 30 seconds, and will run for 7 minutes total. The mission is to go to the middle of the river, conduct a short zig-zag pattern search mission, and loiter until the 7 minute runtime is complete. Observe the followings:
- You will see two vehicle icons; one with the name SB2_ALPHA, and the other SB2_ALPHA_GT. The two vehicles will start at the same location, and then diverge. GT stands for the ground truth; that is, the actual position of the simulated vehicle. The SB2_ALPHA is the navigation solution computed by onboard navigation system; i.e. pMITFS_HydroMANLite application. During our underwater navigation session, we discuss the reasons for this divergence, and how to minimize it.
- You will also note that the vehicle is not able to conduct a clear zig-zag pattern, and it wiggles. During our controls session, we will discuss the reasons for this, and how to minimize it.
- Observe the heading, speed and depth values of the vehicle displayed on the bottom-side on the pMarineViewer window.
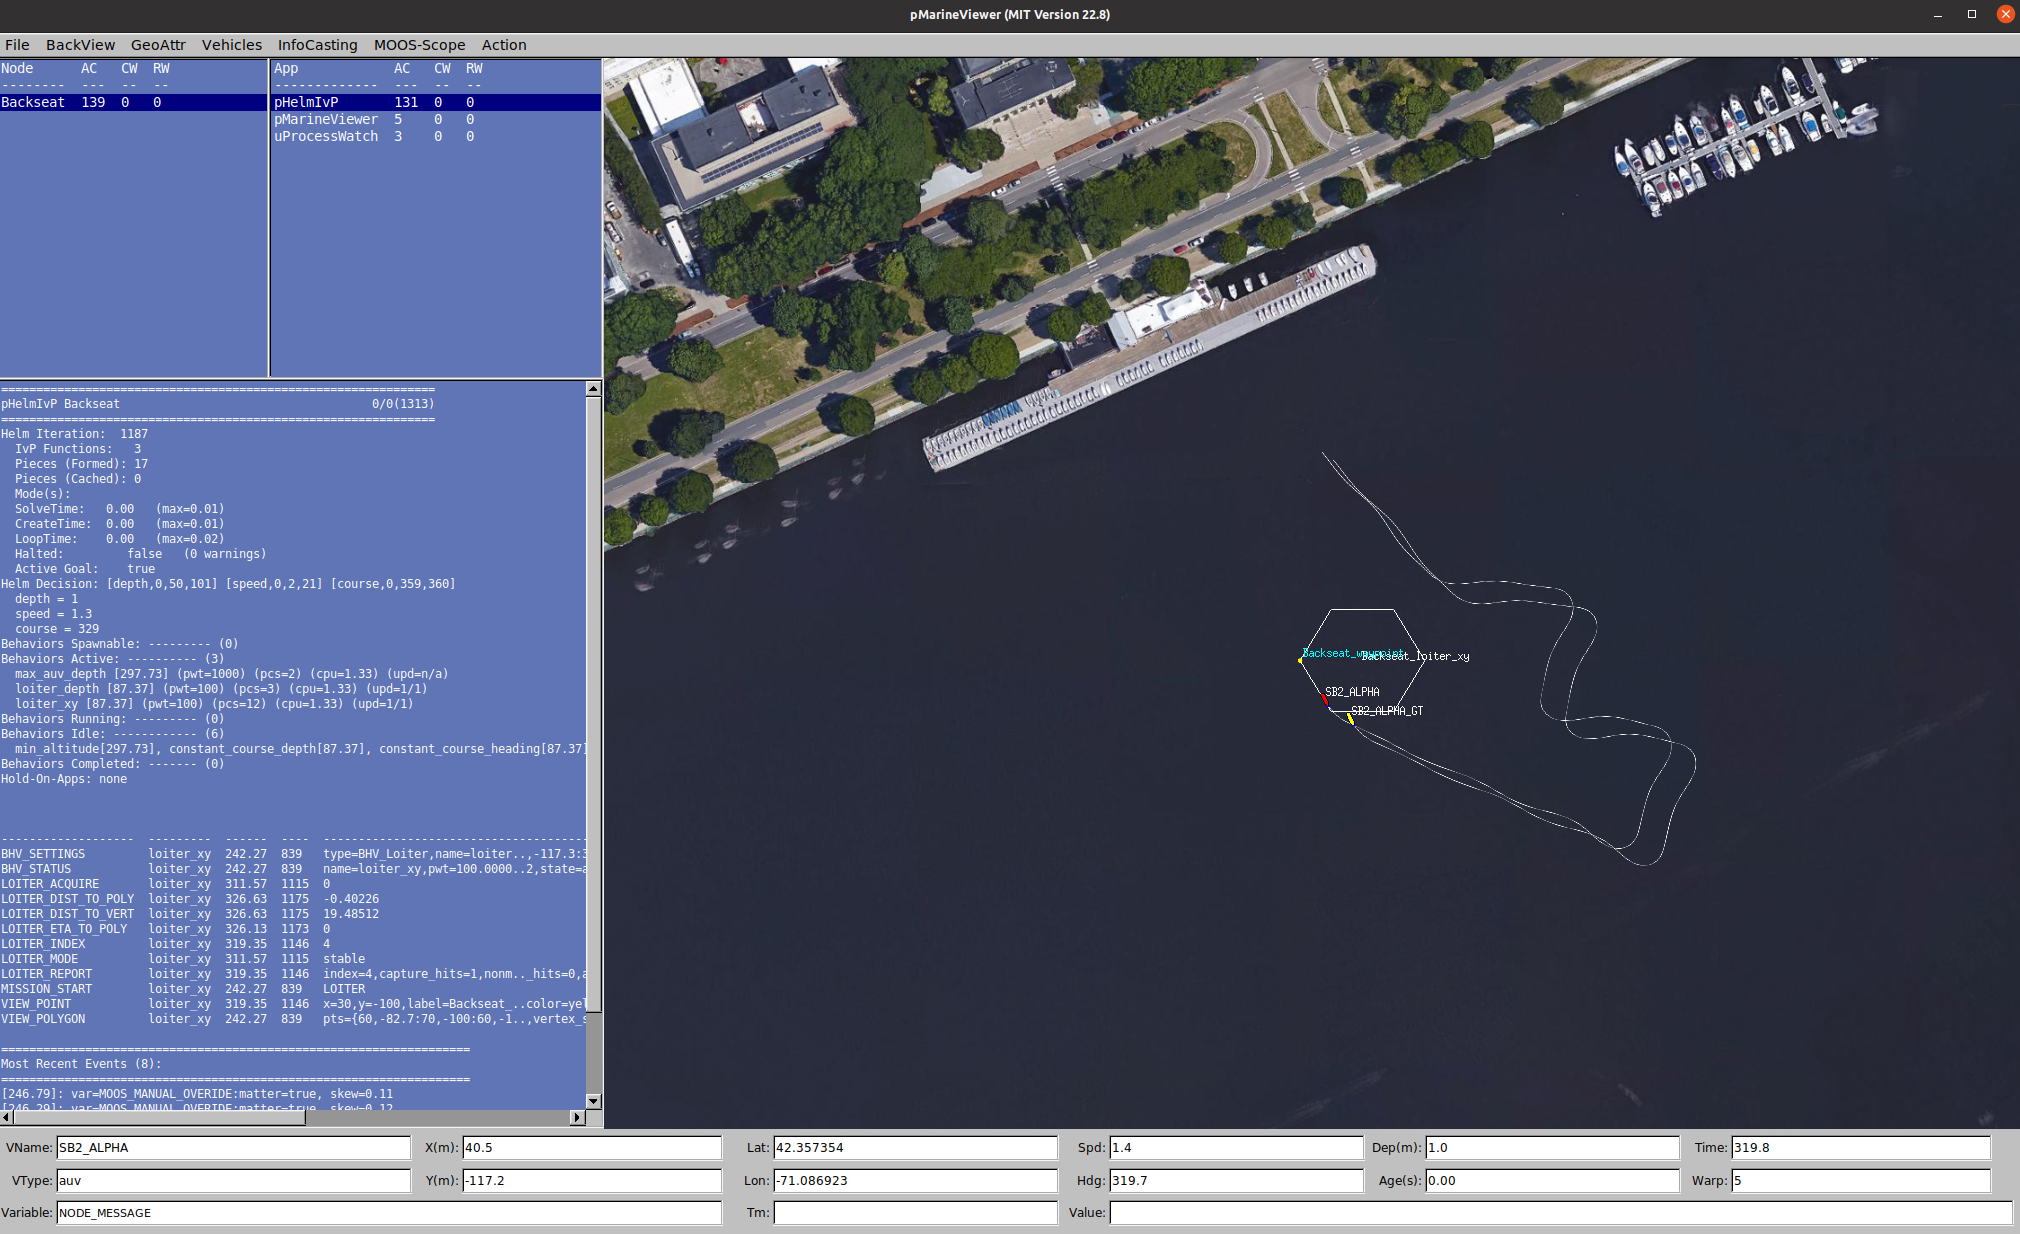
Figure 3.2: pMarineViewer window for the shipwreck_search mission
The software-in-the-loop simulations can be sped-up by time warping. That is, we can simulate missions faster than real time by appending the time warp factor at the end of ./launch_simulation.sh command. For example, if you want to run the simulation 5 times faster than real time:
$ ./launch_simulation.sh 5
Please do NOT time warp hardware-in-the-loop simulations since the servo motors and the thruster can be damaged.
3.5 Killing the mission [top]
You can press ctrl+c on the terminal to kill the mission. To be safe, you can also use ktm command (kill-the-moos) and kill all the MOOS processes.
3.6 Self checkoff assessment [top]
Ensure that:
- Are you able to run the software-in-the-loop simulated mission on your topside computer?
- Does your simulated vehicle behave similar to the track shown in Figure 3.2?
- Can you run the same simulated mission in higher time warps?
4 Building the software stack on the Raspberry Pi
The Raspberry Pi computer of your training kit already has moos-ivp, MITFrontseat, MITFrontseat-drivers, missions-seabeaver and pablo-common downloaded and built. However, you will need to update these repositories to the latest version, and re-build the code. In addition, you will need to install VECTORS. First, log into your training kit's Raspberry Pi embedded computer using either wired or wireless approach.
4.1 Updating pablo-common [top]
We need to update the pablo-common SVN repository in order to obtain the latest configuration parameters:
 $ cd ~/pablo-common/
 $ svn update
You will see an output similar to this:
 $ svn update
 Updating '.':
 A    bin/path_bhv.sh
 A    bin/path_shell.sh
 A    bin/mypath.sh
 Updated to revision 721.
After updating pablo-common, please source the .bashrc file using the command:
$ source ~/.bashrc
4.2 Updating MITFrontseat and installing VECTORS [top]
We need to switch to the 2.s01 branch of MITFrontseat and update it. However, the local repository on the Rapsberry Pi does not know about the new 2.s01 branch on the https://github.com/supun-randeni/MITFrontseat server. So we need to fetch the latest updates first:
 $ cd ~/MITFrontseat
 $ git fetch
Now we can switch to the 2.s01 branch:
 $ git checkout 2.s01
 Branch '2.s01' set up to track remote branch '2.s01' from 'origin'.
 Switched to a new branch '2.s01'
You can use the git pull command to update the repository (i.e. to get the latest version of the code).
 $ git pull
 Already up to date.
Now that we are in 2.s01 branch with the most up-to-date code, we need to install VECTORS by running the dependencies.sh script:
 $ cd ~/MITFrontseat/scripts/
 $ sudo ./dependencies.sh
 [sudo] password for seabeaver-raspi:
Please enter the password of your training-kit's Raspberry Pi computer when you are asked to do so. The dependency installation might take a several minutes. When it is done, you can check if VECTORS is successfully installed by using the command which iVECTORS_Gateway. It should give an output similar to follows. If you get a blank response, please talk to an instructor.
 $ which iVECTORS_Gateway
 /usr/local/bin/iVECTORS_Gateway
Now you have installed all the dependencies. It is time to build MITFrontseat:
 $ cd ~/MITFrontseat/
 $ ./build.sh
Let it build.. While it is building, check if it exits with errors.
4.3 Updating MITFrontseat-drivers [top]
Similar to MITFrontseat, you will need to switch to the 2.s01 branch of MITFrontseat-drivers and update it. Let's fetch the latest updates first:
 $ cd ~/MITFrontseat-drivers
 $ git fetch
Now we can switch to the 2.s01 branch and pull the latest version of the code:
 $ git checkout 2.s01
 Branch '2.s01' set up to track remote branch '2.s01' from 'origin'.
 Switched to a new branch '2.s01'

 $ git pull
 Already up to date.
Now that we are in 2.s01 branch with the most up-to-date code, we can build MITFrontseat-drivers:
 $ cd ~/MITFrontseat-drivers/
 $ ./build.sh
It will first (re)build MITFrontseat, and then continue to build MITFrontseat-drivers. This is since MITFrontseat-drivers depends on MITFrontseat; and we want to make sure that MITFrontseat builds before we attempt to build MITFrontseat-drivers. Let it build.. While it is building, check if it exits with errors.
4.4 Updating missions-seabeaver [top]
Similar to MITFrontseat, you will need to switch to the 2.s01 branch of missions-seabeaver and update it. Let's fetch the latest updates first:
 $ cd ~/missions-seabeaver
 $ git fetch
Now we can switch to the 2.s01 branch and pull the latest version of the code:
 $ git checkout 2.s01
 Branch '2.s01' set up to track remote branch '2.s01' from 'origin'.
 Switched to a new branch '2.s01'

 $ git pull
 Already up to date.
4.5 Self checkoff assessment [top]
The following should be checked off:
- Ensure that MITFrontseat is built properly, and its binaries are in your shell path by running the following which command:
 $ which iVECTORS_MITFS pMITFS_ControlEngine pMITFS_HydroMANLite pMITFS_MissionManager
 pMITFS_MissionScript
 /home/seabeaver-raspi/MITFrontseat/bin/iVECTORS_MITFS
 /home/seabeaver-raspi/MITFrontseat/bin/pMITFS_ControlEngine
 /home/seabeaver-raspi/MITFrontseat/bin/pMITFS_HydroMANLite
 /home/seabeaver-raspi/MITFrontseat/bin/pMITFS_MissionManager
 /home/seabeaver-raspi/MITFrontseat/bin/pMITFS_MissionScript
- Ensure that MITFrontseat-drivers is built properly, and its binaries are in your shell path by running the following which command:
 $ which calibrate_xsens_mti3 iMITFS_GPSReadSerial pMOOSLink test_br_thruster
 iActuatorsPWM iXsensMTi3 test_control_surfaces iMITFS_BR_Depth mitfs_safety_daemon
 /home/seabeaver-raspi/MITFrontseat-drivers/bin/calibrate_xsens_mti3
 /home/seabeaver-raspi/MITFrontseat-drivers/bin/iMITFS_GPSReadSerial
 /home/seabeaver-raspi/MITFrontseat-drivers/bin/pMOOSLink
 /home/seabeaver-raspi/MITFrontseat-drivers/bin/test_br_thruster
 /home/seabeaver-raspi/MITFrontseat-drivers/bin/iActuatorsPWM
 /home/seabeaver-raspi/MITFrontseat-drivers/bin/iXsensMTi3
 /home/seabeaver-raspi/MITFrontseat-drivers/bin/test_control_surfaces
 /home/seabeaver-raspi/MITFrontseat-drivers/bin/iMITFS_BR_Depth
 /home/seabeaver-raspi/MITFrontseat-drivers/bin/mitfs_safety_daemon
5 Building the software stack on the PocketBeagle
5.1 Updating the software repositories [top]
Similar to the Raspberry Pi, we need to update and build MITFrontseat, MITFrontseat-drivers, missions-seabeaver and pablo-common repositories on the PocketBeagle. However there is a slight difference when building MITFrontseat-drivers. You should use the ./build.sh command with the --vehicle flag:
 $ cd ~/MITFrontseat-drivers/
 $ ./build.sh --vehicle
Let it build.. At the end of the build, you will be asked to enter the password of the PocketBeagle to provide root privileges to some of the hardware driver apps; e.g. iActuatorsPWM, test_control_surfaces and test_br_thruster. This is in order to allow these drivers to access the PocketBeagle's hardware modules.
5.2 Self checkoff assessment [top]
The following should be checked off:
- Ensure that MITFrontseat is built properly, and its binaries are in your shell path.
- Ensure that MITFrontseat-drivers is built properly, and its binaries are in your shell path.
- Our latest update to pablo-common adds the Raspberry Pi's public SSH key to the PocketBeagle's authorized devices list. This should allow you to SSH from the Raspberry Pi to the PocketBeagle without having to type the password! This is a requirement for the SeaBeaver mission launch framework. Please ensure that you can login to the PocketBeagle without having the type the password. Exit from the current SSH session of the PocketBeagle, and try to re-login:
 $ exit
 logout
 Connection to 192.168.7.2 closed.
 $ ssh debian@192.168.7.2
 Debian GNU/Linux 10
 BeagleBoard.org Debian Buster IoT Image 2020-04-06
 Support: http://elinux.org/Beagleboard:BeagleBoneBlack_Debian
 default username:password is [debian:temppwd]
 The programs included with the Debian GNU/Linux system are free software;
 the exact distribution terms for each program are described in the
 individual files in /usr/share/doc/*/copyright.
 Debian GNU/Linux comes with ABSOLUTELY NO WARRANTY, to the extent
 permitted by applicable law.
 Last login: Tue Apr 16 03:50:10 2024 from 192.168.7.1
 debian@avi-PB:~$
6 Hardware-in-the-loop (HITL) simulations
Hardware-in-the-loop simulations allow us to test the majority of software and hardware components at a lower cost, minimizing the required in-water testing time and the risk of expensive failures. In SeaBeaver HITL simulations, we try to run the software in respective computers where they are supposed to run during in-water operation to minimize any deviations. That is:
- Frontseat MOOS community runs in the PocketBeagle.
- Backseat MOOS community runs in the Raspberry Pi.
- Topside MOOS community runs in the topside computer.
- VECTORS MOOS community runs in the Raspberry Pi (this is the only deviation).
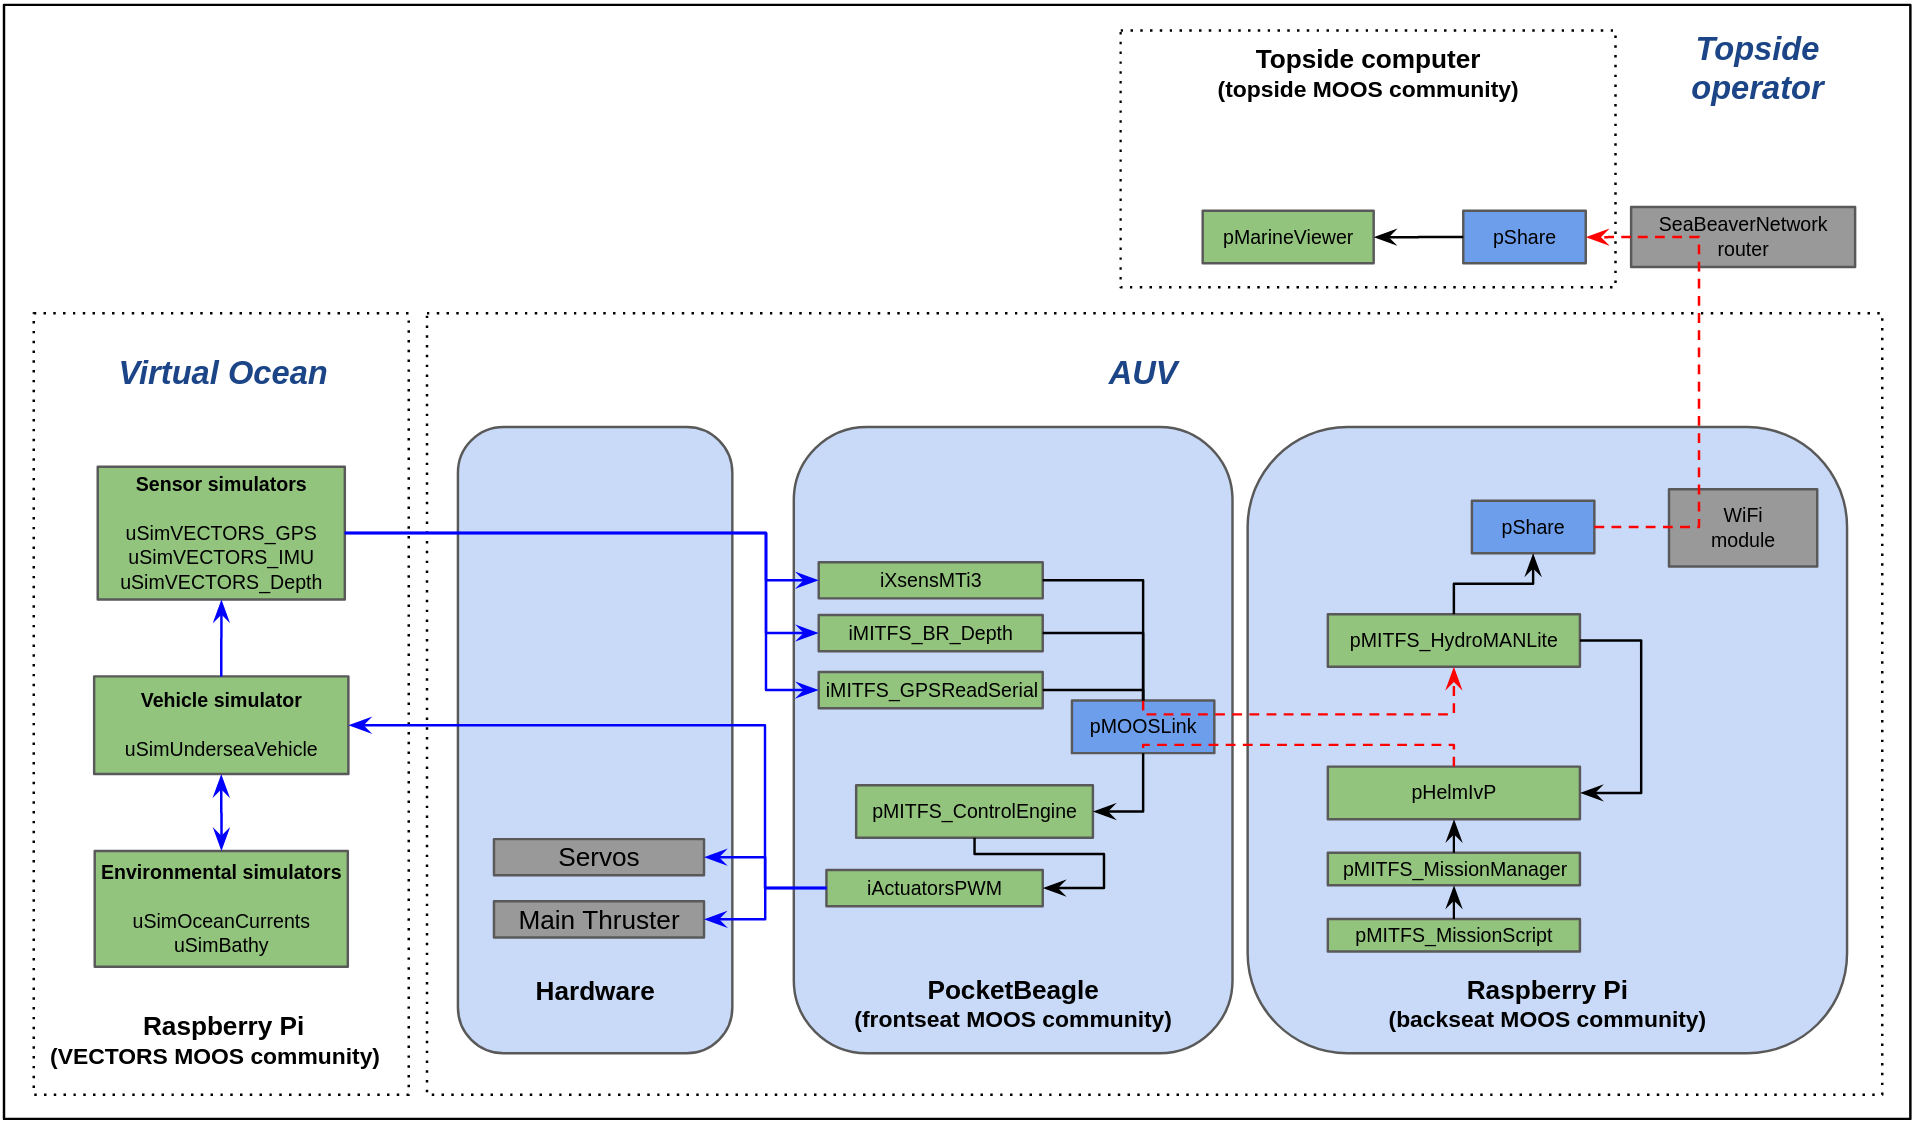
Figure 6.1: Four MOOS communities are launched during hardware-in-the-loop simulations
6.1 Defining the architecture, vehicle and cruise [top]
To run frontseat and backseat MOOS communities in two different computers, we typically need to log into both computers and launch them separately. However, in SeaBeaver AUVs, if we configure the architecture, vehicle or cruise in the Raspberry Pi, the configuration script will automatically apply the same configuration on the PocketBeagle using remote SSH commands. Let's try it.
Please log into both Raspberry Pi and PocketBeagle using two terminal windows. On both computers, change directory to missions-seabeaver and run the clean.sh script to clear off previous configurations and logs:
 $ cd ~/missions-seabeaver
 $ ./clean.sh
On the PocketBeagle, go to the launch_scripts directory and run the configure_architecture.sh script. Observe that the architecture is currently not configured:
 $ cd launch_scripts/
 $ ./configure_architecture.sh
 usage: ./architecture_config.sh {architecture-name}

 current architecture is set to:
 (not set)

 available architectures include:
 seabeaver_ii.def
 template_architecture.def
On the Raspberry Pi, configure the architecture to seabeaver_ii by using the following command:
 $ cd launch_scripts/
 $ ./configure_architecture.sh seabeaver_ii
 Successfully configured the architecture to seabeaver_ii in seabeaver-raspi!
 Configuring the architecture on the PocketBeagle. Architecture name: seabeaver_ii
 Debian GNU/Linux 10

 BeagleBoard.org Debian Buster IoT Image 2020-04-06

 Support: http://elinux.org/Beagleboard:BeagleBoneBlack_Debian

 default username:password is [debian:temppwd]

 Successfully configured the architecture to seabeaver_ii in debian!
As you see, the script also configured the architecture on the PocketBeagle. You can verify this by running configure_architecture.sh script on the PocketBeagle:
 $ ./configure_architecture.sh
 usage: ./architecture_config.sh {architecture-name}

 current architecture is set to:
 seabeaver_ii.def

 available architectures include:
 seabeaver_ii.def
 template_architecture.def
Similarly, configure the vehicle to sb2_alpha and cruise to shipwreck_search on the Raspberry Pi:
 $ ./configure_vehicle.sh sb2_alpha
 Successfully configured the vehicle to sb2_alpha in seabeaver-raspi!
 Configuring the vehicle on the PocketBeagle. Vehicle name: sb2_alpha
 Debian GNU/Linux 10

 BeagleBoard.org Debian Buster IoT Image 2020-04-06

 Support: http://elinux.org/Beagleboard:BeagleBoneBlack_Debian

 default username:password is [debian:temppwd]

 Successfully configured the vehicle to sb2_alpha in debian!

 $ ./configure_cruise.sh shipwreck_search
 Successfully configured the cruise to shipwreck_search in seabeaver-raspi!
 Configuring the cruise on the PocketBeagle. Cruise name: shipwreck_search
 Debian GNU/Linux 10

 BeagleBoard.org Debian Buster IoT Image 2020-04-06

 Support: http://elinux.org/Beagleboard:BeagleBoneBlack_Debian

 default username:password is [debian:temppwd]

 Successfully configured the cruise to shipwreck_search in debian!
6.2 Launching the topside [top]
We typically launch the topside MOOS community before launching the backseat or frontseat MOOS communities. Before launching the topside, we need to configure the architecture, vehicle and cruise on the topside computer as well:
 $ cd ~/missions-seabeaver/launch_scripts/
 $ ./configure_architecture.sh seabeaver_ii
$ ./configure_vehicle.sh sb2_alpha
$ ./configure_cruise.sh shipwreck_search
Now we can launch the topside:
$ ./launch_topside.sh
the pMarineViewer window should open. However, you will not see any vehicles until you launch the backseat and frontseat.
6.3 Launching the hardware-in-the-loop simulation mission [top]
Similar to the configurations, if you launch the mission on the Raspberry Pi (i.e. backseat), it will automatically launch the frontseat on the PocketBeagle. We can use the ./launch_hitl.sh script to launch the mission. However, we do need to let the backseat MOOS community know the IP address of the designated topside laptop by using --topside= flag; for example:
$ ./launch_hitl.sh --topside=10.42.0.1
Now the two vehicle icons (i.e., SB2_ALPHA, and SB2_ALPHA_GT) should appear, and they should start the same shipwreck_search mission that we can in SITL mode. However, this time the mock-up control surfaces and thruster on your training-kit should move.
Observe the followings:
- Movement of the rudder with heading changes.
- Movement of the elevators with heading changes.
- Movement of the elevators with depth (note that the mission expects to run the vehicle at 1m depth).
Please do NOT time warp hardware-in-the-loop simulations since the servo motors and the thruster can be damaged.
6.4 Killing the mission [top]
You can press ctrl+c on the Raspberry Pi terminal to kill both the backseat. It should then automatically kill the frontseat on the PocketBeagle. However, if the servo motors did not stop, please log into the PocketBeagle and use ktm command (kill-the-moos) and kill all the MOOS processes. Press ctrl+c on the topside terminal to kill the topside MOOS community.
6.5 Self checkoff assessment [top]
The following should be checked off:
- Are you able to run the hardware-in-the-loop simulated mission successfully?
- Do you see vehicle on your topside pMarineViewer window?
- Do you see the servo movements in your training-kit's mock-up tailcone?
- Are you able to kill the mission?
Document Maintained by: supun@mit.edu
Page built from LaTeX source using texwiki, developed at MIT. Errata to issues@moos-ivp.org.  Get PDF