Lab 4 - Surface navigation using GPS
1 Overview and Objectives
2 What is a navigation solution
3 Running a mission to log GPS and AHRS navigation data
3.1 Exploring MITFrontseat mission launch framework
3.1.1 Updating missions-seabeaver software to the latest version
3.1.2 Configuring definitions
3.2 Defining the vehicle architecture
3.3 Defining the vehicle
3.4 Defining the cruise
3.5 Launching the mission
3.6 Collecting navigation data
3.7 Killing the mission
3.8 Self checkoff assessment
4 Copying data from PocketBeagle to the topside computer
4.1 Self checkoff assessment
5 Visualizing logged data
5.1 Self checkoff assessment
6 Assessment
1 Overview and Objectives
- Goal - learning basic concepts of navigation
- Goal - mastering the command line
- Goal - learning basic concepts of MITFrontseat mission launching framework
- Goal - Learning how to copy and visualize logs
2 What is a navigation solution
Similar to any other mobile autonomous robot, it is critical for an AUV to know its own position in order to transit to other places to achieve goals. Knowing its own position is called navigation. The best estimate of its current own position is called the navigation solution. There are two types of navigation solutions:
- Absolute navigation solution: the absolute position of the vehicle in a geographic coordinate system (e.g. lattitude and longitude).
- Relative navigation solution: the position of the vehicle relative to another object. The second object could be a buoy, mooring, ship, diver, another autonomous vehicle, etc.
In this class, we will only work with absolute navigation. The absolute navigation solution includes parameters such as: (1) longitude, (2) latitude, (3) local x (optional), (4) local y (optional), (5) depth, (6) roll angle, (7) pitch angle, (8) heading angle, (9) surge speed, (10) sway speed, (11) heave speed.
When the vehicle is above water (e.g. on the water surface), we can use the GPS and AHRS/IMU to obtain majority of these navigation parameters. However, GPS does not work underwater due to high attenuation of electromagnetic waves in the water; making underwater navigation extremely difficult (we will discuss this topic in our Underwater Navigation session). In this lab, we will only focus on GPS and AHRS based surface navigation.
3 Running a mission to log GPS and AHRS navigation data
In this lab, you will launch a navigation data collection mission using your training-kit. It is a ``do nothing" mission. That is, the vehicle is configured to hypothetically just sit on the water surface and collect sensor data. The actuators (i.e. the control surfaces and thruster) will not engage.
To launch the mission, first log into the PocketBeagle. If you don't know how to do that, please refer to lab: How to login to a SeaBeaver II AUV.
3.1 Exploring MITFrontseat mission launch framework [top]
Once you SSH into the PocketBeagle, use ls command to list all the directories in your home directory:

 $ ls
 bin  missions-seabeaver  MITFrontseat  MITFrontseat-drivers  moos-ivp
At a minimum, you will see moos-ivp, MITFrontseat, MITFrontseat-drivers and missions-seabeaver directories. The first three directories contain the source codes of our software, while the mission launching framework of SeaBeaver II AUVs is located in missions-seabeaver directory (you will learn about moos-ivp, MITFrontseat and MITFrontseat-drivers later sessions).
Let's change the directory to missions-seabeaver:
$ cd missions-seabeaver/
If you use ls command to explore, you will see following directories:
 $ ls
 architecture   clean.sh  launch_scripts  meta   README.md          vehicle
 clean_logs.sh  cruise    logs            plugs  release-notes.txt
3.1.1 Updating missions-seabeaver software to the latest version [top]
It is always advised to update the repository to our latest version using git. But first, let's make sure we are in the correct git branch; i.e. 2.s01:
$ git branch
You should see an output like this, that means you are in the 2.s01 branch:
 $ git branch
 * 2.s01
   master
If otherwise, switch to 2.s01 by executing following commands:
 $ git pull
 $ git checkout 2.s01
Once you are in the correct branch, let's pull the latest software.
$ git pull origin 2.s01
3.1.2 Configuring definitions [top]
Before launching a mission using missions-seabeaver, you need to configure three things (while you will learn about these in-detail later in this class, it doesn't hurt to have a rough idea):
- What is the vehicle architecture: This is the vehicle class; SeaBeaver II in our case.
- What is the exact vehicle name: Sometimes each vehicle has have slightly unique parameters. So we need to define what our vehicle is.
- What is the mission to run: This is also known as the cruise. This is will tell the mission-specific parameters. In this lab, it will be ``do nothing" and collect sensor data.
Configuring and launching is done in the launch_scripts directory. So let's go there:
$ cd launch_scripts/
If you use ls command to explore, you will see following scripts:
 $ ls
 configure_architecture.sh  launch_hitl.sh        launch_topside.sh
 configure_cruise.sh        launch_runtime.sh
 configure_vehicle.sh       launch_simulation.sh
3.2 Defining the vehicle architecture [top]
First, let's configure the vehicle architecture. Run the following command to list all the available architectures:
$ ./configure_architecture.sh
It will give you an output similar to this:
 $ ./configure_architecture.sh
 usage: ./architecture_config.sh {architecture-name}

 current architecture is set to:
 (not set)

 available architectures include:
 seabeaver_ii.def
 template_architecture.def
As you can see, there are two available architectures (1) seabeaver_ii, and (2) template_architecture. Let's select our vehicle architecture; i.e. seabeaver_ii:
$ ./configure_architecture.sh seabeaver_ii
note: make sure that you exclude the suffix [.def]. I.e. do NOT configure like this: ./configure_architecture.sh seabeaver_ii.def
3.3 Defining the vehicle [top]
Now let's configure the vehicle name. Run the following command to list all the available vehicles:
$ ./configure_vehicle.sh
It will give you an output similar to this:
 $ ./configure_vehicle.sh
 usage: ./vehicle_config.sh {vehicle-name}

 current vehicle is set to:
 (not set)

 current sensor_config.txt is set to:
 (not set)

 available vehicles include:
 sb2_alpha.def
 template_uuv.def
At a minimum, there will be two vehicles: (1) sb2_alpha, and (2) template_uuv. In later sessions, you will create a definition file for your own vehicle. But for now, let's use Supun's sb2_alpha AUV's definition. Configure the vehicle:
$ ./configure_vehicle.sh sb2_alpha
3.4 Defining the cruise [top]
Finally, we will configure the cruise, or the mission, that we need to run. Run the following command to list all the available cruises:
$ ./configure_cruise.sh
At a minimum, it will show following cruises:
 $ ./configure_cruise.sh
 usage: ./cruiseconfig.sh {cruisename}

 current cruise definition is set to:
 (not set)

 current pMITFS_MissionScript plug is set to:
 (not set)

 available cruise names include:
 a_confidence.def
 bench_test.def
 b_zigzag.def
 lab_4_do_nothing_log_data.def
 template_cruise.def
Now let's select the correct cruise for this lab, lab_4_do_nothing_log_data:
$ ./configure_cruise.sh lab_4_do_nothing_log_data
3.5 Launching the mission [top]
Now we can launch the mission using the following command:
$ ./launch_runtime.sh
You will see an output similar to this:
 $ ./launch_runtime.sh
 RUNTIME launch in process..
 Part 3: Assembling targ_ Frontseat .moos ... Done
 Part 3: Assembling targ_ Frontseat .bhv ... Done
 Launching Frontseat MOOS Community. WARP is 1
 Done
 Launching VECTORS MOOS Community. WARP is 1
 Done
 uMAC launching as uMAC_2291

 uMAC_2291 thread spawned
 starting uMAC_2291 thread
 1711911729.3847 3012543568     -                           disabling nagle

 -------------- moos connect ----------------------
   contacting a MOOS server localhost:9001 -  try 00002
   Handshaking as uMAC_2291              [ok]
   DB reports async support is           [on]
   DB is running on                      beaglebone
   Timing skew estimation is             [off] (not needed)
 --------------------------------------------------

 uMAC_2291 is Running:
  |-Baseline AppTick   @ 5.0 Hz
  |--Comms is Full Duplex and Asynchronous
  -Iterate Mode 0 :
    |-Regular iterate and message delivery at 5 Hz


 ==================================================
 uMAC_2291:  Nodes (1)                   (1) EVENTS
 ==================================================
 AppCasts Recd: 2

 ID  Node       HMode  Recd  CWarns  RWarns
 --  ---------  -----  ----  ------  ------
 a   Frontseat  HMODE  2      0       0


 ==================================================
 uMAC_2291:  Nodes (1)                   (2) EVENTS
3.6 Collecting navigation data [top]
The lecturers will provide you with instructions on your navigation data collection homework exercise. Stay tuned!
3.7 Killing the mission [top]
You can kill the mission by pressing ctrl + c. To be extra safe, you can also use the ktm command (i.e. kill-the-moos):
$ ktm
3.8 Self checkoff assessment [top]
Ensure that:
- Are you able to successfully configure the vehicle architecture.
- Are you able to successfully configure the vehicle.
- Are you able to successfully configure the cruise.
- Are you able to launch the mission.
- Are you able to kill the mission once you logged the data.
4 Copying data from PocketBeagle to the topside computer
Once you completed the mission, we need to copy the logs that contains all the collected data. They are typically stored in the PocketBeagle, at: /home/debian/missions-seabeaver/logs. In order to visualize, you will need to copy them to your topside laptop. To do so, you will need to copy them from the PocketBeagle to Raspberry Pi first, and then copy from the Raspberry Pi to your topside computer.
Log into your Raspberry Pi, and create a directory to store your data. We suggest creating a directory called pb_logs in your home directory. Then move to this directory:
 $ mkdir /home/seabeaver-raspi/pb_logs
 $ cd /home/seabeaver-raspi/pb_logs
Now we can use the secure copy protocol (SCP) to copy logs from the PocketBeagle to the Raspberry Pi:
$ scp -r debian@192.168.7.2:/home/debian/missions-seabeaver/logs/LOG* .
You will be asked to enter the password on the PocketBeagle. Once you entered, it will take a few minutes to copy the files. You should see an output similar to this:
 $ scp -r debian@192.168.7.2:/home/debian/missions-seabeaver/logs/LOG* .
 Debian GNU/Linux 10

 BeagleBoard.org Debian Buster IoT Image 2020-04-06

 Support: http://elinux.org/Beagleboard:BeagleBoneBlack_Debian

 default username:password is [debian:temppwd]

 debian@192.168.7.2's password:
 LOG_SB2_ALPHA_Frontseat_31_3_2024_____19_02_ 100%   14KB   2.7MB/s   00:00
 LOG_SB2_ALPHA_Frontseat_31_3_2024_____19_02_ 100%   17MB   4.9MB/s   00:03
 LOG_SB2_ALPHA_Frontseat_31_3_2024_____19_02_ 100% 1395   991.1KB/s   00:00
 LOG_SB2_ALPHA_Frontseat_31_3_2024_____19_02_ 100%    0     0.0KB/s   00:00
 LOG_SB2_ALPHA_Frontseat_31_3_2024_____19_02_ 100% 1602KB   4.9MB/s   00:00
 targ_Frontseat._bhv                          100% 7909     2.9MB/s   00:00
Now you can use the ls command and make sure the logs are copied. Then it is time to copy the logs over to your topside laptop.
In your topside laptop, create a directory where you'd like to store the data logs, and go to that directory. For example:
 $ mkdir /home/supun/2S01_data
 $ cd /home/supun/2S01_data
Now we can use the secure copy protocol (SCP) to copy logs from the Raspberry Pi to the topside computer:
$ scp -r seabeaver-raspi@10.42.0.5:/home/seabeaver-raspi/pb_logs/LOG* .
You will be asked to enter the password on the Raspberry Pi. Once you entered, it will take a few minutes to copy the files. Use cd and ls commands to navigate around, and make sure the logs are copied.
4.1 Self checkoff assessment [top]
Ensure that:
- Are you able to successfully copy the logs from PocketBeagle to Rapberry Pi.
- Are you able to successfully copy the logs from Rapberry Pi to your topside computer.
5 Visualizing logged data
We will use the alogview utility tool that comes with MOOS-IvP to visualize the collected data. Depending on the number of missions you launched, there will be several directories with log files. Go to the directory that contains logs that you want to visualize (note: log directories are named with date and time). This directory will contain several files:
 $ ls
 LOG_SB2_ALPHA_Frontseat_31_3_2024_____19_02_11.alog
 LOG_SB2_ALPHA_Frontseat_31_3_2024_____19_02_11.blog
 LOG_SB2_ALPHA_Frontseat_31_3_2024_____19_02_11._moos
 LOG_SB2_ALPHA_Frontseat_31_3_2024_____19_02_11.slog
 LOG_SB2_ALPHA_Frontseat_31_3_2024_____19_02_11.ylog
 targ_Frontseat._bhv
In later sessions, we will go into more details on these files. For now, we are interested in the *.alog file. Let's open it with alogview tool; for example:
$ alogview LOG_SB2_ALPHA_Frontseat_27_3_2024_____16_42_04.alog
You will see a window similar to Figure 5.1.
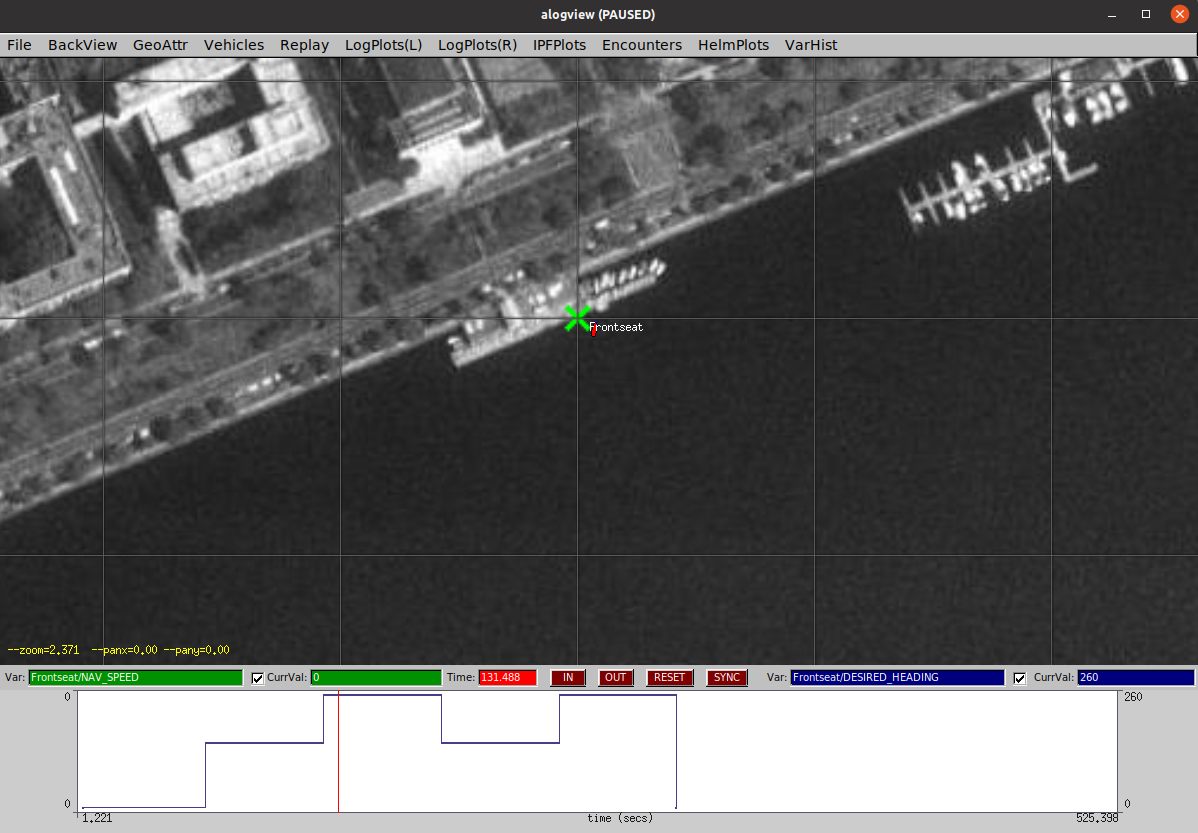
Figure 5.1: Alogview screen when you load the logs
Explore various options such as trail size, trail length, stream speed and visualize your navigation data. Try to create a plot similar to Figure 5.2. More details regarding alogview is given here: https://oceanai.mit.edu/ivpman/apps/alogview.
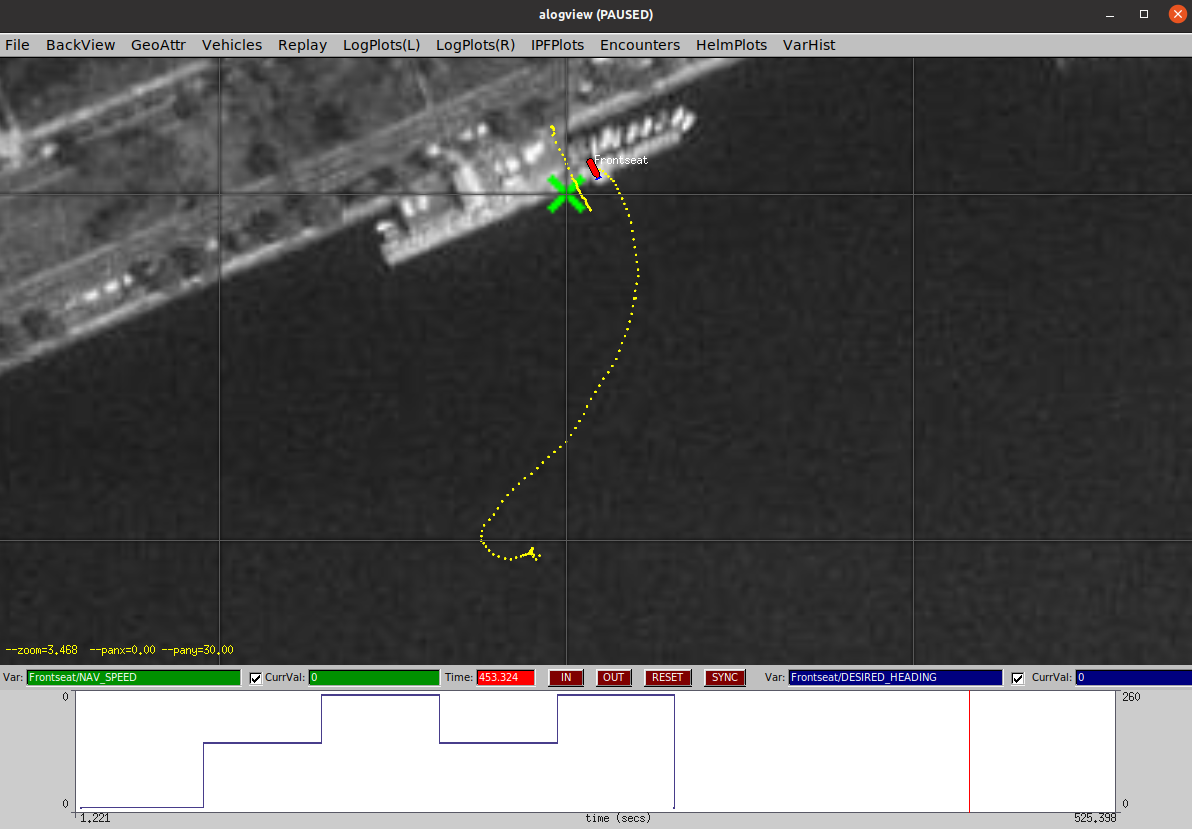
Figure 5.2: Alogview screen when you load the logs
5.1 Self checkoff assessment [top]
Ensure that:
- Are you able to visualize the surface navigation data using the alogview tool.
6 Assessment
The lab assessments are structured to ensure that you stay on track to complete your AUV by the end of the semester for in-water trials. You are expected to demonstrate to one of the instructors that you can complete the following tasks. More importantly, please don't hesitate to communicate with the instructors if you encounter any issues.
- Visualize the surface navigation data that you collected using alogview (similar to Figure 5.2), and send a screenshot to the instructors using Piazza .
Document Maintained by: supun@mit.edu
Page built from LaTeX source using texwiki, developed at MIT. Errata to issues@moos-ivp.org.  Get PDF