Lab 2 - Robot Middleware, Autonomy and Missions
1 Overview and Objectives
2 Concepts I: Robot Software
2.1 Stand-Alone Applications vs Coordinated Applications
2.2 Robot Middleware
2.3 Further MOOS Basics
2.3.1 MOOS IP Address, Port Number, and Community Name
2.3.2 MOOSDB Contents
2.3.3 MOOS Conventions
3 Exercises I: Experimenting with Robot Software
3.1 Exercise 1: Launch MOOSDB and a Scope (self checkoff)
3.2 Exercise 2: Launch MOOSDB, Scope and Poke (self checkoff)
3.3 Exercise 3: Repeat on the AUV Training Kit (self checkoff)
4 Concepts II: Autonomy
4.1 Sense-Plan-Act
4.2 Sense-Decide-Act for an AUV
4.3 Sense-Decide-Act for the Alpha Mission
5 Exercises II: Autonomy
5.1 Exercises 4: Interjecting Autonomy Commands
1 Overview and Objectives
The goals of this lab are to introduce concepts on robot middleware, autonomy, and methods for launching missions on an AUV and in simulation.
Concepts introduced in this lab:
- The difference between monolithic software applications and distributed/modular applications.
- Robot middleware and its role on an AUV
- Launching and interacting with robot apps
- The sense-plan-act loop for autonomous robots
- Methods for launching missions in simulation and in the field
Pre-lab assumptions:
- You have a course laptop and AUV training kit
- You have downloaded and built the course autonomy software and are able to run the Alpha mission
- You are able to log into the RasPi and the PocketBeagle computer
- You have reviewed and can identify the basic hardware components of the SB2 AUV
- You are able to run the command-line scripts to access the sensors and actuators.
Linking the Course Web Pages [top]
There are two main web pages for this course, the main course page on the MIT server, and the Piazza Page. We recommend putting these pages in your browser's bookmarks or Favorites tab as soon as possible. We will be referring to them a lot:
- Course wiki: https://oceanai.mit.edu/2.S01
- Piazza: https://piazza.com/mit/spring2025/2s01
2 Concepts I: Robot Software
At this stage we have thus far established how to log into our course laptops, and from there log into the AUV RasPi computer, and from the RasPi log into the PocketBeagle computer. We turn our attention now to the software environment running on each computer.
2.1 Stand-Alone Applications vs Coordinated Applications [top]
A term application is refers to a program that runs on your computer. Examples include your web browsers, calendar, MS Word, a PDF viewer and so on. Other equivalent terms are an executable, or a a binary. The latter refers to a class of programs that are compiled, i.e., translated from human-readable software into a file that is runnable on your computer. C++ applications of this style. The executable C++ program is no longer human-readable when examining the file contents, resembling more a collections of 1's and 0's, thus the term binary.
Some applications are stand-alone, meaning the application is a single program running, with perhaps I/O to the user using the program, and I/O to the system hard drive, or I/O over the Internet. Other applications are coordinated, meaning the functionality is comprised of a number of applications coordinating and communicating with each other to perform their tasks. Coordinated applications my all be running on a single computer, or may be distributed over a local network or over the Internet. Two common ways of coordinating communications between multiple apps are shown in Figure 2.1.
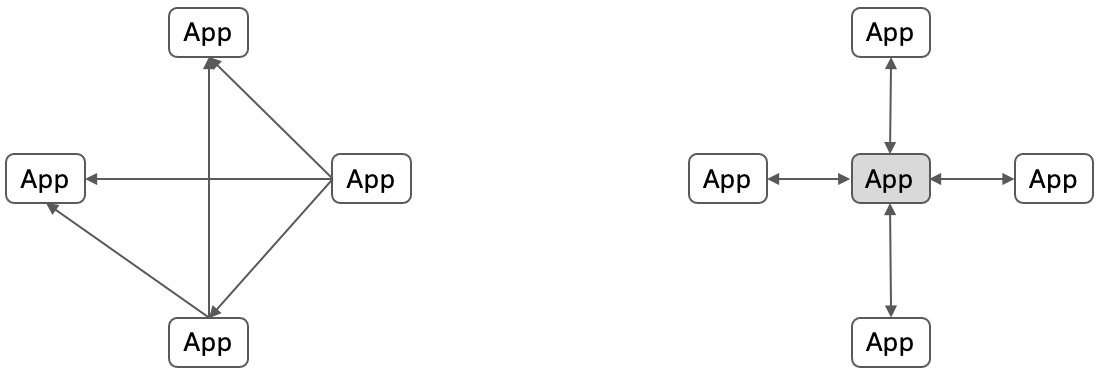
Figure 2.1: Two ways of coordinating multiple apps: (a) direct communications between apps, or (b) inter-app communication through another app as a broker.
The advantage of direct communications between apps is the reduced latency since messages do not need to be routed through an intermediate app. The advantage of using the intermediate app is reduced complexity in how apps discover one another and other simplifications. In practice, both styles are commonly found on robots.
2.2 Robot Middleware [top]
The primary role of a robot middleware is to facilitate communication between applications. MOOS is the middleware used on the Sea Beaver II AUV. It uses a publish-subscribe protocol where messages are regarded as mail messages. A particular app has an interface, defined by which mail it publishes and to which mail it subscribes. Sometimes such architectures are referred to as "pub-sub" architectures. Each app is refereed to as a "MOOS App", and the app handling the mail processing is an a called a MOOS Database, or MOOSDB for short.
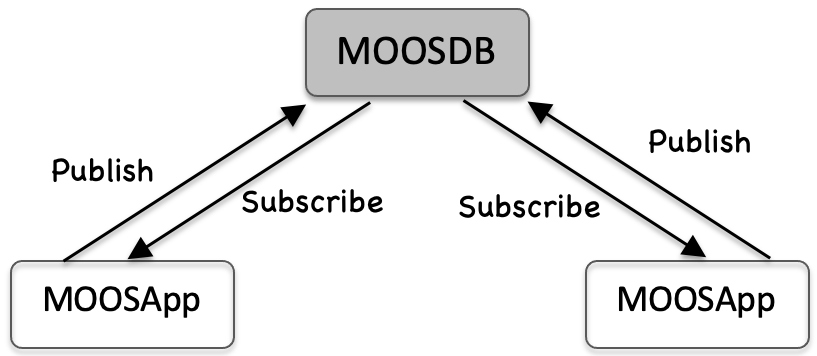
Figure 2.2: MOOS uses an application called the MOOSDB to broker communications between applications. Each app looks for the mail it needs and otherwise typically is not concerned with which app or apps generated the mail. This enables one app to be swapped for another as long as it matches the publication/subscription interface of the app being replaced.
Each MOOS app has an internal endlessly running loop. At the outset of each loop, MOOS reads a mailbox for any incoming mail messages. Each message is characterized by a MOOS variable and the value for that variable. Each app registers for mail by subscribing to one or named variables at the outset. Once the mail has been read, the primary loop is executed, during which the app may publish outgoing messages of its own. The frequency of this loop can be configured by the user, and depends on the operation. For example, an app handling GPS messages may run at 5 Hz if the GPS device is publishing updated positions five times per second.
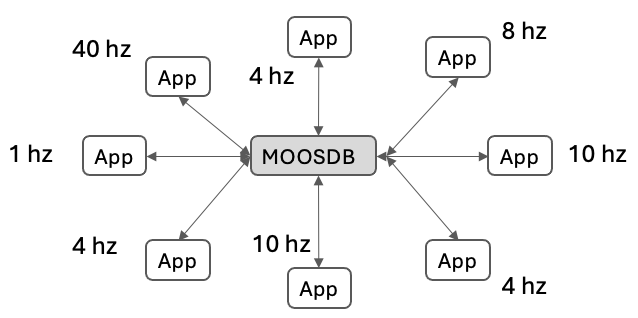
Figure 2.3: MOOS Community: a collection of MOOS apps communicating with a single MOOSDB is a MOOS community. MOOS middleware allows the user to configure the execution rate for each app.
When an AUV is prepared for launch, the operator will run a script to launch all apps including the MOOSDB. Once the apps have started with no errors or warnings, the operator can release the vehicle to begin its mission in the water. The MOOS middleware includes utilities for launching the mission, monitoring for warnings, and logging the data during the mission.
Other well known middlewares include ROS, MOOS, LCM and DDS.
2.3 Further MOOS Basics [top]
A few further basic MOOS features are described there that are useful up front and for today's lab.
2.3.1 MOOS IP Address, Port Number, and Community Name [top]
The MOOSDB is a server, with clients (apps) in regular communication with incoming and outgoing mail messages. Apps need to know where to reach the MOOSDB, so the MOOSDB needs to launch with three pieces of configuration information, (a) the machine IP address on which to run, and (b) the port number on which to serve clients, and the community name. Typically the latter corresponds to the name of the robot.
An IP address is comprised of four numbers in the range of [0,255] separated by a period. IP addresses are used for finding a particular machine on the Internet. For example, the oceanai class server resides at 18.18.38.22. The term "localhost" acts as a stand-in IP address when referring to one's own machine. The port number refers to a channel of sorts on a computer. It's fair to think of the IP address like the street address of an apartment building, and the port number as the unit number within the building where a particular resident resides.
When the MOOSDB is launched, it is launched with the IP address and port number as configuration parameters. All apps are also launched with the same IP address and port number, so they know where to find the MOOSDB.
2.3.2 MOOSDB Contents [top]
The MOOSDB holds the latest value of all published mail for all variables. We say a variable has been written to if some MOOS app published an outgoing mail message using that variable name. Two important notes: (1) If an app writes to a variable several times, an app that has registered for that variable may have several mail messages for that variable in its in-box on its next iteration. The receiving app will receive all mail messages, even if the publishing app is posting the mail much more frequently than the receiving app. (2) When an app is launched and first connects to the MOOSDB, if it registers for a variable FOOBAR, it will at least receive the most recently posted mail to FOOBAR, even it was published by an app long ago.
The current state of the MOOSDB can be thought of in terms of a table like that shown in Figure 2.4 below. Each row in the table contains the MOOS variable name, the app the that last published the variable, the MOOSDB community name, time of the last publication, and the current value of the variable.
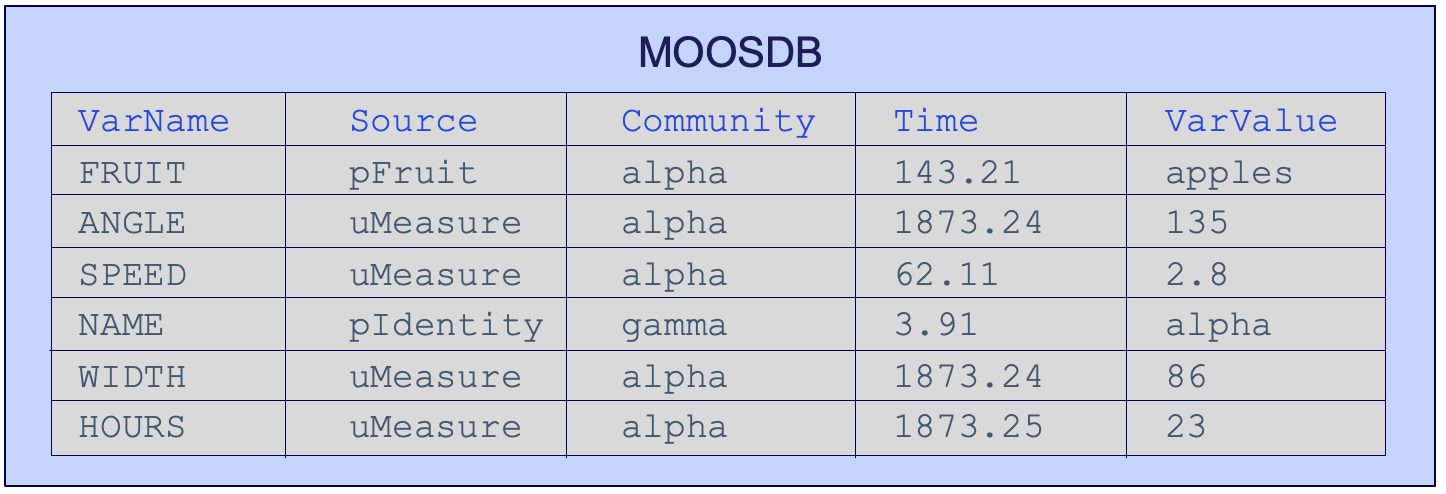
Figure 2.4: MOOS uses an application called the MOOSDB to broker of the app being replaced.
Not surprisingly, the structure of every MOOS message, i.e., piece of mail, contains these fields, and a few others discussed later. The timestamp, in seconds, is relative to the start time of the MOOSDB. When the MOOSDB is started, the start time is noted and logged so each message can be traced back to a global time stamp.
2.3.3 MOOS Conventions [top]
A few conventions are worth mentioning at this stage. Like most conventions, these are not enforced rules, but rather a set of common practices that make things easier to understand for users.
- MOOS app names: MOOS apps typically start with a lower case letter, usually 'p', 'u', or 'i'. For example pHelmIvP, uXMS, or iGPS. The 'p' apps are typically core processes like pHelmIvP or pNodeReporter. The 'u' apps are typically utilities like uXMS, uMAC, or uTimerScript. The 'i' apps are typically associated with drivers of instruments, like iGPS, iSeaTrackX15. Apps that begin with 'uFld' belong to the uField Toolbox collection of utilities for coordinating shore and field operations.
- MOOS variable names are typically (a) upper case, (b) only contain the underscore character for white space, (c) and if they contain numbers, they are usually the trailing characters of the variable name. Good names: DEPTH, NAV_SPEED, THRUSTER_4. Bad examples: temperature, LEFT@SIDE, 856_VALUE.
- Most MOOS apps support a few useful command-line options. For these options, instead of launching the app, useful help output will be displayed followed by the immediate quit of the app. The --example, or -e option will display an example configuration block for the app, often with indications of default values an parameter value options. The --interface, or -i option will display the variables published and subscribed for by the app, often with example variable values to give an idea of the format or type of certain variables. The --web, or {-w} option will open a web browser to the full documentation of the MOOS app. Most but not all apps support this option.
In documentation, MOOS apps are indicated in color by magenta, e.g., pHelmIvP, MOOS variable names in green, e.g., NODE_REPORT, and MOOS app configuration parameters in blue, e.g., vehicle_name.
3 Exercises I: Experimenting with Robot Software
In the below exercises we will experiment with the MOOS middleware and AUV software in simulation, both on the course laptop and the AUV training kit.
3.1 Exercise 1: Launch MOOSDB and a Scope (self checkoff) [top]
In this exercise you will use your course laptop to launch a small MOOS community of just the MOOSDB and a scope. A scope is any app that connects to and provides visibility into the values currently held by the MOOSDB. We will bump into a few tools in this class that act as a scope. A simple tool used in this exercise is uXMS. First let's launch a MOOSDB in a terminal window. In this exercise we will want a few open terminal windows, so before you begin, open three distinct terminal windows on your laptop and make sure all can be viewed simultaneously.
Step 1: In the first terminal window:

  $ MOOSDB
  ------------------- MOOSDB V10 -------------------
  Hosting  community                "#1"
  Name look up is                   off
  Asynchronous support is           on
  Connect to this server on port    9000
  --------------------------------------------------
  network performance data published on localhost:9020
  listen with "nc -u -lk 9020"
At this point the MOOSDB is running on the local machine, serving clients on port 9000. A few variables are already being published, by the MOOSDB itself.
Step 2: In the second terminal window, open a scope by launching the uXMS app:
   $ uXMS DB_CLIENTS DB_TIME DB_UPTIME --serverhost=localhost --serverport=9000

   ==============================================================
   uXMS_581                                              0/0(154)
   ==============================================================
   VarName     (S)ource   (T)ime  (C)  VarValue (SCOPING:EVENTS)
   ----------  ---------  ------  ---  -------------------------
   DB_CLIENTS  MOOSDB_#1  38.14        "uXMS_581,"
   DB_TIME     MOOSDB_#1  38.14        1387380731.414707
   DB_UPTIME   MOOSDB_#1  38.14        39.00859
The Source and Time columns may be expanded by hitting the "s" and "t" keys respectively after it launches, or you can add --show=source,time as a command line argument to uXMS, to launch with these two columns expanded.
Step 3: Create a file with the following three lines, and save it as mission.moos
 ServerHost = localhost
 ServerPort = 9005
 Community  = alpha
In the two terminal windows running the MOOSDB and uXMS, quit by typing ctrl-c. In this step, repeat the above launches except this time provide the mission.moos file as an argument, like:
$ MOOSDB mission.moos (in terminal one)
and
$ uXMS mission.moos --all (in terminal two)
Both apps should launch, providing essentially the same output as before, but notice that the community name is "alpha", and the MOOSDB is serving content on port 9005. The use of the mission.moos file makes launching much easier, and the mission file will be used in most all cases in the future.
3.2 Exercise 2: Launch MOOSDB, Scope and Poke (self checkoff) [top]
In this exercise, still on the course laptop, we will again launch a MOOSDB and scope, but also poke the MOOSDB with new values for new variables. We will need three terminal windows open to do this exercise. We will also use the three-line mission.moos file with contents:
 ServerHost = localhost
 ServerPort = 9005
 Community  = alpha
Step 1: In two side-by-side terminal windows, again launch a MOOSDB in one window, and the uXMS app. In this case uXMS is launched with --show=source so the column showing the app responsible for the posting the most recent value is shown.
 $ MOOSDB mission.moos                      (in terminal one)
 $ uXMS mission.moos --all --show=source    (in terminal two)
In the third terminal window, invoke the uPokeDB app to publish a new variable with a value. Since uPokeDB will connect to the MOOSDB just launched, it also needs to know the IP address and port number. Try the following in the third window:
 $ uPokeDB mission.moos DEPTH=85
   ...

 VarName  Source  Time  VarValue
 -------  ------  ----  --------
 DEPTH                  n/a

 VarName  Source   Time   VarValue
 -------  -------  -----  --------
 DEPTH    uPokeDB  34.18  85.00000
The poke will be made and you should see the output similar to the above where the previous value of DEPTH is shown, followed by the new value after the poke. If the variable has never been written to before, the value will simply be "n/a" as in this example.
The output of uXMS should have also changed, with addition of the new line for the variable DEPTH, and it should also show uPokeDB as the source application responsible for this value.
Step 2: Try poking again with a different value:
$ uPokeDB mission.moos DEPTH=9000
Verity that the effect is apparent in both the uPokeDB and uXMS output. Then try poking the following to the same variable:
$ uPokeDB mission.moos DEPTH=shallow
Notice that the poke is ignored, apparent in both the uPokeDB and uXMS output. This is not because MOOS somehow knows anything about legal values for the variable DEPTH. This is because MOOS variables are either of type string or double, and the variable type is determined by the first publication. If the first poke had the value "shallow", it would have been accepted.
Step 3: Try poking the variable DB_UPTIME. This is the number of seconds that the MOOSDB has been running. Notice it is already in the uXMS output, with regular updates posted by the MOOSDB app itself. What happens when another app like uPokeDB writes to it?
$ uPokeDB mission.moos DB_UPTIME=50
After the poke, the value of 50 should be evident in the output of the uXMS window briefly. And the source of the value should show that the value of 50 came from the uPokeDB app. Notice that soon it returns to the values published by the MOOSDB. Multiple apps can publish to any variable. MOOS does not prevent this. However, the source of the value is also always known. Any subscriber can choose to ignore mail postings if they are not posted by a certain app if the the subscribing app choose to listen to only a certain source.
3.3 Exercise 3: Repeat on the AUV Training Kit (self checkoff) [top]
In this exercise the goal is to repeat the steps from the previous exercise, on the SB2 training kit rather than your laptop.
Step 1: Ensure there are three open terminal windows on the laptop, and in each terminal, log into the training kit. This assumes your training kit is connected by Ethernet cable and the training kit has the IP address below. To log in:
$ ssh seabeaver-raspi@10.42.0.5
For each of the three terminal windows, log into the training kit.
Step 2: In one of the terminal windows where you are logged onto the training kit, create a mission.moos file as before with the contents:
 ServerHost = localhost
 ServerPort = 9005
 Community  = alpha
Step 3: Repeat the actions of the previous exercise with the below three commands in each of the terminal windows. Make sure each of the below commands is invoked in the directory with the newly created mission.moos file:
 $ MOOSDB mission.moos                      (in terminal one)
 $ uXMS mission.moos --all --show=source    (in terminal two)
 $ uPokeDB mission.moos DEPTH=50            (in terminal three)
4 Concepts II: Autonomy
The Autonomous in AUVs is the focus here. The ability of an AUV to autonomous make decisions about its own trajectory is what distinguishes an AUV from an ROV (remotely operated, tethered). Autonomy decisions are deeply tied to the goals of the mission, sensors on board, the physical mobility limitations of the vehicle, and inter-vehicle messages if the AUV is equipped with underwater communications.
4.1 Sense-Plan-Act [top]
An AUV is a type of robot and virtually all robots at a high enough level can be described as conforming to a sense-plan-act loop like that shown in Figure 4.1.
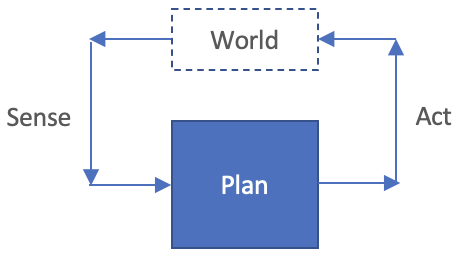
Figure 4.1: Sense-Plan-Act loop for autonomous robots.
The robot repeatedly assesses the world through its set of sensors, and incoming communications, and determines a course of action. The course of action is a set of decisions concerning the robot direction, speed (and depth for AUVs). These decisions are converted into actuator actions by control software that converts the direction, speed and depth into rudder position, propeller speed, and depth actuators. Then the whole loop repeats.
A further distinction can be made within the "plan" box. We distinguish a plan to be a sequence of states, such as waypoints in the water, over a period of time. We regard a decision as choice for direction, speed, or depth made in service of execution of a plan, perhaps with momentary modifications for other considerations outside the plan, such as collision or obstacle avoidance. We regard an action as a control setting in service of achieving a heading, speed or depth decision. The distinction is shown in Figure 4.2.
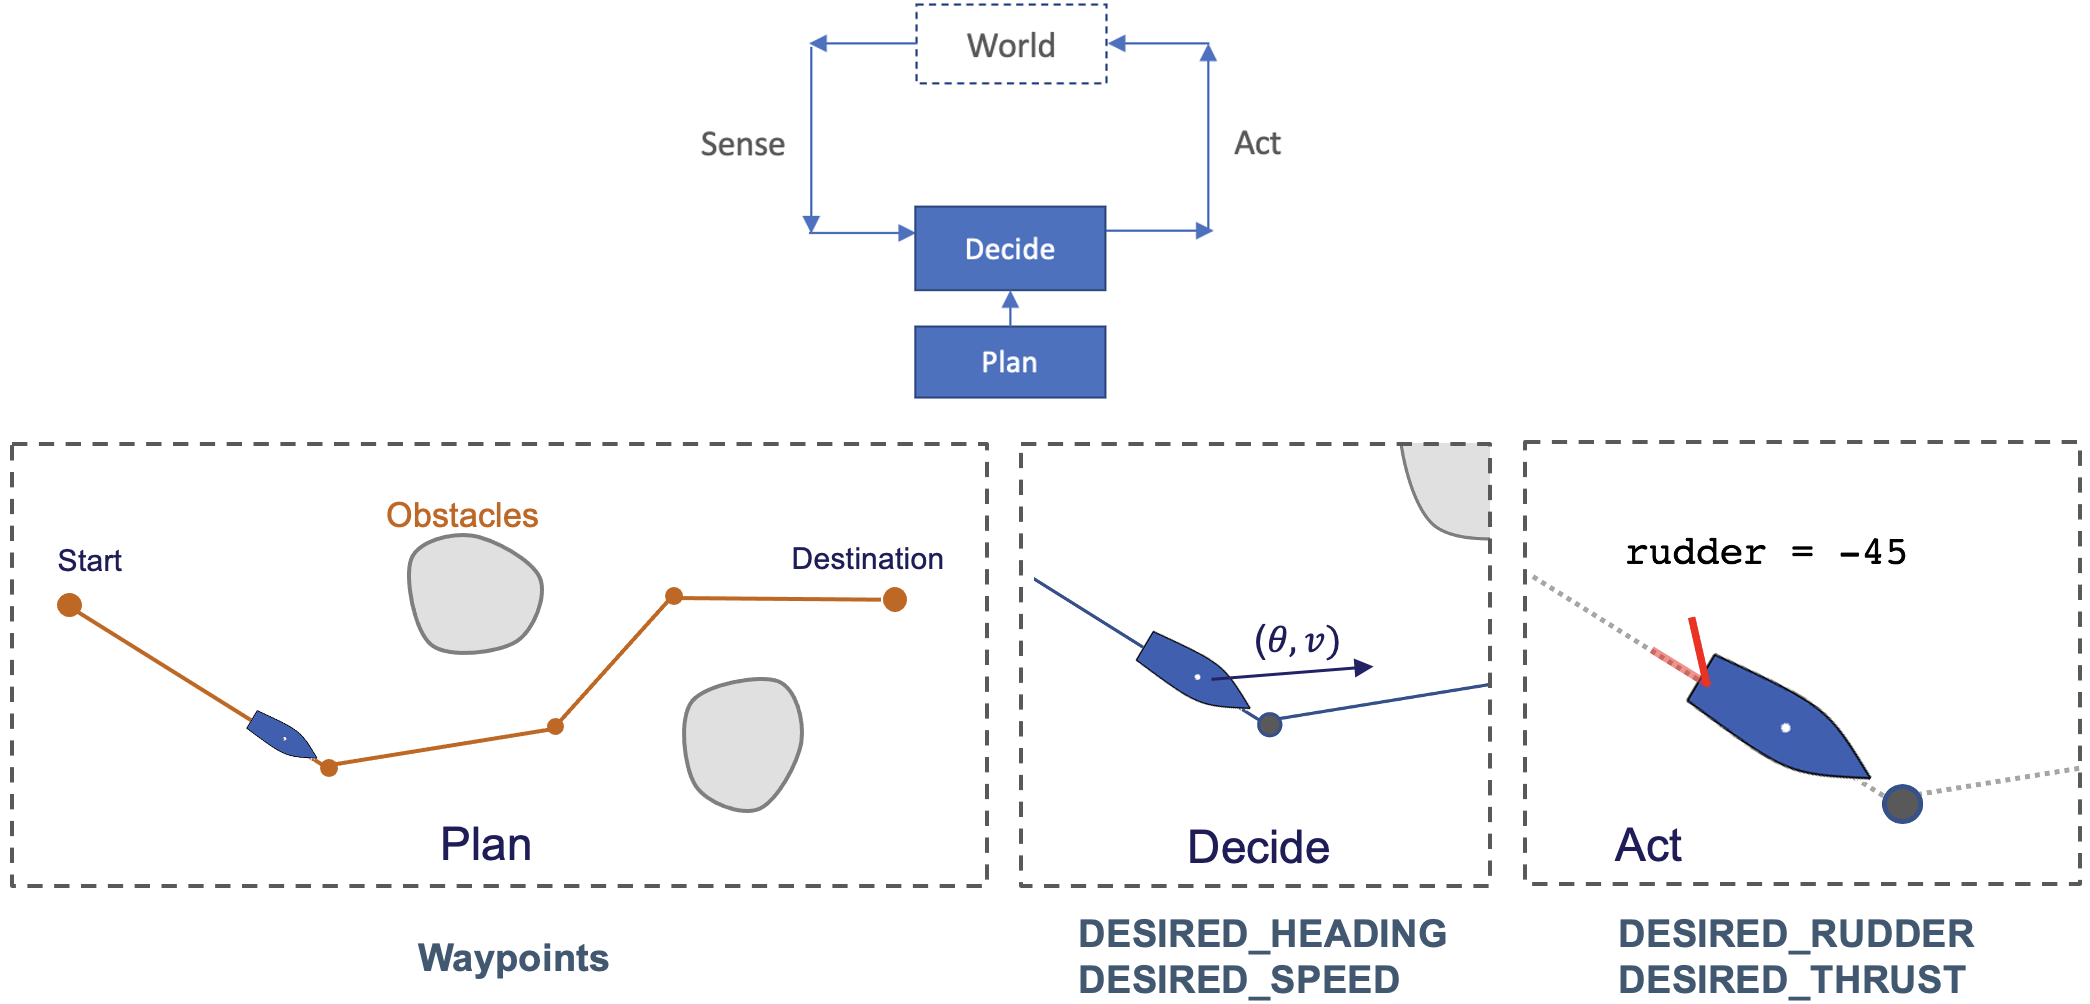
Figure 4.2: Sense-Decide-Act loop for autonomous robots.
4.2 Sense-Decide-Act for an AUV [top]
On an AUV the sense-decide-act loop still applies at a certain level. But how does the notion of a "loop" play out in a publish-subscribe architecture like MOOS, especially since MOOS apps are all talking through a central MOOSDB in an asynchronous manner. In Figure 4.3 below, the sense-decide-act loop is stretched out a bit and conveyed also in a MOOS structure.
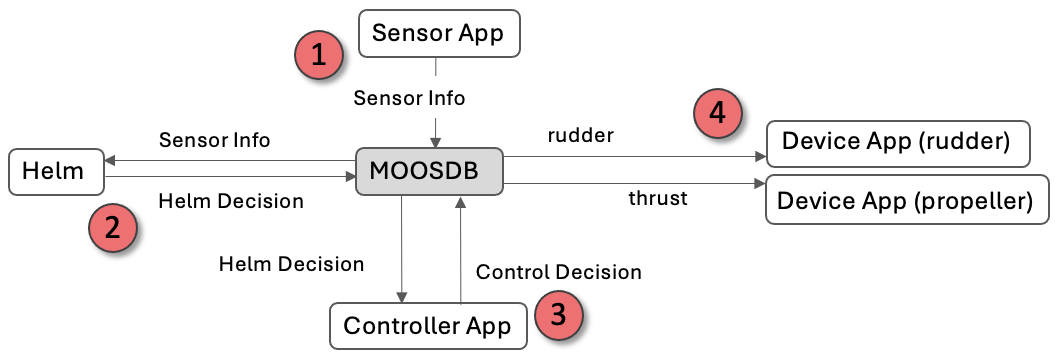
Figure 4.3: Sense-Plan-Act loop for autonomous robots. The numbers and directions of the arrows imply a flow of information, however each stage may be running at much different frequencies in terms of subscription, calculation and publication of information.
Recall that MOOS processes operate asynchronously. Even if they were all running at the same frequency, they should always be considered as asynchronous - there are no strict timing guarantees. In the processes in Figure 4.3, a few observations can be made regarding timing. First, we can safely assume the frequency of the controller apps, talking directly to the hardware actuators, is not going to be faster than the output of the controller. A controller on an AUV is likely to run about 10-40 Hz. The frequency of the helm is usually in the range of 1-4 Hz, with 4 being more typical. Certainly the helm will not run faster than the rate of change coming from the sensors. There are usually multiple AUV sensors, both for AUV position navigation, and detection of external objects, or environmental quality sensors. Certain sets of sensors, especially for navigation, will be process by a sensor fusion app before the helm uses such information.
4.3 Sense-Decide-Act for the Alpha Mission [top]
The sense-decide-act loop can be found in the Alpha mission and this is explored here. Recall the Alpha mission is the first mission recommended to run after downloading and installing MOOS-IvP on your machine. It is launched with:
   $ cd moos-ivp/ivp/missions/s1_alpha        (navigate to mission folder)
   $ ./launch.sh 10                           (launch with time warp 10)
It looks like:
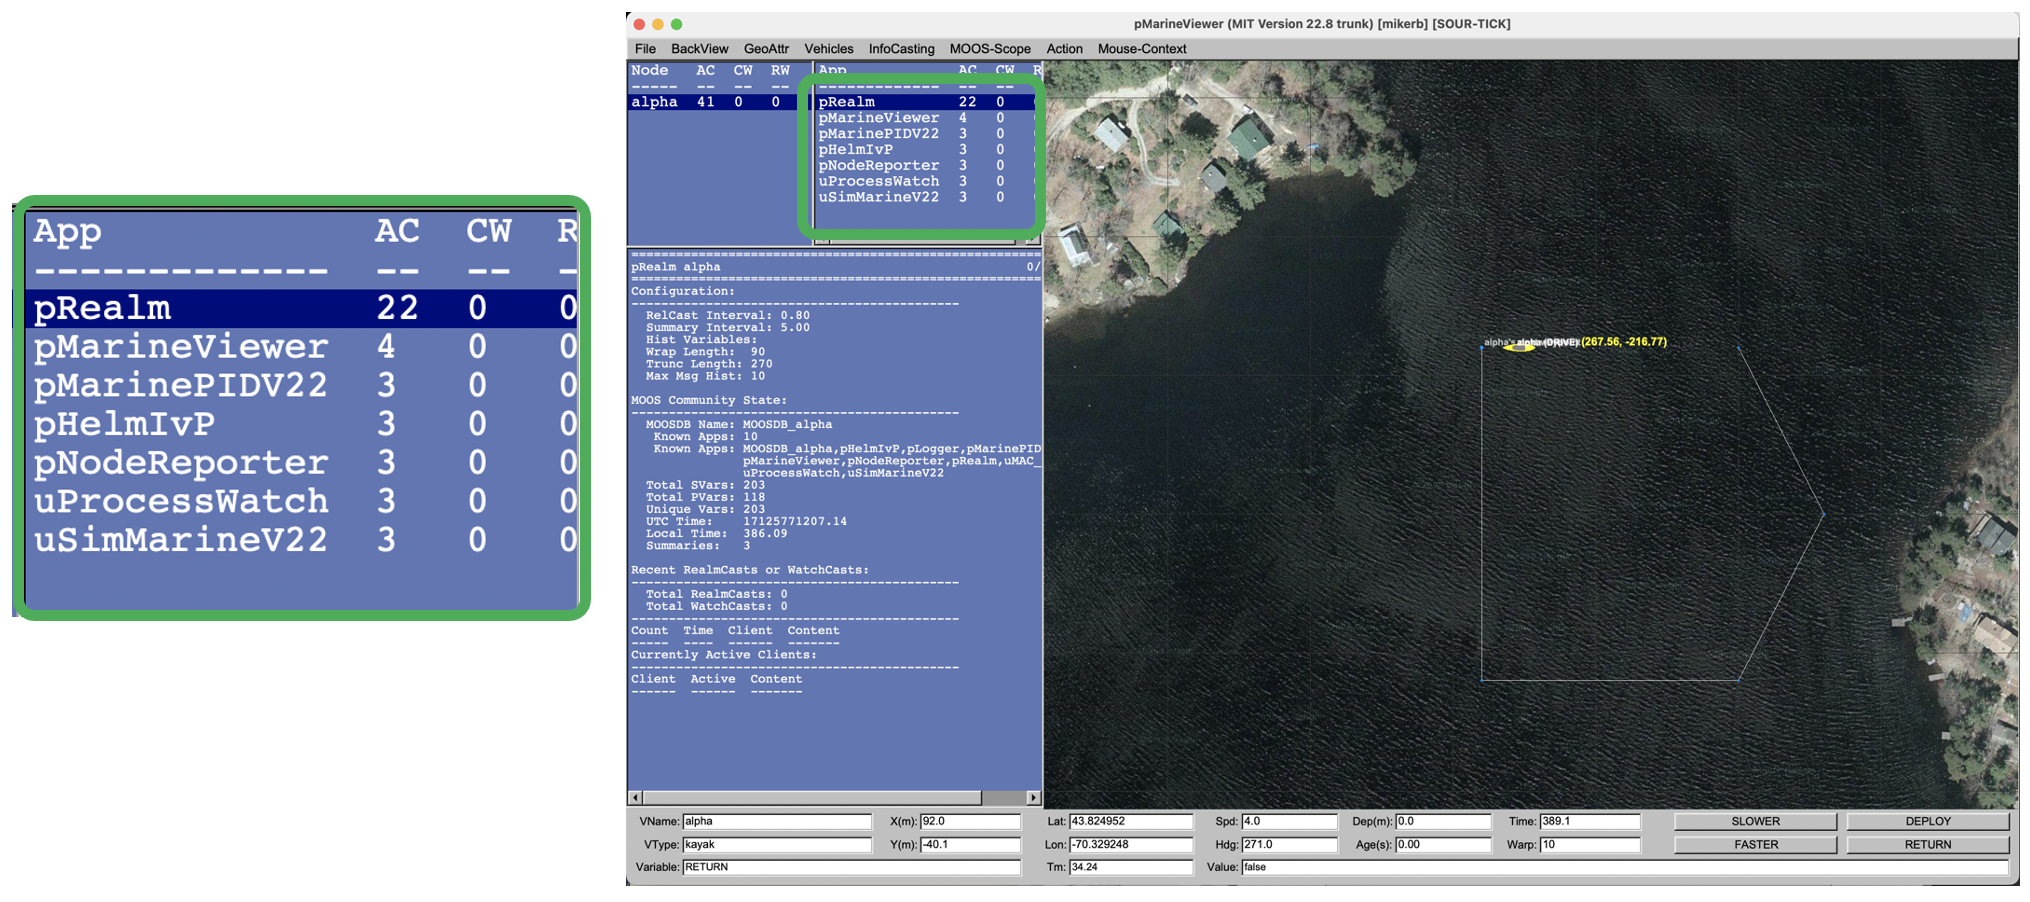
Figure 4.4: The Alpha Mission: A simple single vehicle mission traversing a set of five waypoints. The highlighted sub-window on the left indicates the set of MOOS apps running during this mission.
The set of control windows on the left show (a) the set of vehicles running in the mission, only "alpha" in this case (b) the set of MOOS apps participating in the mission, in the upper right blue window, and (c) the "engineering" information related to the selected application, pRealm in this case.
The primary apps involved in this mission are shown in Figure 5.1 below. First, note that this mission is started with two configuration files, alpha.moos and alpha.bhv. For now just know that the .moos file names the handful of apps to run in this mission, and the .bhv file configures the helm, which in this example includes the five waypoints to be traversed.
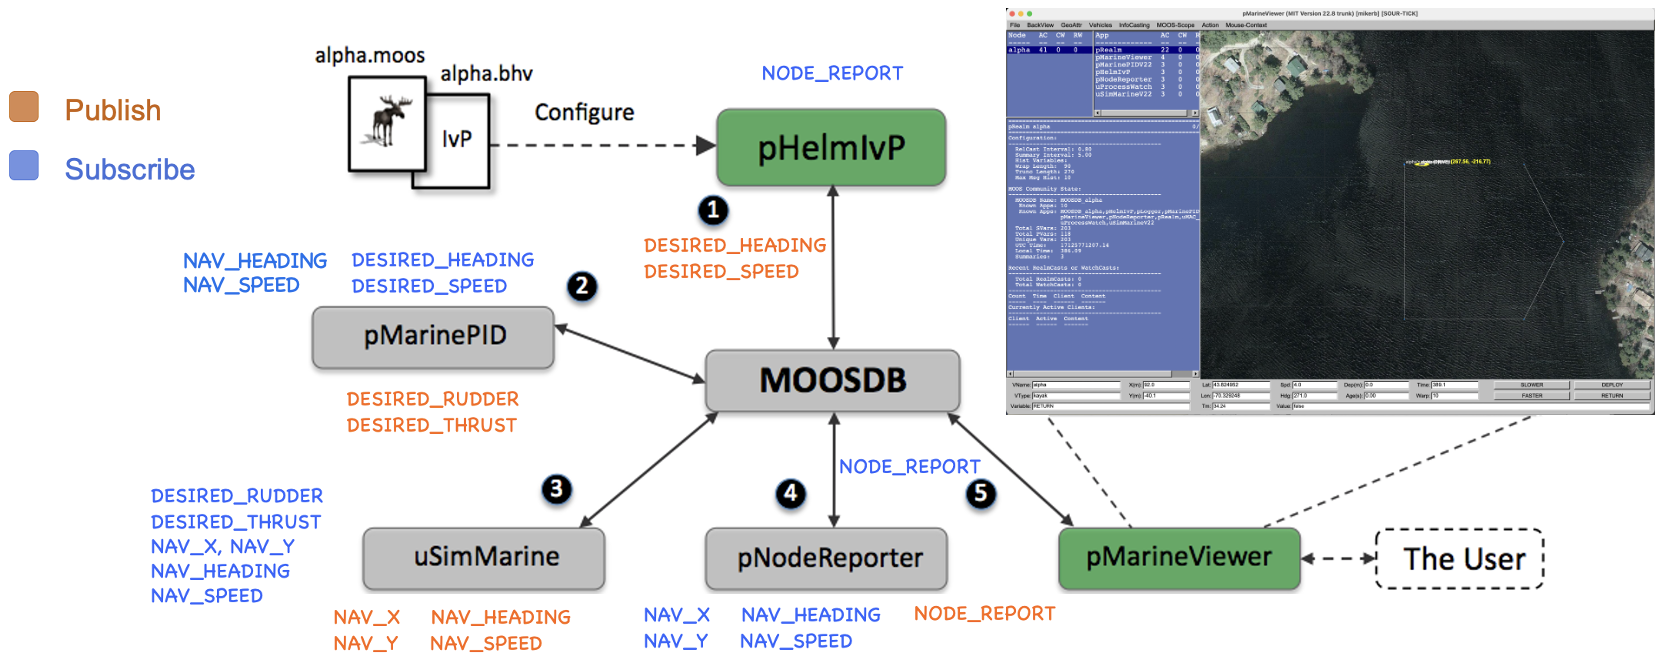
Figure 4.5: The Alpha Mission: A simple single vehicle mission traversing a set of five waypoints. The highlighted sub-window on the left indicates the set of MOOS apps running during this mission.
To find the sense-decide-act loop in this mission consider the sequence starting with the helm:
- The helm, pHelmIvP is configured with a set of waypoints from the alpha.bhv configuration file. The helm "senses" its own position through the receipt of the NODE_REPORT message. It determines a heading and speed relative to its current position and the next waypoint, and publishes DESIRED_HEADING and DESIRED_SPEED.
- The PID controller, pMarinePID, the controller compares the current heading and speed against the desired heading and speed and publishes DESIRED_RUDDER and DESIRED_THRUST to bring the desired values closer to the actual values. The actual current heading and speed, in the field are obtained from navigation sensors, and in simulation are obtained from simulator output.
- The simulator, uSimMarine, converts the previous vehicle position, heading and speed into a new updated position heading and speed based on the current actuator values. The "nav solution" is in the form of NAV_X, NAV_Y, NAV_HEADING, and NAV_SPEED.
- The node reporter, pNodeReporter, subscribes to the nav solution variables, and packages a single string summary in the form of a NODE_REPORT published. The node report is then used for the next iteration of the loop.
It is worth pointing out again that these apps to not run all at the same frequency. The NODE_REPORT variable is also read by the pMarineViewer GUI, to allow the vehicle position to be updated on the screen.
The other two apps running in this mission are pRealm and uProcessWatch. The latter monitors the list of expected apps and will post a warning if one disappears. The former, pRealm is an app that summarizes the publications and subscriptions for each app for debugging support.
5 Exercises II: Autonomy
In the below exercises we will experiment with the Alpha mission simulation on the course laptop, and explore the the publish-subscribe interface of the apps involved, and methods for affecting change into the simulation.
5.1 Exercises 4: Interjecting Autonomy Commands [top]
In this exercise the goal is to explore methods for interjecting autonomy commands into a running simulation, as well as methods for scoping MOOS variables during a mission.
Step 1: Navigate to the Alpha mission and launch with time warp 5.
   $ cd moos-ivp/ivp/missions/s1_alpha
   $ ./launch.sh 5

Figure 5.1: The Alpha Mission: The viewer is configured to scope on the single MOOS variable RETURN. The Return button is configured to set this variable to true when clicked. mission.
Note the bottom most field in the viewer is field for scoping a single MOOS variable. In this mission, the viewer is configured on startup to scope on the MOOS variable RETURN. Note that it is set to false at the outset. If you hover the mouse over the RETURN button (or any button), you will see what value is poked to the MOOSDB when the button is pressed.
Step 2: Launch the mission by hitting the DEPLOY button.
Hover the mouse over the deploy button to see that this button publishes DEPLOY to true and MISSION_MANUAL_OVERRIDE to false and RETURN to false. Pressing the DEPLOY button results in all three values being published. Try repeatedly hitting the DEPLOY and RETURN buttons to see the vehicle toggle between two modes.
Step 3: In the pMarineViewer window, type the 'a' key to toggle between the blue and yellow information panels on the left.
The yellow panels are called "realmcast" panels. Click on the pHelmIvP menu item in the upper right hand panel. In the main bottom yellow panel there are two tables, the top listing all the variables currently subscribed for by the helm, and the bottom are all the MOOS variables published by the helm. You can change the text size if you want by selecting options in the InfoCasting pull-down menu.
Step 4: Note three of the variables subscribed for by the helm are DEPLOY, RETURN, and MOOS_MANUAL_OVERRIDE. Note the current values. Try hitting the DEPLOY and RETURN buttons again and notice the change of values. Not also that the "source" of the variable is list as pMarineViewer.
Step 4: Note three of the variables subscribed for by the helm are DEPLOY, RETURN, and MOOS_MANUAL_OVERRIDE. Note the current values. Try hitting the DEPLOY and RETURN buttons again and notice the change of values. Not also that the "source" of the variable is list as pMarineViewer.
Step 5: Assuming the mission is still running, in a separate terminal window, navigate again to the mission folder.
Try using uPokeDB to emulate the job of the RETURN button.
   $ cd moos-ivp/ivp/missions/s1_alpha
   $ uPokeDB alpha.moos++  RETURN=true
Note that we use the alpha.moos++ file instead of alpha.moos. They are the same except the time warp in the former is set to 5, like the rest of the mission when launched. Note the value of the RETURN value changing in the realmcast window, and notice the source of the current value will be uPokeDB after the poke. You can also try poking RETURN to false and the vehicle should resume its original path again.
Document Maintained by: mikerb@mit.edu
Page built from LaTeX source using texwiki, developed at MIT. Errata to issues@moos-ivp.org.  Get PDF