2.680 Labs
01 Machine Setup
2A Version Control W/Git
02 Intro to MOOS
03 MOOS Programming
04 Helm Autonomy
05 Multiple Vehicles Pt1
06 Multiple Vehicles Pt2
07 Distributed TSP
08 Multi-Machine TSP
09 Inter-Vehicle Messaging
10 Behavior Writing
11 Payload Autonomy
12 Operating MIT Herons
13 Autonomous Rescue (Pt1)
14 Autonomous Rescue (Pt2)
15 Autonomous Rescue (Pt3)
16 Autonomous Rescue (Pt4)
17 Autonomous Rescue (Pt5)
2.680 Retired Labs
12 Hazard Search
13 Hazard Search II
17 Front Estimation
18 In-Water Front Estimate
Ten Short C++ Labs
01 C++ Program Structure
02 C++ Cmd Line Args
03 C++ Functions
04 C++ I/O and Vectors
05 C++ Classes, Rand #'s
06 C++ Deserialization
07 C++ Build Systems
08 C++ Inheritance
09 C++ Coding Guidlines
10 C++ Style Guidelines
Lab 13 - Autonomous Rescue Challenge - Part 1
Maintained by: mikerb@mit.edu  Get PDF
1 Overview and Objectives
2 Preliminaries
2.1 Preliminaries: Documentation Conventions
2.2 Preliminaries: Pull Latest Code and Mission Files
2.3 Preliminaries: Pavilion Coordinates
2.4 Preliminaries: The Shell Path
2.5 The uFldRescueMgr MOOS App for the Rescue Lab
3 Running the Autonomous Rescue Mission in Simulation
3.1 The Autonomous Rescue Baseline Mission
3.2 The Swimmer File
3.3 Assignment 1: (self check off) - Running the Baseline Mission
4 Building a Path Planning App for Rescue Traversals
4.1 Assignment 2 (self check off) Creating a New Path Planning App
4.2 Swimmer Alert Messages from the Shoreside
4.3 Found Swimmer Messages from the Shoreside
4.4 Assignment 3 (check off) - Demonstrate Dynamic Path Planning
5 Instructions for Handing In Assignments
5.1 Requested File Structure
5.2 Due Date
1 Overview and Objectives
The Autonomous Rescue Challenge is a multi-lab sequence culminating the lab work of MIT 2.680 for the Spring 2026 semester. It introduces to 2.680 an adversarial head-to-head mission where teams will be fielding their robots on the same playing field in a zero-sum competition. There will be several variants to the competition as we progress through the multi-week lab sequence. In it's simplest form, the problem is similar to the Traveling Salesman Problem (TSP) from Labs 7 and 8. A given set of "swimmers" and their locations are provided to an autonomous vehicle. The mission is to visit and rescue each swimmer:


Figure 1.1: The Problem Overview: A robot is provided a list of swimmers and their locations, and is tasked with visiting and rescuing all of them as quickly as possible.
In adversarial variants of this lab, two teams will each launch a rescue vehicle and will compete to rescue the most swimmers. The team with the most swimmers, after all have been rescued, or after a fixed amount of time, will be the winner. This can be compared to an Easter egg hunt.
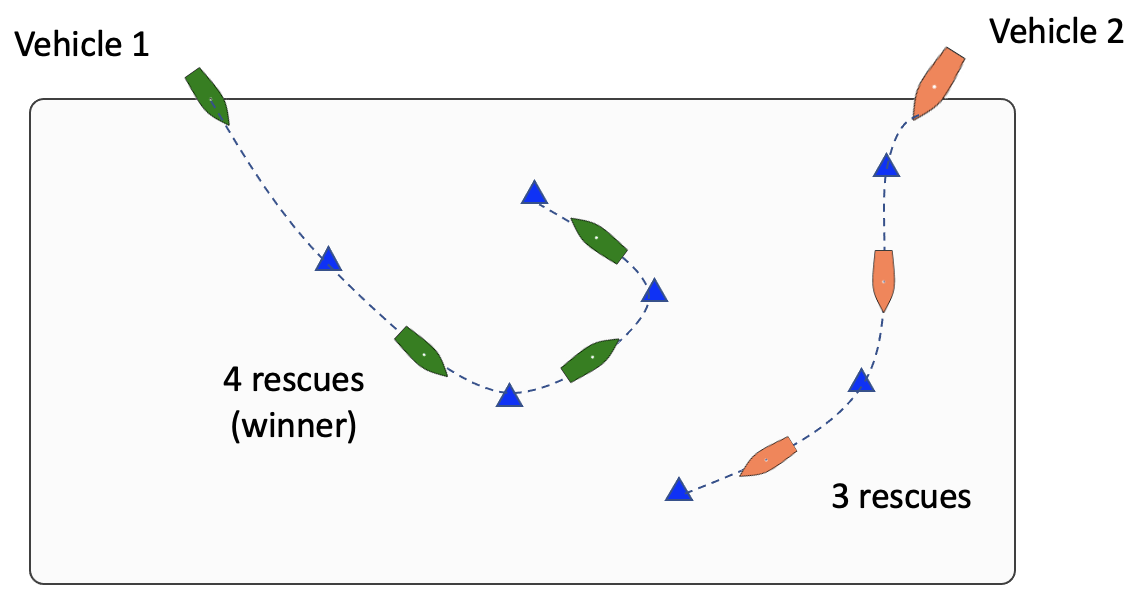
Figure 1.2: Adversarial Rescue: Two robots are each provided information about a set of swimmers and their locations. Each proceeds by trying to rescue as many as possible. They operate in an adversarial manner, each trying to rescue as many as possible. Once a swimmer has been rescued by one vehicle, it cannot be rescued by the other. The winning vehicle is the one who rescues the most swimmers.
In the first part of this lab sequence, Lab 13 will focus on the above two variants, first in simulation and then on the water with Herons or BlueBoats. In the last part of this sequence, Lab 17, each team will deploy a second collaborative vehicle acting as a sensor vehicle. The exact locations of a some of the swimmers in this case will not be known to the rescue vehicle at the outset, but will instead be discovered by the sensor vehicle.
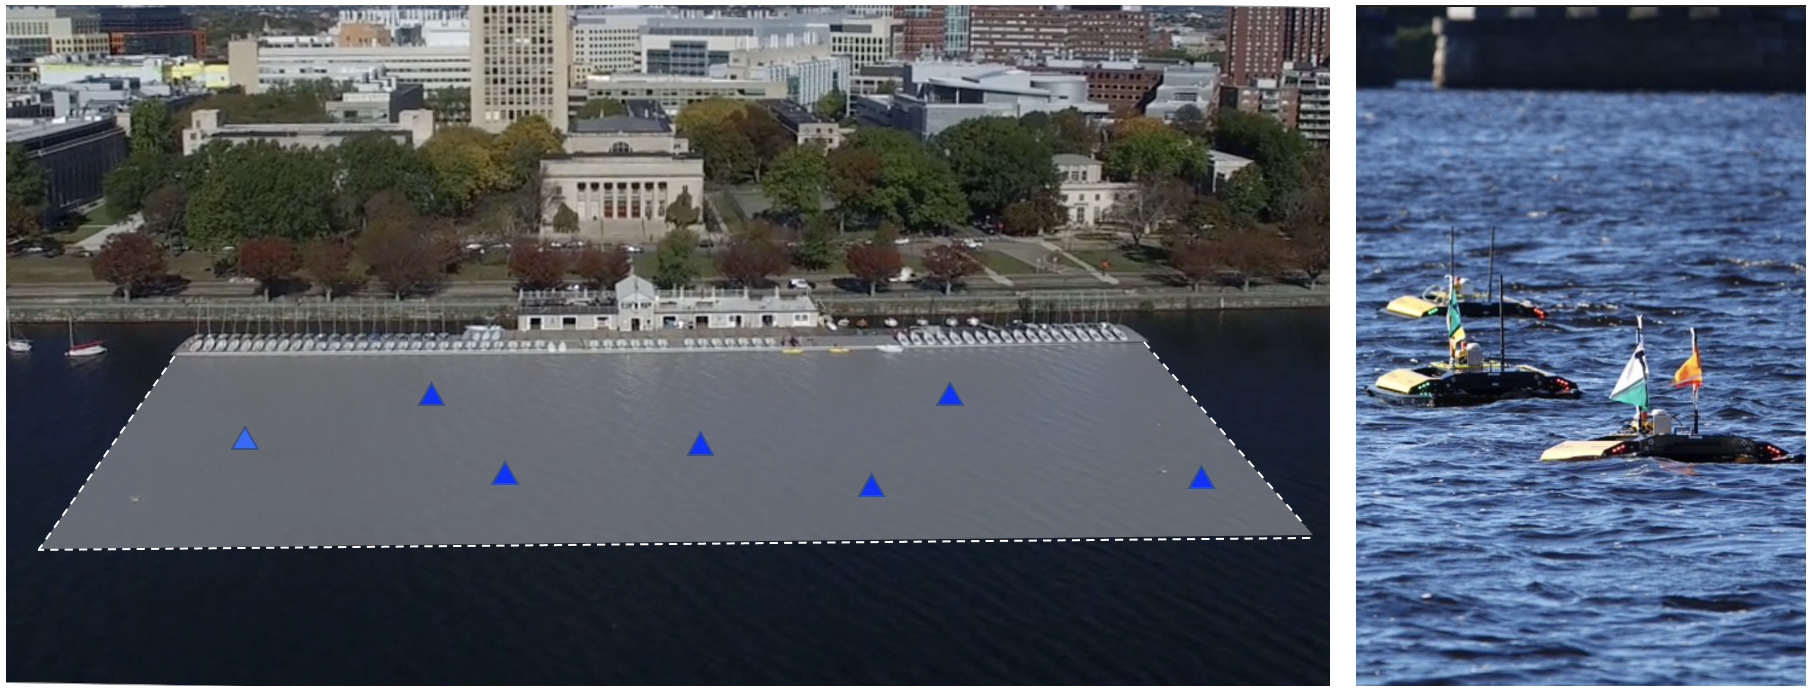
Figure 1.3: Field Competitions: The in-water portion of the lab will be at the MIT Sailing Pavilion, where the playing field is aligned with the docks as shown. The rescue vehicles will be the Clearpath M300 Heron, or BlueBoat, unmanned surface vehicles (USVs).
A summary of topics:
- Path planning revisited
- Path re-planning in the face of new information
- Path re-planning that considers adversarial intent
- Collision avoidance
2 Preliminaries
2.1 Preliminaries: Documentation Conventions [top]
To help distinguish between MOOS variables, MOOS App configuration parameters, MOOS App names, behavior parameters, we will use the following conventions:
- MOOS variables are rendered in green, such as IVPHELM_STATE, as well as postings to the MOOSDB, such as DEPLOY=true.
- MOOS configuration parameters are rendered in blue, such as AppTick=10 and verbose=true.
- Behavior parameters are rendered in brown, such as priority=100 and endflag=RETURN=true.
- MOOS-IvP applications are rendered in magenta, such as pShare, or pHelmIvP.
- General GNU/Linux commands are represented in dark purple, such as wget, mkdir, or cd.
When distinguishing between command-line actions on a PABLO, and on your laptop, the below convention is used:
        $ cd moos-ivp    (a command executed on your local laptop)
  PABLO $ cd moos-ivp    (a command executed on the PABLO computer)
2.2 Preliminaries: Pull Latest Code and Mission Files [top]
At each stage of the lab we need to be mindful of the code on both the laptop and the PABLO. Changes may be made to (a) course-provided code, (b) the course baseline mission, and (c) your own moos-ivp-extend code. Use this section as a reminder to update frequently.
To recap, here are the relevant trees:
- moos-ivp: All the core autonomy code, and MOOS middleware
- moos-ivp-2680: uFldRescueMgr, gen_swimmers, and the baseline BHV_Scout behavior in lib_bhv_scout.
- moos-ivp-extend: Your pGenRescue and your BHV_Scout behavior.
- moos-ivp-heron: (PABLO only) When running on the Heron, we need the iM300 app. This should already be on your provided PABLO.
- moos-ivp-blueboat: (PABLO only) When running on the BlueBoat, we need to run the BlueBoat backseat app. This repo should already be on your provided PABLO.
- pablo-common: (PABLO only) Enviroment settings for the Heron. This should already be on your provided PABLO.
The PABLO boot script is configured to automatically update the pablo-common tree when the PABLO boots and finds the Internet. This tree contains the boot script itself. The boot script will automatically:
- git pull the moos-ivp tree. Rebuild if any change detected.
- git pull the moos-ivp-2680 tree. Rebuild if any change detected.
- git pull the moos-ivp-heron tree. Rebuild if any change detected.
- git pull the moos-ivp-blueboat tree. Rebuild if any change detected.
So the only tree you need to manually update is your own moos-ivp-extend tree.
Ensure the Latest Code and Updates On your Laptop [top]
Updates will be needed on your laptop to run the initial simulations. You may also be using your laptop to act as the shoreside computer during field tests. You will need to update and possibly rebuild: the moos-ivp, moos-ivp-2680, and moos-ivp-extend trees:
 $ cd ~/moos-ivp; git pull; ./build-ivp.sh
 $ cd ~/moos-ivp-2680; git pull; ./build.sh
 $ cd ~/moos-ivp-extend; git pull; ./build.sh
By the time you reach the rescue lab you likely alredy have the moos-ivp-2680 tree as it was needed in previous labs. If for some reason you do not already have the moos-ivp-2680 tree, it can be obtained as below, placing it alongside your moos-ivp and moos-ivp-extend trees. You will need to augment your shell path accordingly, to include moos-ivp-2680/bin.
$ git clone git@github.com:mit2680/moos-ivp-2680.git
Ensure the Latest Code and Updates On your PABLO [top]
Updates will also be needed on your PABLO. Re-connect your PABLO to your laptop with Internet Sharing enabled, and update the following trees. As mentioned above, the below trees (except moos-ivp-extend should be built when your PABLO reboots while connected to the Internet. If for some reason it booted with no Internet connection, you can always update and rebuild manually. Sometimes a TA might even announce that there has been a changed pushed to say the moos-ivp-2680 tree and you'll need to pull that change and rebuild. We hope that this doesn't happen often or at all, but sometimes it does.
- The moos-ivp tree, and build
- The moos-ivp-2680 tree, and build
- The moos-ivp-heron tree, and build
- The moos-ivp-blueboat tree, and build
- The pablo-common tree (build not needed)
- The moos-ivp-extend tree, and build
The first five trees above are on your PABLO when you received it, but may need updating if changes were made during the course of the lab. The moos-ivp-extend tree was not on your PABLO when you received it (since it is your individual work), but should be on your PABLO as part of Lab 11 Introduction to the PABLO.
 $ cd ~/moos-ivp; git pull; ./build-ivp.sh
 $ cd ~/moos-ivp-2680; git pull; ./build.sh
 $ cd ~/moos-ivp-heron; git pull; ./build.sh
 $ cd ~/moos-ivp-blueboat; git pull; ./build.sh
 $ cd ~/moos-ivp-extend; git pull; ./build.sh
Note: In a pinch, you can do any of the above steps while your PABLO is connected to a Heron or BlueBoat, but the more you can do before you work with the physical robot, the better. This will free up robot time and TA time for other users.
2.3 Preliminaries: Pavilion Coordinates [top]
The MIT Sailing Pavilion is the center of operations for the Pavlab, or Marine Autonomy Lab. The (0,0) coordinates, or datum, is located at: 42.358456, -71.087589. These datum coordinates are declared in the top of every .moos file in this lab, and set in the plug file plug_origin_warp.moos:
 // MIT Sailing Pavilion
 LatOrigin  = 42.358456
 LongOrigin = -71.087589
All other coordinates are usually configured in local coordinates relative to the above datum.
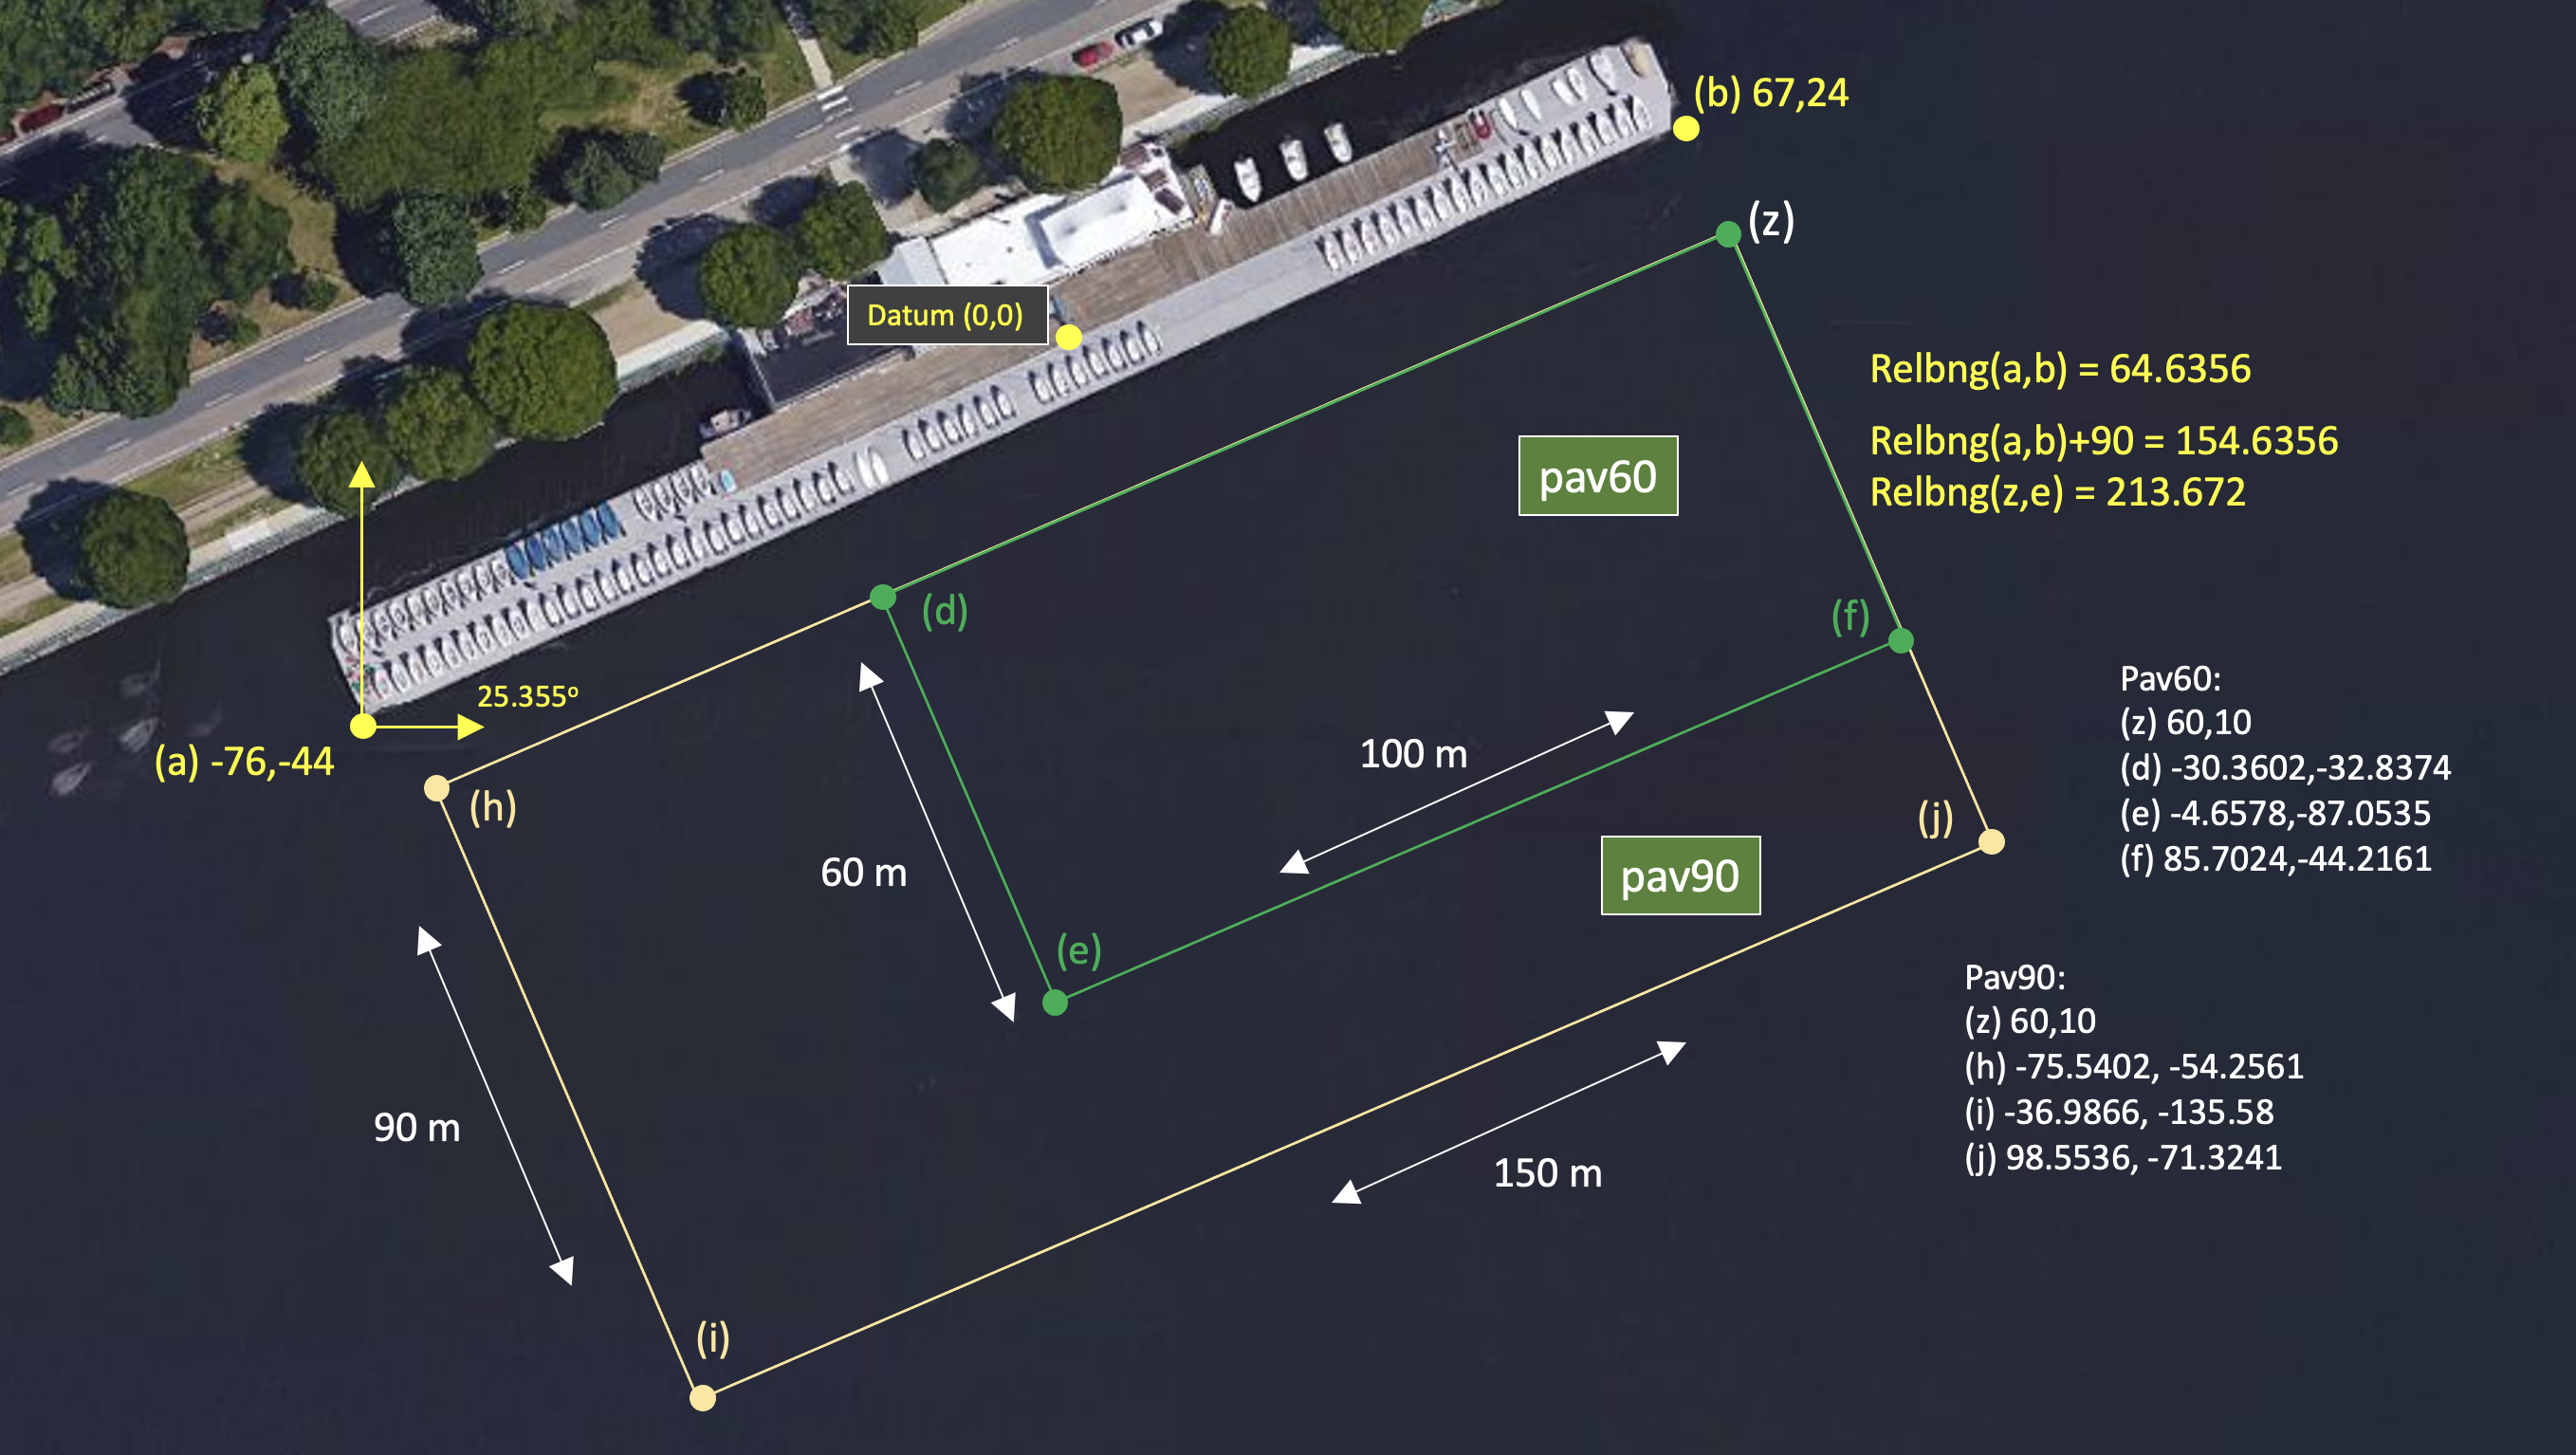
Figure 2.1: Useful coordinates related to the rescue lab. There are two playing field rectangles, a large one ("pav90") roughly the extent of the docks, and a smaller region ("pav60") closer to the Pavlab doors on the East end of the dock.
Note there are two rectangles representing a small and large operation area. The smaller area (pav60) is typically used for in-water tests involving one or two vehicles. The larger area (pav90) is typically used for in-water tests involving two-on-two competitions.
These two regions can be passed to the gen_swimmers app:
 $ gen_swimmers = --pav60 --swimmers=15
 $ gen_swimmers = --pav90 --swimmers=17 --unreg=11
Likewise, in the baseline mission, a new set of random swimmer locations can be generated at launch time with either of the two MIT regions:
 $ ./launch.sh --pav60 -r1 10
 $ ./launch.sh --pav90 -r2 --swimmers=17 10
The boundaries of the playing field are read in by uFldRescueMgr from the swim file. The swim file is a key config parameter for this app, and it contains the location of all the swimmers. The region will will be communicated to the vehicles, through the MOOS variable RESCUE_REGION. For example, for the larger region above:
RESCUE_REGION = pts={60,10:99,-71:-37,-136:-76,-54}
The region message is received by the vehicle and is ingested by the OpRegionV24 behavior in the helm, so the vehicle will know the playing field.
2.4 Preliminaries: The Shell Path [top]
This lab sequence will use applications in the following locations:
- moos-ivp/bin
- moos-ivp/scripts
- moos-ivp-2680/bin
- moos-ivp-extend/bin (your code)
The moos-ivp-2680 tree will hold a few apps specific to this lab, e.g., uFldRescueMgr, and the moos-ivp-extend tree will hold your app, pGenRescue. To augment your path, you may need to edit your .bashrc file as below:
 PATH+=:~/moos-ivp/bin             (this was likely already there)
 PATH+=:~/moos-ivp/scripts         (this was likely already there)
 PATH+=:~/moos-ivp-extend/bin
 PATH+=:~/moos-ivp-2680/bin
 export PATH                       (this was likely already there)
You can confirm this by examining the contents of the $PATH bash environment variable:
$ echo $PATH
Confirmation can also be done with the GNU/Linux which function:
  $ which pHelmIvP
  /Users/you/moos-ivp/bin/pHelmIvP              (or /home/you/... in GNU/Linux)
  $ which uFldRescueMgr
  /Users/you/moos-ivp-2680/bin/uFldRescueMgr    (or /home/you/... in GNU/Linux)
There exists a convenience function in moos-ivp/scripts called path_shell.sh. This command will list your $PATH environment variable in a more human readable format. Normally the output is one long line with each directory separated by a colon:
  $ echo $PATH
  /usr/bin:/usr/local/bin:/bin:/Users/janedoe/bin:/Users/janedoe/project-pavlab/utils/bin:
  /Users/janedoe/moos-ivp-janedoe/bin:/Users/janedoe/moos-ivp-heron/bin:/Users/janedoe/mo
  os-ivp-extend/bin:/Users/janedoe/moos-ivp-2680/bin:/Users/janedoe/moos-ivp/bin:
  /Users/janedoe/pablo-common/bin
The path_shell.sh utility will separate each directory out to a single line:
  $ path_shell.sh
  1: /usr/bin
  2: /usr/local/bin
  3: /bin
  4: /Users/janedoe/bin
  5: /Users/janedoe/project-pavlab/utils/bin
  6: /Users/janedoe/moos-ivp-janedoe/bin
  7: /Users/janedoe/moos-ivp-heron/bin
  8: /Users/janedoe/moos-ivp-extend/bin
  9: /Users/janedoe/moos-ivp-2680/bin
  10: /Users/janedoe/moos-ivp/bin
  11: /Users/janedoe/pablo-common/bin
2.5 The uFldRescueMgr MOOS App for the Rescue Lab [top]
The core staff-provided app for the rescue lab is the the uFldResueMgr app. It is found in the moos-ivp-2680 tree. You can think of this as being similar to the pPointAssign app from Lab 7, since it will be informing vehicles about visit points, or in this case, swimmers. But unlike pPointAssign, (a) it will not necessary announce all swimmers at the outset, and (b) it will keep track of which swimmers have been visited, and by whom. It will serve as the competition mediator and judge for these labs. As the layout in Figure 2.2 shows, uFldRescueMgr runs on the shoreside, and the pGenRescue app runs on the vehicle. The latter app is comparable to the pGenPath app from lab 7.
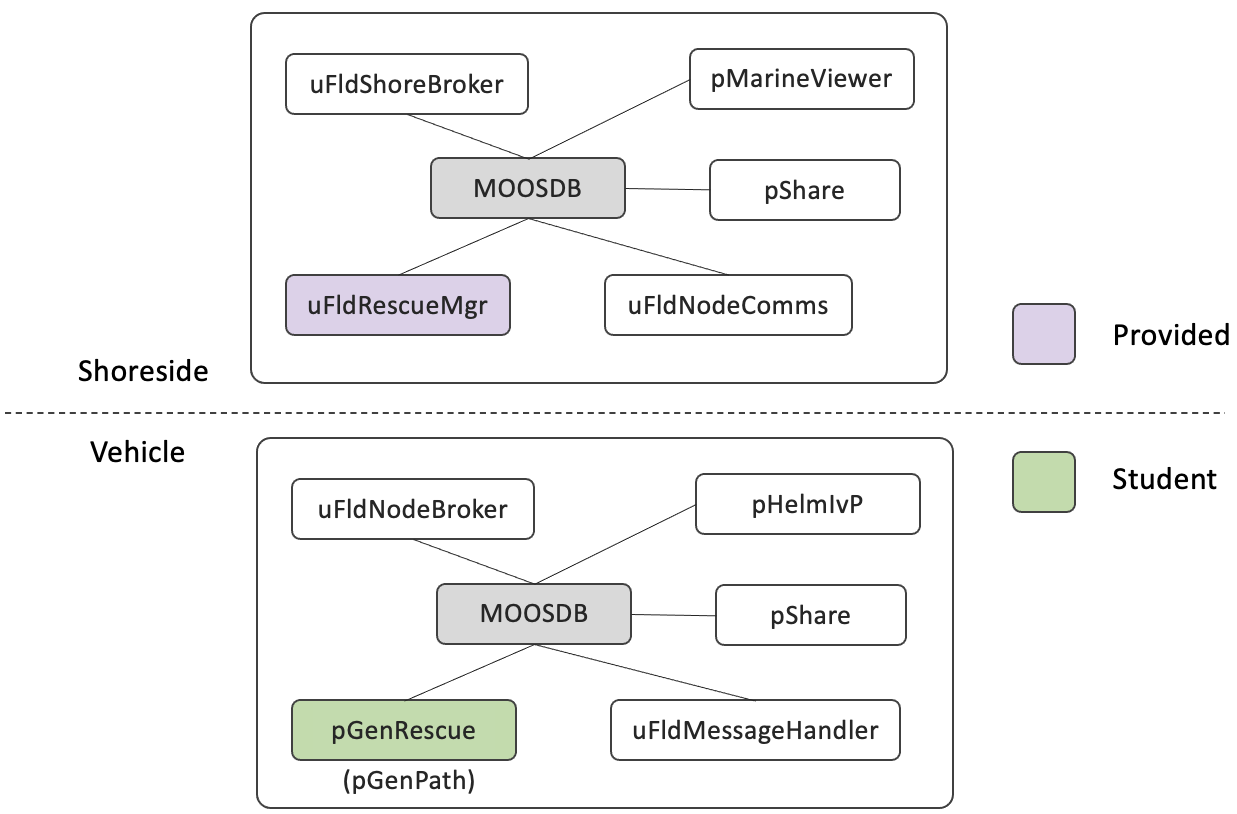
Figure 2.2: Software Topology: The uFldRescueMgr app will run on the shoreside and is distributed as part of this lab. The pGenRescue app is provided by the student to handle path planning on on the vehicle.
The interface and capability for this app will be described in later sections, but salient points for this lab can be summarized:
- The uFldRescueMgr will ingest a swim file, with pre-calculated locations of swimmers.
- The uFldRescueMgr will broadcast locations of swimmers to the vehicles with a SWIMMER_ALERT message including a unique ID per swimmer and its location.
- Vehicles will send a RESCUE_REQUEST message to uFldRescueMgr to attempt a swimmer rescue. The rescue manager will either grant or deny the request based on the vehicle proximity to the swimmer and whether or not the swimmer has been rescued already by another vehicle.
3 Running the Autonomous Rescue Mission in Simulation
The goals of this section are:
- Run the autonomous rescue baseline mission
- Modify your Lab 7 pGenPath app to work in this mission
- Run the rescue baseline mission in simulation with your app
3.1 The Autonomous Rescue Baseline Mission [top]
The baseline mission resides in the moos-ivp-2680 tree. This tree, per the steps described in Section 2.2, should now be downloaded onto your laptop. The baseline mission is located here:
 $ cd moos-ivp-2680/missions/lab_14_rescue_basline
 $ ls
 build_swim_files.sh* meta_shoreside.moos  mit_03.txt
 clean.sh*            meta_vehicle.bhv     mit_05.txt
 init_field.sh*       meta_vehicle.moos    plugs.moos
 launch.sh*           mit_00.txt
 launch_shoreside.sh* mit_01.txt
 launch_vehicle.sh*   mit_02.txt
You may also see a few other files only relevant to the TAs when we later perform automated testing:
 archive/             prelaunch.sh*
 quick_res.sh*        get_scout.sh*
IMPORTANT NOTE: Unlike other labs where the baseline mission was to be copied into your moos-ivp-extend tree, we will all work from the lab_14_rescue_baseline mission folder in moos-ivp-2680/missions. This allows the staff to modify the baseline mission if needed, with only a version control update needed on the user's end. The mission is carefully constructed such that student contributions are primarily limited to student versions of the rescue MOOS app, and scout IvP behavior.
This mission, like some other of our baseline missions involving multi-machine or in-water experiments, is structured to be launched in one of three ways:
- launch.sh: Full simulation, launching shoreside and vehicle.
- launch_vehicle.sh: Launching on vehicle only (sim or on the water).
- launch_shoreside.sh: Launching the shoreside only.
Like virtually all other launch scripts, these script supports the --help, or -h and --just_make, or -j options. The latter is useful for using the launch script to build the targ_* files without launching the mission. This can help in debugging sometimes.
In this first lab (13), you will launch a full simulation on your laptop, acting as shoreside and vehicle. In the next lab (14), we will move to the river, and you will launch just the vehicle portion of the mission on your Heron or BlueBoat, and the staff or lab partner will launch the shoreside independently.
3.2 The Swimmer File [top]
The rescue manager app, uFldRescueMgr, is initialized with a file containing the list of swimmers and locations. The example used in the baseline mission is in the file mit_01.txt, and shown below.
 // gen_swimmers --swimmers=5 --pav90 --sep=5
 poly = pts={60,10:-75.5402,-54.2561:-36.9866,-135.58:98.5536,-71.3241}
 swimmer = name=p01, x=64.7, y=-39.7
 swimmer = name=p02, x=4.7, y=-99.4
 swimmer = name=p03, x=27.3, y=-58.6
 swimmer = name=p04, x=50.1, y=-91
 swimmer = name=p05, x=41.2, y=-24
This file is generated with another utility, gen_swimmers, which is a separate command-line utility in the moos-ivp-2680 tree. The command to create the above file was:
$ gen_swimmers --swimmers=5 --pav90 --sep=5
The resulting locations listed above are also rendered in Figure 3.1. The baseline mission contains the two swimmer files, mit_00.txt and mit_01.txt. When the baseline mission is run with the first file, it will proceed nicely, visiting each swimmer. The baseline mission is configured to run a waypoint behavior with hard-coded waypoints matching the swimmer locations in mit_00.txt. When the mission is run with the second swimmer file, the vehicle will perform poorly since the waypoints were configured to match the first file. To make your vehicle work generally, you will need to abandon the hard-coded waypoint approach and instead utilize a version of your pGenPath app, as discussed below.
3.3 Assignment 1: (self check off) - Running the Baseline Mission [top]
The baseline mission folder has at least two swim files, mit_00.txt, and mit_01.txt. Launch the first mission with:
   $ cd moos-ivp-2680/missions/lab_14_rescue_baseline
   $ ./launch.sh 10                            (--swim_file=mit_00.txt is default)
It should look similar to the example image, or video, in Figure 3.1 below. The vehicle visits each of the five swimmers directly and efficiently. While you are watching this run, you may want to select the appcasting output for uFldRescueMgr. This app will be discussed in more detail later, but most of the output may be discernible just by looking at it while it runs.

Figure 3.1: In the first baseline mission, the vehicle will proceed to visit all five swimmer locations, before returning home. The circle moving with the vehicle represents the sensor range for performing rescues.
There is not a lot of intelligence in this baseline mission. If you look under the hood, in the meta_vehicle.bhv file, you will notice the initial deployment results in a waypoint behavior that traverses the waypoints that conveniently overlay very closely the location of each swimmer. The order is even more-or-less optimal. This same mission applied to a different swim file will fail badly. Launch the same mission using another swim file named mit_01.txt:
   $ cd moos-ivp-2680/missions/lab_14_rescue_baseline
   $ ./launch.sh --swim_file=mit_01.txt 10        (time warp 10)
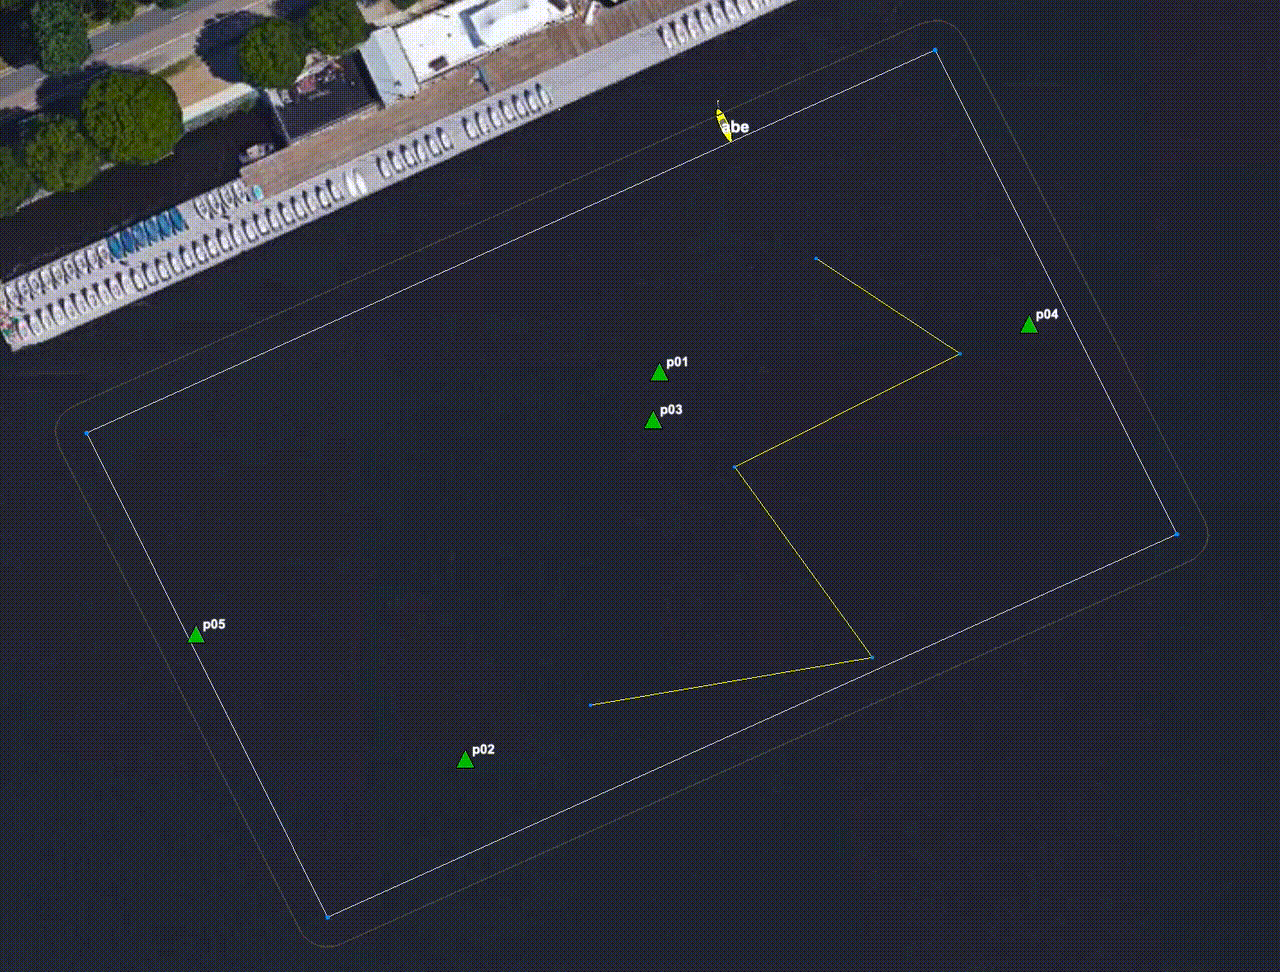
Figure 3.2: In the second baseline mission, the vehicle will proceed to to visit all the hard-coded points as in the first baseline mission. In this case the points do not match up with swimmer locations and none of the swimmers are rescued.
In a nutshell, your strategy will be to add an app, like your pGenPath app from Lab 7, to this mission. It will register for information comparable to the VISIT_POINT messages from Lab 7. In this case the information will come from the shoreside uFldRescueMgr app, with format described in Section 4.2. As in Lab 7, your app will then post updates to the waypoint behavior. In this first lab, it will not get much more complicated than this, but as we progress the strategy will become more involved.
4 Building a Path Planning App for Rescue Traversals
In this lab, a key app will be the one that generates a waypoint path to visit and "rescue" each swimmer. As with Lab 7, this app will receive coordinates from the shoreside, formulate a strategic decision in the form of a waypoint path, and then pass that path to the helm in the form of an update to the waypoint behavior. At first, in this lab, our primary focus is to get this new app running and ingesting the slightly different format of incoming information from the shoreside.
4.1 Assignment 2 (self check off) Creating a New Path Planning App [top]
The path planning app in this lab should be called pGenRescue.
The pGenPath app from Lab 7 is a good place to start. You have two options. (a) You could modify that app to suit the needs for this lab, and superficially rename the app, or (b) you can make a copy of that app to suit the needs of this lab. My recommendation is the latter. Even though your code is under version control and you can revert changes, a good rule of thumb is to leave a perfectly working app alone, in case you want to come back to it later. We suggest that you make a copy of pGenPath, calling it pGenRescue:
   $ cd moos-ivp-extend/src
   $ cp -rp pGenPath pGenRescue
Once this folder is copied, you will need to do the following
- Edit the CMakeLists.txt file in pGenRescue
- Rename files like GenPath.cpp to GenRescue.cpp etc., and edit the file contents, including main.cpp
- Add pGenRescue to the CMakeLists.txt file in the moos-ivp-extend/src directory.
The goal of this assignment is to simply get your new app to build, creating the binary in your moos-ivp-extend/bin folder alongside your previous apps. (so, no change required for your shell path.)
4.2 Swimmer Alert Messages from the Shoreside [top]
The shoreside app uFldRescueMgr will convey the swimmer coordinates to vehicles in the form of the MOOS variable SWIMMER_ALERT. Here are two examples:
 SWIMMER_ALERT = x=23, y=54, id=04
 SWIMMER_ALERT = x=-4, y=95, id=09
This message can be thought of as a "man overboard!" alert sent to all vehicles. Unlike Lab 7, with pPointAssign, there will be no bookend messages indicating that the first or last swimmer info has been sent. Two things to keep in mind:
- A swimmer alert may come at any point in the mission, ranging from right up front, until very late in the mission. In this first lab, they will be all given right up front at the outset.
- The swimmer alerts, will be repeated every 15 seconds from the shoreside. This makes handshaking a bit easier, i.e., we don't have to worry about which app has started first and so on. But you do need to make sure that when successive swimmer alerts are received, that you note the swimmer ID and just ignore swimmers that you know about already.
- The location of swimmers will not change over time.
- Even after a swimmer has been rescued, you may still get an alert about it.
Since there are no guarantees about when or if further SWIMMER_ALERT messages will arrive, when should you generate a path and update your behavior? Ultimately this is a decision up to you and you may want to apply your own strategy, but for now, in this lab, you should re-generate a path and update the behavior each time a new swimmer alert is received.
4.3 Found Swimmer Messages from the Shoreside [top]
The shoreside app uFldRescueMgr will also convey the swimmer status to vehicles in the form of the MOOS variable FOUND_SWIMMER. Here are two examples:
 FOUND_SWIMMER = id=01, finder=abe
 FOUND_SWIMMER = id=07, finder=ben
Note that one vehicle may receive FOUND_SWIMMER messages indicating a swimmer has been rescued by another vehicle. In this lab, only one vehicle will be deployed, but in subsequent labs, multiple vehicles will be deployed at the same time. Your goal in those later labs will be to use information about swimmers that have been rescued by others. Presumably your pGenRescue app would recalculate a path that removes visits to swimmers that have already been rescued.
4.4 Assignment 3 (check off) - Demonstrate Dynamic Path Planning [top]
The goal of this lab is to run the baseline mission with your pGenRescue app accepting SWIMMER_ALERT messages from the shoreside. The goal is to launch the baseline mission as described in Section 3.3, using the mit_01.txt swim file:
   $ cd moos-ivp-2680/missions/lab_14_rescue_baseline
   $ ./launch.sh --swim_file=mit_01.txt 10
Recall that in the baseline mission, the waypoints are hard coded, and the vehicle performs poorly for this swimmer file, as in Figure 3.2. Your goal is to apply your pGenRescue app to perform nicely with this set of coordinates, similar to how the vehicle efficiently visited swimmers in Figure 3.1.
Note 1: In the rescue_baseline mission, the pGenRescue app is part of the Antler launch list on the vehicle (meta_vehicle.moos). Until you have added your own pGenRescue app, there may be a warning about the missing app. You can disable the warning by commenting out the pGenRescue in the Antler block. In this configuration, the simple hard-coded waypoints will be traversed as in Figures 3.1 and 3.2. Once a pGenRescue has been built, and in your shell path, it can be included in the vehicle mission and it will overwrite the hard-coded waypoints. To invoke the mission using pGenRescue, uncomment the pGenRescue line in the Antler block of meta_vehicle.moos file and run:
   $ cd moos-ivp-2680/missions/lab_14_rescue_baseline
   $ ./launch.sh --swim_file=mit_01.txt 10
Note 2: Recall that you can check to see if your pGenRescue has been built and will be found when launched, by running which pGenRescue.
Note 3: The config block for pGenRescue in the baseline mission, in meta_vehicle.moos does exist, but has no configuration parameters. (My version for testing has no config params.) If your version of pGenRescue has configuration parameters, you will need to add them also to the meta_vehicle.moos file.
5 Instructions for Handing In Assignments
5.1 Requested File Structure [top]
The assignment for this lab is to demonstrate a working simulation of the rescue mission using your newly created pGenRescue app.
   moos-ivp-extend/
     src/
        pGenRescue         (created by you)
5.2 Due Date [top]
This lab should be completed by the end of lab Thursday. (April 16th, 2026).
Document Maintained by: mikerb@mit.edu
Page built from LaTeX source using texwiki, developed at MIT. Errata to issues@moos-ivp.org. Get PDF