LabGit 02: Creating Your Own Git Repo
Maintained by: mikerb@mit.edu  Get PDF
1 Overview and Objectives
2 Set Up Your GitHub Account
3 Create Your New Git Repo
3.1 Getting the MOOS-IvP Extend Tree from GitHub
3.2 Stripping the Git Info from the Local MOOS-IvP Extend Tree
3.3 Preparing a Tree to Become a Repo
3.4 Preparing Your Repo on GitHub
3.5 Attaching your Local Repo to the GitHub Repo
4 Build, Configure and Test your New Repo
4.1 Build the New Repo
1 Overview and Objectives
Goals for this lab:

- Have your own GitHub Account (or similar)
- Clone the moos-ivp-extend tree as your baseline code folder
- Establish your own moos-ivp-user tree on GitHub (or similar)
In this lab, if you have never used a Git hosting service like GitHub, Gitlab or similar, you will be asked to establish a free account for hosting your own tree using Git. You will be asked to convert a software folder on your local laptop, not currently under Git version control, to be under version control with Git using the service you have chosen.
The particular folder you will establish under version control is the "moos-ivp-extend" tree. This folder has a ready-made structure for adding new MOOS apps and IvP behaviors, and MOOS-IvP missions. It will be the starting point for MIT 2.680 student labs, and is a good starting point for anyone wishing to extend MOOS-IvP with their own code.
The last step, for students of MIT 2.680, will be to make the newly created tree available to the MIT 2.680 TA staff.
o Somewhere mention augmenting the shell path and IvPBehavior dir o Run the Alder mission with a gif
2 Set Up Your GitHub Account
If you are already a user of GitHub, you can skip this section. If you use another version control service such as Gitlab or the MIT GitHub, may also skip ahead, but consider setting up a GitHub account anyway if you don't have too much invested in whatever you may aleady be using. In MIt 2.680 and in the Marine Autonomy Lab, members are steered to GitHub. Working with the same toolset may make it easier to get help and ultimately help others.
(Add bits later for walking a new user through the account setup)
3 Create Your New Git Repo
In this step we will make a Git repo from a specific folder, the moos-ivp-extend folder. This folder is a starting template for creating new MOOS apps, IvP Helm behaviors, and missions. It is nearly empty to start with, but contains an example MOOS app, Helm behavior and a mission. Starting with this folder it is easier to add new components by following the examples.
In this section, the steps will be:
- Obtain the moos-ivp-extend folder from GitHub.
- Remove the Git meta data tying the folder from its origin.
- Make a new repo on your GitHub account, for your own moos-ivp-extend folder.
3.1 Getting the MOOS-IvP Extend Tree from GitHub [top]
The moos-ivp-extend folder/tree/repo is available from GitHub. The first step is download/clone this tree onto your local machine. The recommended location is to be in the same folder as your moos-ivp tree, i.e., they should be side-by-side. To download:
$ git clone https://github.com/pavlab-mit/moos-ivp-extend.git
The contents of the tree should look like:
  $ cd moos-ivp-extend
  $ ls
  CMakeLists.txt  bin/            clean.sh*       scripts/
  README          build/          lib/            src/
  README.md       build.sh*       missions/
3.2 Stripping the Git Info from the Local MOOS-IvP Extend Tree [top]
The moos-ivp-extend tree, immediately after downloading from Git, is tied to the GitHub repo still. To verify this, try running:
 $ git remote -v
 origin	https://github.com/pavlab-mit/moos-ivp-extend.git (fetch)
 origin	https://github.com/pavlab-mit/moos-ivp-extend.git (push)
Note the URL above is the same URL you used for cloning the tree in the previous step. This information is contained in a "hidden" folder, .git. A hidden file and folder in Linux and MacOS is any file or folder that begins with a ".". To see hidden files, try running ls with the -a option:
 ./              CMakeLists.txt  bin/            clean.sh*       scripts/
 ../             README          build/          lib/            src/
 .git/           README.md       build.sh*       missions/
Note the presence of the .git/ folder. This is where all the Git meta-data is contained. By simply removing this folder, the local moos-ivp-extend tree will be detached from GitHub.
   $ cd moos-ivp-extend
   $ rm -rf .git
You can confirm that the moos-ivp-extend folder has been detached:
 $ git remote -v
 fatal: not a git repository (or any of the parent directories): .git
At this point, your moos-ivp-extend folder is just a "regular" folder on your hard drive.
3.3 Preparing a Tree to Become a Repo [top]
To distinguish your tree from the baseline moos-ivp-extend tree, rename the tree. For MIT 2.680 users, we strongly suggest using your MIT Kerberos name. For example if you are stanlee@mit.edu, then the suggested name for your moos-ivp-extend tree is moos-ivp-stanlee.
$ mv moos-ivp-extend moos-ivp-stanlee
Now that the tree/folder is fully yours, the goal is to put it under Git version control again, but this time using your own GitHub account. The first step is to initialize Git within your folder:
  $ cd moos-ivp-stanlee
  $ git init
The above step essentially re-creates your hidden .git folder. (You can run "ls -a" again to verify.) We can now run the git status command to see how things look:
 $ cd moos-ivp-stanlee
 $ git status
 On branch main

 No commits yet

 Untracked files:
   (use "git add <file>..." to include in what will be committed)
 	CMakeLists.txt
 	README
 	README.md
 	build.sh
 	clean.sh
 	missions/
 	scripts/
 	src/

 nothing added to commit but untracked files present (use "git add" to track)
At this point, the moos-ivp-stanlee tree is Git-enabled, but no files have been explicitly added or identified to be under Git control. We can add and commit all files with:
  $ cd moos-ivp-stanlee
  $ git add *
  ...
  $ git commit -m "initial message" *         (a message is mandatory)
  ...
  $ git status
  On branch main
  nothing to commit, working tree clean
At this point the moos-ivp-stanlee tree is legitimate Git repo, fully capable of many of the version control features such as adding, committing files, creating branches and reverting to older versions if desired. However, the entire history is solely on your machine. If your machine is lost, you lose everything. It is also hard to share your code with collaborators. The next step is to upload your repo to GitHub to address these issues.
3.4 Preparing Your Repo on GitHub [top]
The goal of this section is to attach your newly created moos-ivp-stanlee repo, local on your laptop, to a GitHub repo. As discussed above, this will (a) create a durable backup to your tree in case you lose your laptop, and (b) allow others to access your code through GitHub. (This will also allow you to get your code onto a robotic platform at some point.)
Log on to your GitHub page, and navigate to the "repositories" page, look for the button to create a new repository:

Figure 3.1: Create a new repository: Navigate to the window with this view and click on the green button.
In the top part of the page, select the options as shown in the Figure 3.2 below. (a) select No Template, (b) select the repo name equivalent to moos-ivp-stanlee, (c) Add a short description similar to as shown, and (d) make this a Private repo for now.

Figure 3.2: Configuring a new repository: Select the options as shown or similar for your repo name.
In the bottom part of the page, select the options as shown in the Figure 3.3 below. (a) the button to add a README file, (b) For the Add .gitignore pull-down menu, select the .gitignore template: C++, (c) select the GNU General Public License v3.0, and finally click the green Create repository button.
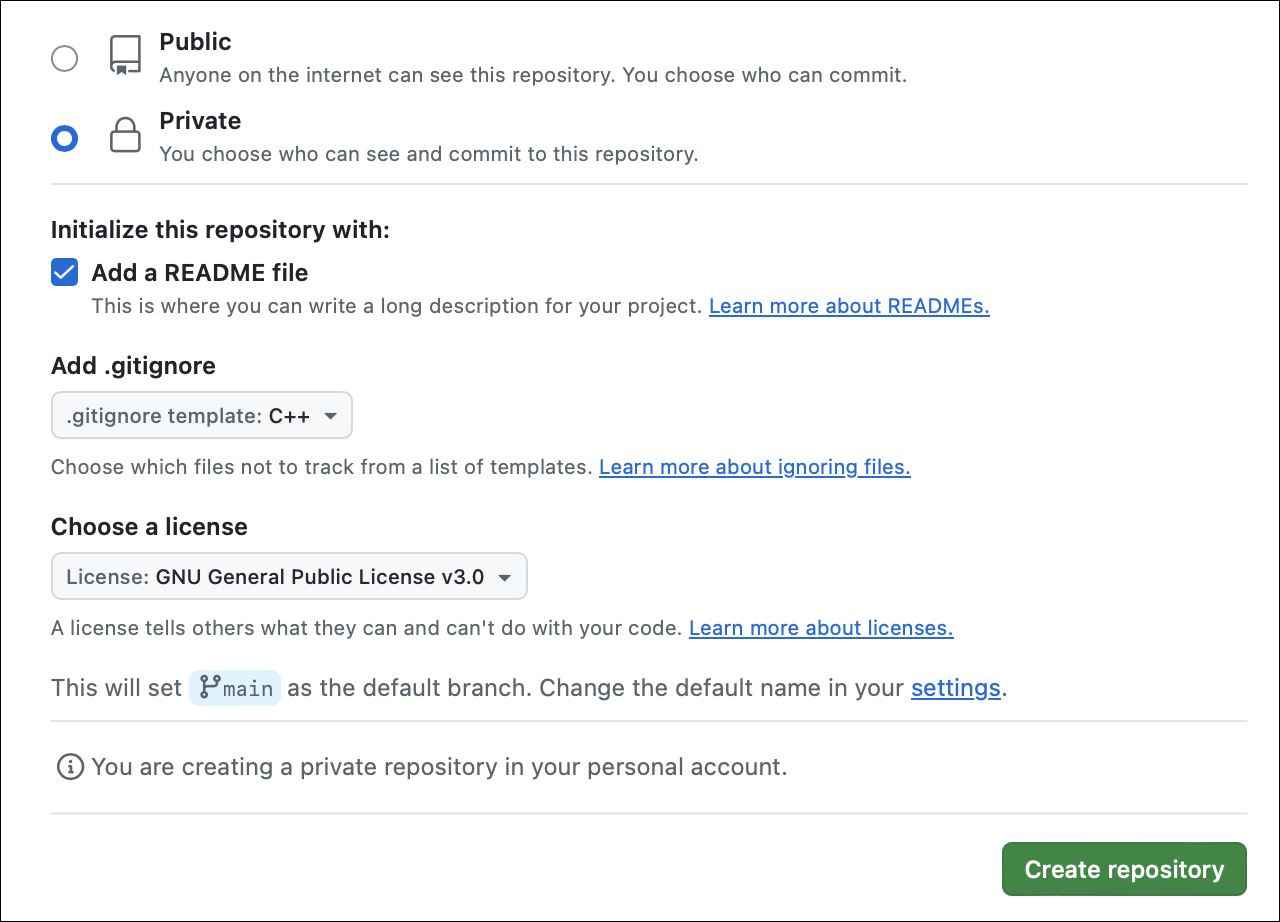
Figure 3.3: Configuring a new repository: Select the options as shown or similar for your repo name. Then hit the Create button.
At this point you now have two versions of your moos-ivp-stanlee repo. The nearly empty one just created on GitHub. And the first version, based on moos-ivp-extend, you created previously on your laptop. The next step is to attach the two.
3.5 Attaching your Local Repo to the GitHub Repo [top]
To attach your locally created moos-ivp-stanlee repo to the one on GitHub, return to the command-line on your laptop and do the following:
  $ cd moos-ivp-stanlee
  $ git branch -M main
  $ git remote add origin git@github.com:stanlee/moos-ivp-stanlee.git
  $ git push --set-upstream origin main
  $ git push
The above assumes (a) your user account on GitHub is also stanlee. If instead it was something like stanlee873, then the above line would be instead:
$ git remote add origin git@github.com:stanlee873/moos-ivp-stanlee.git
It also assumes that you have installed an ssh-key or other form of credentialing on GitHub. Remember that the credentialing for pushing content on GitHub is different than the user login password you may use to log onto your GitHub page.
 $ git remote -v
 origin	https://github.com/stanlee/moos-ivp-stanlee.git (fetch)
 origin	https://github.com/stanlee/moos-ivp-stanlee.git (push)
4 Build, Configure and Test your New Repo
Now that you have your own version of the moos-ivp-extend tree on your laptop and under version control with Git, a few further steps remain to ensure that things are ready to go:
- Build the moos-ivp-extend tree
- Modify the Bash shell path and IvP Helm behavior path
- Confirm setup by running the alder mission.
4.1 Build the New Repo [top]
Build the new moos-ivp-extend repo, i.e., your moos-ivp-stanlee folder. Note this assumes you have already downloaded and built the moos-ivp folder alongside the moos-ivp-extend folder. In other words, these two folders are in the same parent folder, typically the users home directory. To build:
   $ cd moos-ivp-extend
   $ ./build.sh
You can confirm success by checking for the presence of the
Document Maintained by: mikerb@mit.edu
Page built from LaTeX source using texwiki, developed at MIT. Errata to issues@moos-ivp.org. Get PDF